Go を仕事で使うことになったので、最近よく使われているらしいパッケージマネージャのdepを使えるようになっておこうと勉強してみることにした。Mac は既に持っているけど、最近Windowsの強力なマシンを買ったのでそちらで環境を作ってみたくなった。Goならその辺の相性は間違いないので準備として学んでみた。
Windows へのインストール
Installationのページには Windows はなくちょっとびっくりしたが、ReleaseにはしっかりWindows用のバイナリがあるので、これを落としてパスを通すとよいだろう。しかし、私はコマンドライン好きなので、depをハックしたい人用のこのコマンドで入れることにした。もちろん、GOPATHを設定して、$GOPATH/bin を設定したあとで実行する。
go get -u github.com/golang/dep/cmd/dep
これでコマンドを見てみる。
$ dep
Dep is a tool for managing dependencies for Go projects

Usage: "dep [command]"

Commands:

  init     Set up a new Go project, or migrate an existing one
  status   Report the status of the project's dependencies
  ensure   Ensure a dependency is safely vendored in the project
  prune    Pruning is now performed automatically by dep ensure.
  version  Show the dep version information

Examples:
  dep init                               set up a new project
  dep ensure                             install the project's dependencies
  dep ensure -update                     update the locked versions of all dependencies
  dep ensure -add github.com/pkg/errors  add a dependency to the project

Use "dep help [command]" for more information about a command.
シンプルそうでいい感じ。このリファレンスで分からなかった英単語は prune だけど、to cut off dead branches という意味らしい。パッケージの整理をしてくれるのかな。
プロジェクトの初期化
dep init でプロジェクトを初期化する。すると、Gopkg.toml ファイルと、そのlock ファイルが出来て vendor ディレクトリも出来た。この書き方をこれから学んでいく。
- Getting Startedを流してみる。
$ dep init
$ ls
Gopkg.lock  Gopkg.toml  vendor/
構成は、多くのパッケージマネジメントシステムと同じなので、特に説明は不要だろう。
go ensure
dep のコマンドで普段使うのは、dep ensure と dep status のみで大体良い。go ensure を実行するとGopkg.lock, Gokpg.toml の内容を読んで vendor/ にパッケージをインストールしてくれる。特徴としては、dep ensure の場合、all or nothing ストラテジーで、書き込みが完全に完了するか、何も変更されないかという2つの状態が保証されている。例えば、パッケージインストール中に、kill -9 が発行されたりマシンが落ちたとしても、変更前の状態になっている。
$ dep ensure -add github.com/pkg/errors
no dirs contained any Go code
おっと何もgo ファイルがないと怒られる様子。とても簡単なmain.go を書いて再度実行。
$ dep ensure -add github.com/pkg/errors
Fetching sources...

"github.com/pkg/errors" is not imported by your project, and has been temporarily added to Gopkg.lock and vendor/.
If you run "dep ensure" again before actually importing it, it will disappear from Gopkg.lock and vendor/.
丁寧なメッセージでいい感じ。Gopkg.toml にエントリが増えている。ちなみに、TOMLはよく知らなかったけど、リンクしたブログによく記述されていた。JSONに近いけど、JSONより人間が読みやすくなっている。例えばコメントが書ける。また、YAMLよりもシンプルに記述できる。
Gopkg.toml
[[constraint]]
  name = "github.com/pkg/errors"
  version = "0.8.0"
Gopkg.lock
[[projects]]
  name = "github.com/pkg/errors"
  packages = ["."]
  revision = "645ef00459ed84a119197bfb8d8205042c6df63d"
  version = "v0.8.0"
二つのファイルにエントリが追加されて、vendor/ 配下にパッケージがダウンロードされた。
dep ensure の pruning
pruning は、盆栽の枝切りみたいな意味。depのコマンドにもあるのだが、dep ensure で同時に実行されている。今の状態で、main.go にはgithub.com/pkg/errors をインポートしていない。この状態で、dep ensure を実行してみる。
$ dep ensure
Warning: the following project(s) have [[constraint]] stanzas in Gopkg.toml:

  ✗  github.com/pkg/errors

However, these projects are not direct dependencies of the current project:
they are not imported in any .go files, nor are they in the 'required' list in
Gopkg.toml. Dep only applies [[constraint]] rules to direct dependencies, so
these rules will have no effect.

Either import/require packages from these projects so that they become direct
dependencies, or convert each [[constraint]] to an [[override]] to enforce rules
on these projects, if they happen to be transitive dependencies.
ワーニングが出てきた。使われてないよという内容。実際にどうなるかというと、Gopkg.tomlにはエントリは残るけど、Gopkg.lock と、vendor/ からエントリが消えている。これは相当ありがたい。
ちなみに複数のパッケージをインポートするのも簡単。
$ dep ensure -add github.com/pkg/errors github.com/foo/bar
続けて書ける。
コードで、該当パッケージを使ってみる
Gopkg.lock と vendor/ から、github.com/pkg/errors が削除された状態でmain.go に対して、該当のパッケージを使うようなコードを書いてみる。パッケージインポートのためだけのコードを書いてみる。
package main

import (
	"fmt"
	"log"
	"os"

	"github.com/pkg/errors"
)

func newFile(fn string) *os.File {
	fp, err := os.OpenFile(fn, os.O_WRONLY|os.O_APPEND, 0644)
	if err != nil {
		log.Fatal(errors.Wrap(err, "File could not open!"))
	}
	return fp
}

func main() {
	fmt.Println("Hello, world")
	fp := newFile("Gopkg.toml")
	defer fp.Close()
}
次に
$ go ensure
を再度実行すると再びGopkg.lock と、vendor/ にライブラリが戻ってきた。これは相当便利だ。
Update
こうすると最新バージョンにアップしてくれる。
$ dep ensure -update github.com/foo/bar
こうするとすべてのライブラリをアップデートしてくれる。
$ dep ensure -update
では、特定のバージョンにアップしたいときはどうするんだろう? 特に記述はなかったが、自分で試してみた結果、コマンドでは無理そうだけど、Gopkg.toml を変更して、dep ensure でバージョンが変更された。
Gopkg.toml
[[constraint]]
  name = "github.com/pkg/errors"
  version = "0.8.0"
ちなみに、Gopkg.toml には、ブランチやリビジョンも指定できるようだ。ensure の詳細のアーキテクチャはここに書いてある。もっと細かいことをしたくなった時に読んでみよう。
Gopkg.toml の構文
下記の通り。
# Gopkg.toml example
#
# Refer to https://golang.github.io/dep/docs/Gopkg.toml.html
# for detailed Gopkg.toml documentation.
#
# コードから参照されていないけど必要なパッケージ
# required = ["github.com/user/thing/cmd/thing"]
#
# dep ソースの静的解析をするときに無視するパッケージ。
# ignored = ["github.com/user/project/pkgX", "bitbucket.org/user/project/pkgA/pkgY"]
#
# 通常のパッケージの設定
# [[constraint]]
#   name = "github.com/user/project"
#   version = "1.0.0"
#
#
# [[constraint]]
#   name = "github.com/user/project2"
#   branch = "dev"
#   source = "github.com/myfork/project2"
#
# 現在のプロジェクトで直接指定した依存に加えて、依存するライブラリにもルールを適用
# したいときに使う。ただし、本来は、[[constraint]]を使うのが正しいので、一時的にライブラリ依存の
# 問題を解決したいときに用いる。
# [[override]]
#   name = "github.com/x/y"
#   version = "2.4.0"
#
# [prune]
#   non-go = false
#   go-tests = true
#   unused-packages = true
あまり、Gopkg.tomlのよい解説ページはないけど、このブログはとても良かった。
詳細のリファレンスはここ
バージョンの記法や、各設定の意味はオフィシャルを読むのがよい。オフィシャルに乗っていたサンプル(2018/03/09時点)
required = ["github.com/user/thing/cmd/thing"]

ignored = [
  "github.com/user/project/pkgX",
  "bitbucket.org/user/project/pkgA/pkgY"
]

[metadata]
codename = "foo"

[prune]
  non-go = true

  [[prune.project]]
    name = "github.com/project/name"
    go-tests = true
    non-go = false

[[constraint]]
  name = "github.com/user/project"
  version = "1.0.0"

  [metadata]
  property1 = "value1"
  property2 = 10

[[constraint]]
  name = "github.com/user/project2"
  branch = "dev"
  source = "github.com/myfork/project2"

[[override]]
  name = "github.com/x/y"
  version = "2.4.0"

  [metadata]
  propertyX = "valueX"
その他
コマンドサンプル
$ dep ensure --examples
ステータスの表示
$ dep status
PROJECT                CONSTRAINT  VERSION  REVISION  LATEST  PKGS USED
github.com/pkg/errors  ^0.8.0      v0.8.0   645ef00   v0.8.0  1
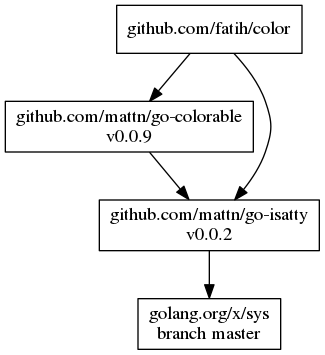
その他にも、依存関係をビジュアル化する方法もある
> choco install graphviz.portable
> dep status -dot | dot -T png -o status.png; start status.png
避けるべきこと
- シンボリックリンクはつわないこと。相性が悪い
- vendor の下を直接いじらないこと。
dep ensureが書き換えてしまうため
まとめ
dep はシンプルだが、相当使いやすそう。余分なパッケージも知らせてくれるし、パッケージのインポートが中途半端にならないので、以前のように、vendor 以下を消して再インストールみたいなこともしなくて済むだろう。gilde を以前使っていたが、これからは公式でもあるこれを使うことにしよう。