Azure Functions では、V2からCustom Bindings の作成がサポートされている。Custom Bindings を作成すると、自分の好きなバインディングを作れるだけではなく、Azure Functions の Bindings の挙動を理解することもできるので、遊ぶにはとてもお勧めだ。
今回は ARM テンプレートをデプロイする Output bindings を作成してみたので、それを元に Output bindings を作成する方法を整理しておきたい。
NOTE: Azure Functions V2 の breaking change により、書き方が若干変わりました。その対応のブログを書いておきましたので、ご参照ください。2018/9/4
Custom Trigger のサポート状況
尚、Custom Trigger も作成できるのだが、Custom Trigger は、Consumption Plan ではサポートされていない。App Service Plan なら良い。Consumption plan だと、Scale Controller にその Trigger のサポートのロジックが必要になるが、残念ながら Scale Controller のコードは現在のところ公開されていないので、現時点では、Custom Bindings のみが正式サポートだ。もしご興味があれば、Custom Trigger の記事とサンプルも公開しているので、参考になれたい。
Custom Bindings の構成要素
Custom Bindings を作成するためには次の4つの要素が必要になる。
- Attribute クラス
- Context クラス
- Configuration クラス
- Collector クラス
それぞれを、下記のサンプルプロジェクトを基に解説していきたい。
事前準備
Bindings を作成するためには、.NET Standard Class library のプロジェクトを作成しよう。その後、Nuget パッケージとして、Microsoft.NET.Sdk.Functions をプロジェクトに追加しよう。私の環境だと、v1.0.13 を使用した。基本的にそれだけだ。今回はリソースマネージャのデプロイメントがあるので、Microsoft.Azure.Management.Fluent ライブラリも追加しているが、それは、リソースマネージャのデプロイの方に使われるのでBindings 自体には関係ない。
Attribute の作成
Attribute は クラスやパラメータに付加できるメタ情報のことだ。例えば今回のプロジェクトだと、今回作った Custom Bindings を使ったサンプルのファンクションは次のようなメソッドシグネチャになる。この、HttpTrigger だったり、ResourceDeployment の部分だ。この部分はクラスになっている。
Azure Functions では、メソッド定義の部分で使われて、ここに定義した値が Bindings に引き渡される。
実体を見てみよう。
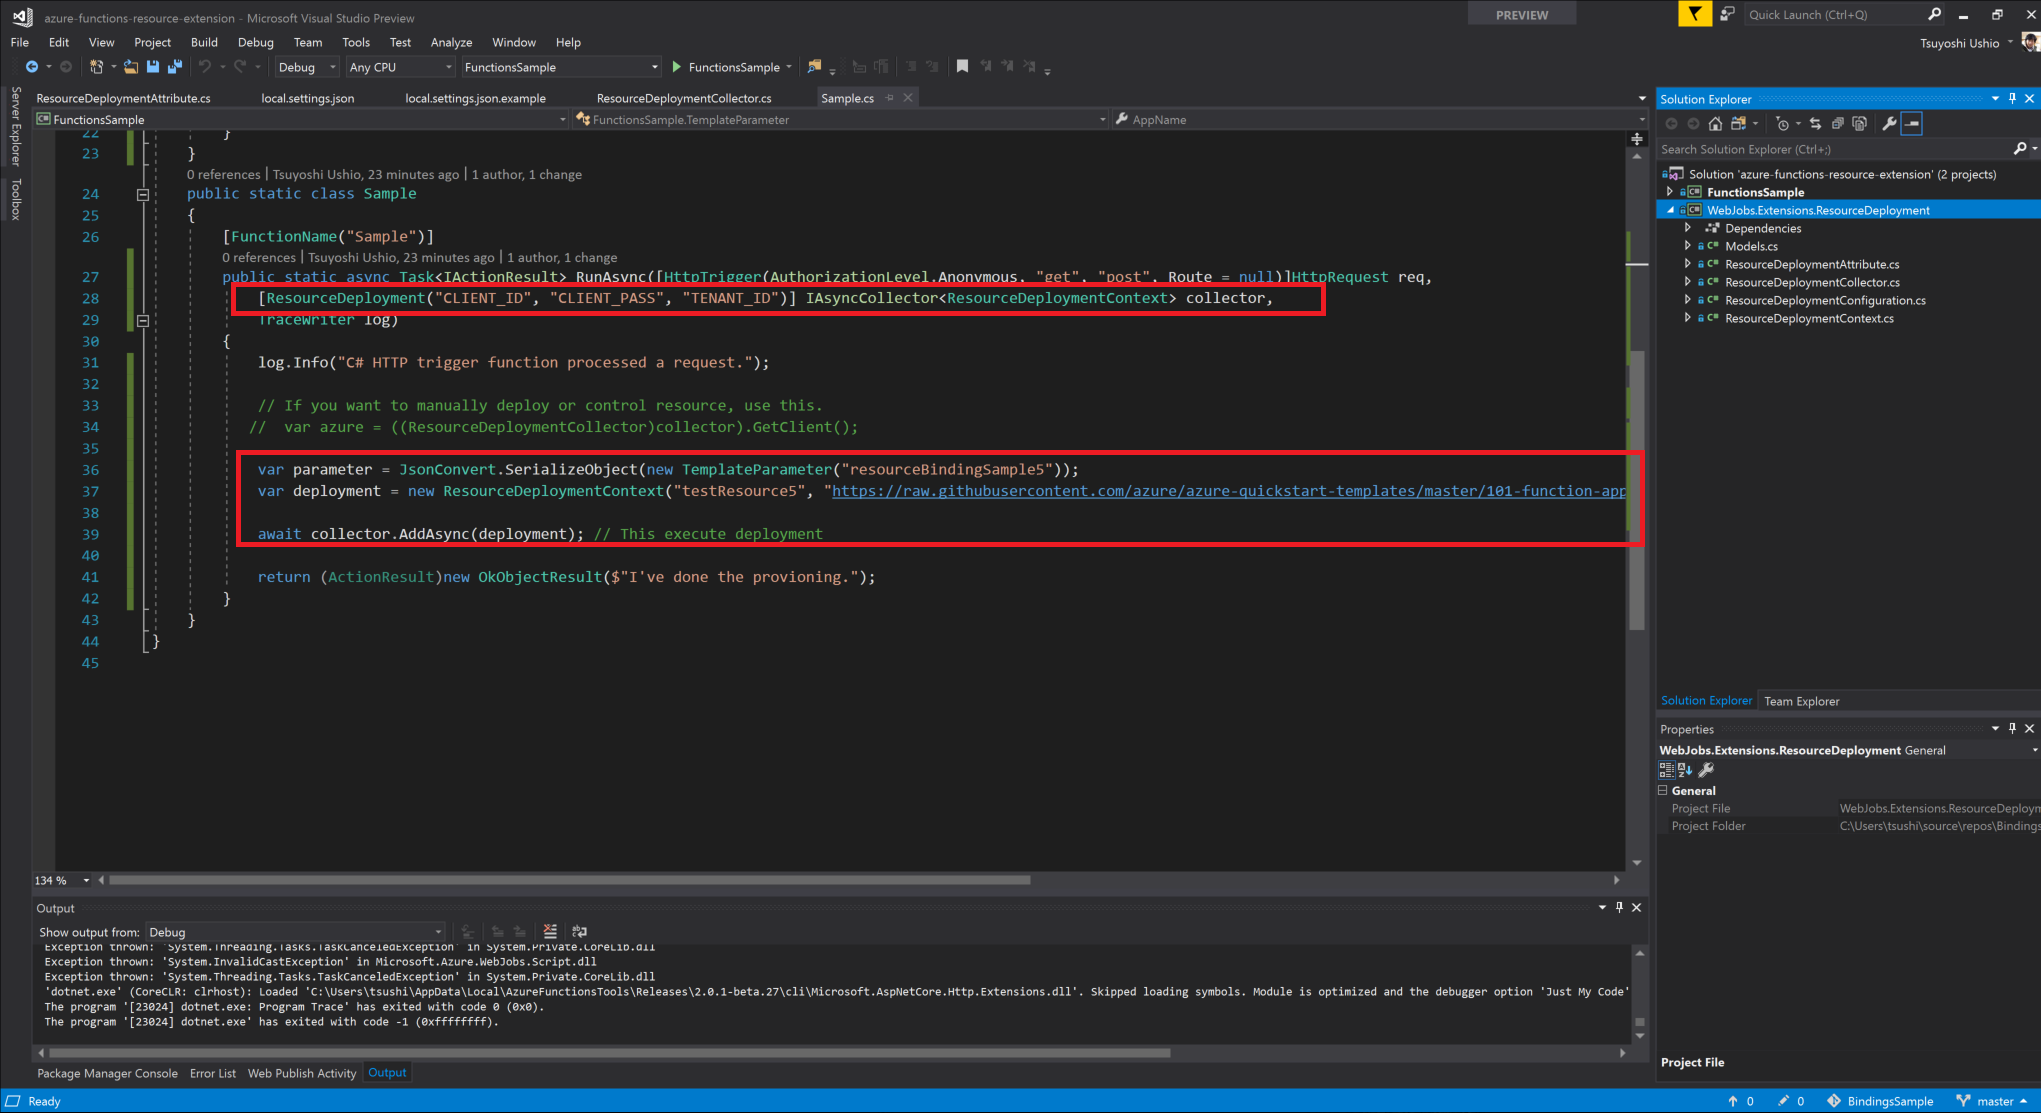
        public static async Task<IActionResult> RunAsync([HttpTrigger(AuthorizationLevel.Anonymous, "get", "post", Route = null)]HttpRequest req,
            [ResourceDeployment("CLIENT_ID", "CLIENT_PASS", "TENANT_ID")] IAsyncCollector<ResourceDeploymentContext> collector,
            TraceWriter log)
クラスの定義の実態は次のとおり。なんてことはない。単なるクラスで、ただ、Attribute を継承しており、AttributeUsage という Attribute で、どのようにこのクラスが使えるかが定義してあり、Binding という Attribute でこれは Azure Functions にこれは、Binding で使われることを示すためのものだ。上記のメソッド定義と比較しても、単に属性をAttribute からセットできるようにしているに過ぎない。ここにセットした値が、Bindings に引き渡すことができるようになる。Attribute 名は、クラス名 - Attribute になる。
    [AttributeUsage(AttributeTargets.Parameter | AttributeTargets.ReturnValue)]
    [Binding]
    public class ResourceDeploymentAttribute : Attribute
    {
        public string ClientID { get; set; }
        public string ClientPassword { get; set; }
        public string TenantId { get; set; }
        public bool DeferMode { get; set; }

        /// <summary>
        /// Constructs a new instance. Set the Application attribute with ServicePrincipal.
        /// </summary>
        /// <param name="clientId">Application Id</param>
        /// <param name="clientPassword">Application Password</param>
        /// <param name="tenantId">Tenant Id</param>
        public ResourceDeploymentAttribute(string clientId, string clientPassword, string tenantId)
        {
            ClientID = clientId;
            ClientPassword = clientPassword;
            TenantId = tenantId;
            DeferMode = false;
        }
    }
Context クラス
Context クラスは、Bindings の出力につかわれる。出力したい値を格納するためのクラスだ。中身を見ても単なるクラスに過ぎない。これは、IAsyncCollector 等に Add することが可能なオブジェクトとなる。今回は ARM のテンプレートをデプロイするために必要な情報を持つようにしている。例えば皆さんが仮に、Slack の Output bindings をつくりたかったら、Slack に出力するために必要な情報を持たせるようにするとよい。
    public class ResourceDeploymentContext
    {
        public string Name { get; set; }
        public string TemplateUrl { get; set; }
        public string TemplateVersion { get; set; }
        public string Parameter { get; set; }
        public string ResourceGroup { get; set; }
        public string Location { get; set; }
        public Microsoft.Azure.Management.ResourceManager.Fluent.Models.DeploymentMode DeploymentMode { get; set; }

        public ResourceDeploymentContext(string name, string templateUrl, string parameter, string resourceGroup, string location)
        {
            this.Name = name;
            this.TemplateUrl = templateUrl;
            this.Parameter = parameter;
            this.ResourceGroup = resourceGroup;
            this.Location = location;
            SetDefault();
        }

        private void SetDefault()
        {
            this.TemplateVersion = "1.0.0.0";
            this.DeploymentMode = Microsoft.Azure.Management.ResourceManager.Fluent.Models.DeploymentMode.Incremental;
        }
    }
Configuration
このクラスは Bindings の起点となるクラスだ。ポイントは2つ。IExtensionConfigProviderを継承していること。また、public void Initialize(ExtensionConfigContext context) というメソッドが実装されていることだ。Azure Functions の ScriptHost は、IExtensionConfigProvider を継承したクラスをスキャンして、bindings を登録し、そのクラスのInitialize を実行して、バインディングルールを設定している。ここでは、Output bindings のみなので、BindToCollector というメソッドのみ実装していて、ResourceDeploymentAttribute を Attribute として使用していることと、ResourceDeploymentCollector がOutput bindings 用の ResourceDeploymentCollectorであることをバインディングしている。
    public class ResourceDeploymentConfiguration : IExtensionConfigProvider
    {
           :
        public void Initialize(ExtensionConfigContext context)
        {
            context.AddBindingRule<ResourceDeploymentAttribute>().BindToCollector(attr => new ResourceDeploymentCollector(attr, this));
        }
他のサンプルに関しては、CosmosDB のものがいろいろサポートしていてわかりやすいと思う。該当部分を下記にリンクしておく。
Collector
Collector クラスは、多くの場合ロジックの実行を行うクラスだ。Output bindings のパラメータとして引き渡される。先の例を再度引用すると、IAsyncCollector で引き渡される実体のクラスを実装する。
        public static async Task<IActionResult> RunAsync([HttpTrigger(AuthorizationLevel.Anonymous, "get", "post", Route = null)]HttpRequest req,
            [ResourceDeployment("CLIENT_ID", "CLIENT_PASS", "TENANT_ID")] IAsyncCollector<ResourceDeploymentContext> collector,
            TraceWriter log)
該当のクラスを見てみよう。ARM テンプレートの具体的なロジックは一旦置いておいて、Azure Functions の Bindings の構造として必須のものを見てみよう。本質的な部分は次の箇所のみだ。
IAsyncCollector インターフェイスを実装する。その時テンプレートクラスは、ResourceDeploymentContext クラスを指定しておく。このようにすると、(1) コンストラクタ の箇所で先に作成した Attribute と Config クラスが引き渡されている。どのような値を引き渡すかは、本来は Config クラスの Initialize の部分で決定されている。ただ、Attribute 等は最低限渡しておくとよい。(2) の部分は実際にユーザが functions の中で呼び出す部分だ。大抵の場合は、ここで、Context クラスを内部のコレクションに格納しておく。最終的に (3) FlushAsync の部分が、Functions の実行後に呼ばれて実行される。
 public class ResourceDeploymentCollector : IAsyncCollector<ResourceDeploymentContext>
    {

        public ResourceDeploymentCollector(ResourceDeploymentAttribute attribute, ResourceDeploymentConfiguration config) // (1) コンストラクタ
        {
            :
        }

        public async Task AddAsync(ResourceDeploymentContext item, CancellationToken cancellationToken = default(CancellationToken)) // (2) AddAsync メソッド
        {
             :
        }

        public async Task FlushAsync(CancellationToken cancellationToken = default(CancellationToken))   // (3) FlushAsync メソッド
        {
             :
        }
是非本番のコードがどうなっているか見てほしい。
Tips
この4つの要素で Bindings が出来ている。皆さんが Bindings のコードを読む際も、Config クラスを見つけてそこから読み始めるのがよいと気づくかもしれない。私の Bindings のサンプルで、いくつか 工夫をしたところがあるのでそこだけ共有しておきたい。
IAzure client をキャッシュ
de:code 2018 の私のsessionを見ていただいた人はわかるかもしれないが、Azure Functions のコードを書くときに重要なこととして、Outbound の通信をするときのクライアントは、static にしておくなり、DI でインジェクションするなりして、毎回 New されないようにするのが必要だ。今回の私の Bindings では、cliendId はユニークになるはずなので、clientId 毎に1クライアントを作成するようにしている。これにより、他のサブスクリプションにもデプロイしたい場合にも問題がないだろう。実体は Config クラスの中で記述した。ここは1度しか呼ばれないからだ。
        internal readonly ConcurrentDictionary<string, IAzure> ClientCache = new ConcurrentDictionary<string, IAzure>(); // Client のキャッシュ

        public void Initialize(ExtensionConfigContext context)
        {
            context.AddBindingRule<ResourceDeploymentAttribute>().BindToCollector(attr => new ResourceDeploymentCollector(attr, this));
        }

        internal IAzure GetClient(string clientId, string clientPassword, string tenantId)
        {
            return ClientCache.GetOrAdd(clientId, (c) => {
                var credentials = SdkContext.AzureCredentialsFactory.FromServicePrincipal(c, clientPassword, tenantId, AzureEnvironment.AzureGlobalCloud);
                var client = Azure
                    .Configure()
                    .WithLogLevel(HttpLoggingDelegatingHandler.Level.Basic)
                    .Authenticate(credentials)
                    .WithDefaultSubscription(); // Client の生成。インスタンスがあればそれを使う
                return client;
            });

        }
DeferMode の実装
サンプルのファンクションを見てみると次のようになる。ポイントは、Collector クラスの AddAsync メソッドだが、通常の Azure Functions のバインディングの実装だと、この時点では内部のコレクションに足されるだけで、最終的に Functions の実行が完了してから、FlushAsync が呼ばれた時点で目的のロジックを実行する。
この実装だと、問題が一つあって、FlushAsync が実行されるのは、functions の実行の後なので、エラーが発生した場合にデバッグがやりにくくなる。この Bindings ではデフォルトで、AddAsync の時にコードが実行されて、ARM テンプレートがデプロイされるようになっている。もし問題があれば、エラーメッセージを見れてデバッグがしやすい。ただし、この実装にもトレードオフがあって、この実装にすると、C#, F# 以外の実装だと、実行がされないようになってしまう。あくまで bindings は C# で書かれており、node の output bindings はあくまで functions 実行後にしか有効にならない。このようなケースだと、Attribute の部分で DeferMode = true にしておくと、通常のfunctionsのように実行が FlushAsync で実行されるので、nodeでも問題なく実行できるようになる。
            var deployment = new ResourceDeploymentContext("testResource5", "https://raw.githubusercontent.com/azure/azure-quickstart-templates/master/101-function-app-create-dynamic/azuredeploy.json", parameter, "testResource5", "westus");

            await collector.AddAsync(deployment); // This execute deployment
おわりに
Azure Functions のインターナルを含めて、Custom Bindings の書き方を解説してみた。たった4つのクラスをみなさんにもカスタムバインディングスが作れる。ぜひ楽しんでみてほしい。
尚、Custom Trigger に興味がある方は、私が過去にブログを書いているので参考にされたい。