Intro
※Paging3についてはこちら (2020/07/16)
今回は、**Android Jetpack**の一部、Architecture Components Paging library を使っていきたいと思います。(長い)
LiveDataを取り扱ったことのある人にとってはお茶の子さいさいだと思います。むしろ意外とさいさいで可能性を感じたので、記事にしました。
初歩的なAACの理念や、DataBinding、LiveDataに関しては、以前の記事をご覧いただけますと幸いです。
↓
Android Architecture Components 初級 ( MVVM + LiveData 編 )
Paging library
長大なデータを徐々に、優雅にロードしてくれる機能を持つコンポーネントです。
APIやデータベースのデータを、小分けにして、状態に合わせてロードしてくれる便利なライブラリですね。
Sample
Pagingライブラリが、LiveDataにとても相性が良さそうだったのと、業務で使えそうだなーと思いつつ、情報が少なかったので、見て見ぬふりをしていました。
そんな折、業務で使えそうなチャンスがやってきたので、下記サイトのJavaサンプルを参考に、databindingしながら Kotlin に書き換えてみました。
Android Paging Library Tutorial using Retrofit
ここは他記事も、シンプルでわかりやすいのでオススメです。
↓↓↓
SIMPLIFIED CODING
Demo
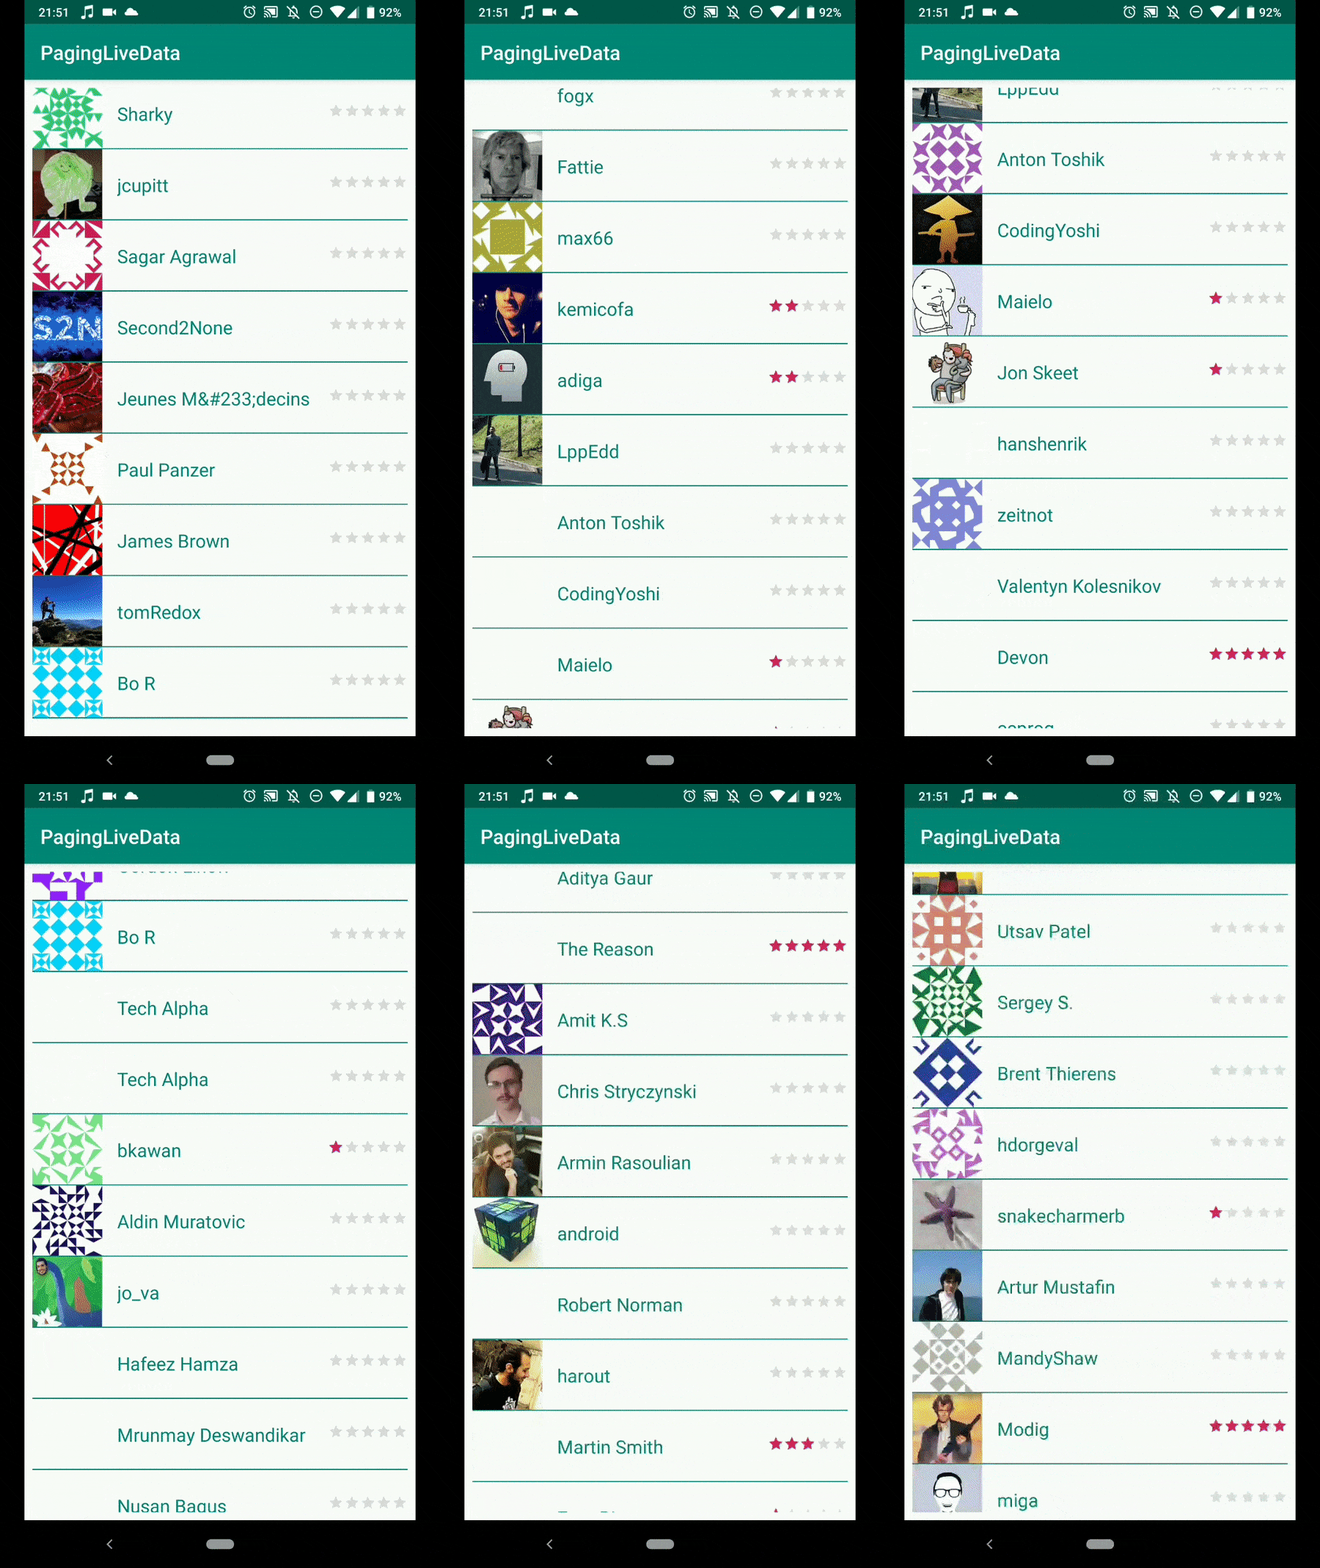
こんな感じで**無限スクロール!!**できます。星は趣味で足しただけです。
リポジトリはこちら
↓
https://github.com/Tsutou/PagingLiveData
意外とスッキリかけそうで、既存のよくあるMVVMパターンのアプリへの導入コストもそんなに高くなさそうだと思いましたので、復習がてら導入考えておられる方に共有できればと思います。
(今更感あったら非常に辛い..)
gradle dependency
dependencies {
    def paging_version = "1.0.1"
    def view_model_version = "1.1.1"
    def support_version = "28.0.0"
    def glide_version = "4.3.1"

    //....中略

    //Retrofit + Gson
    implementation 'com.squareup.retrofit2:retrofit:2.5.0'
    implementation 'com.squareup.retrofit2:converter-gson:2.4.0'

    //AAC (lifecycle)
    implementation "android.arch.lifecycle:extensions:$view_model_version"
    implementation "android.arch.lifecycle:viewmodel:$view_model_version"

    //AAC (Paging)
    implementation "android.arch.paging:runtime:$paging_version"

    //recyclerview and cardview
    implementation "com.android.support:cardview-v7:$support_version"
    implementation "com.android.support:recyclerview-v7:$support_version"

    //Glide
    implementation "com.github.bumptech.glide:glide:$glide_version"
    annotationProcessor "com.github.bumptech.glide:compiler:$glide_version"
    implementation "org.jetbrains.kotlin:kotlin-stdlib-jdk7:$kotlin_version"

    //Timber log
    implementation 'com.jakewharton.timber:timber:4.7.0'

}
Pagingライブラリは 1.0.1 を使用します。(執筆時点)
他には、APIを扱うため、 Retrofit + Gson やら、画像ローダは Glide 、他、AACの LifeCycle 、 ViewModel やら、LiveData様を取扱う際のレギュラーメンバーに来てもらいましょう。
Model
API (data)
interface Api {
    @GET("answers")
    fun getAnswers(@Query("page") page: Int, @Query("pagesize") pagesize: Int, @Query("site") site: String): Call<StackApiResponse>
}
簡単ですね。クエリとしては、リクエストするページ("page")と、返してもらうページサイズ("pagesize")と、サイト名を投げます。
↓
https://api.stackexchange.com/2.2/answers?page=1&pagesize=50&site=stackoverflow
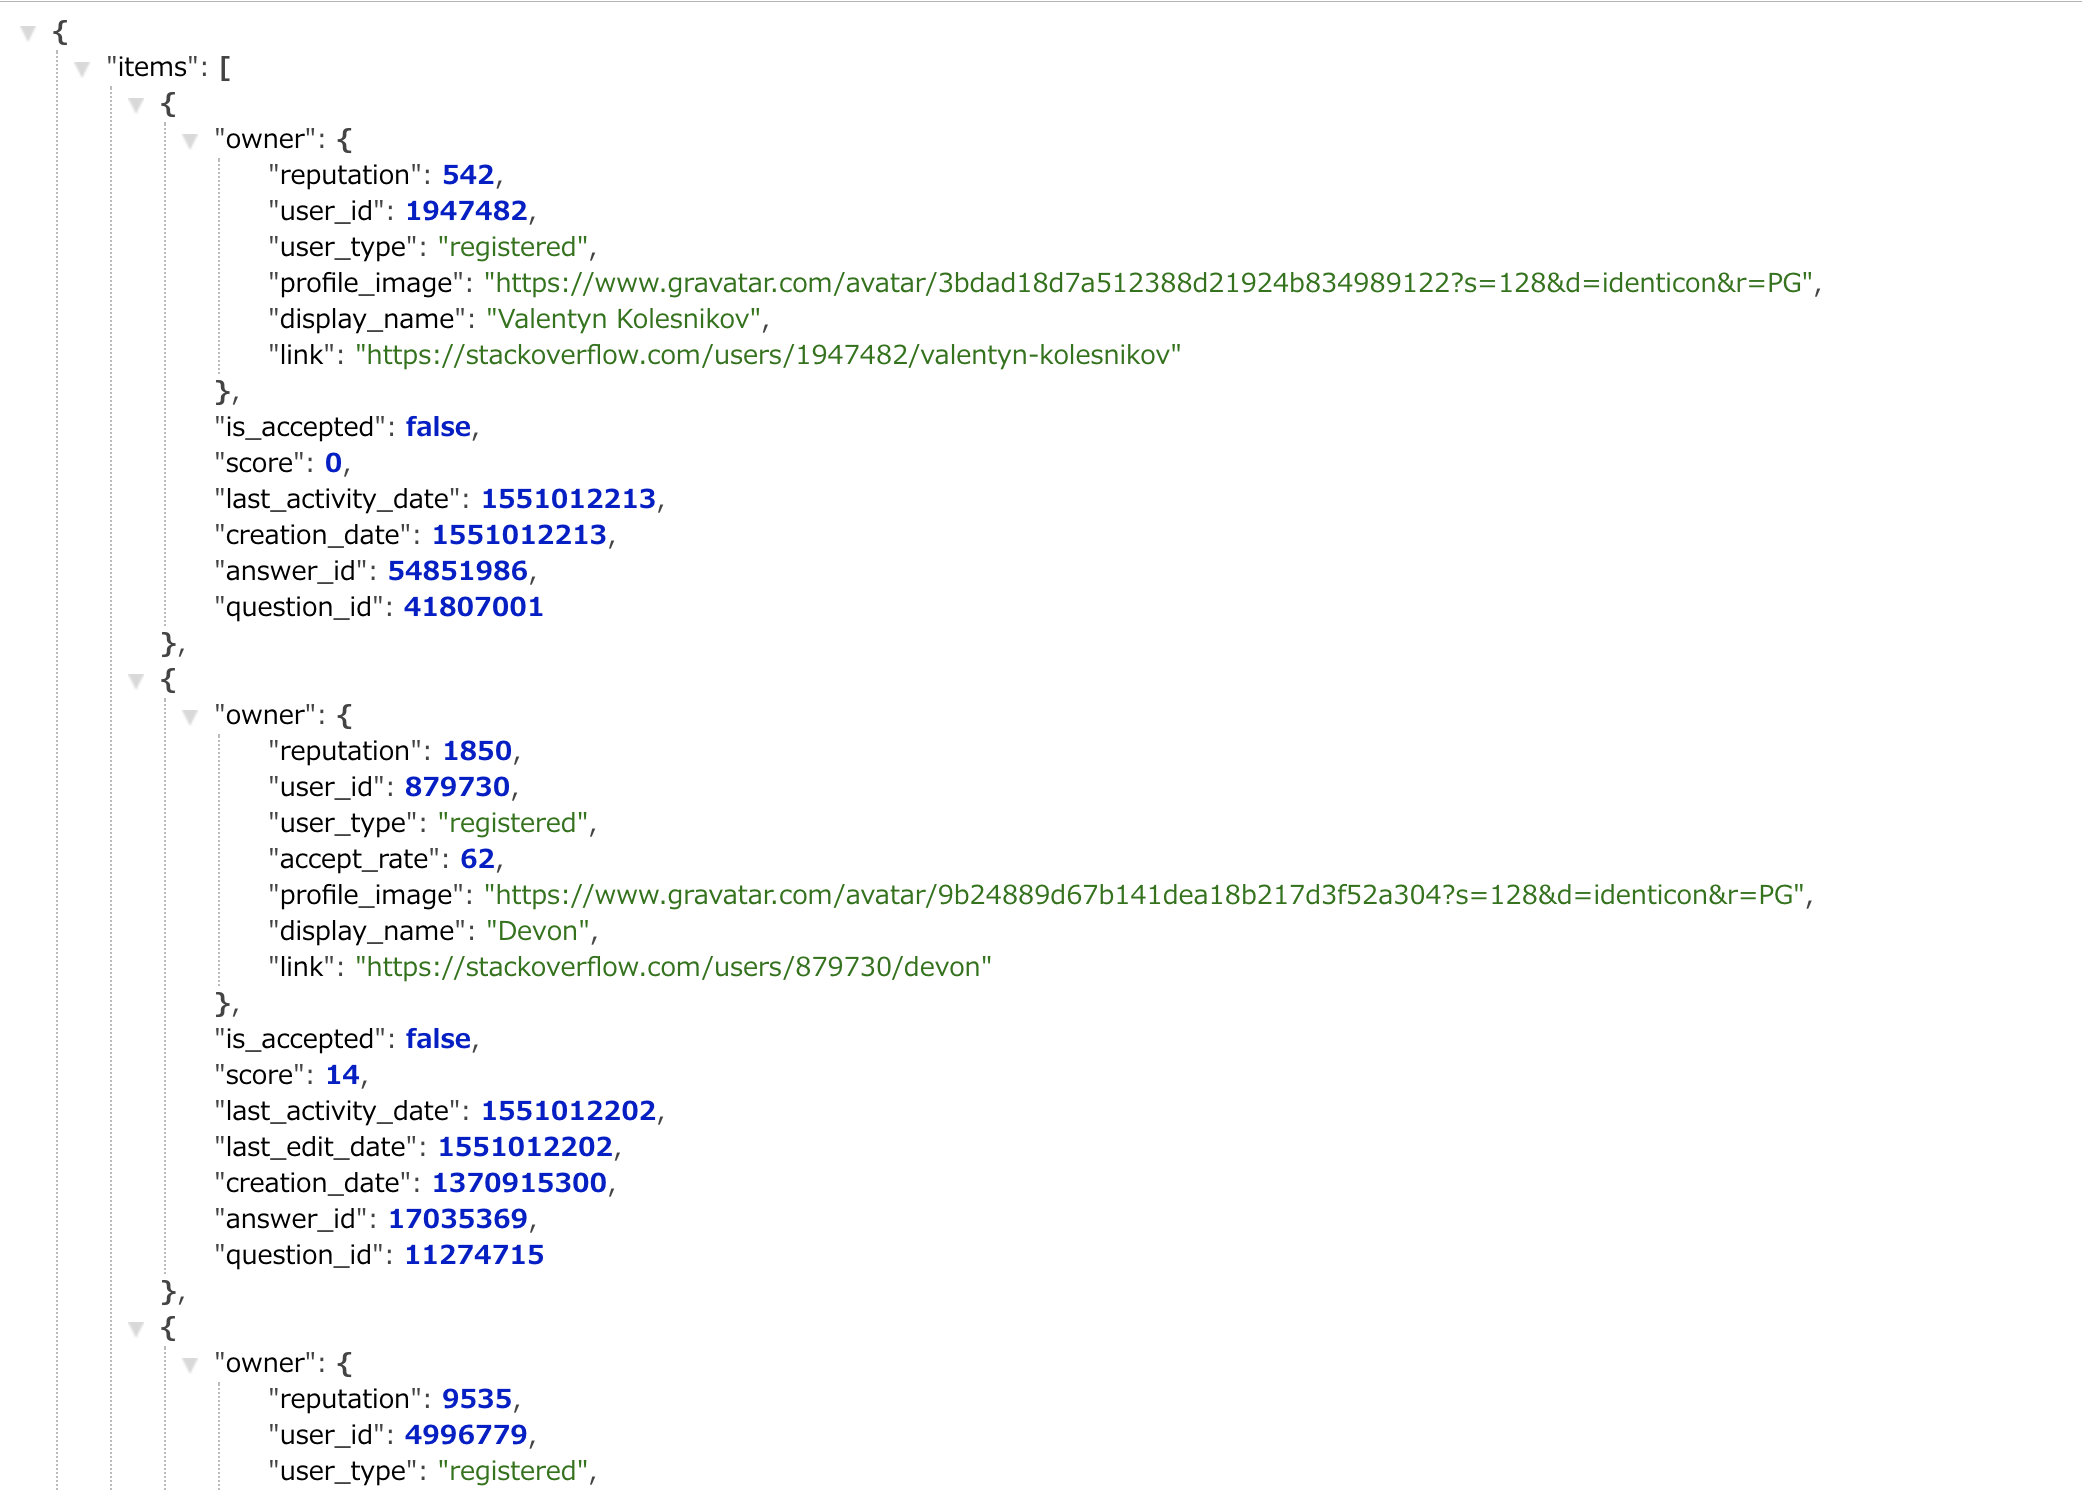
今回は、StackOverFlowのApiで、レスポンスは下記のような形で返ってきます。
無論、ページは無限にあります。

Object Entity
上記をもとに、data classで、Retrofitに取り回してもらうモデルを書き出しておきます。
/**
 * Owner Object
 */
data class Owner(
    val reputation: Int,
    val user_id: Long,
    val user_type: String,
    val profile_image: String,
    val display_name: String,
    val link: String
)

/**
 * Item Object
 */
data class Item(
    val owner: Owner,
    val is_accepted: Boolean,
    val score: Int,
    val last_activity_date: Long,
    val creation_date: Long,
    val answer_id: Long,
    val question_id: Long
)

/**
 * StackApiResponse Object
 * 全体をラップするルートオブジェクト
 * @property items Paging対象のitemのコレクション
 * @property has_more 次のページがあるかどうか判定するフラグ
 */
data class StackApiResponse(
    val items: List<Item>,
    val has_more: Boolean,
    val quota_max: Int,
    val quota_remaining: Int
)
基本的にはシンプルで、各 Item に Owner オブジェクトがひも付き、全体オブジェクトにページング情報が含まれています。
has_moreは次のページがあるかどうかを返してくれるパラメータです。
もし、Pagingする際のバックエンドを自作するときは、あると嬉しいですね。
Pagingしたいデータへのリクエスト制御に、後ほど使うことになります。
これだけ覚えておけば良さそうです。
DataSource
実際に、APIに問い合わせ、それをページング可能なオブジェクトにマッピングしていきます。
まず、dataを受け取るまでの処理はここで共通化してあげたいです。
しかし、Pagingでは、ページロードのコールが、最初と、前と後の三種類あり、それぞれ送るクエリが変わってきてしまいます。
//PagedListをデータで初期化するために`最初に`呼び出されます
void loadInitial (LoadInitialParams<Key> params,
                LoadInitialCallback<Key, Value> callback)
//前のページをロードする (今回は使っていません)
void loadBefore (LoadParams<Key> params,
                LoadCallback<Key, Value> callback)
//次のページを取得する時に呼び出されます。( 最初と、RecyclerViewを最後までスクロールしたとき )
void loadAfter (LoadParams<Key> params,
                LoadCallback<Key, Value> callback)
の三種類のメンバを実装してあげなければいけません。
なので、後の処理を高階関数で、Pagingの各処理ごとにコールバック(pagingCallBack)として各手続きごと受け取れるようにしてあげます。
(もっといい方法あったら教えてください..)
次に、上記のデータリクエストをPagingと絡ませていきます。
PageKeyedDataSource は、要求が次のページまたは前のページのキーを返す、ページキー付きコンテンツ用のデータローダーで、こいつをデータリクエストの処理と絡ませてあげなければいけません。
/**
 * 要求が次のページまたは前のページのキーを返す、ページキー付きコンテンツ用のデータローダー。
 * 高階関数で、処理にコールバックを設定する
 */
class ItemDataSource : PageKeyedDataSource<Int, Item>() {

    /**
     * PagedListをデータで初期化するために最初に呼び出される
     */
    override fun loadInitial(params: LoadInitialParams<Int>, callback: LoadInitialCallback<Int, Item>) {
        /**
         * 最初にロードする処理(First Pageを取得)
         */
        fetchData(FIRST_PAGE) { data ->
            callback.onResult(data.items, null, FIRST_PAGE + 1)
            Timber.d("loadInitial:itemSize=${data.items.size}, currentPageKey=${FIRST_PAGE}, nextPageKey=${FIRST_PAGE + 1}")
        }
    }

    /**
     * 前のページを取得する時に呼び出される
     */
    override fun loadBefore(params: LoadParams<Int>, callback: LoadCallback<Int, Item>) {
        /**
         * 前のページをロードする処理 今回は使っていない
         */
        fetchData(params.key) { data ->
            val adjacentKey = if (params.key > 1) params.key - 1 else null
            callback.onResult(data.items, adjacentKey)
            Timber.d("loadBefore:itemSize=${data.items.size}, currentPageKey=${params.key}, nextPageKey=$adjacentKey")
        }
    }

    /**
     * 次のページを取得する時に呼び出される
     */
    override fun loadAfter(params: LoadParams<Int>, callback: LoadCallback<Int, Item>) {
        /**
         * 次のページをロードする処理
         * 初期化時、loadInitial後に前もって1度行われ、ページを最後までスクロールするたびに呼ばれる
         */
        fetchData(params.key) { data ->
            val key = if (data.has_more) params.key + 1 else null
            callback.onResult(data.items, key)
            Timber.d("loadAfter:itemSize=${data.items.size}, currentPageKey=${params.key}, nextPageKey=$key,hasMoreData=${data.has_more}")

        }
    }

    private fun fetchData(firstPageIndex: Int, pagingCallback: (StackApiResponse) -> Unit) {
        /**
         * Retrofit Factoryからシングルトンでインスタンスを取得
         */
        RetrofitClient.instance
            .api.getAnswers(firstPageIndex, PAGE_SIZE, SITE_NAME)
            .enqueue(object: Callback<StackApiResponse> {
                /**
                 * 成功時、各Pagingフェーズのコールバックを受け取る
                 */
                override fun onResponse(call: Call<StackApiResponse>, response: Response<StackApiResponse>) {

                    val data = response.body()

                    if (data != null) {
                        pagingCallback(data)
                    }
                }

                override fun onFailure(call: Call<StackApiResponse>, t: Throwable) {
                    t.printStackTrace()
                }
            })
    }
}
ViewModel
LiveData
そうしたら、今回ページング対象となるItemオブジェクトの、データソース用のファクトリクラスを作ってあげましょう。
/**
 * データソース用のファクトリクラス (itemLiveDataSource :MutableLiveDataのFactory)
 */
class ItemDataSourceFactory : DataSource.Factory<Int, Item>() {

    val itemLiveDataSource = MutableLiveData<PageKeyedDataSource<Int, Item>>()

    override fun create(): DataSource<Int, Item> {
        /**
         * 初期化
         */
        val itemDataSource = ItemDataSource()

        /**
         *LiveDataにポスト
         */
        itemLiveDataSource.postValue(itemDataSource)

        return itemDataSource
    }
}
ItemViewModel
上記のデータソースファクトリにより、ここまでの流れから、Paging可能なItemオブジェクトのObservableなListを、ようやくViewModelが取り扱えるようになります。
/**
 * PagedList<Item> のLiveDataを持つ ViewModel
 */
class ItemViewModel(application: Application) : AndroidViewModel(application) {

    var itemPagedList: LiveData<PagedList<Item>>? = null
    var liveDataSource: LiveData<PageKeyedDataSource<Int, Item>>? = null

    init {
        /**
         * Data Source Factoryを作成
         */
        val itemDataSourceFactory = ItemDataSourceFactory()

        /**
         * Data Source Factoryから、PageKeyedDataSource(LiveData)を取得
         */
        liveDataSource = itemDataSourceFactory.itemLiveDataSource

        /**
         * PageListConfigを取得
         */
        val pagedListConfig = PagedList.Config.Builder()
            .setEnablePlaceholders(false)
            .setPageSize(PAGE_SIZE).build()

        /**
         * 与えられたDataSource.Factoryと PagedList.ConfigをもとにLiveData<PagedList>を生成する
         */
        itemPagedList = LivePagedListBuilder(itemDataSourceFactory, pagedListConfig)
            .build()
    }

    /**
     * ViewModelFactory
     */
    @Suppress("UNCHECKED_CAST")
    class Factory(private val application: Application) : ViewModelProvider.NewInstanceFactory() {

        override fun <T : ViewModel> create(modelClass: Class<T>): T {

            return ItemViewModel(application) as T
        }

    }
}
View
PagedListAdapter
PagedListAdapterを継承したAdapterです。
RecyclerView.AdapterからPagedListのページデータを表示するための基本クラスです。
RecyclerView.Adapterとの違いはDiffUtilのコールバックを持っていることです。
なので、既存の、RecyclerView.Adapterクラスを継承したAdapterは、DiffUtil(差分を計算していい感じにリストの更新などを行ってくれる)のコールバックを与えてあげれば、難なく書き換えてあげられます。
中でやっていることは普段と特別変わらないデータバインディングと、ViewHolderのバインドです。
class ItemAdapter constructor(private val context: Context) :
    PagedListAdapter<Item, ItemAdapter.ItemViewHolder>(DIFF_CALLBACK) {

    /**
     * DataBinding可能なViewHolderを生成
     */
    override fun onCreateViewHolder(parent: ViewGroup, viewType: Int): ItemViewHolder {
        val binding =
            DataBindingUtil.inflate(
                LayoutInflater.from(parent.context),
                R.layout.recycler_view_users,
                parent,
                false) as RecyclerViewUsersBinding
        return ItemViewHolder(binding.root)
    }

    /**
     * 各アイテムをViewHolderにバインドする
     */
    override fun onBindViewHolder(holder: ItemViewHolder, position: Int) {

        val item = getItem(position)

        if(item != null && holder.binding != null) {
            holder.binding.setVariable(BR.item, item)
            holder.binding.executePendingBindings()
        } else {
            Toast.makeText(context, "Item is null", Toast.LENGTH_LONG).show()
        }
    }

    /**
     * ViewHolderクラス
     */
    inner class ItemViewHolder(itemView: View) : RecyclerView.ViewHolder(itemView) {
        val view: View = itemView
        val binding: ViewDataBinding? = DataBindingUtil.bind(itemView)
    }
    companion object {
        /**
         * DiffUtilのコールバック
         */
        private val DIFF_CALLBACK = object : DiffUtil.ItemCallback<Item>() {
            override fun areItemsTheSame(oldItem: Item, newItem: Item): Boolean {
                return oldItem.question_id == newItem.question_id
            }

            override fun areContentsTheSame(oldItem: Item, newItem: Item): Boolean {
                return oldItem == newItem
            }
        }
    }
}
RecyclerView
最後に、MainActivityです。
今回はこいつが、直でRecyclerViewを持っています。
やっていることはいつもと、変わりませんね。
ViewModelのPaging可能になったItemオブジェクトのLiveDataをオブザーブし、変更があればRecyclerViewをアップデートします。
class MainActivity : AppCompatActivity() {

    lateinit var binding: ActivityMainBinding
    lateinit var adapter: ItemAdapter

    override fun onCreate(savedInstanceState: Bundle?) {
        super.onCreate(savedInstanceState)

        /**
         * Timberの初期化
         */
        Timber.plant(Timber.DebugTree())

        binding = DataBindingUtil.setContentView(this, R.layout.activity_main)
        binding.recyclerview.layoutManager = LinearLayoutManager(this)
        binding.recyclerview.setHasFixedSize(true)

        /**
         * ロード開始
         */
        binding.isLoading = true

        /**
         * viewModelFactoryでViewModelインスタンス生成
         */
        val itemViewModel =
            ViewModelProviders
                .of(this,ItemViewModel.Factory(application = application)).get(ItemViewModel::class.java)

        /**
         * PagedListAdapterを継承したrecyclerView用のAdapter
         */
        adapter = ItemAdapter(this)

        /**
         * viewModelのObserve開始
         */
        observeViewModel(itemViewModel)

        recyclerview.adapter = adapter
    }

    private fun observeViewModel(itemViewModel: ItemViewModel) {
        /**
         * <PagedList<Item>>のObserve開始
         */
        itemViewModel.itemPagedList?.removeObservers(this)
        itemViewModel.itemPagedList?.observe(this, Observer { items ->

            if (items != null) {
                /**
                 * AdapterへItemのアップデートを通知
                 */
                adapter.submitList(items)
                /**
                 * 少し待ってロード
                 */
                Handler().postDelayed({
                    binding.isLoading = false
                },2000)
            }
        })
    }
}
まとめ
これで一通りの実装が完了しました。レイアウトのリソースやバインディングはリポジトリ参照なさってください。
クローンしていただいて、ログを確認するとわかると思うのですが、
アプリ立ち上げ時、loadInitialが最初に読み込まれ、loadAfterが時間差で読み込まれます。

次に、RecyclerViewを一番下までスクロールして頂くと、一瞬引っかかり、その度に loadAfter が呼ばれます。
 とても良さそうですね。
現状は垂れ流しなので、実際に運用する際は、ロードするたびに制御が必要そうです。
APIへの問い合わせ回数が増えるので、キャッシュ構造もしっかり構築してあげなければいけなさそうです。
なので、運用を間違えると、バックエンドにとても負荷をかけることになりそうです。(実際に、このサンプルも高速でロードしまくると速攻で短時間のIP制限かけられます。)
慎重に、しっかり使っていけたら大量のデータを流すフィード系のアプリは、大きなUXの向上になりそうですね。
もっとしっかりした実装を見たい人はこちらが良さそうです。
↓
googlesamples/android-architecture-components/PagingWithNetworkSample
もっといけてるやり方、こんなのもあるよ!という方、ガシガシご教示いただければと思います。
