前置き不要な方は、"構成" の段落からお読みください。
ここで使われている言葉について
「認証」という言葉が所々で出てきますが、ここでは混乱を避けるため、以下のように使い分けていくものとします。
- 本記事での"認証"という言葉の使い分け
| ログイン認証 | あなたが運用しているWeb サーバへログインするためのbasic 認証、digest 認証等のこと。 |
|---|---|
| 証明書取得認証 | Let's encrypt 側のサーバがあなたのサーバ(Let's encrypt クライアント)に対して証明書を発行するために行うサーバ、ドメイン所有者の確認のための認証 |
ログイン認証がかかっているサイトでダウンタイム無しで証明書を更新する
letsencrypt では、80/443 port を使用してletsencrypt クライアント側の証明書取得認証を行いますが、既に本番運用でWeb サーバが起動して80/443 port が既に使われており、且つログイン認証がかかっているとエラーにより証明書を取得することができません。
# ./letsencrypt-auto certonly --webroot --renew-by-default --agree-tos -w /var/www/html -d foo.example.com
Checking for new version...
Requesting root privileges to run letsencrypt...
   /root/.local/share/letsencrypt/bin/letsencrypt --no-self-upgrade certonly --webroot --renew-by-default --agree-tos -w /var/www/html -d foo.example.com
Failed authorization procedure. foo.example.com (http-01): urn:acme:error:unauthorized :: The client lacks sufficient authorization :: Invalid response from http://foo.example.com/.well-known/acme-challenge/aaLQdJUNOVyUEOkuoMt22pvFdxrNMfrzdWw5MmT4rtE [122.26.79.73]: 401

IMPORTANT NOTES:
 - The following errors were reported by the server:

   Domain: foo.example.com
   Type:   unauthorized         # <- ログイン認証に失敗しているためエラーとなっている
   Detail: Invalid response from http://foo.example.com/.well-known
   /acme-challenge/aaLQdJUNOVyUEOkuoMt22pvFdxrNMfrzdWw5MmT4rtE
   [xxx.xxx.xxx.xxx]: 401

   To fix these errors, please make sure that your domain name was
   entered correctly and the DNS A record(s) for that domain
   contain(s) the right IP address.
Web サーバを一旦ダウンさせてletsencrypt クライアントをstandalone 形式で起動すれば証明書を取得/更新することができますが、これではサービスにダウンタイムができてしまいます。
また別の方法としてドキュメントルート(例えば/var/www/html)に対して、一時的にログイン認証無しでアクセスできるようにすることでも可能ですが、そうすると特定の人のみに見せたいコンテンツが不特定多数の人に公開されてしまう時間ができてしまい、セキュリティ的にあまりよい状態ではありません。
対応案を考えてみた
letsencrypt クライアントをstandalone で80/443 port 以外を使用して認証を行うようにすればできる…と考えましたが、既に同様な考えをしている先人がいるようでした。
- LE client needs to bind to port 80, which I’m already using
- https://community.letsencrypt.org/t/le-client-needs-to-bind-to-port-80-which-im-already-using/2739
証明書取得認証にはletsencrypt サーバ側は、letsencrypt クライアント側の80/443 portが必要でそれは変えられない(?)ようです(確か策定途中のACME プロトコルの縛り)。
ただし、letsencrypt クライアント側のstandalone 方式では、証明書取得認証に使うport を変更することが可能です。
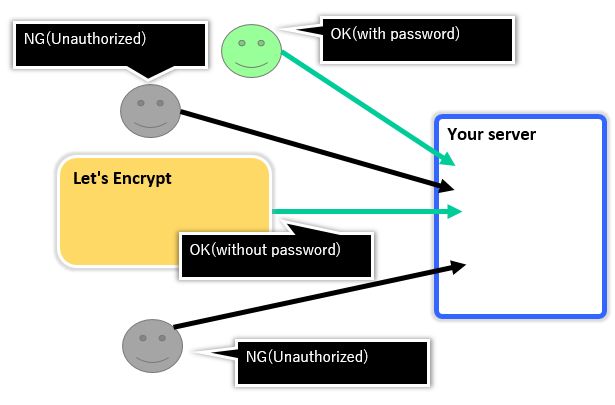
その特性を利用して、今までどおり80/443 port でListen させた状態でletsencrypt サーバ側からの証明書取得認証のアクセスのみをログイン認証不要な形式として、それ以外のアクセスは今までどおり証明書取得認証を行うよう設定することで本問題に対処することができます。
具体的には、Let's Encrypt はletsencrypt クライアント側にアクセスするときに/.well-known/acme-challenge/ のロケーションに対してリクエストをしてくるので、そのロケーションに対してのみログイン認証不要なstandalone なletsencrypt クライアントへ内部プロキシするように設定します。
構成
今回はFedora Linux とApache を使用した時の手順について説明していきたいと思います。
CentOS 7 でもほぼ同様な手順で実施することができるはずです。
- 今回の構成
| OS | Fedora 23 |
|---|---|
| Web サーバ | Apache 2.4.18 |
内部プロキシの設定を追加する
Apache にletsencrypt クライアントのstandalone のListen port に内部プロキシするための設定を追加します。
# cd /etc/httpd/conf.d
# vim proxy_for_letsencrypt.conf
以下の内容を追記します。
<IfModule mod_proxy.c>
    ProxyPass "/.well-known/acme-challenge/" "http://127.0.0.1:9999/.well-known/acme-challenge/" retry=1
    ProxyPassReverse "/.well-known/acme-challenge/" "http://127.0.0.1:9999/.well-known/acme-challenge/"
    <Location "/.well-known/acme-challenge/">
        ProxyPreserveHost On
        Order allow,deny
        Allow from all
        Require all granted
    </Location>
</IfModule>
ファイルを追加したらApache をreload します。
# systemctl reload apache2
プロキシの設定ができているか確認する
サーバ側でnc コマンドを使用してテスト用サーバを起動し、そこに内部プロキシされることを確認します。
サーバ側で以下のコマンドを実行し、9999 番ポートでListen させ、適当なクライアントから/.well-known/acme-challenge/ ロケーションに対してリクエストを送信します。
$ nc -l -p 9999 -c 'echo -e "HTTP/1.1 200 OK\n\nHello World"'
$ curl -i http://foo.example.com/some/path
HTTP/1.1 401 Unauthorized    # <- Unauthorized が返ってくること
......
$ curl -i http://foo.example.com/.well-known/acme-challenge/
HTTP/1.1 200 OK
......

Hello World      # <- Hello World が返ってくること
上記のような結果になれば、内部プロキシの設定は成功です。
standalone でletsencrypt クライアントを起動する
letsencrypt クライアントをstandalone 形式で起動します。
standalone 形式で起動する場合は--http-01-port フラグで9999 を指定するようにしてください。
# ./letsencrypt-auto certonly --standalone --agree-tos --renew-by-default --standalone-supported-challenges http-01 --http-01-port 9999 -d foo.example.com
Checking for new version...
Requesting root privileges to run letsencrypt...
   /root/.local/share/letsencrypt/bin/letsencrypt --no-self-upgrade certonly --standalone --agree-tos --renew-by-default --standalone-supported-challenges http-01 --http-01-port 9999 -d foo.example.com

IMPORTANT NOTES:
 - Congratulations! Your certificate and chain have been saved at
   /etc/letsencrypt/live/foo.example.com/fullchain.pem. Your cert
   will expire on 2016-05-13. To obtain a new version of the
   certificate in the future, simply run Let's Encrypt again.
 - If you like Let's Encrypt, please consider supporting our work by:

   Donating to ISRG / Let's Encrypt:   https://letsencrypt.org/donate
   Donating to EFF:                    https://eff.org/donate-le
上記のように出力されれば成功です。
取得した証明書については通常の取得方法と同様に/etc/letsencrypt/live/foo.example.com ディレクトリ配下に証明書へのシンボリックリンクが作成されるので、それをいつもどおり使用することができます。
後処理
証明書の取得が終わったら、必要に応じてWeb サーバの設定を元に戻してください。
今回は/etc/httpd/conf.d ディレクトリに作成したファイルを削除し、systemctl reload するだけでOK です。
# rm /etc/httpd/conf.d/proxy_for_letsencrypt.conf
# systemctl reload httpd
その他
今後、ACME プロトコルが策定されるようになれば、Web サーバが勝手にACME プロトコルで証明書の更新をしてくれるようになるのが一般的になるかもしれませんね…。
そうなれば、このような複雑な手順も不要になり、より簡単に証明書の発行と更新ができるようになってくれるはずです。
参考
- LE client needs to bind to port 80, which I’m already using
- Let's Encrypt を支える ACME プロトコル