はじめに
Androidでデータ一覧を表示する時は、List Viewを使うと便利です。
なので、今日の勉強会はList Viewを学んでいきます!
ListViewとAdapter
ListViewクラスは、データをリスト形式で表示するためのビュークラスです。
このListViewにデータを表示するには、Adapterを使用します。
Adapterとは…
"データをViewの橋渡しをするもの"です。
つまり、開発者はAdapterを使ってデータにアクセスしているということです。
Adapterにはいくつか種類があるので少し紹介します。
・ ArrayAdapter
配列やListを1行に1つ表示する時に使う
・ SimpleAdapter
XMLファイルで定義されたビューを表示する時に使う
・ BaseAdapter
ArrayAdapter・CursorAdapter・SimpleAdapterのスーパークラス。
独自のAdapterクラスを定義して、レイアウトを自由にカスタマイズする時に使う
作ってみよう!
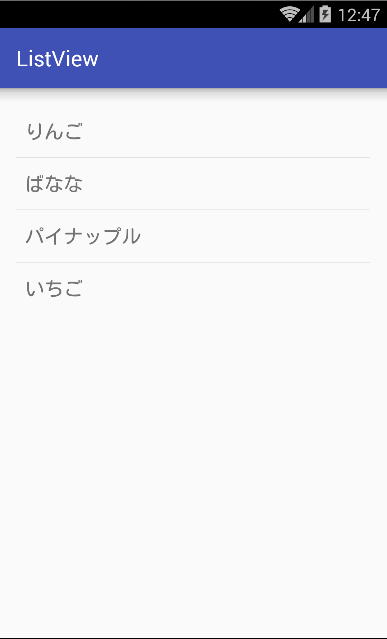
ということで、実際にListViewを使ってListを表示してみよう〜!
レイアウトでListViewを追加してから、
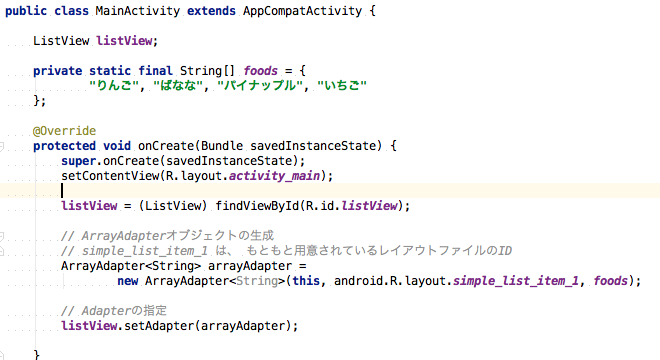
ArrayAdapterオブジェクトの生成
ArrayAdapterのコンストラクタ
・ArrayAdapter(Context context, int textViewResourceId, List< T > objects)
| 引数 | 説明 |
|---|---|
| context | Contextオブジェクト |
| textViewResourceId | レイアウトファイルのID |
| objects | 表示するデータを示す配列 or Listクラス |
「android.R.layout.simple_list_item_1」は、アンドロイドにあらかじめ用意されているレイアウトファイルで、自分でカスタマイズすることも可能です。
表示することができました。
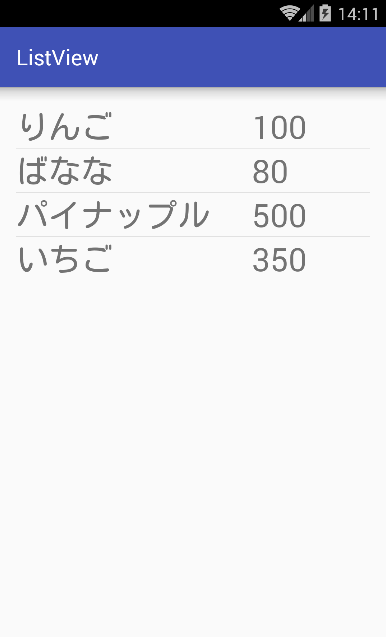
独自のAdapterを作ってみよう!
自作のAdapterを用意することで、複数の画像やテキストなどをViewに表示させる事ができます。
自由にList Viewをカスタマイズすることが出来ます。
例えば、下のように。
独自のAdapterを作る前に、Listに表示させるオブジェクトを作ろう!
例えば、以下のような形で作ってみよう。
public class Food {
    long id;
    private String name;
    private int price;

    public long getId() {
        return id;
    }

    public void setId(long id) {
        this.id = id;
    }

    public String getName(){
        return name;
    }

    public void setName(String name){
        this.name=name;
    }

    public int getPrice(){
        return price;
    }

    public void setPrice(int price){
        this.price=price;
    }

}
List Viewの行に使うレイアウトファイルを作成しよう!
自分の好きなようにレイアウトしてみよう。
上の例では、食べ物の名前と値段を表示するために、TextViewを2つ置いた。
<?xml version="1.0" encoding="utf-8"?>
<LinearLayout xmlns:android="http://schemas.android.com/apk/res/android"
    android:orientation="vertical" android:layout_width="match_parent"
    android:layout_height="match_parent">

    <LinearLayout
        android:orientation="horizontal"
        android:layout_width="match_parent"
        android:layout_height="match_parent">

        <TextView
            android:layout_width="0dp"
            android:layout_height="wrap_content"
            android:text="New Text"
            android:id="@+id/name"
            android:textSize="30dp"
            android:layout_weight="2" />

        <TextView
            android:layout_width="0dp"
            android:layout_height="wrap_content"
            android:text="New Text"
            android:id="@+id/price"
            android:textSize="30dp"
            android:layout_weight="1" />
    </LinearLayout>

</LinearLayout>
独自のAdapterを作成しよう!
先ほど出てきた、BaseAdapterを継承した独自のAdapterを作成します。
getView()内で先ほど作成したListViewの行のレイアウトファイルを指定しTextViewに名前や値段を格納します。
import android.content.Context;
import android.view.LayoutInflater;
import android.view.View;
import android.view.ViewGroup;
import android.widget.BaseAdapter;
import android.widget.TextView;

import java.util.ArrayList;

public class MyAdapter extends BaseAdapter {
    Context context;
    LayoutInflater layoutInflater = null;
    ArrayList<Food> foodList;

    public MyAdapter(Context context) {
        this.context = context;
        this.layoutInflater = (LayoutInflater)context.getSystemService(Context.LAYOUT_INFLATER_SERVICE);
    }

    public void setFoodList(ArrayList<Food> foodList) {
        this.foodList = foodList;
    }

    @Override
    public int getCount() {
        return foodList.size();
    }

    @Override
    public Object getItem(int position) {
        return foodList.get(position);
    }

    @Override
    public long getItemId(int position) {
        return foodList.get(position).getId();
    }

    @Override
    public View getView(int position, View convertView, ViewGroup parent) {
        convertView = layoutInflater.inflate(R.layout.foodrow,parent,false);

        ((TextView)convertView.findViewById(R.id.name)).setText(foodList.get(position).getName());
        ((TextView)convertView.findViewById(R.id.price)).setText(String.valueOf(foodList.get(position).getPrice()));

        return convertView;
    }
}
AdapterにListViewをセットしよう!
最後に、AdapterにListViewをセットすれば完成!
  @Override
    protected void onCreate(Bundle savedInstanceState) {
        super.onCreate(savedInstanceState);
        setContentView(R.layout.activity_main);

        listView = (ListView) findViewById(R.id.listView);

        ArrayList<Food> list = new ArrayList<>();
        MyAdapter myAdapter = new MyAdapter(MainActivity.this);

        myAdapter.setFoodList(list);
        listView.setAdapter(myAdapter);

    }
ListViewに新しくアイテムを追加するのは、以下のようにすればできます。
Food food = new Food();
food.setName("りんご");
food.setPrice(100);
list.add(food);
myAdapter.notifyDataSetChanged();
いろいろカスタマイズしてみよう!
アイテムを増やしたり、画像を入れてみたり、List Viewの行のレイアウトを変えたりして、ListViewを使ってみよう〜〜