はじめに
Nuxt1を軽く触った程度なのと、tsほぼ未経験の状態でこの記事を記載していますので間違っているところはぜひご指摘頂けますと幸いです🙇
前提
- nuxt
- 2.0.0
- typescript
- 3.1.1
やってみる
Nuxt2をインストールする
執筆時点ではver2インストールの和訳はされていないのでenページの手順通り行います。
npxを使ったことがなかったので今回はnpxでやってみます。
npx create-nuxt-app sample-project
色々聞かれますが、今回は以下の通りにしてみました。
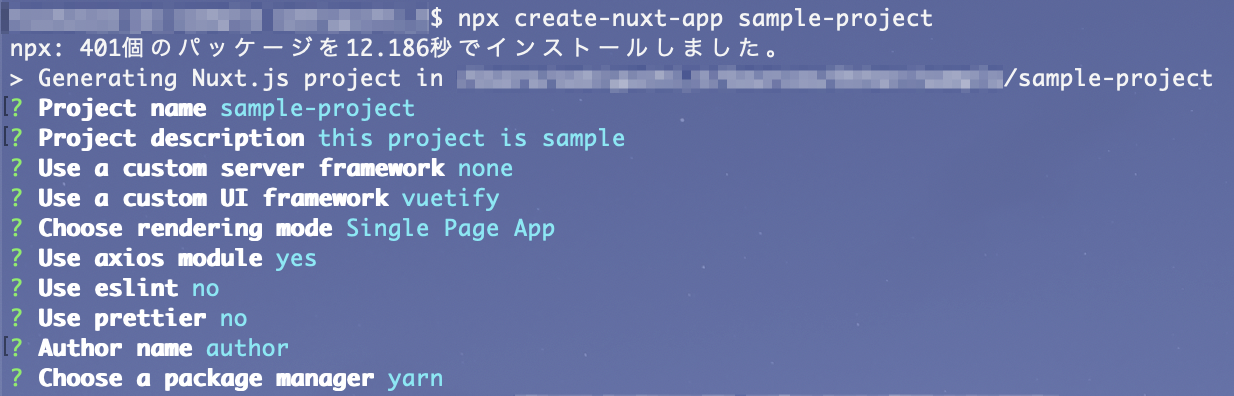
| 項目 | 選択肢 | 補足 |
|---|---|---|
| Project name | 適当 | |
| Project description | 適当 | |
| Use a custom server framework | none | 素のやつ以外使ったことない😇 |
| Use a custom UI framework | vuetify | vuesax使ってたけどこの選択肢の中だったらなんとなくこれかな、くらいの気持ち |
| Choose rendering mode | Single Page App | SPAしかやったことない😇し、SSRも必要なかった |
| Use axios module | yes | |
| Use eslint | no | TypeScript使うので |
| Use prettier | no | TypeScript使うので |
| Author name | 適当 | |
| Choose a package manager | yarn |
無事インストール完了しました。

TypeScriptを入れる
パッケージ導入
まずはtypescriptとtsの関連パッケージを入れます。
yarn add typescript ts-loader tslint tslint-config-prettier --dev
今回はデコレータを使いたかったのでデコレータも入れます。
yarn add nuxt-property-decorator --save
関連ファイル追加
次に、.tsを読み込むための定義ファイルを作成します。
ファイルの内容はnuxt-communityのテンプレをそのまま使いまわします。
module.exports = function() {
  // Add .ts extension for store, middleware and more
  this.nuxt.options.extensions.push("ts")
  // Extend build
  this.extendBuild(config => {
    const tsLoader = {
      loader: "ts-loader",
      options: {
        appendTsSuffixTo: [/\.vue$/]
      }
    }
    // Add TypeScript loader
    config.module.rules.push(
      Object.assign(
        {
          test: /((client|server)\.js)|(\.tsx?)$/
        },
        tsLoader
      )
    )
    // Add TypeScript loader for vue files
    for (let rule of config.module.rules) {
      if (rule.loader === "vue-loader") {
        rule.options.loaders = {
          ts: "tsLoader",
        }
      }
    }
    // Add .ts extension in webpack resolve
    if (config.resolve.extensions.indexOf(".ts") === -1) {
      config.resolve.extensions.push(".ts")
    }
  })
}
typescript.jsをnuxt.config.jsで読み込むようにします。
  modules: [
    '@nuxtjs/axios',
    '~/modules/typescript.js' // この行を追加
  ],
次に、.vueを型定義するためのindex.d.tsを作成します。
ファイルの内容はmodules/typescript.js同様nuxt-communityのテンプレをそのまま使いまわします。
declare module "*.vue" {
  import Vue from "vue"
  const _default: Vue
  export default _default
}
続いて、tsコンパイルの指定をする為にtsconfig.jsonを作成します。
こちらもnuxt-communityのテンプレをそのまま使いまわします。
{
  "compilerOptions": {
    "target": "es5",
    "lib": ["dom", "es2015"],
    "module": "es2015",
    "moduleResolution": "node",
    "experimentalDecorators": true,
    "noImplicitAny": false,
    "noImplicitThis": false,
    "strictNullChecks": true,
    "removeComments": true,
    "suppressImplicitAnyIndexErrors": true,
    "allowSyntheticDefaultImports": true,
    "allowJs": true,
    "baseUrl": ".",
    "paths": {
      "~/*": ["./*"]
    }
  }
}
tslintも入れたので設定を入れちゃいます。
これはnuxt-communityにないのでひとまず自作のものにしておきます。
{
  "defaultSeverity": "error",
  "extends": [
    "tslint:recommended",
    "tslint-config-prettier"
  ],
  "jsRules": {},
  "rules": {
    "no-namespace": false,
    "no-string-literal": false,
    "max-line-length": {
      "options": {"limit": 120},
      "severity": "warn"
    },
    "interface-name": [true,  "never-prefix"],
    "ordered-imports": false,
    "object-literal-sort-keys": false
  },
  "rulesDirectory": []
}
js→tsに書き換えてみる
これでtypescriptが使えるようになったので、テンプレのlayouts/default.vueファイルにtypescriptを組み込んでみます。
変更前はこちら
// /////////
// before
// /////////
// templateは省略
<script>
  export default {
    data() {
      return {
        clipped: false,
        drawer: true,
        fixed: false,
        items: [
          { icon: 'apps', title: 'Welcome', to: '/' },
          { icon: 'bubble_chart', title: 'Inspire', to: '/inspire' }
        ],
        miniVariant: false,
        right: true,
        rightDrawer: false,
        title: 'Vuetify.js'
      }
    }
  }
</script>
変更後はこちら
// /////////
// after
// /////////
// templateは省略
<script lang="ts">
import { Component, Vue } from 'nuxt-property-decorator'

@Component
export default class extends Vue {
  clipped = false
  drawer = true
  fixed = false
  items = [
    { icon: 'apps', title: 'Welcome', to: '/' },
    { icon: 'bubble_chart', title: 'Inspire', to: '/inspire' }
  ]
  miniVariant = false
  right = true
  rightDrawer = false
  title = 'Vuetify.js'
}
</script>
余談
ちょっと冗長ですが、現時点では.vueをtsにする場合、
<script lang="ts">
import { Component, Vue } from 'nuxt-property-decorator'

@Component
export default class extends Vue {}
</script>
こいつを決め打ちで入れてやる必要があるのかなと思います。
デコレータの書き方はREADMEを見ればわかるかなと思います。
(data()の書き方がわからなくてちょっと焦りました😅)
vuexのテンプレをつくる
TS初心者にはこれが結構きつかったです😅
調べた(ザッピング程度ですが)ところ、こちらの記事がすごく親切だったので参考にさせて頂きました。
※そのままだとtslintで怒られたりうまく動かないところがあったのでところどころ修正しています
やっていることの概要
導入方法の前にやっていることをざっくり説明します。
やっていることは、
- vuex共通の型定義をする
- versionというプロパティを作成する(stateだけのモデル)
- profileというモデルを作成する
こんな感じです。
パッケージの導入
まずはライブラリを入れます。
yarn add vuex-class --save
関連ファイル追加
次に、vuexで最終的に全てのモデルをまるっと入れておくための型を定義します。
export interface RootState {
  version: string
}
続いて、共通の型定義ファイルを作成します。
import {Action, Mutation, Getter} from 'vuex'

export interface ActionTree<S, R> {
  [key: string]: Action<S, R>
}
export interface MutationTree<S> {
  [key: string]: Mutation<S>
}
export interface GetterTree<S, R> {
  [key: string]: Getter<S, R>
}
export interface Module<S, R> {
  namespaced?: boolean
  state?: S | (() => S)
  getters?: GetterTree<S, R>
  actions?: ActionTree<S, R>
  mutations?: MutationTree<S>
}
次に、ベースとなるindex.tsを作成します。
import Vue from 'vue'
import Vuex, { StoreOptions } from 'vuex'
import { RootState } from '~/store/types'
import { profile } from './profile/index'

Vue.use(Vuex)

const store: StoreOptions<RootState> = {
  modules: {
    profile
  },
  state: {
    version: '1.0.0' // a simple property
  }
}

const createStore = () => {
  return new Vuex.Store<RootState>(store)
}

export default createStore
最後に、profileモデルの為に必要なファイルを作成します。
import { Module } from 'vuex'
import { getters } from './getters'
import { actions } from './actions'
import { mutations } from './mutations'
import { ProfileState } from './types'
import { RootState } from '../types'

export const state: ProfileState = {
  user: undefined,
  error: false
}

const namespaced: boolean = true

export const profile: Module<ProfileState, RootState> = {
  namespaced,
  state,
  getters,
  actions,
  mutations
}
import { ActionTree } from 'vuex'
// APIは別の話なので今回は固定値としておきます
// import axios from 'axios'
import { ProfileState, User } from './types'
import { RootState } from '../types'

export const actions: ActionTree<ProfileState, RootState> = {
  fetchData({ commit }): any {
    // APIは別の話なので今回は固定値としておきます
    // axios({
    //   url: 'https://....'
    // }).then((response) => {
    //   const payload: User = response && response.data
    //   commit('profileLoaded', payload)
    // }, (error) => {
    //   console.log(error)
    //   commit('profileError')
    // })
    const payload = {
      firstName: 'firstNameのデータ',
      lastName: 'lastNameのデータ',
      email: 'sample@example.com',
      phone: '+819000000000'
    }
    commit('profileLoaded', payload)
  }
}
import { GetterTree } from 'vuex'
import { ProfileState } from './types'
import { RootState } from '../types'

export const getters: GetterTree<ProfileState, RootState> = {
  fullName(state): string {
    const { user } = state
    const firstName = (user && user.firstName) || ''
    const lastName = (user && user.lastName) || ''
    return `${firstName} ${lastName}`
  }
}
import { MutationTree } from 'vuex'
import { ProfileState, User } from './types'

export const mutations: MutationTree<ProfileState> = {
  profileLoaded(state, payload: User) {
    state.error = false
    state.user = payload
  },
  profileError(state) {
    state.error = true
    state.user = undefined
  }
}
export interface User {
  firstName: string
  lastName: string
  email: string
  phone?: string
}

export interface ProfileState {
  user?: User
  error: boolean
}
確認してみる
vuex側のテンプレは以上です。
vuexからデータを引っ張ってくるサンプルページを作成します。
<template>
  <div class="container">
    <p>
      version: {{ version }}
    </p>
    <div v-if="profile.user">
      <p>
        Full name: {{ fullName }}
      </p>
      <p>
        Email: {{ email }}
      </p>
    </div>
    <div v-if="profile.error">
      Oops an error occured
    </div>
  </div>
</template>

<script lang="ts">
import Vue from 'vue'
import { State, Action, Getter } from 'vuex-class'
import Component from 'vue-class-component'
import { ProfileState, User } from '~/store/profile/types'
const namespace: string = 'profile'
@Component
export default class UserDetail extends Vue {
  @State('version') version: string
  @State('profile') profile: ProfileState
  @Action('fetchData', { namespace }) fetchData: any
  @Getter('fullName', { namespace }) fullName: string

  mounted() {
    // fetching data as soon as the component's been mounted
    this.fetchData()
  }

  // computed variable based on user's email
  get email() {
    const user = this.profile && this.profile.user
    return (user && user.email) || ''
  }
}
</script>
作成したページのメニューを追加します。
// templateは省略
<script lang="ts">
import { Component, Vue } from 'nuxt-property-decorator'

@Component
export default class extends Vue {
  clipped = false
  drawer = true
  fixed = false
  items = [
    { icon: 'apps', title: 'Welcome', to: '/' },
    { icon: 'bubble_chart', title: 'Inspire', to: '/inspire' },
    { icon: 'account_box', title: 'Sample', to: '/sample' } // ここを追加
  ]
  miniVariant = false
  right = true
  rightDrawer = false
  title = 'Vuetify.js'
}
</script>
長くなりましたがようやく完成です!
確認してみます!
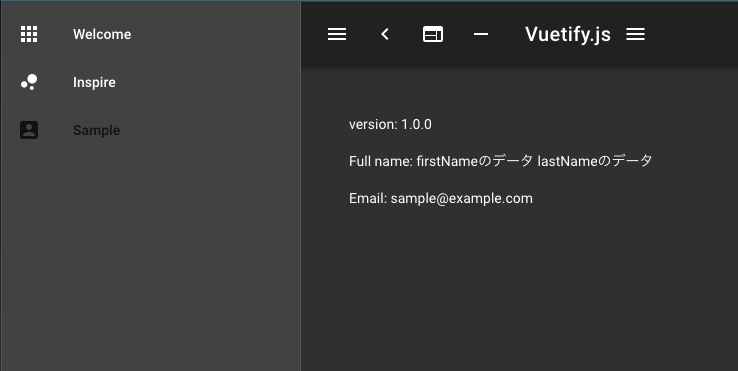
無事にデータが表示出来ました!!!
蛇足(scssを使えるようにする)
タイトルと関係ないですね😅
が、scssも結構入れる人多いと思うので記載しておきます。
必要なパッケージを導入します。
yarn add node-sass sass-loader --dev
まずは.vueファイルに記載する場合、
// template, scriptは省略
<style lang="scss" scoped>
.sample {
  .text {
    color: blue;
  }
}
</style>
これだけです。
次に、共通ファイルを読み込む場合、
.sample {
  .text {
    background-color: red;
  }
}
ファイルを作成して、
  css: [
    '~/assets/style/app.styl',
    '~/assets/sass/mixins.scss' // ここに追加
  ],
これだけですね。
ちょっとここ定かではないんですが、Nuxt2になってsass-resource-loaderなしで行けるようになったんですかね?
外部のscssファイルを読み込むだけなら大丈夫ですが、その中で変数を使う場合はnuxt-sass-resource-loaderが必要でした。
こちらの記事ですごく丁寧に書かれていますね。
■追記■
デフォでstylus入ってたので無理にscssを使えるようにする必要もなかったですね😅
さいごに
vuexの部分、今回は参考にさせて頂いた記事を真似てactions, getters, mutations, typesをファイル分割しましたが、よほどでかくならない限り個人的には1ファイルでも良いのかなぁと思ったりしました。
サンプル通りに設定してみたつもりだけどうまく動かない😇、みたいなことが度々あったのでもう少し中身を理解しないといけないよなと痛感しました(当たり前
Vue3系もTypeScriptで書き直されるとのことですし、もうTypeScript化の流れから逃げることは出来ないと思うので、私と同じくTypeScriptそろそろさわらなきゃなぁと思っている方の一助になれば幸いです🙇
冒頭に触れましたが、間違っているところはぜひご指摘頂けますと幸いです![]()