はじめに
こんにちは。
本記事ではAmazon Connectインスタンス間のコンタクトフロー移管について紹介します。Amazon Connectを知っている方を対象にしていますが、なじみが少ない方でも後述するコンポーネント作成で依存性を持つ場合のアプローチは他の分野でも行かせると思いますので、よければぜひご覧ください。
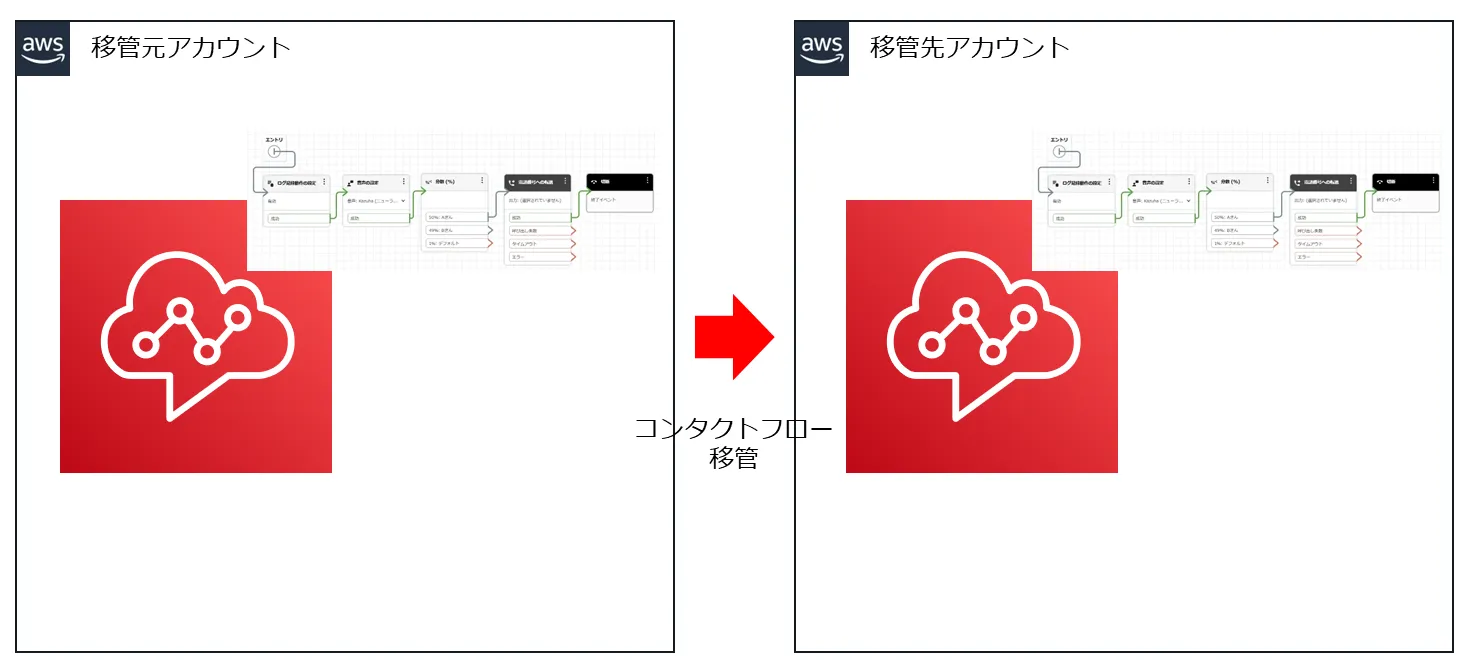
Amazon Connectは、AWSのコンタクトセンターサービスであり、コンタクトセンターシステムや自動受付システムを下図のようにシンプルなUIで構築できます。
Amazon Connectでシステム開発をする際は、従来のITシステムと変わらず開発環境(develop)・検証環境(staging)・本番環境(production)毎に環境用意が推奨されます。今回はAmazon Connectで構築したシステムを各環境間の移管する際に伴う、主のコンポーネントであるコンタクトフローの移管方法についてまとめました。
インスタンス間のコンタクトフローの移管
インスタンス間のコンタクトフローの移管は、Amazon Connectが提供するUIとSDKを活用する2通りの対応方針が立てられます。
1. UIによる対応
Amazon Connectではコンタクトフローのインスタンス間の移管では、UIにより機能が提供されています。
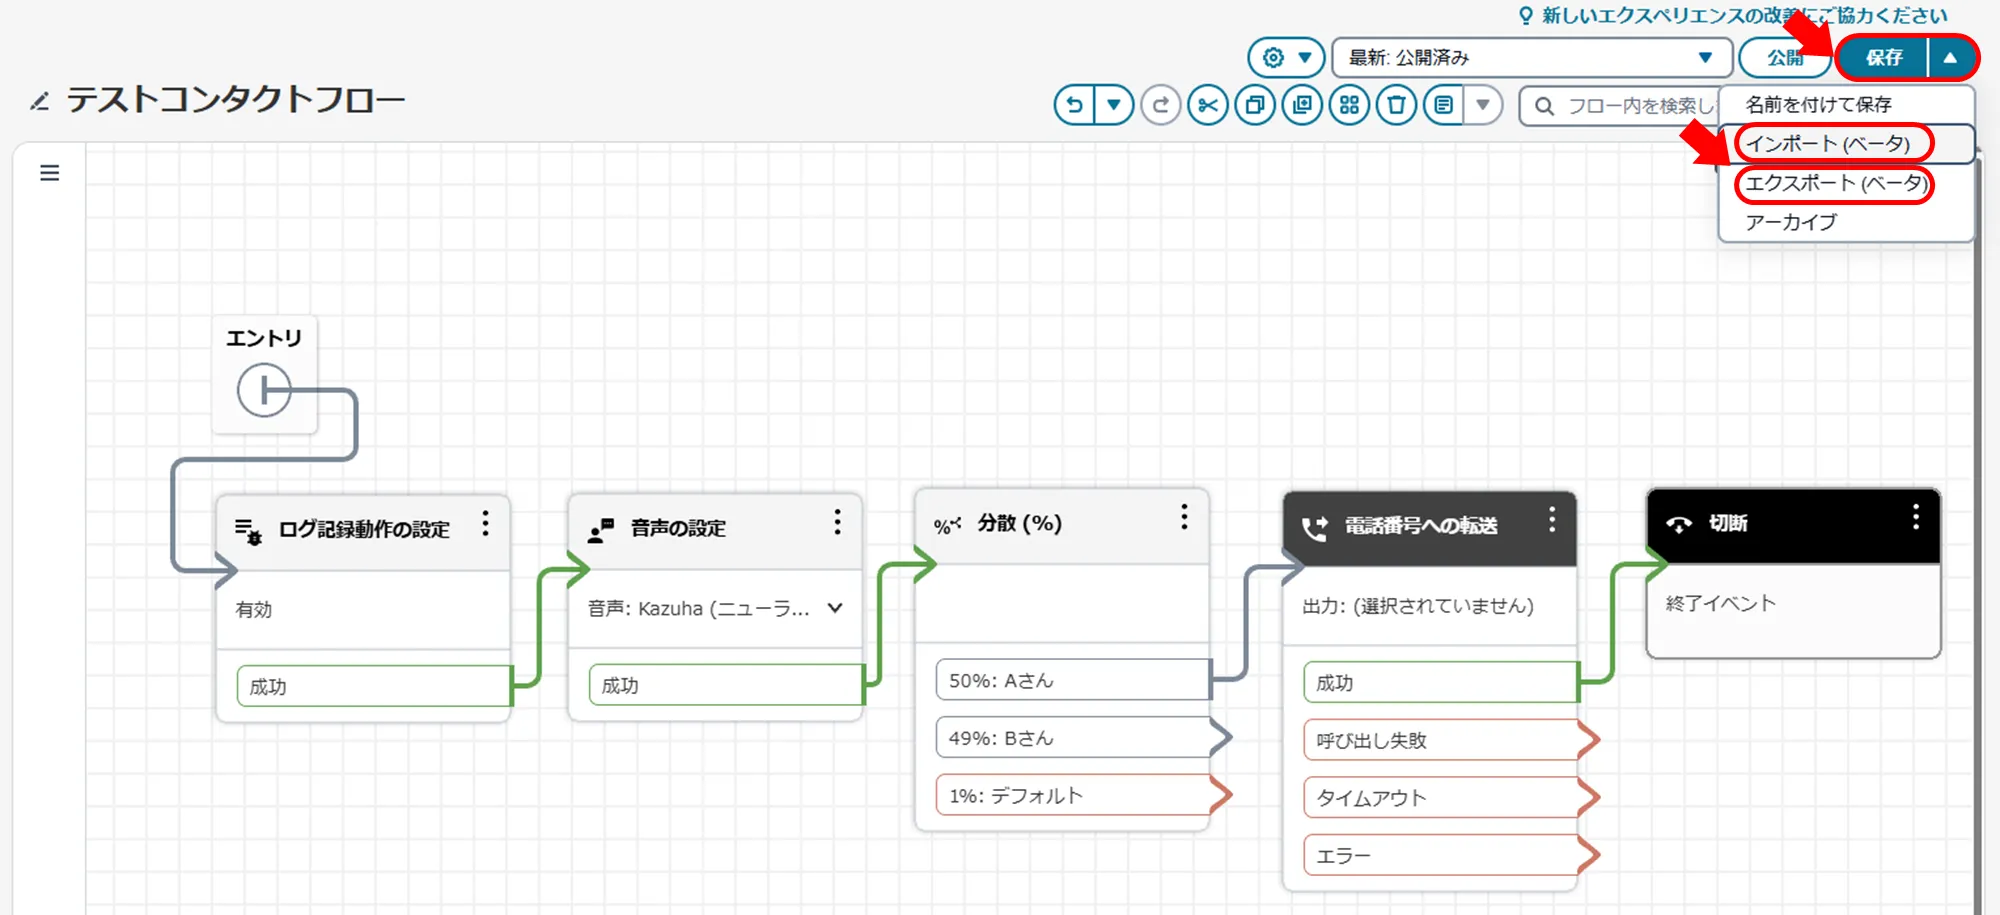
コンタクトフローの画面右上の保存のプルダウンを展開して、移管元インスタンスからエクスポートしてローカル端末にJSONファイルをダウンロードして、移管先インスタンスでインポートすることが移管できます。
数個のコンタクトフローであれば問題なく簡単にできますが、数十~百レベルのコンタクトフローの場合はヒューマンエラーが生じたり、腱鞘炎になっちゃいます💦
2. SDKによる自動化対応
Amazon ConnectではSDKも提供されており、スクリプト化による実施がもう一つの対応方針になります。基本的には下記の二つのAPIを活用していきます。
- DescribeContatactFlow(移管元AWSアカウントを向き先にて)
- CreateContactFlow, UpdateContactFlowModule(移管先AWSアカウントを向き先にて)
Amazon Connectインスタンス内のコンポーネントARN設計について
SDKでの実施に伴い、Amazon Connectインスタンス内のARN設計について整理します。AWS CLIでAmazon ConnectのキューのリストでARNを確認すると、キューの名前でARNが生成されるのではなくUUID形式で吐き出されていることが確認できます。他のAmazon ConnectのコンポーネントのHourOperation・ContactFlowなども同様になります。
※Lambdaなどの場合は、arn:aws:lambda:${AWS_REGION}:${AWS_ACCOUNT_ID}:${function_name}
$ aws connect list-queues --instance-id ${instance_id}
{
	"QueueSummaryList": [
		{
			"Id": "92b5a537-b185-4f30-9a7e-1c71770216ac",
			"Arn": "arn:aws:connect:ap-northeast-1:${AWS_ACCOUNT_ID}:instance/${INSTANCE_ID}/queue/92b5a537-b185-4f30-9a7e-1c71770216ac",
			"Name": "BasicQueue",
			"QueueType": "STANDARD",
			"LastModifiedTime": "2024-09-05T10:07:12.925000+09:00",
			"LastModifiedRegion": "ap-northeast-1"
		}
	]
}
そのため、インスタンスが変われば各Amazon ConnectのコンポーネントのARNがアカウントIDだけでなく末尾のリソース特定まで異なります。
Amazon Connectのコンタクトフローファイル設計について
先ほどのUIでエクスポートした(一部抽出した)JSONファイルを確認すると、下記のような構造をしております。ActionsMetaDataオブジェクトのKeyと、ActionsリストのIndentifierのValueで連携されている構造であることが分かります。
Queueに注目すると、{"ActionsMetadata": "${UUID}": {"queue"}}, {"Actions": [{"ParametersId": "QueueId}]になります。
{
    "Version": "2019-10-30",
    "StartAction": "3f04132d-3a01-4446-aea4-558a31ec8e21",
    "Metadata": {
        "entryPointPosition": {
            "x": 40,
            "y": 40
        },
        "ActionMetadata": {
		      "9bdf87bd-a3de-49a6-a627-c84266001dd9": {
		        "position": {
		          "x": 812,
		          "y": 258.4
		        },
		        "parameters": {
		          "QueueId": {
		            "displayName": "standardQueue"
		          }
		        },
		        "queue": {
		          "text": "standardQueue",
		          "id": "arn:aws:connect:AWS_REGION:AWS_ACCOUNT_ID:instance/INSTANCE_ID/queue/4768dcc0-3329-48f1-b32f-3514efbcca45"
		        }
		      },
        }
        "Annotations": []
    },
    "Actions": [
        {
		    "Identifier": "72a7f304-4767-4c25-a77f-80e382b1b914",
            "Type": "UpdateContactTargetQueue",
            "Parameters": {
                "QueueId": "4768dcc0-3329-48f1-b32f-3514efbcca45"
            },
            "Transitions": {
                "NextAction": "5611195c-442c-4ec3-adc9-cec6cb2c60f2",
                "Errors": [
                    {
                        "NextAction": "5611195c-442c-4ec3-adc9-cec6cb2c60f2",
                        "ErrorType": "NoMatchingError"
                    }
                ]
            }
        }
    ]
}
DescribeContactFlowを実施しても返っているアウトプットは、ContactFlowのContentで中身がstringで定義されているので自作すると下記のようなinterfaceになります。
export interface ContactFlowContent {
  Version: string;
  StartAction: string;
  Metadata: {
    entryPointPosition: {
      x: number;
      y: number;
    };
    ActionMetadata: {
      [key: string]: {
        position: {
          x: number;
          y: number;
        };
        children?: string[];
        fragments?: {
          [key: string]: string;
        };
        contactFlow?: {
          [key: string]: string;
        };
        conditionMetadata?: any;
        parameters?: any;
        promptName?: string;
        customerOrAgent?: boolean;
        dynamicParams?: [];
        overrideConsoleVoice?: boolean;
        overrideLanguageAttribute?: boolean;
        Annotaions?: any;
        queue?: {
          id?: string;
          text?: string;
        };
      };
    };
  };
  Actions: {
    Identifier: string;
    Type: string;
    Parameters: any;
    Transitions: {
      NextAction: string;
      Errors?: [
        {
          [key: string]: string;
        },
      ];
      Conditions?: [
        {
          [key: string]: string;
        },
      ];
    };
  }[];
}
したがって、AWSアカウント間で移行するときには次のステップを挟む必要があります。
移管元のインスタンスに対してやること(UIのエクスポートに当たる作業)
移管元のインスタンスに対して、DescribeAPIやListAPIでコンタクトフロー・キューやオペレーション時間のIdentifierを取得
import * from "@aws-sdk/client-connect"

async descriveContactFlow(
  instanceId: string,
  flowId: string,
): Promise<ContactFlowContent> {
  const cmd = new DescribeContactFlowCommand({
    InstanceId: instanceId,
    ContactFlowId: flowId,
  });

  const res = await this.connect.send(cmd);
  const flow = res.ContactFlow?.Content;

  if (!flow) {
    throw new Error("Contact flow is not defined");
  }

  return JSON.parse(flow);
}

// listHoursOfOperation関数は同様なので略
async listStandardQueues(instanceId: string): Promise<Array<QueueSummary>> {
  let queues: Array<QueueSummary> = [];
  let token = undefined;

  while (true) {
    console.log(token);
    const cmd = new ListQueuesCommand({
      InstanceId: instanceId,
      QueueTypes: [QueueType.STANDARD],
    });

    const res = await this.connect.send(cmd);
    queues = queues.concat(res.QueueSummaryList ?? []);
    token = res.NextToken;
    if (!token) {
      break;
    }
  }

  return queues;
 }

const [rawFlow, agentQueues, hoursOfOperations] = await Promise.all([
  this.aws.descriveContactFlow(instance.Id!, flow.Id!),
  this.aws.listStandardQueues(instance.Id!),
  this.aws.listHoursOfOperation(instance.Id!),
]);
取得したキューやオペレーション時間をMapに変更して、Arnを引数に引き出せるように整形。
const agentQueueMap = new Map(
	agentQueues.map((queue) => [queues.Arn, queue]),
);
移管先のコンタクトフローでもキューの名前から、取得したコンタクトフローからインスタンス固有のARNに変更できるようにregaxで変更を掛けます。
const UUID = "[0-9a-f]{8}-[0-9a-f]{4}-[0-5][0-9a-f]{3}-[089ab][0-9a-f]{3}-[0-9a-f]{12}";

export const AWSAccountIdRegExp = new RegExp(`:\d{12}:`, "g");
export const ConnectRefArnRegExp = new RegExp(
  `arn:aws:connect:.*:.*:instance/${UUID}/.*/${UUID}`,
  "g",
);
export const QueueArnRegExp = new RegExp(
  `arn:aws:connect:.*:.*:instance/${UUID}/queue/${UUID}`,
);
export const OperatingHoursArnRegExp = new RegExp(
  `arn:aws:connect:.*:.*:instance/${UUID}/operating-hours/${UUID}`,
);

const flowJsonStr = JSON.stringify(rawFlow, null, 4)
  .replaceAll(AWSAccountIdRegExp, AWS_ACCOUNT_ID_PLACEHOLDER)
  .replaceAll(ConnectRefArnRegExp, (arn) => {
    if (QueueArnRegExp.test(arn)) {
      const queue = agentQueueMap.get(arn)!;
      return `%queue/${queue.Name}%`;
    }
    if (OperatingHoursArnRegExp.test(arn)) {
      const hoo = hoursOfOperationMap.get(arn)!;
      return `%operating-hours/${hoo.Name}%`;
    }
    throw new Error(`Undefined connect arn found: ${arn}`);
  });
最後に、整形したコンタクトフローをローカル端末に出力させればエクスポート作業します。全コンタクトフローをループ化させれば、移管先に対しての準備ができたUIのエクスポート作業を自動化できたことになります。
移管先のスタンスに対してやること(UIのインポートに当たる作業)
移管元のインスタンスから各種情報を引き出して、コンタクトフローを移管先に当てる準備ができたので、下記の順番で実施していきます。
- 手元にコンタクトフローとコンタクトフローの中に登録されている移管先インスタンスのARNに対応予定のコンポーネント所持。
- 移管先のインスタンスの各種コンポーネントのARNを取得。
- 移管先のインスタンスに対して、所持しているコンタクトフローの値を置換。
基本的に1と2はエクスポート時の対応と同じ操作ですが、置換するにあたって今所持しているのはキューのARNではなく名前でMapを作成して名前から各種情報を引き出せるようにします。
const agentQueueMap = new Map(
  agentQueues.map((queue) => [queue.Name, queue]),
);
これで置換を掛けて、移管先のインスタンスにCreateContactFlowおよびUploadをすることでヒューマンエラーなどの運用ミスを考慮しないで移行完了できます。しかし、これだけでは無事に完了しないケースもあるので、そちらも紹介します。
★コンタクトフロー同士の依存性についてとその解消方法
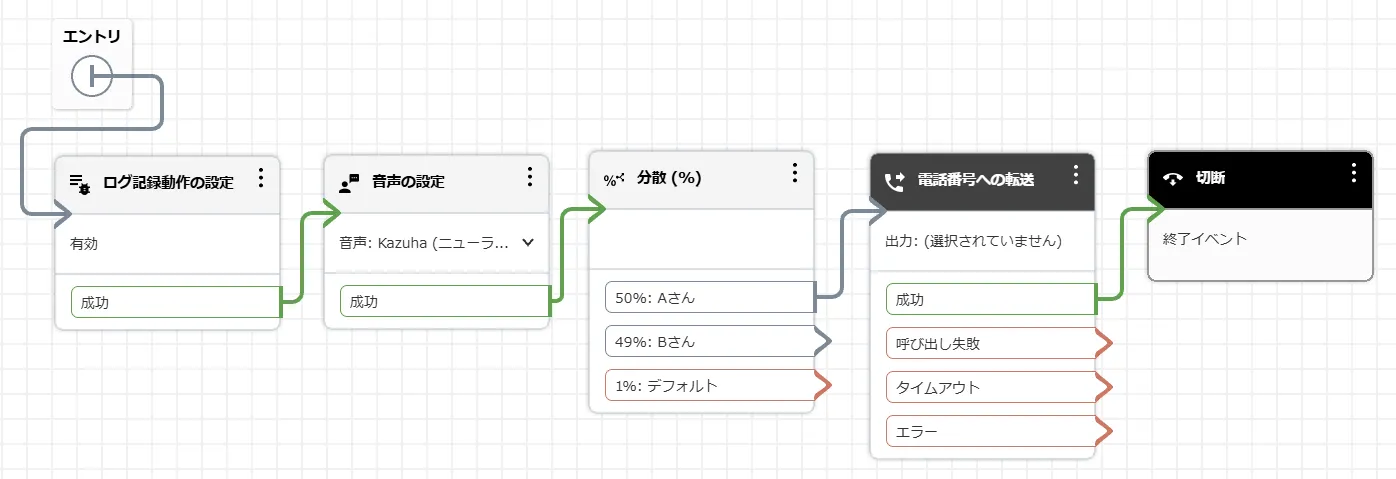
上述までの対応でAmazon Connectのコンタクトフローを移管元から移管先に移管ができます。しかし、コンタクトフローにはコンタクトフロー自身を参照する場面があります。

キャプチャの例では、時間外の場合は同一フローに誘導するパターンになります。その他にも、ケースとしてはIVRの分岐後に細かいコンタクトフローに誘導する場合などがあげられます。その場合、コンタクトフローを移管する場合、コンタクトフローを呼び出していないものから移管をすることで、移管の順番を考慮する必要があります。
各種IaCのリソースでも同じような事象と対策が取られていると想定されます。
対策としては、下記のように考えます。依存関係を基にソートをあらかじめ把握しておいてから終わったものから、記録用のリストに追加して入れていきます。

// dependence flow
const flowSet = new Set<string>();
const flowsInfo = await Promise.all(
  flows.map(async (flow) => {
    const rawFlow = await fs.readFile(flow, {
      encoding: "utf-8",
    });
    const references = rawFlow.match(ContactFlowRegExp);
    return {
      Name: path.basename(flow, ".json"),
      Type: path.basename(path.dirname(flow)) as ContactFlowType,
      Content: rawFlow,
      References: references
    }
}));

ol: for (let i = 0; i < flowsInfo.length; i++) {
  const flowContent = flowsInfo[i];
  const refs = flowContent.References;

  if (!refs) {
    flowSet.add(`%flow/${flowContent!.Name}%`);
    continue;
  }

  for (const reference of refs!) {
    const isBefore = flowSet.has(reference);
    if (!isBefore) {
      flowsInfo.splice(i, 1);
      flowsInfo.push(flowContent);
      i--;
      continue ol;
    }
  }
  flowSet.add(`%flow/${flowContent!.Name}%`);
}
これでコンタクトフロー間の依存関係も問題なく、移管元から移管先へ整理でき、自動化ができます。
最後に
最後までお読みいただきありがとうございました。本記事では、Amazon Connectのインスタンス間でコンタクトフローを自動移管する方法を紹介しました。
UIによる手動対応だけでなく、SDKを活用した自動化手法や、コンタクトフロー間の依存関係の解消方法まで解説しています。大量のフロー移管時のヒューマンエラー防止や効率化に役立つ内容となっていますので、ぜひ業務で活用いただければ幸いです。