はじめに
先月、「2019 年度 enPiT ビジネスシステムデザイン分野ワークショップ」に参加してきました。(私は「感情表現を付加した Web チャットシステム」のプロジェクトメンバーとして参加)
そこでプロトタイプを制作したので機能や実装方法も含めここに書き出していきたい思います。
https://enpit.coins.tsukuba.ac.jp/bizsysdws2019/
注意点
- PBL 終了後( 1 月終わり)に助っ人として参加
- 実装期間が 1 週間しかなかった
- いろいろゴリ押して実装している所多々あり
気になること多々あると思いますが、多めに見てください... 😇
書き方やその他のアドバイスなどあればお気軽にどうぞ!
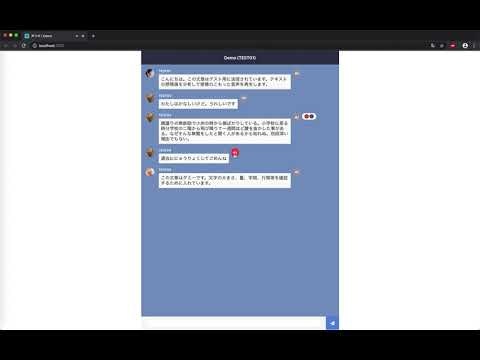
できたもの
せっかくなのでデモ動画をどうぞ 📺
https://youtu.be/wIenptbd71I
機能としては
1. ユーザー名を指定してログイン
2. 普通のテキストチャットのように文章を打ち込む
3. 右上の音声化ボタンをクリックすることによって感情が付与された音声が再生される(アイコン付き)
となっています
使用技術
クライアントサイド
サーバーサイド
チャット部分
React で UI 部分を作成し、テキストデータを Firebase Realtime Database に送るように実装しました。
こんな感じでゴリ押してます😅
function MessageInput(props) {
    const [value, setValue] = useState('');

    function setMessageForFirebase () {
        if (value !== '') {
            const sendData = {
                user: props.user,
                text: value,
                createdAt: new Date()
            };

            const newPostKey = props.database.ref().push().key;
            let updates = {};
            updates['/messages/' + newPostKey] = sendData;
            props.database.ref().update(updates);

            setValue('');
        }

        else {
            alert('文章を入力してください!');
        }
    }

    return (Object.keys(props.database).length)
        ? (
            <div className="MessageInput">
                <input className="MessageInput-input" type="text" value={value} onChange={(e) => { setValue(e.target.value) }} />
                <div className="MessageInput-button" onClick={() => setMessageForFirebase()}>
                    <FontAwesomeIcon icon={['fas', 'paper-plane']} />
                </div>
            </div>
        )
        : (<div />);
}
テキストの感情付与
チャットの吹き出し右上にある音声ボタンをクリックすると音声が再生されるように実装しました。
ボタンが押されると NestJS で実装した自作 API にテキストデータを送信します。
テキストデータは複数行にも対応できるようにし、「。」「?」「!」「.」で行が区切られると仮定しました。
「、」はまだ行が続いていることが多いと判断したため、区切らないようにしています。
// ローディング画面を表示
props.setIsLoading(true);

// 複数行や「。」に対応する
const splitTextArray = (props.message.text).split(/[。?!.]/);
if (splitTextArray[splitTextArray.length - 1] === "") {
    splitTextArray.pop();
}

const url = `http://localhost:3000/api`;
const res = await fetch(url, {
    method: 'POST',
    mode: 'cors',
    body: JSON.stringify(({ texts: splitTextArray })),
    headers: {
        'Content-Type': 'application/json'
    }
});
const data = await res.json();
感情の分類
次にメタデータ株式会社さんの「感情分析 API」と NTT コミュニケーション株式会社さんの「COTOHA API」を使用してテキストがどの感情を指しているかを決めます。
今回は音声を再生するときに使用する「VoiceTextWeb API」の仕様上、感情を表現できる
- 怒り
- 悲しみ
- 喜び
を感情の値として分類しました。
public async analysisForMetadataApi (text: string): Promise<any> {
    const res = await fetch(`http://ap.mextractr.net/ma9/emotion_analyzer?out=json&apikey=${this.metadataApikey}&text=${encodeURI(text)}`);
    const data = await res.json();

    // 感情値が取れなかった場合
    if (data.likedislike === 0 && data.joysad === 0 && data.angerfear === 0) {
        return 'none';
    }

    // まずは 3 軸のどれにするかを決める (VoiceText Api がこの 3 種類の感情から声を生成するため)
    // TODO: ゴリ押し
    let targetEmotion = 'happiness';
    let targetEmotionScore = data.likedislike;

    if (Math.abs(data.joysad) < Math.abs(data.angerfear)) {
        targetEmotion = 'anger';
        targetEmotionScore = data.angerfear;
    }

    if (Math.abs(data.likedislike) < Math.abs(data.joysad)) {
        targetEmotion = 'sadness';
        targetEmotionScore = data.joysad;
    }

    // 感情の値が負か正かを判別
    if (Math.sign(targetEmotionScore) === 1) {
        if (targetEmotion === 'sadness') {
            targetEmotion = 'happiness';
        }
    }

    else if (Math.sign(targetEmotionScore) === -1) {
        if (targetEmotion === 'happiness') {
            targetEmotion = 'sadness';
        }

        else if (targetEmotion === 'anger') {
            targetEmotion = 'sadness';
        }
    }

    return targetEmotion;
}

public async analysisForCotohaApi (text: string): Promise<any> {
    // アクセストークンを何度も取得する必要はない
    if (this.cotohaAccessToken === '') {
        const tokenUrl = `https://api.ce-cotoha.com/v1/oauth/accesstokens`;
        const tokenBody = {
            'grantType': 'client_credentials',
            'clientId': this.cotohaClientId,
            'clientSecret': this.cotohaClientSecret
        };

        const tokenRes = await fetch(tokenUrl, {
            method: 'POST',
            headers: { 'Content-Type': 'application/json;charset=UTF-8' },
            body: JSON.stringify(tokenBody)
        });

        const tokenJson = await tokenRes.json();
        this.cotohaAccessToken = await tokenJson.access_token;
    }

    const url = `https://api.ce-cotoha.com/api/dev/nlp/v1/sentiment`;
    const body = { 'sentence': text };

    const res = await fetch(url, {
        method: 'POST',
        headers: { 'Content-Type': 'application/json;charset=UTF-8',  'Authorization': `Bearer ${this.cotohaAccessToken}` },
        body: JSON.stringify(body)
    });

    const data = await res.json();

    if (data.status === 0) {
        const emotionData = data.result;

        // 感情分類値は 3 つ存在している
        switch (emotionData.sentiment) {
            case 'Positive':
                return 'happiness';

            case 'Negative':
                // 怒りか悲しみか判断する
                // とりあえず、「怒る」と「悲しい」の判別要素の個数で多い方を優先する
                const angryPhraseArray = emotionData.emotional_phrase.filter((e) => (e.emotion === '怒る'));
                const sadPhraseArray = emotionData.emotional_phrase.filter((e) => (e.emotion === '悲しい'));

                if (angryPhraseArray.length < sadPhraseArray.length) {
                    return 'sadness';
                }

                // 感情値の個数が同値だった場合は怒りを優先する
                else {
                    return 'anger';
                }

            case 'Neutral':
                return 'neutral';
        }
    }
}
メタデータ株式会社さんの API では感情の値が likedislike、joysad、angerfear の3つで値が返ってきます。それぞれ -3 から 3 の間で値が返ってくるので、今回は一番値が大きい感情値を使うことにしました。Math.abs() を使用することで絶対値が取れるので一番大きな値がわかります。
COHOTA API では感情の値が Positive と Negative で返ってきます。 Negative の場合は「怒り」と「悲しみ」を一発で判断できないので判別する処理を入れています。
ちなみに COTOHA API ではもう少し詳細に感情値が返ってくるのですが今回は割愛します…
たくさん機能があるので試しに使ってみるのはどうでしょうか。
感情の起伏
その後、感情の起伏がどのくらいあるのかを判別します。
今回は GCP の「Natural Language API」に判別をかけ、ポジネガの値の大きさで感情の起伏を判別しました。
公式から Node.js で Natural Language API を使用できるライブラリが出ていますのでそれを使いました。
Natural Language: Node.js Client
起伏の閾値は適当に決めています。
public async analysisForGoogleNaturalLanguageApi (text: string): Promise<any> {
    const client = new LanguageServiceClient;
    const document: any = {
        content: text,
        type: 'PLAIN_TEXT'
    };

    if (sentiment.score <= -0.75 || sentiment.score >= 0.75) {
        return '4';
    }

    else if (sentiment.score <= -0.5 || sentiment.score >= 0.5) {
        return '3';
    }

    else if (sentiment.score <= -0.25 || sentiment.score >= 0.25) {
        return '2';
    }

    else {
        return '1';
    }
}
テキストの音声化
VoiceTextWeb API を使用して音声化を行います。
パラメータに音声化したい文章と感情値と感情の起伏を入れて送信すると音声データが返ってきます。
最終的に音声データを base64 で使いたいので変換しておきます。
public async convertToVoice (data: any): Promise<any> {
    const url = `https://api.voicetext.jp/v1/tts`;
    const params = new URLSearchParams();
    params.append('text', data.text);
    params.append('speaker', 'hikari');
    params.append('emotion', (data.emotion !== 'neutral') ? data.emotion : '');
    params.append('emotion_level', data.emotionLevel);

    const res = await fetch(url, {
        method: 'POST',
        headers: { Authorization: "Basic " + new Buffer(`${this.voiceTextWebApiUserID}:${this.voiceTextWebApiPassword}`).toString("base64") },
        body: params
    });

    const buffer = await res.buffer();
    const base64 = buffer.toString('base64');

    return {
        emotion: data.emotion,
        base64: base64
    };
}
クライアントサイドに結果を返す
最終的にデータが集まったら感情値と音声データが入っている配列データとしてクライアントサイドに返してあげます。
public async mixTextToVoice(params: any): Promise<any> {
    const texts = params.texts;
    const analysisArray = [];
    const voiceDataArray = [];

    // 感情分析をかける (Google Natural Language API と メタデータ感情分析 API)
    for (const text of texts) {
        // 今回はメタデータさんの感情分析から一番感情のゆらぎが大きいものをその文章の感情として使用する
        let emotion = await this.analysisForMetadataApi(text);
        let emotionLevel = '';

        // メタデータさんの結果が微妙な場合
        if (emotion === 'none') {
            // COTOHA API
            emotion = await this.analysisForCotohaApi(text);
        }

        // COTOHA API でも結果が微妙な場合
        if (emotion === 'neutral') {
            emotion = '';
            emotionLevel = '';
        }

        // 感情の値が取れている場合は Google Natural Language API を使用する
        else {
            emotionLevel = await this.analysisForGoogleNaturalLanguageApi(text);
        }

        analysisArray.push({
            text: text,
            emotion: emotion,
            emotionLevel: emotionLevel
        });
    }

    // 分析したデータから音声化を行う
    for (const anaData of analysisArray) {
        const bufferVoiceData = await this.convertToVoice(anaData);
        voiceDataArray.push(bufferVoiceData);
    }

    return voiceDataArray;
}
結果を表示する
アイコンを表示する
感情値を表示してくれるコンポーネントを作成して表示します。
親コンポーネントから子コンポーネントにデータを受け渡して…
// 感情をアイコンで表示する
let emotionArray = [];
data.map((item) => emotionArray.push(item.emotion));
emotionArray = emotionArray.filter(function(x, i, self) {
    return self.indexOf(x) === i;
});
setEmotion(emotionArray);
子コンポーネントで表示します。
function MessageEmotion(props) {
    return (props.emotion.length) ?
        (
            <div className="MessageEmotion">
                {
                    props.emotion.map((v, i) => <EmotionComponent key={i} emotion={v} />)
                }
            </div>
        )
        : (<div />);
}

function EmotionComponent(props) {
    const componentArray = {
        'happiness': <FontAwesomeIcon className="MessageEmotion-child smile" icon={['fas', 'smile']} />,
        'anger': <FontAwesomeIcon className="MessageEmotion-child angry" icon={['fas', 'angry']} />,
        'sadness': <FontAwesomeIcon className="MessageEmotion-child sad" icon={['fas', 'sad-cry']} />,
        'neutral': <FontAwesomeIcon className="MessageEmotion-child meh" icon={['fas', 'meh']} />
    };

    return componentArray[props.emotion];
}
音声の再生
音声の再生は、文章の順に音声データが返ってくるため順に再生できるように実装しました。
Audio オブジェクトを作成して再生 します。音声再生終了後に呼ばれるイベントリスナーがあったので Promise オブジェクトを返すようにする ことで 音声が同時に再生してしまう問題を解消 しました。
個人的にこの辺の理解が甘くてハマってしまった…
// 音声を再生する
let audioPlayStateQueue = [];
for (const d of data) {
    audioPlayStateQueue.push(d.base64);
    const targetSoundBase64 = audioPlayStateQueue.pop();

    await new Promise((resolve) => {
        const sound = new Audio("data:audio/wav;base64," + targetSoundBase64);
        sound.play();
        sound.addEventListener('ended',async () => {
            await sleep(100);
            resolve();
        }, {once: true});
    });
}
感想
1 週間で制作したので結構ガタガタなコードになってしまいました…
NestJS の勉強も含めて制作したので思ったより時間がかかってしまったなあという印象です。
はやく express.js しかサーバーサイドのJSフレームワーク触れない人間やめたい
あと TypeScript、React もちゃんと勉強しないなあと思いました。
(TypeScript に関してはほとんど触ったことなかったので…)
個人的には結構面白いプロトタイプを作れたんじゃないかなあと思っているの機会があったらもう少し改良していきたいなあと考えてます。
まとめ
早く JavaScript つよつよ人間になりたいなあ 🥺