初めに
生産技術部で製品の検査工程を担当しているエンジニアです。AWS Well-Architected フレームワークの中から運用の優秀性を参考に、CodePipeline構築からデプロイまでのコード化を実施しましたので紹介します。
具体的な実装はGitHubを参照してください。
CodePipeline構築のIaC化
AWS CLIをシェルスクリプトから実行し、環境構築を行います。CodePipelineだけでなく、デプロイするために必要な鍵やパラメータ、CloudFormationのテンプレートやLambdaのコードを保存するためのS3バケット、ECRも作成します。パラメータ以外は、CloudFormationのテンプレートを利用して作成します。パラメータはセキュアな情報も含まれるため、ローカルに作成したパラメータの設定ファイルをAWS CLIでアップロードしています。
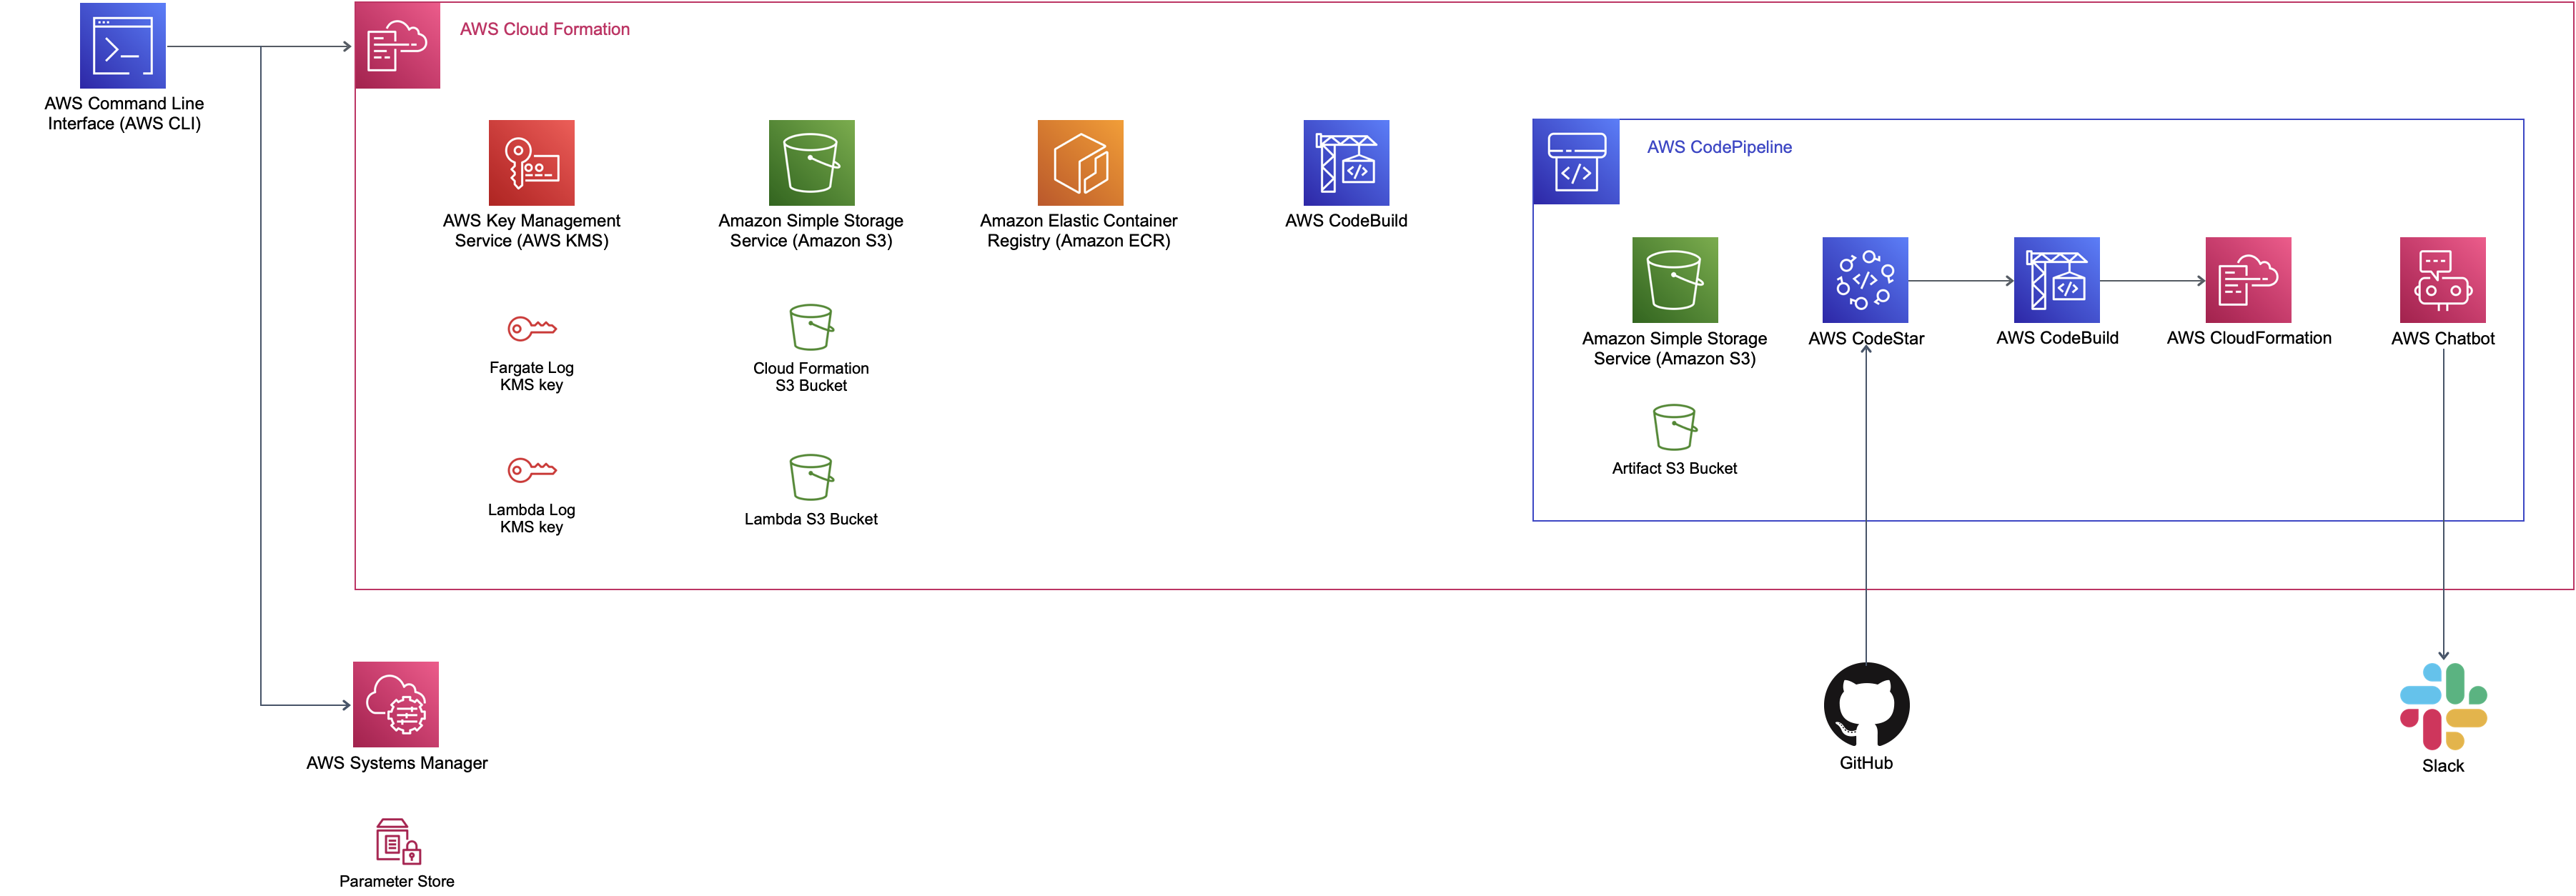
AWS CLIをラップしたcfn-stack-ops.shを用意し、手元からも簡単にAWS CLIが実行できるようにしています。ParameterStoreに保存したパラメータは、aws ssm get-parameterで取得し利用しています。開発環境でも本番環境でも利用できるように、鍵のエイリアス、パラメータ名、S3のバケット名、ECRのリポジトリ名にdevもしくはprodといったパーティションを付けて作成しました。例)/${DEPLOY_ENV}/s3/cfn/BucketName
#!/bin/sh

# Common settings
DEPLOY_ENV="dev" # set dev or prod

# Environment settings
SCRIPT_DIR=$(cd $(dirname $0); pwd)
WORK_DIR="${SCRIPT_DIR}/../.."
alias cfn-stack-ops="${WORK_DIR}/provisioning/helper-scripts/cfn-stack-ops.sh $1"

# KMS
# Create kms to encrypt/decrypt logs.
cfn-stack-ops deploy kms ${SCRIPT_DIR}/cfn/kms.yaml FargateLogKeyAliasName=alias/${DEPLOY_ENV}/fargate LambdaLogKeyAliasName=alias/${DEPLOY_ENV}/lambda

# SSM
# Create parameters.
# Need to set github connection id and slack workspace/channel ids in secrets/*.yaml, before create parameters.
${WORK_DIR}/provisioning/params/create-params-${DEPLOY_ENV}.sh

# S3
# Get s3 bucket name from ssm.
S3CfnBucketName=$(aws ssm get-parameter --name /${DEPLOY_ENV}/s3/cfn/BucketName --query "Parameter.Value" --output text)
S3LambdaBucketName=$(aws ssm get-parameter --name /${DEPLOY_ENV}/s3/lambda/BucketName --query "Parameter.Value" --output text)
# Create s3 buckets
cfn-stack-ops deploy s3 ${SCRIPT_DIR}/cfn/s3.yaml S3CfnBucketName=${S3CfnBucketName} S3LambdaBucketName=${S3LambdaBucketName}

# ECR
# Create repogitory in elastic container registory.
cfn-stack-ops deploy ecr ${SCRIPT_DIR}/cfn/ecr.yaml EcrRepogitoryName=${DEPLOY_ENV}-repogitory

# CodeBuild, CodePipeline
# Create codebuild and codepipeline.
cfn-stack-ops package ${WORK_DIR}/provisioning/pre-build/cfn/pre-build.yaml ${S3CfnBucketName} ${WORK_DIR}/provisioning/artifacts/pre-build-artifact.yaml
cfn-stack-ops deploy dev ${WORK_DIR}/provisioning/artifacts/pre-build-artifact.yaml
CloudFormationの操作用のAWS CLIは、以下のスクリプトにまとめています。(ボリュームも多く醜いので、golangなどで作ってみてもいいかもしれません。)
#!/bin/sh
# ref: https://www.slideshare.net/yktko/cloudformation-getting-started-with-yaml

mode=$1; shift
arg1=$1; shift
arg2=$1; shift
arg3=$1; shift
arg4=$1; shift
if [ "$mode" != "create" -a "$mode" != "update" -a "$mode" != "delete" -a "$mode" != "list" -a "$mode" != "describe" -a "$mode" != "validate" -a "$mode" != "package"  -a "$mode" != "deploy" ]; then
    echo ""
    echo "Usage: $0 MODE ARGS"
    echo ""
    echo "Mode:     Args:"
    echo "create    stack-name s3-bucket [param1=val1 param2=val2]"
    echo "update    stack-name s3-bucket [param1=val1 param2=val2]"
    echo "package   path-to-cfn-template-file s3-bucket output-template-file"
    echo "deploy    stack-name path-to-cfn-template-filee"
    echo "list      ";
    echo "describe  stack-name";
    echo "validate  s3-bucket"
    echo "delete    stack-name"; exit 1
fi

if [ "$mode" == "create" -o "$mode" == "update" ]; then
    param1=$(echo ${arg3} | perl -pe "s/([^= ]+)=([^ ]+)/--parameter-overrides \1=\2/g")
    param2=$(echo ${arg4} | perl -pe "s/([^= ]+)=([^ ]+)/\1=\2/g")
    args="--template-url https://s3.amazonaws.com/${arg2}/artifact.yaml --capabilities CAPABILITY_IAM --capabilities CAPABILITY_NAMED_IAM ${param1} ${param2}"
    stack_name_option="--stack-name ${arg1}"
    mode_option="${mode}-stack"
fi

if [ "$mode" == "package" ]; then
    args="--template-file ${arg1} --s3-bucket ${arg2} --output-template-file ${arg3}"
    stack_name_option=""
    mode_option="${mode}"
fi

if [ "$mode" == "deploy" ]; then
    param1=$(echo ${arg3} | perl -pe "s/([^= ]+)=([^ ]+)/--parameter-overrides \1=\2/g")
    param2=$(echo ${arg4} | perl -pe "s/([^= ]+)=([^ ]+)/\1=\2/g")
    args="--template-file ${arg2} --capabilities CAPABILITY_IAM --capabilities CAPABILITY_NAMED_IAM ${param1} ${param2}"
    stack_name_option="--stack-name ${arg1}"
    mode_option="${mode}"
fi

if [ "$mode" == "list" ]; then
    args="--stack-status-filter CREATE_COMPLETE"
    stack_name_option=""
    mode_option="${mode}-stacks"
fi

if [ "$mode" == "describe" ]; then
    args=""
    stack_name_option="--stack-name ${arg1}"
    mode_option="${mode}-stacks"
fi

if [ "$mode" = "validate" ]; then
    args="--template-url https://s3.amazonaws.com/${arg1}/artifact.yaml"
    stack_name_option=""
    mode_option="${mode}-template"
fi

if [ "$mode" = "delete" ]; then
    args=""
    stack_name_option="--stack-name ${arg1}"
    mode_option="${mode}-stack"
fi
cmd="aws cloudformation ${mode_option} ${stack_name_option} ${args}"
echo ${cmd}
eval ${cmd}
パラメータの保存
yamlファイルにパラメータを設定し、アップロードします。ParameterStoreのAWS CLIにもskeltonが用意されていますので、yamlファイルを自動で生成することができます。(jsonファイルも利用可能です。)
必要なパラメータごとにyamlファイルを作成し、設定を変更します。
Name: "/dev/name" # [REQUIRED] The fully qualified name of the parameter that you want to add to the system.
# Description: "" # Information about the parameter that you want to add to the system.
Value: "sample-value" # [REQUIRED] The parameter value that you want to add to the system.
Type: String # The type of parameter that you want to add to the system. Valid values are: String, StringList, SecureString.
# KeyId: "alias/aws/ssm" # The Key Management Service (KMS) ID that you want to use to encrypt a parameter.
# Overwrite: true # Overwrite an existing parameter.
# AllowedPattern: "" # A regular expression used to validate the parameter value.
# Tags: # Optional metadata that you assign to a resource.
#   - Key: "" # [REQUIRED] The name of the tag.
#     Value: "" # [REQUIRED] The value of the tag.
Tier: Standard # The parameter tier to assign to a parameter. Valid values are: Standard, Advanced, Intelligent-Tiering.
# Policies: "" # One or more policies to apply to a parameter.
# DataType: "" # The data type for a String parameter.
以下のスクリプトを実行し、スクリプトの保存されているフォルダ以下のdev-*.yamlファイルをすべてParameterStoreに保存します。
#!/bin/sh

for file in `\find . -name 'dev-*.yaml'`; do
    aws ssm put-parameter --cli-input-yaml file://${file}
done
デプロイのIaC化
デプロイのフェーズでは、CloudFormationで以下の構成を作成します。
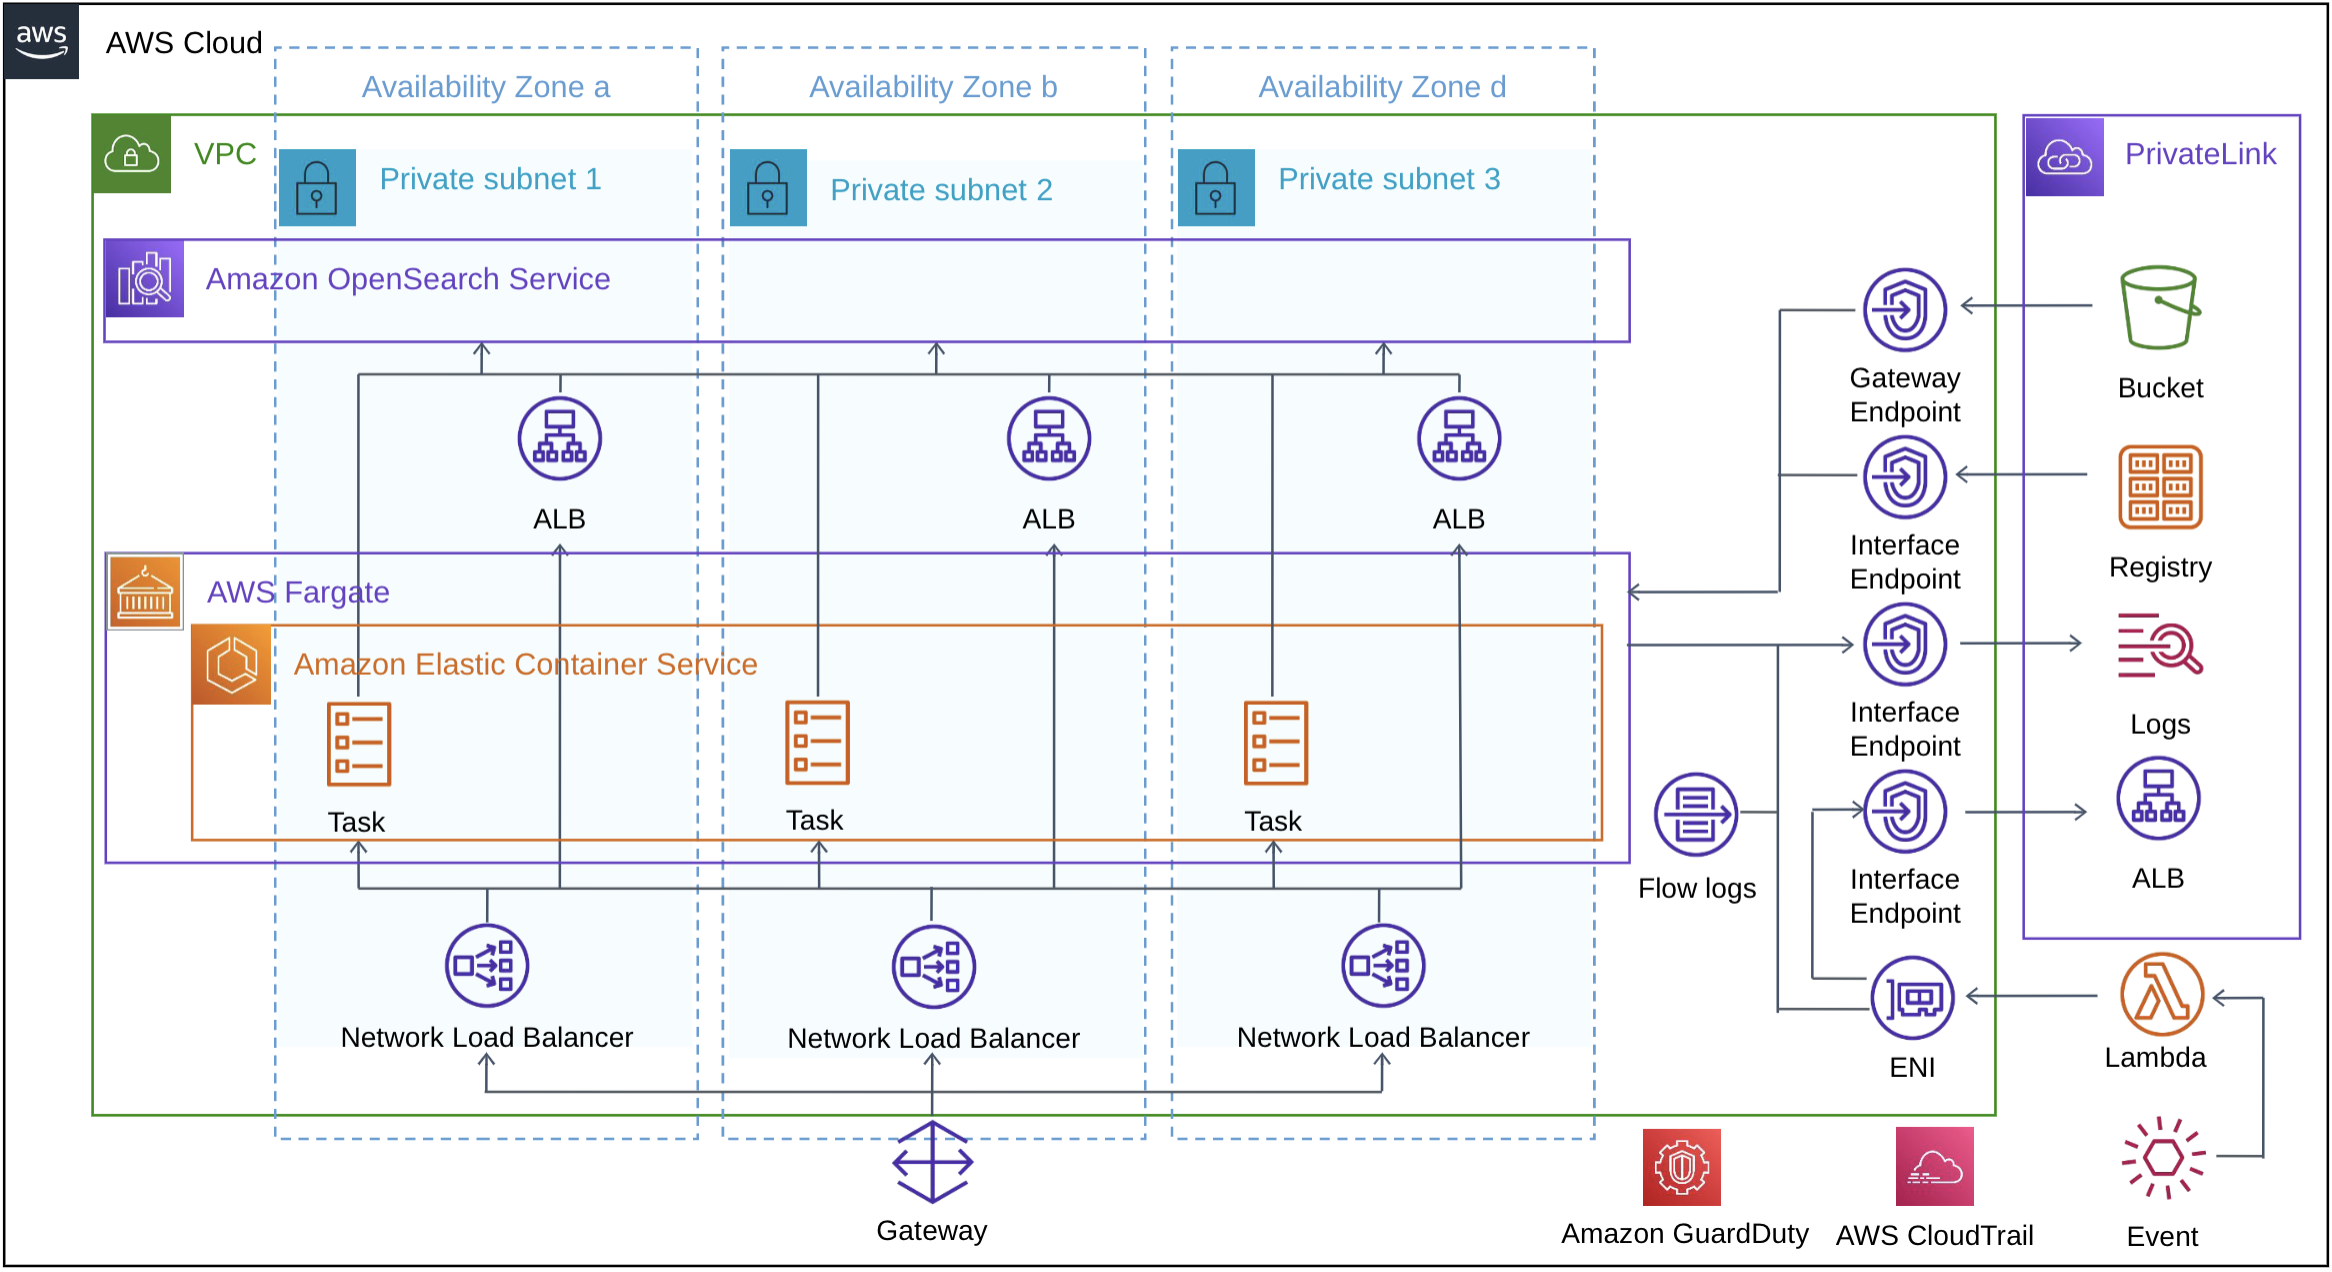
CloudFormationのネストされたスタックを利用し、ファイルを必要な単位に分割し管理します。Lambdaのコード、ECRに保存するイメージはあらかじめ保存しておく必要があるため、CodeBuildでデプロイします。
AWSTemplateFormatVersion: 2010-09-09
Description: Elastic Stack
# ------------------------------------------------------------------------------
# Parameters
# ------------------------------------------------------------------------------
Parameters:
  VpcCidrBlock:
    Type: String
    Default: 172.31.0.0/16
  PrivateIPv4Address1:
    Type: String
    Default: 172.31.0.100
  PrivateIPv4Address2:
    Type: String
    Default: 172.31.16.100
  PrivateIPv4Address3:
    Type: String
    Default: 172.31.32.100
  LogExpirationInDays:
    Type: String
    Default: 7
  DeployEnv:
    Type: String
    Default: dev

# ------------------------------------------------------------------------------
# Resources
# ------------------------------------------------------------------------------
Resources:
  Network:
    Type: AWS::CloudFormation::Stack
    Properties:
      TemplateURL: network.yaml
      Parameters:
        VpcCidrBlock: !Ref VpcCidrBlock
        LogExpirationInDays: !Ref LogExpirationInDays
  SecurityGroup:
    Type: AWS::CloudFormation::Stack
    Properties:
      TemplateURL: security-group.yaml
      Parameters:
        VpcId: !GetAtt Network.Outputs.VpcId
        VpcCidrBlock: !Ref VpcCidrBlock
        DeployEnv: !Ref DeployEnv
  SpringBoard:
    Type: AWS::CloudFormation::Stack
    DependsOn: Elb
    Properties:
      TemplateURL: ec2.yaml
      Parameters:
        KeyName: elastic-stack
        SubnetId: !GetAtt Network.Outputs.PublicSubnet1Id
        SecurityGroupId: !GetAtt SecurityGroup.Outputs.SecurityGroupId
  Opensearch:
    Type: AWS::CloudFormation::Stack
    DependsOn: Elb
    Properties:
      TemplateURL: opensearch.yaml
      Parameters:
        SubnetIds: !GetAtt Network.Outputs.PrivateSubnetIds
        SecurityGroupId: !GetAtt SecurityGroup.Outputs.OpenSearchSecurityGroupId
        InstanceType: t3.small.search
  VpcEndpoint:
    Type: AWS::CloudFormation::Stack
    DependsOn: Elb
    Properties:
      TemplateURL: vpc-endpoint.yaml
      Parameters:
        VpcId: !GetAtt Network.Outputs.VpcId
        SubnetIds: !GetAtt Network.Outputs.PrivateSubnetIds
        SecurityGroupId: !GetAtt SecurityGroup.Outputs.VpcEndpointSecurityGroupId
        PrivateRouteTableId: !GetAtt Network.Outputs.PrivateRouteTableId
  Lambda:
    Type: AWS::CloudFormation::Stack
    Properties:
      TemplateURL: lambda.yaml
      Parameters:
        SubnetIds: !GetAtt Network.Outputs.PrivateSubnetIds
        SecurityGroupId: !GetAtt SecurityGroup.Outputs.VpcEndpointSecurityGroupId
        DomainEndpoint: !GetAtt Opensearch.Outputs.DomainEndpoint
        AlbId: !GetAtt Elb.Outputs.AlbId
        AlbTargetGroupId: !GetAtt Elb.Outputs.AlbTargetGroupId
        LogExpirationInDays: !Ref LogExpirationInDays
        DeployEnv: !Ref DeployEnv
  LambdaForFargateSpot:
    Type: AWS::CloudFormation::Stack
    Properties:
      TemplateURL: lambda-for-fargate-spot.yaml
      Parameters:
        SubnetIds: !GetAtt Network.Outputs.PrivateSubnetIds
        SecurityGroupId: !GetAtt SecurityGroup.Outputs.VpcEndpointSecurityGroupId
        NlbId: !GetAtt Elb.Outputs.NlbId
        NlbTargetGroupId: !GetAtt Elb.Outputs.NlbTargetGroupId
        ClusterId: !GetAtt LogstashFargate.Outputs.ClusterId
        LogExpirationInDays: !Ref LogExpirationInDays
        DeployEnv: !Ref DeployEnv
  LogstashFargate:
    Type: AWS::CloudFormation::Stack
    DependsOn:
      - Opensearch
      - VpcEndpoint
    Properties:
      TemplateURL: logstash-fargate.yaml
      Parameters:
        VpcId: !GetAtt Network.Outputs.VpcId
        SubnetIds: !GetAtt Network.Outputs.PrivateSubnetIds
        SecurityGroupId: !GetAtt SecurityGroup.Outputs.FargateSecurityGroupId
        LbTargetGroupId: !GetAtt Elb.Outputs.NlbTargetGroupId
        LogExpirationInDays: !Ref LogExpirationInDays
        DeployEnv: !Ref DeployEnv
  Elb:
    Type: AWS::CloudFormation::Stack
    Properties:
      TemplateURL: elb.yaml
      Parameters:
        VpcId: !GetAtt Network.Outputs.VpcId
        SubnetIds: !GetAtt Network.Outputs.PrivateSubnetIds
        SecurityGroupId: !GetAtt SecurityGroup.Outputs.AlbSecurityGroupId
        PrivateIPv4Address1: !Ref PrivateIPv4Address1
        PrivateIPv4Address2: !Ref PrivateIPv4Address2
        PrivateIPv4Address3: !Ref PrivateIPv4Address3
        LogExpirationInDays: !Ref LogExpirationInDays
  GuardDuty:
    Type: AWS::CloudFormation::Stack
    Properties:
      TemplateURL: guard-duty.yaml
      Parameters:
        DeployEnv: !Ref DeployEnv

# ------------------------------------------------------------------------------
# Outputs
# ------------------------------------------------------------------------------
Outputs:
  VpcId:
    Value: !GetAtt Network.Outputs.VpcId
CodeBuildのIaC化
buildspecに設定しビルドします。CodeBuildでは、LinterでのCloudFormationの検証とLambdaとDockerのビルド、デプロイを実施し、CloudFormationテンプレートをS3にアップロードします。
pre_buildフェーズでは、以下の静的解析ツールを利用させていただいています。個人的には、セキュリティの知識がなく困っていたため、cfn nagに助けられました。Logが取れてない、暗号化されていない等、細かくチェックしてくれます。cfn lintはローカル環境のVSCodeにも導入しているため、逐一チェックしてくれて、無くてはならない存在でした。CloudFormation guardは使い始めたばかりで、まだ使い方がよくわかってないですが強力なツールだと思っています。
- cfn lint
https://github.com/aws-cloudformation/cfn-lint - cfn nag
https://github.com/stelligent/cfn_nag - cloudformation guard
https://github.com/aws-cloudformation/cloudformation-guard
buildフェーズでは、LambdaとDockerのビルド、デプロイ、CloudFormationのネストされたスタックのテンプレートをS3へのアップロードを行います。CodePipeline構築のIaC化で既に環境が整っているため、アップロードするだけで完了です。
post_buildフェーズでは、ネストされたスタックをアップロードした際に生成されたartifact.yamlをCloudFormation標準の静的解析を利用しチェックし、完了です。
version: 0.2

phases:
  install:
    on-failure: ABORT
    runtime-versions:
      golang: 1.14
      ruby: 2.7
    commands:
      - export ECR_URI=$(aws ecr describe-repositories --repository-names dev-repogitory --query 'repositories[].repositoryUri' --output text)
      - pip install cfn-lint
      - gem install cfn-nag
      - curl --proto '=https' --tlsv1.2 -sSf https://raw.githubusercontent.com/aws-cloudformation/cloudformation-guard/main/install-guard.sh | sh
      - export PATH="~/.guard/bin/:$PATH"
      - chmod +x ${CODEBUILD_SRC_DIR}/provisioning/build/lambda/build.sh
      - chmod +x ${CODEBUILD_SRC_DIR}/provisioning/build/ecs/deploy-container-image-to-ecr.sh
      - chmod +x ${CODEBUILD_SRC_DIR}/provisioning/helper-scripts/s3-ops.sh
      - chmod +x ${CODEBUILD_SRC_DIR}/provisioning/helper-scripts/cfn-stack-ops.sh

  pre_build:
    on-failure: ABORT
    commands:
      - cfn-lint -t ${CODEBUILD_SRC_DIR}/provisioning/build/cfn/*
      - cfn_nag_scan --input-path ${CODEBUILD_SRC_DIR}/provisioning/build/cfn/
      - cd ${CODEBUILD_SRC_DIR}/cfn-guard-rules
      - ./run-cfn-guard.sh

  build:
    on-failure: ABORT
    commands:
      - cd ${CODEBUILD_SRC_DIR}/provisioning/build/lambda
      - ./build.sh
      - ${CODEBUILD_SRC_DIR}/provisioning/helper-scripts/s3-ops.sh push ${S3_BUCKET_LAMBDA_NAME} populate-alb-tg-with-opensearch/populate-alb-tg-with-opensearch.zip
      - ${CODEBUILD_SRC_DIR}/provisioning/helper-scripts/s3-ops.sh push ${S3_BUCKET_LAMBDA_NAME} detach-task-to-be-terminated-from-nlb/detach-task-to-be-terminated-from-nlb.zip
      - cd ${CODEBUILD_SRC_DIR}/provisioning/build/ecs
      - ./deploy-container-image-to-ecr.sh
      - cd ${CODEBUILD_SRC_DIR}
      - ${CODEBUILD_SRC_DIR}/provisioning/helper-scripts/cfn-stack-ops.sh package provisioning/build/cfn/elastic-stack.yaml ${S3_BUCKET_CFN_NAME} artifact.yaml

  post_build:
    on-failure: ABORT
    commands:
      - ${CODEBUILD_SRC_DIR}/provisioning/helper-scripts/s3-ops.sh push ${S3_BUCKET_CFN_NAME} artifact.yaml
      - ${CODEBUILD_SRC_DIR}/provisioning/helper-scripts/cfn-stack-ops.sh validate ${S3_BUCKET_CFN_NAME}

artifacts:
  files:
    - artifact.yaml
Golangで作成したLambdaのコードをフォルダごとにビルドしzipで圧縮するスクリプトです。
AWS CLIを使ってデプロイします。
#!/bin/sh

for SERVICE in populate-alb-tg-with-opensearch detach-task-to-be-terminated-from-nlb;
do
  (cd ${SERVICE} ; GOOS=linux go build ${SERVICE}.go)
  (cd ${SERVICE} ; zip ${SERVICE}.zip ${SERVICE})
done
Docker ImageをビルドしECRにデプロイするスクリプトです。
#!/bin/sh

docker context use default

aws ecr get-login-password --region ${AWS_REGION}| docker login --username AWS --password-stdin ${ECR_URI}

for SERVICE in logstash ecs-searchdomain-sidecar;
do
  docker image build -t ${ECR_URI}:${SERVICE} ${SERVICE}/
  docker image push ${ECR_URI}:${SERVICE}
done
最後に
CodePipelineの環境構築から、デプロイまでをIaC化しました。社内で一人で構築を行っていますが、そのうち他の人に引き継ぐタイミングがあると思い、IaC化を行いました。醜いスクリプトなども多いですが、徐々に改善していけば良いと思っています。
AWS Well-Architected フレームワークの「運用をコードとして実行する」がひとまず完了しましたが、「障害を予想する」ができていない事などが課題として残っています。運用に使うスクリプトも十分に準備できていませんので、今後も改善し続けていきたいです。