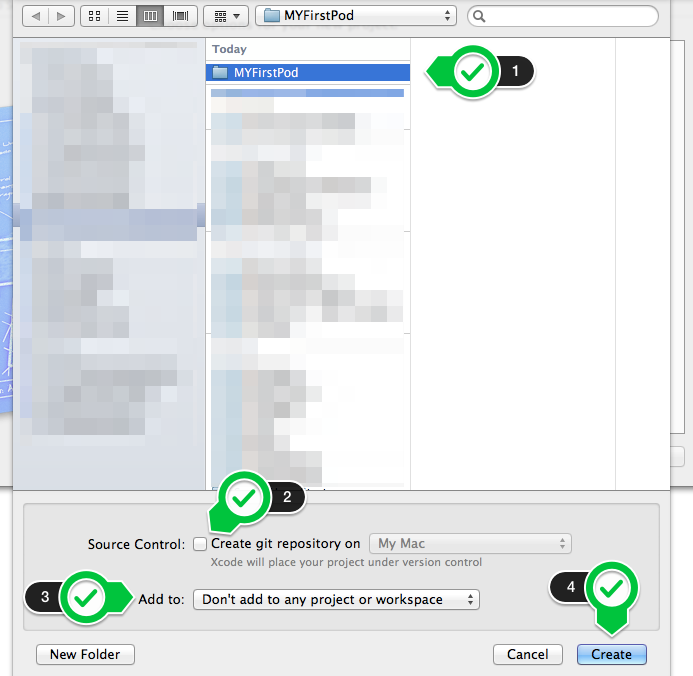
自作のライブラリ本体とそれを使うデモ用のプロジェクトをそれぞれ新規作成して、GitHubへInitial Commitするところまで説明しています。
ライブラリ本体用とデモ用プロジェクトのためのルートディレクトリを作る。
shell
$ mkdir MYFirstPod
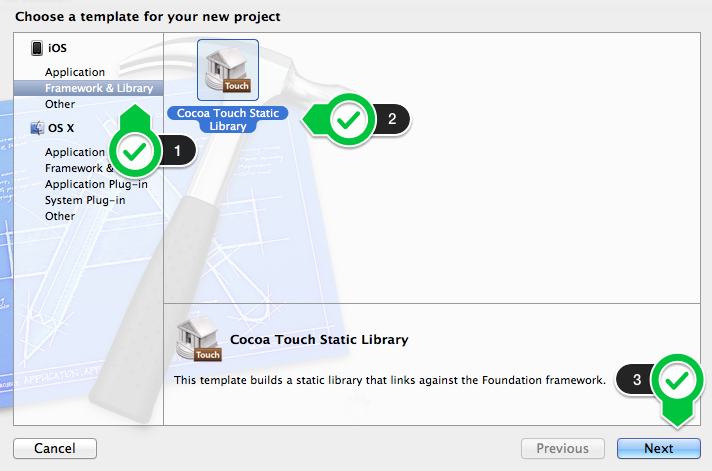
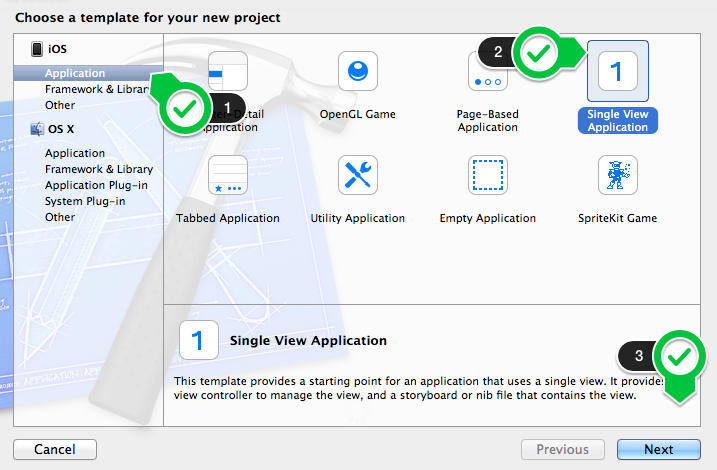
Xcodeでライブラリ本体用のプロジェクトを作成する。
- Xcode - File - New - Project
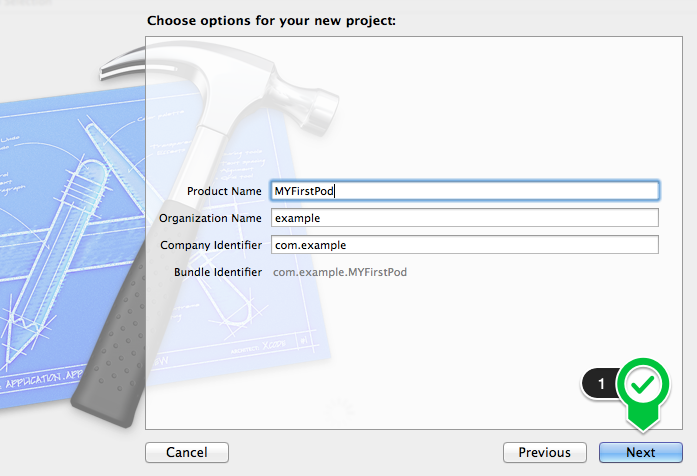
2. 「Product Name, Organization Name, Company Identifier」を入力する。
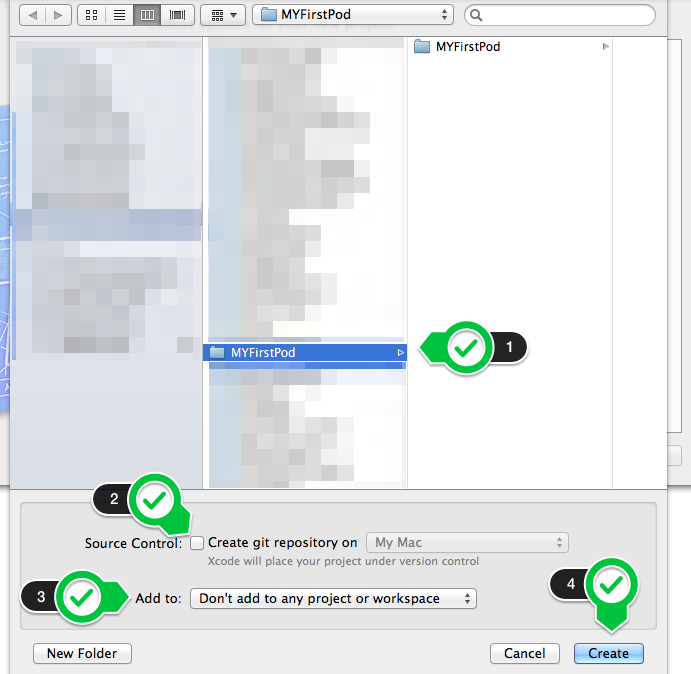
3. 上記で作成したルートディレクトリにライブラリ本体用のプロジェクトを作成する。
podspecファイルを作成・編集する。
shell
$ cd MYFirstPod
$ pod spec create MYFirstPod
$ vi MYFirstPod.podspec
$ pod lib lint
podspec作成時との差分を示します。
$ pod lib lintした時にERRORやWARNが表示される時は修正指示に従って適宜修正して下さい。
s.platformは対象とするiOSのバージョンを指定して下さい。
s.requires_arcはARCを使用する場合にtrueにして下さい。
diff --git a/MYFirstPod.podspec b/MYFirstPod.podspec
index 7e2ad26..82a120b 100644
--- a/MYFirstPod.podspec
+++ b/MYFirstPod.podspec
@@ -1,20 +1,4 @@
-#
-#  Be sure to run `pod spec lint MYFirstPod.podspec' to ensure this is a
-#  valid spec and to remove all comments including this before submitting the spec.
-#
-#  To learn more about Podspec attributes see http://docs.cocoapods.org/specification.html
-#  To see working Podspecs in the CocoaPods repo see https://github.com/CocoaPods/Specs/
-#
-
 Pod::Spec.new do |s|
-
-  # ―――  Spec Metadata  ―――――――――――――――――――――――――――――――――――――――――――――――――――――――――― #
-  #
-  #  These will help people to find your library, and whilst it
-  #  can feel like a chore to fill in it's definitely to your advantage. The
-  #  summary should be tweet-length, and the description more in depth.
-  #
-
   s.name         = "MYFirstPod"
   s.version      = "0.0.1"
   s.summary      = "A short description of MYFirstPod."
@@ -28,106 +12,20 @@ Pod::Spec.new do |s|
                    * Finally, don't worry about the indent, CocoaPods strips it!
                    DESC

-  s.homepage     = "http://EXAMPLE/MYFirstPod"
-  # s.screenshots  = "www.example.com/screenshots_1", "www.example.com/screenshots_2"
-
-
-  # ―――  Spec License  ――――――――――――――――――――――――――――――――――――――――――――――――――――――――――― #
-  #
-  #  Licensing your code is important. See http://choosealicense.com for more info.
-  #  CocoaPods will detect a license file if there is a named LICENSE*
-  #  Popular ones are 'MIT', 'BSD' and 'Apache License, Version 2.0'.
-  #
-
-  s.license      = 'MIT (example)'
-  # s.license      = { :type => 'MIT', :file => 'FILE_LICENSE' }
-
+  s.homepage     = "https://github.com/foobar/MYFirstPod"

-  # ――― Author Metadata  ――――――――――――――――――――――――――――――――――――――――――――――――――――――――― #
-  #
-  #  Specify the authors of the library, with email addresses. Email addresses
-  #  of the authors by using the SCM log. E.g. $ git log. If no email can be
-  #  found CocoaPods accept just the names.
-  #
+  s.license      = { :type => 'MIT', :file => 'LICENSE' }

   s.author       = { "foobar" => "foobar@example.com" }
-  # s.authors      = { "foobar" => "foobar@example.com", "other author" => "email@address.com" }
-  # s.author       = 'foobar', 'other author'
-
-
-  # ――― Platform Specifics ――――――――――――――――――――――――――――――――――――――――――――――――――――――― #
-  #
-  #  If this Pod runs only on iOS or OS X, then specify the platform and
-  #  the deployment target. You can optionally include the target after the platform.
-  #
-
-  # s.platform     = :ios
-  # s.platform     = :ios, '5.0'
-
-  #  When using multiple platforms
-  # s.ios.deployment_target = '5.0'
-  # s.osx.deployment_target = '10.7'
-
-
-  # ――― Source Location ―――――――――――――――――――――――――――――――――――――――――――――――――――――――――― #
-  #
-  #  Specify the location from where the source should be retrieved.
-  #  Supports git, hg, svn and HTTP.
-  #
-
-  s.source       = { :git => "http://EXAMPLE/MYFirstPod.git", :tag => "0.0.1" }
-
-
-  # ――― Source Code ―――――――――――――――――――――――――――――――――――――――――――――――――――――――――――――― #
-  #
-  #  CocoaPods is smart about how it include source code, for source files
-  #  giving a folder will include any h, m, mm, c & cpp files. For header
-  #  files it will include any header in the folder.
-  #  Not including the public_header_files will make all headers public.
-  #
-
-  s.source_files  = 'Classes', 'Classes/**/*.{h,m}'
-  s.exclude_files = 'Classes/Exclude'
-
-  # s.public_header_files = 'Classes/**/*.h'
-
-
-  # ――― Resources ―――――――――――――――――――――――――――――――――――――――――――――――――――――――――――――――― #
-  #
-  #  A list of resources included with the Pod. These are copied into the
-  #  target bundle with a build phase script. Anything else will be cleaned.
-  #  You can preserve files from being cleaned, please don't preserve
-  #  non-essential files like tests, examples and documentation.
-  #
-
-  # s.resource  = "icon.png"
-  # s.resources = "Resources/*.png"
-
-  # s.preserve_paths = "FilesToSave", "MoreFilesToSave"
-
-
-  # ――― Project Linking ―――――――――――――――――――――――――――――――――――――――――――――――――――――――――― #
-  #
-  #  Link your library with frameworks, or libraries. Libraries do not include
-  #  the lib prefix of their name.
-  #
-
-  # s.framework  = 'SomeFramework'
-  # s.frameworks = 'SomeFramework', 'AnotherFramework'
-
-  # s.library   = 'iconv'
-  # s.libraries = 'iconv', 'xml2'

+  s.platform     = :ios, '5.1'

-  # ――― Project Settings ――――――――――――――――――――――――――――――――――――――――――――――――――――――――― #
-  #
-  #  If your library depends on compiler flags you can set them in the xcconfig hash
-  #  where they will only apply to your library. If you depend on other Podspecs
-  #  you can include multiple dependencies to ensure it works.
+  s.source       = { :git => "https://github.com/foobar/MYFirstPod.git", :tag => "0.0.1" }

-  # s.requires_arc = true
+  s.source_files  = 'MYFirstPod/**/*.{h,m}'
+  s.exclude_files = 'MYFirstPod/**/*Tests.{h,m}'

-  # s.xcconfig = { 'HEADER_SEARCH_PATHS' => '$(SDKROOT)/usr/include/libxml2' }
-  # s.dependency 'JSONKit', '~> 1.4'

+  s.requires_arc = true
 end
Xcodeでライブラリのデモを行うプロジェクトを作成する。
- Xcode - File - New - Project
2. 「Product Name, Organization Name, Company Identifier」を入力する。
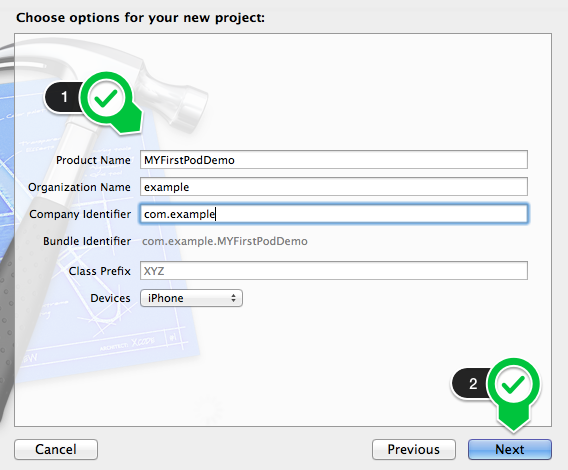
3. 上記で作成したルートディレクトリにライブラリのデモ用のプロジェクトを作成する。
MYFirstPod内のライブラリを使えるようにPodfileを修正する。
shell
$ cd MYFirstPod/MYFirstPodDemo
$ pod init
$ vi Podfile
$ pod install
Podfile
# Uncomment this line to define a global platform for your project
platform :ios, "5.1"

xcodeproj 'MYFirstPodDemo'
workspace 'MYFirstPodDemo'

pod 'MYFirstPod', :path => '..'
GitHubにInitial Commitする
shell
$ cd MYFirstPod
$ vi .gitignore
$ git add .
$ git commit -m "first commit"
$ git remote add origin git@github.com:foobar/MYFirstPod.git
$ git push -u origin master
.gitignore
# OS X
.DS_Store

# Xcode
build/
*.pbxuser
!default.pbxuser
*.mode1v3
!default.mode1v3
*.mode2v3
!default.mode2v3
*.perspectivev3
!default.perspectivev3
xcuserdata
*.xccheckout
profile
*.moved-aside
DerivedData
*.hmap
*.xccheckout

# CocoaPods
Pods
以上、Xcodeでのプロジェクト作成からGitHubへのInitialCommitするまでの説明でした。
