要約
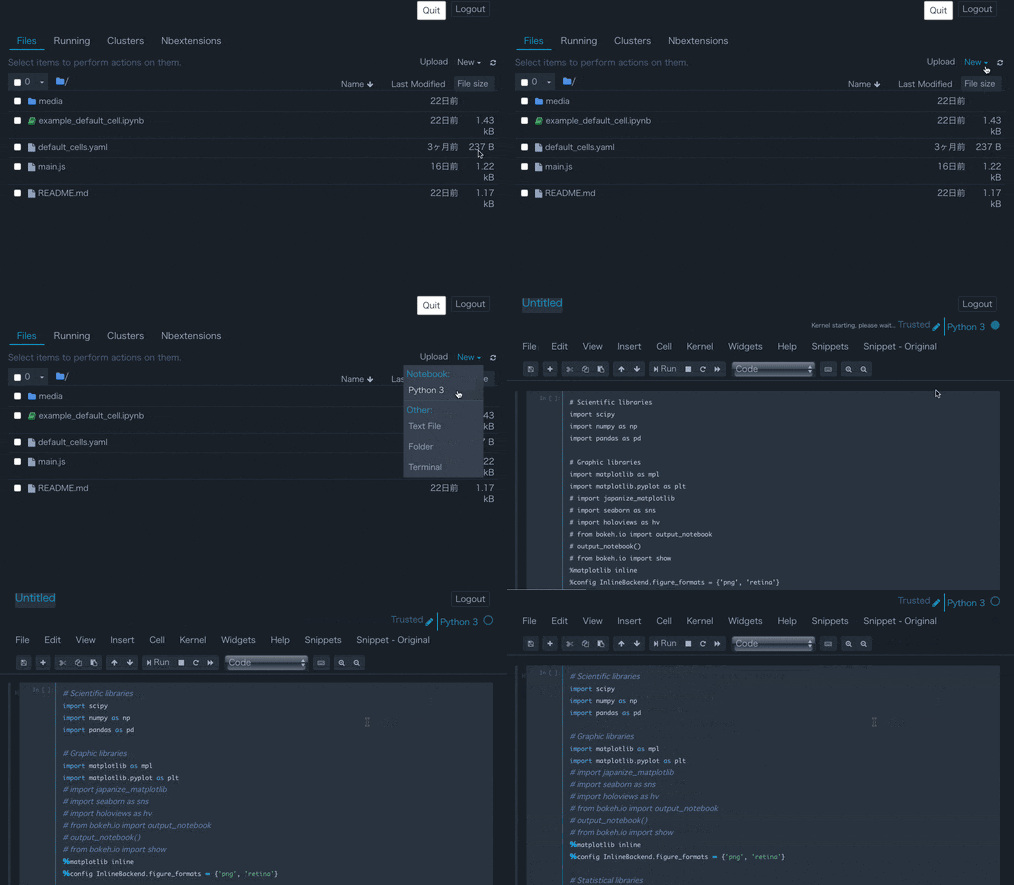
本記事では,Jupyter Notebookファイルを新規作成したときに,モジュールのimport文がコードされたセルを,自動で挿入する方法を紹介する.
Keywords: Jupyter Notebook, Python, default cell, startup cell.
注意
- 本記事では,Jupyter Notebook (以下,JupyterNB)を用いてPythonコードを書く場合にフォーカスしている.
- IPython, Jupyterおよびjupyter_contrib_nbextensionsの3つはすでに導入済みであることを前提とする.
- 筆者はMacユーザーなので,Macでの環境を例にする.
イントロダクション
JupyterNBは,対話的かつ部分的なコードの実行を可能とします.
この特徴から,JupyterNBは,プログラミングに慣れていない研究者が実験的にコードを書く時に重宝されています.
実際,筆者は実験系生物学者ですが,Pythonによる解析を行ううえで,JupyterNBも使っています.
本職のプログラマとは異なり,ある研究プロジェクトで用いる解析に関して,コードを書いては投げ,書いては投げする我々からすると,インポートするPythonのパッケージ群はかなり定型化されます.
たとえばmath, scipy, numpy, pandas, matplotlibは毎回インポートしますし,reやBio, statsmodelsなどの出現率も高いです.
JupyterNBのスタートアップ時に,これらを自動的にインポートできればとても便利です.
これを行う方法には,いくつか方法がありました.
-
ipython_config.pyを用いる -
jupyter_contrib_nbextensionsを用いる-
Snippets Menuを用いる -
Snippetsを用いる
-
1のipython_config.pyを用いる方法は,JupyterNBの立ち上げと同時にパッケージがインポートされるので,1行目から
df = pd.read_csv('./data.csv', header=0, index_col=0)
plt.scatter(x=df.iloc[:, 0], y=df.iloc[:, 1])
plt.show()
のように書き始めることが可能です.
しかし,この方法は,JupyterNBファイルを共有する場合に問題があります.
import pandas as pd
import numpy as np
import matplotlib.pyplot as plt
というimport文が無いため,同じ設定をipython_config.pyに行っていない環境で実行するとエラーが表示されるでしょう.
そもそも,そのコードがどういうモジュールを用いているかは,とても大事な情報で,明示的に記載されている必要があります.
一方,2のjupyter_contrib_nbextensionsを用いる方法は,import文をセルに明示的に記載できますが,新規JupyterNBファイルを作成した後,マニュアルで操作する必要があります.
そもそも,マニュアル操作をしたくないから始めたので,これでは意味がありません.
そこで本記事では,JupyterNBファイルを新規作成すると同時に,自動でモジュールのimport文が挿入されるエクステンションを作る方法を紹介します.
手順
1. jupyter_contrib_nbextensionsをインストールする
本記事では省略します.
ググるなりQiitaで検索するなりすれば,たくさん記事がでてきます.
2. nbextensionsのパスを調べる
筆者は/usr/local/share/jupyter/nbextensions/というパスに,自動挿入のエクステンションをいれています.
その他のパスを調べたいときは,
python -c "from jupyter_core.paths import jupyter_path; print(jupyter_path())"
というコマンドを打ってください.
でてきたディレクトリの中で,nbextensionsというディレクトリを含むものを選べばよいです.
たとえば共有サーバーを使っているならば~/Library/Jupyter/nbextensionsみたいなディレクトリが適しています.
3. エクステンションを作る
上記のディレクトリ内に,jupyterNB_startup_cellsというディレクトリを作りましょう.ついでに,エクステンションに必要なファイルも作っておきましょう;
cd "2で調べたパス"
mkdir jupyterNB_startup_cells
cd jupyterNB_startup_cells
touch README.md main.js jupyterNB_startup_cells.yaml
README.mdは空でも良いので,まずは心臓部のmain.jsを書きましょう.私の設定はこんな感じです;
define([
    'base/js/namespace'
], function(
    Jupyter
) {
    function load_ipython_extension() {
      if (Jupyter.notebook.get_cells().length===1){
        Jupyter.notebook.insert_cell_above('code', 0).set_text("\
import scipy\n\
import numpy as np\n\
import pandas as pd\n\
import matplotlib as mpl\n\
import matplotlib.pyplot as plt\n\
from matplotlib import rcParams\n\
# import seaborn as sns\n\
\n\
%matplotlib inline\n\
%config InlineBackend.figure_formats = {'png', 'retina'}\n\
%alias_magic t time\n\
\n\
# import re\n\
# import Bio\n\
# from datetime import datetime\n\
# import collections\n\
\n\
# import statsmodels.stats as stats\n\
# import statsmodels.stats.multicomp as multi\n\
# import statsmodels.formula.api as smf\n\
# import scikit_posthocs as sp");
      }
    }
    return {
        load_ipython_extension: load_ipython_extension
    };
});
もうひとつ,yamlもエクステンションを動かすために必要です;
Type: IPython Notebook Extension
Compatibility: 3.x, 4.x
Name: JupyterNB Startup Cells
Main: main.js
Link: README.md
Description: スタートアップ時にデフォルトでセルを挿入する
Parameters:
- none
4. エクステンションを有効化する
jupyter nbextension enable jupyterNB_startup_cells/main
拡張
セルを複数入れたいときは,以下のように,Jupyter.notebook.insert_cell_above('code', N)のNをインクリメントする.
define([
    'base/js/namespace'
], function(
    Jupyter
) {
    function load_ipython_extension() {
      if (Jupyter.notebook.get_cells().length===1){
        Jupyter.notebook.insert_cell_above('code', 0).set_text("\
import numpy as np");
        Jupyter.notebook.insert_cell_above('code', 1).set_text("\
import pandas as pd");
        Jupyter.notebook.insert_cell_above('code', 2).set_text("\
import matplotlib.pyplot as plt");
        // Jupyter.notebook.insert_cell_above('code', 3).set_text("\
// # import hogehoge");
        // ...
      }
    }
    return {
        load_ipython_extension: load_ipython_extension
    };
});
