Deep LearningのFrameworkである"Theano"であるが,正直かなり難しい.学習にあたって,本家Tutorialや(Qiitaにもあります)日本語解説を参考に取り組んできたが,なかなか理解が進まない.ここでは,再度,小さなコードを動かしながら,Theanoの基本を確認していく.(現時点での私の環境は,python 2.7.8,theano 0.7.0 になります.)
変数の使い方 - シンボリック変数と共有変数
Theanoでは,いわゆる変数を直接操作することはせず,シンボルで関係性を記述してそれを処理系に預け,処理系が必要に応じて加工した後に入出力を行う.この「加工」の中には,式の自動微分が含まれることは,Theanoの大きな特徴となっている.
まず,通常のシンボリック変数を使ってみる.
import theano
import theano.tensor as T

a = T.dscalar('a')
b = T.dscalar('b')

c = a + 2 * b

f_1 = theano.function([a,b], c)
ここまで入力して実行するとHDDががらがら音をたてて中間ファイルを生成している気配がしてくる.その後,定義した関数を実行する.
>>> f_1(2,3)
>>> array(8.0)
ここまでが,Theano シンボリック変数の使い方.いろいろある変数のタイプをTheanoドキュメントから抜粋し,リストする.
Theano Variables
| 変数タイプ | 使用可能な変数 |
|---|---|
| byte | bscalar, bvector, bmatrix, brow, bcol, btensor3, btensor4 |
| 16-bit integers | wscalar, wvector, wmatrix, wrow, wcol, wtensor3, wtensor4 |
| 32-bit integers | iscalar, ivector, imatrix, irow, icol, itensor3, itensor4 |
| 64-bit integers | lscalar, lvector, lmatrix, lrow, lcol, ltensor3, ltensor4 |
| float | fscalar, fvector, fmatrix, frow, fcol, ftensor3, ftensor4 |
| double | dscalar, dvector, dmatrix, drow, dcol, dtensor3, dtensor4 |
| complex | cscalar, cvector, cmatrix, crow, ccol, ctensor3, ctensor4 |
上記の通り,変数 %scalar, %vector の最初の1文字は変数のビット長を示している.これを省略するとディフォルト値の "float"でビット長(変数タイプ,dtype)は,floatX型(configurationで設定できる型)となる.
もう一つ,覚える必要があるのが共有変数(shared variable).シンボリック変数はどちらかと言うとTheanoで「閉じた」変数であるのに対し,共有変数は複数の関数から参照される変数で,学習パラメータのように都度,更新されるものに使用される.この共有変数を使ってみる.
w = theano.shared(np.zeros(10), name='w')
print w.get_value()
上記の通り,theano.shared(初期値, Theanoでのシンボル名) で定義する.また,通常のシンボリック変数とは異なり,共有変数(shared variable)は,"get_value()"でその変数の中身を取り出すことができる.(逆にいえば,共有変数でないシンボリック変数の値を取り出すには,その用途の関数を用意する必要となる.)
>>> print a    # Theano Symbol
>>> a          # I cannot see it

>>> print b    # Theano Symbol
>>> b          # I cannot see it...

>>> print w.get_value()    # Theano Shared Variable
>>>[ 0.  0.  0.  0.  0.  0.  0.  0.  0.  0.]
shared変数をコンストラクタで宣言する際,’borrow' 指定をするオプションがある.
s_default = theano.shared(np_array)   # ディフォルトは borrow=False
s_false   = theano.shared(np_array, borrow=False)
s_true    = theano.shared(np_array, borrow=True)
これはshared変数を生成する際にcopyを作らないオプションである.(元のnumpyオブジェクトが破棄される.)(今一つ理解できていないので,詳細は こちら を参照ください.)
Theanoの関数
Theanoの中で最も重要なところ.まず,いくつか書き方を引用してみる.(4つの文は,それぞれ無関係です.)
>>> f = theano.function([x], 2*x)
>>> predict = theano.function(inputs=[x], outputs=prediction,
          allow_input_downcast=True)
>>> linear_mix = theano.function([A, x, theano.Param(b, default=b_default)], [y, z])
>>> train = theano.function(
          inputs=[x,y],
          outputs=[prediction, xent],
          updates=((w, w - 0.1 * gw), (b, b - 0.1 * gb)),
          allow_input_downcast=True)
上記の通り,オプションのつけ方によっては長く記述されるのがtheano.function()である.
最も短い形式のものは,次の通り.
f = theano.function("入力", "出力")
で,複数の入力,出力に対してはListやtupleを使うことになる.(入力の指定には,scalar型変数一つでも,リスト形式とする必要があるようです.)
以下,ドキュメントの説明一部を転載する.
function.function(inputs, outputs, mode=None, updates=None, givens=None, no_default_updates=False, accept_inplace=False, name=None, rebuild_strict=True, allow_input_downcast=None, profile=None, on_unused_input='raise')
Parameters
- params : 入力値(必須, inputsのこと)
- outputs : 出力値(必須)
- mode
- updates
- givens
- no_default_updates
- name
- rebuild_strict
- allow_input_downcast
- profile
updatesは,最適化計算で行われるようなパラメータの更新で多用される.以下,updatesの使用例.
a = T.dscalar('a')
w2 = theano.shared(0.0, name='w2')
c = a + 2 * b + w2

f_3 = theano.function([a, b], c, updates=({w2: w2 + 1}))
# または f_3 = theano.function([a,b],c, updates=[(w2, w2 + 1)])

for i in range(5):
    print f_3(2, 3)

>>>
8.0
9.0
10.0
11.0
12.0
関数が呼ばれる度に,updatesの内容が反映されているのが確認できる.
givens は,変数に具体的な数値を代入するのに使用する.特に,共有変数(shared variable)をtheano関数にアサインするときに使用される.(共有変数をinputsで与えるとエラーとなります.)
w1 = T.dscalar('w1')
c = a + w1 * b
f_2a = theano.function([a, b], c, givens=[(w1, -2.0)])

print f_2a(2, 3)
>>> -4.0   # OK, c=a + w1 * b のw1に-2.0が代入されている.

# 共有変数をinputsで指定するとエラーが発生する.
w2 = theano.shared(-2.0, name='w2')         # w2 は shared variable
f_2b = theano.function([a, b, w2], c)       # 第1引数は inputs
---------------------------------------------------------------------------
. . .
TypeError: Cannot use a shared variable (w2) as explicit input. Consider substituting a non-shared variable via the `givens` parameter
allow_input_downcastは,厳格なTheano内の変数型管理でErrorが出る状況で,型管理を緩和し,エラーを回避するのに用いられる.
最小値の探索 ( T.grad() は使わずに )
ここまで見てきた機能で,関数の最小値を探索することをやってみたい.例として関数 $ y = (x-1)^4 $ で,xを変えながらyの変化量を監視し,変化が所定しきい値を下回るまで反復計算を行う,というCodeを実行してみた.
(微分値を使っていないので,勾配法ではない.)
x_init = -1.0
x = theano.shared(x_init, name='x')
y = T.dscalar('y')

y = (x - 1.) ** 4
# 関数 f_4() を定義.update で x の増分値を指定している.
f_4 = theano.function([], y, updates=({x: x + 0.01}))

# into loop
iter = 1000
y_prev = (x_init -1.1) ** 4
eps = 1.e-6
for i in range(iter):
    y_update = f_4()      #### Loop内で,f_4() 呼び出し.
    y_delta = np.abs(y_update - y_prev)

    if y_delta < eps:
        x_min = x.get_value()
        break
    y_prev = y_update

print 'x_min = ', x_min

>>> x_min =  0.98999995552
目論見通りに関数 $ y = (x-1)^4 $ の最小値を与える x_min を算定できている.theano function f_4 に対して明示的に x を入力していないが,updates オプションが正しく機能していることが分かる.
自動微分T.grad()を使ってみる
さていよいよtheanoの特長となっているT.grad()である.
x = T.dscalar('x')
y = (x - 4) * (x ** 2 * 2+ 6)    # 微分される数式

# yをxに関して微分
gy = T.grad(cost=y, wrt=x)

# 微分係数を求める関数を定義, 入力:x, 出力: gy
f = theano.function(inputs=[x], outputs=gy)
print theano.pp(f.maker.fgraph.outputs[0])
#
print f(0)
print f(1)
print f(2)
>>>
((TensorConstant{1.0} * (((x ** TensorConstant{2}) * TensorConstant{2}) + TensorConstant{6})) + ((((TensorConstant{1.0} * (x - TensorConstant{4})) * TensorConstant{2}) * TensorConstant{2}) * (x ** TensorConstant{1})))
6.0
-4.0
-2.0
上記の通り,print theano.pp(...) で与えられた数式を微分した結果を表示できる.また各x (=0, 1, 2) におけるy微分値も算定できている.一応,ドキュメントから指定できるパラメータを確認しておく.
theano.gradient.grad(cost, wrt, consider_constant=None, disconnected_inputs='raise', add_names=True, known_grads=None, return_disconnected='zero', null_gradients='raise')
Parameters:
- cost : 微分する対象の数式(必須)
- wrt : 微分係数(必須)
- consider_constant
- disconnected_inputs
- add_name
- known_grads
- return_disconnected
- null_gradients
cost と wrt が必須パラメータである.
勾配降下法(gradient descent)を実装する
必要な部品への理解が深まったので,勾配降下法を実装してみる.対象とした関数は,勾配法等のアルゴリズムのベンチマークで多用される(らしい)Rosenbrock関数である.
Fig. Rosenbrock Function
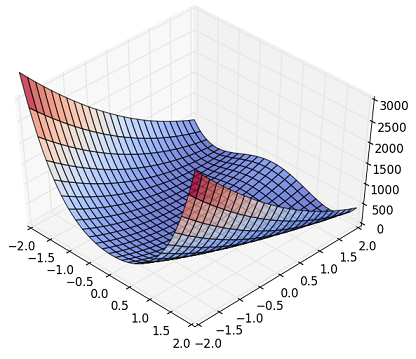
上の図ではわかりにくいが,円環状に溝があって,その周辺部を外れると急にZが立ち上がるという非線形性を持っている.(Wikipediaにきれいな図があるので,興味のある方は参照してください.)
数式は,次の通り.
f(x, y) = (a - x)^2 + b * (y - x^2)^2
\ \ \ \\usually \ a\ = 1,\ and\ b\ =100
この関数は,$(x, y) = (a, a^2)$ で $f=0.0$ の最小値(global minimum) を持つ.以下のコードを作成し実行した.
import numpy as np
import theano
import theano.tensor as T

    # Prep. variables and function
    x_init = np.array([2.0, 2.0])
    x = theano.shared(x_init, name='x')

    a, b = (1., 100.)
    # z_rb = (a - x) ** 2 + b * (y - x **2) **2
    z_rb = (a - x[0]) ** 2 + b * (x[1] - x[0] **2) **2

    dx = T.grad(cost=z_rb, wrt=x)

    # Compile
    train = theano.function(
          inputs=[],
          outputs=[z_rb],
          updates=[(x, x-0.001 *dx)]
          )
    # Train
    steps = 10000

    print '(x,y)_init = (%9.3f, %9.3f)' % (x_init[0], x_init[1])
    for i in range(steps):
        z_tmp = train()

    x_fin = x.get_value()
    print '(x,y)_final= (%9.3f, %9.3f)' % (x_fin[0], x_fin[1])

>>>
(x,y)_init = (    2.000,     2.000)
(x,y)_final= (    1.008,     1.016)
パラメータ(x, y)を長さ2のベクトルx[]にまとめている.初期値 x=[2.0, 2.0] からスタートし,理論解 (1, 1) に近い値を得ることができた.
x[] (x, y) の履歴をプロットしたのが下図になる.
Fig. Rosenbrock Function, contour
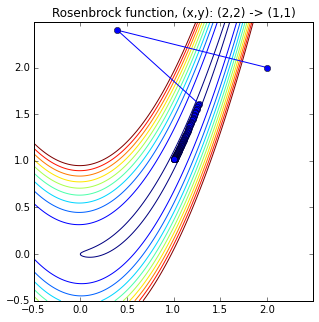
初めに(2., 2.)から大きく左に振られ,その後,円環状の溝部に落ちていく様子が分かる.(最初,初期値(3., 3.)で計算してみたところ,みごとに発散してしまいました... 因みに,Theanoを使わない,Numpy + scipy.optimize のコードは初期値(3., 3.)でも収束解を求めることができました.Theano使用の有無というより,最適解探索のアルゴリズムに関係していると思われます.)
ここまで理解できると,Theano Tutorialに出てくる参考コードの動きがかなり見えるようになる.(実際に,ロジスティック回帰の簡単なプログラムを作成して動かしてみたりしました.)最近は"Chainer"が人気で,「Theanoを学ぼう」という人は減ってきているのかもしれない.しかしながら,海外初のDeep Learning関連記事でTheanoを扱ったものはこれからも出てくるだろうし,MCMC実装ライブラリのPyMC3もTheanoベースだったりするので,Theanoの理解を深めることは大切ではないかと考えている.
参考文献 (web site)
- Theano Documentation
http://deeplearning.net/software/theano/#documentation - [Qiita]Theanoの基本メモ
http://qiita.com/mokemokechicken/items/3fbf6af714c1f66f99e9 - Theanoによる2クラスロジスティック回帰の実装,人工知能に関する断創録
http://aidiary.hatenablog.com/entry/20150519/1432038633 - SciPy Optimizationドキュメント
http://docs.scipy.org/doc/scipy/reference/tutorial/optimize.html - Wikipedia, Rosenbrock function
https://en.wikipedia.org/wiki/Rosenbrock_function