この記事はプログラミング学習者がアプリ開発中に躓いた内容を備忘録として記事におこしたものです。内容に不備などあればご指摘頂けると助かります。
記事投稿の背景
Xのクローンサイトを制作している中で通知機能の実装に苦戦していました。この記事では実装内容や実装中に気付いたことなどを共有したいと思います。
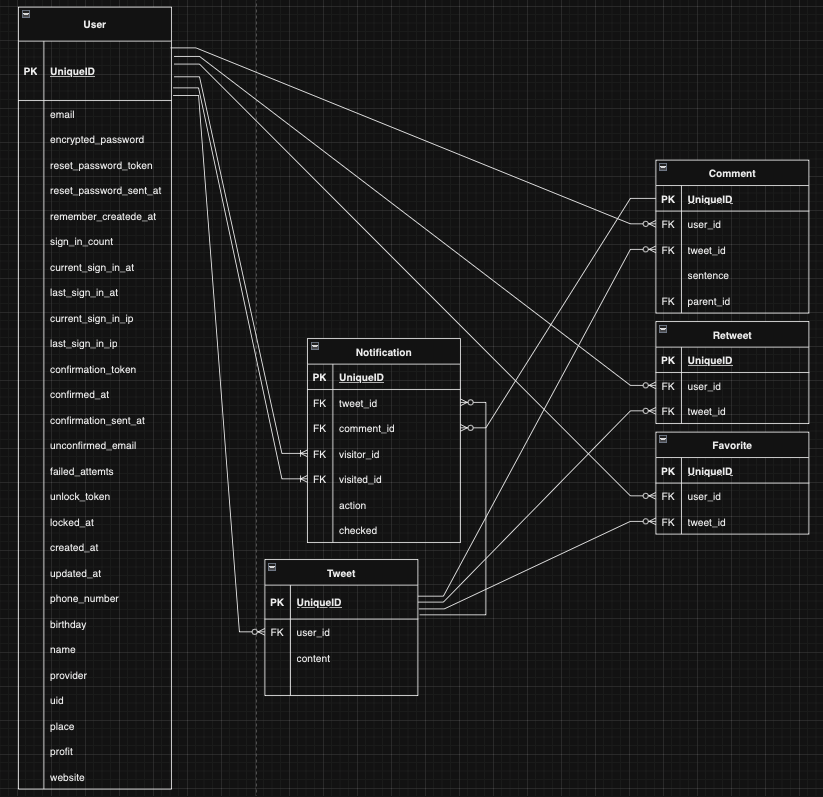
実装時のER図
通知機能についてモデルの概要
通知モデル(Notificationモデル)のテーブル内容は以下の通りです。
| visitor_id | visited_id | tweet_id | comment_id | action | checked |
|---|---|---|---|---|---|
| 1 | 2 | nil | nil | follow | false |
| 1 | 2 | 3 | nil | favorite | false |
| 1 | 2 | 3 | nil | retweet | false |
| 1 | 2 | 3 | 4 | comment | false |
※数字は仮のidです。
- visitor_id 通知を送るユーザーのid
- visited_id 通知を受け取るユーザーのid
- tweet_id favorite, retweet, commentアクション対象の投稿文のid
- comment_id commentアクション対象のコメント文のid
- action follow, favorite, retweet, commentアクションのいずれか
- checked 通知を受け取ったユーザーが該当の通知を確認したかどうか true or false
tweet_idとcomment_idではアクションによってはidが入らないので、nilを許容する設定にしています。
※notification.rbのoptional: trueがこれに当たります。
通知モデルの作成
rails g model Notification
class CreateNotifications < ActiveRecord::Migration[7.0]
  def change
    create_table :notifications do |t|
      t.integer :visitor_id, null: false
      t.integer :visited_id, null: false
      t.integer :tweet_id
      t.integer :comment_id
      t.string :action, default: '', null: false
      t.boolean :checked, default: false, null: false

      t.timestamps
    end

    add_index :notifications, :visitor_id
    add_index :notifications, :visited_id
    add_index :notifications, :tweet_id
    add_index :notifications, :comment_id
  end
end
前述の通り、tweet_idとcomment_idではnilを許容しているので、null: falseのオプションは付けていません。
rails db:migrate
実装時のコード
  has_many :notifications, dependent: :destroy

  def check_notification(current_user, action)
    temp = current_user.active_notifications.where(visited_id: user_id, tweet_id: id, action:)
    temp.present?
  end

  def create_notification!(current_user, action, user_id:, comment_id: nil)
    # いいね、若しくはリツイートされている場合は処理を終了する
    return if check_notification(current_user, action) && action == %w[favorite retweet]

    notification = current_user.active_notifications.new(
      tweet_id: id,
      visited_id: user_id,
      comment_id:,
      action:,
      # 自分の投稿に対するいいね、リツイート、コメントの場合は通知済みとする
      checked: current_user.id == user_id
    )
    notification.save if notification.valid?
    NotificationMailer.send_notification(notification, User.find(user_id), current_user).deliver_now
  end

  def create_notification_comment!(current_user, comment_id)
    # 自分以外にコメントしている人を全て取得して、全員に通知を送る
    temp_ids = Comment.select(:user_id).where(tweet_id: id).where.not(user_id: current_user.id).distinct
    temp_ids.each do |temp_id|
      create_notification!(current_user, 'comment', user_id: temp_id['user_id'], comment_id:)
    end
    # まだ誰もコメントしていない場合は投稿者に通知を送る
    create_notification!(current_user, 'comment', user_id:, comment_id:) if temp_ids.blank?
  end
- 冒頭のcheck_notificationメソッドでは通知作成前に同じ相手、同じ投稿id、同じアクションで既に通知が作成されていないかを確認しています。既に通知が存在してアクションがfavoriteかretweetの場合、新たに通知作成の必要がないのでメソッドを終了させるように
returnを入れています。アクションがcommentの場合、同じ投稿に対して複数回コメントをすることも考えられるので強制終了の対象から外しています。
また、件のメソッドについて当初は以下の内容でした。
この内容でも機能しますので、問題はありません。
temp = Notification.where(["visitor_id = ? and visited_id = ? and post_id = ? and action = ? ", current_user.id, user_id, id, 'like'])
最終的にリファクタリングを通して下記の内容に書き換えました。
temp = current_user.active_notifications.where(visited_id: user_id, tweet_id: id, action:)
変更後のメリットとして2つ挙げられます。
1、配列からハッシュに形式を変えたので、処理速度が上昇しました。
2、ハッシュ形式の方がコードが短くなり、可読性が上がりました。
変更前はプレースホルダを使うことでSQLインジェクションを防いでいました。
実はハッシュでも同じようにSQLインジェクションを防げるのでデメリットにはなりません。
- Notificatonオブジェクトを作成する所で
checked: current_user.id == user_idとすることで条件が成立するかどうかでtrueかfalseが入るboolean型としています。 - モデル内で定義したメソッドの引数に
current_userメソッドを渡しています。deviseを導入していればcurrent_userはどこでも使えるはず、と勝手に思っていたら、ViewとControllerでしか直接呼び出しできないことが分かりました。Model内部で使用したい場合、Controllerなどから引数として渡してあげる必要があります。 -
create_notification_comment!は他の通知メソッドとロジックが異なります。ローカル変数のtemp_idsにコメントしようとしている投稿に既に投稿しているユーザーのidを重複無しで代入します(※ログインユーザーは除く)。each文を使って取得したuser_idそれぞれに対して通知データを作成・送付します。コメント時点でまだ誰もコメントしていない場合は投稿者に通知を送ります。
has_many :notifications, dependent: :destroy
# デフォルトの並び順を作成日時の降順(新しいものから取得)
default_scope -> { order(created_at: :desc) }
# optional: trueでカラム内のnilを許容する
belongs_to :tweet, optional: true
belongs_to :comment, optional: true

belongs_to :visitor, class_name: 'User', optional: true
belongs_to :visited, class_name: 'User', optional: true
  # 自分からの通知
  has_many :active_notifications, class_name: 'Notification', foreign_key: 'visitor_id', dependent: :destroy,
                                  inverse_of: :visitor
  # 相手からの通知
  has_many :passive_notifications, class_name: 'Notification', foreign_key: 'visited_id', dependent: :destroy,
                                   inverse_of: :visited
  def create_notification_follow!(current_user)
    temp = current_user.active_notifications.where(visited_id: id, action: 'follow')
    return if temp.present?

    notification = current_user.active_notifications.new(
      visited_id: id,
      action: 'follow'
    )
    # 自分で自分のフォローはしない・できないので、current_user.id == user_idの判別は不要
    notification.save if notification.valid?
    NotificationMailer.send_notification(notification, User.find(id), current_user).deliver_now
  end
- NotificationモデルとUserモデルのアソシエーションを考える時にNotificationモデル側からですと
Notification belongs_to :userとなるのですが、Notification(通知)を送る際にUserモデルは2種類が考えられます。通知が送られる時はfavorites, retweets, comments, followsの4アクションのどれかが動くわけですが、どのアクションも動作をするユーザーとそれを受けるユーザーの2種類が存在します。その点をclass_nameオプションを使ってvisitor(User) - 動作をする側とvisited(User) - 動作を受け取る側で分けて表現しています。また、Userモデルから見た場合もNotificationモデルは2種類考えられます。active_notification(Notification) - 自分からの通知とpassive_notification(Notification) - 相手からの通知となります。 -
inverse_ofはforeign_keyオプションやclass_nameオプションを使うことで相互のモデル間で関連が曖昧になっている部分をRailsに正しく認識させて無駄なクエリを発生させたりしないように、また関連を考慮したデータ保存ができるようにすることができます。これにより、2つのモデル間でデータベースへの不要なアクセスを防ぎ、パフォーマンスを向上させることができます。ちなみにinverse_ofは必須ではなく、使用しなくても同様の機能を動かすことができます。 -
default_scope -> { order(created_at: :desc) }の部分でデフォルトのデータの順番を作成日時で降順としています。これは日付が新しいデータが最初にきて日付が徐々に古くなっていく順番となります。
以下のコードではモデル内で定義した通知機能を各コントローラー内で呼び出しています。
  def create
    # buildメソッドはnewメソッドと違い関連付けたインスタンスを生成できる
    @favorite = current_user.favorites.build(tweet_id: params[:tweet_id])
    tweet = Tweet.find(params[:tweet_id])
    if @favorite.save
      # 通知機能を呼び出し
      tweet.create_notification!(current_user, 'favorite', user_id: tweet.user.id)
      redirect_to home_index_path
    else
      redirect_to home_index_path, alert: 'お気に入りの保存に失敗しました。'
    end
  end
  def create
    # buildメソッドはnewとは異なり、関連づけられたインスタンスを作成できる
    @retweet = current_user.retweets.build(tweet_id: params[:tweet_id])
    tweet = Tweet.find(params[:tweet_id])
    if @retweet.save
      # 通知機能を呼び出し
      tweet.create_notification!(current_user, 'retweet', user_id: tweet.user.id)
      redirect_to home_index_path
    else
      redirect_to home_index_path, alert: 'リポストに失敗しました。'
    end
  end
create_notification!メソッドはfavorites_controllerとretweets_controllerで共用しています。
  def create
    @comment = Comment.new(comment_params)
    @comment.user_id = current_user.id
    @comment.tweet_id = params[:tweet_id]
    @comment.parent_id = params[:id] if params[:id].present? && Comment.exists?(params[:id]) # 親コメントに対して返信する場合
    if @comment.save
      # 通知機能を呼び出し
      @comment.tweet.create_notification_comment!(current_user, @comment.id)
      redirect_to home_index_path, notice: 'コメントを投稿しました。'
    else
      flash.now[:alert] = 'コンテンツの投稿に失敗しました。'
      @tweets = Tweet.all.includes(:user,
                                   { images_attachments: :blob }).order(created_at: 'DESC').page(params[:recommend])
      @followers_tweets = Tweet.includes(:user,
                                         { images_attachments: :blob }).where(user_id: current_user.followers.pluck(:user_id)).page(params[:follow])
      render template: 'home/index', status: :unprocessable_entity
    end
  end
  def follow
    @relation = current_user.relations.build(follower_id: params[:id])
    @user = User.find(params[:id])
    if @relation.save
      # 通知機能を呼び出し
      @user.create_notification_follow!(current_user)
      redirect_to home_index_path, notice: 'フォローしました。'
    else
      redirect_to home_index_path, alert: 'フォローに失敗しました。'
    end
  end
どのコントローラーでも生成したオブジェクトの保存に成功した時に通知機能が動くように設定しています。Modelの所でも説明しましたが、通知機能を呼び出す時に引数としてcurrent_userを渡しています。これはModel内ではdeviseのcurrent_userメソッドを直接使用することができないので、意図時にControllerやViewから引数として渡すことが必要だからです。
また、総じてオブジェクト取得の際にN+1問題を避ける為にincludesを使って対応しています。
通知閲覧画面の作成
先ずは通知用のコントローラーを作成していきます。
rails g controller notifications
次にルートの設定を行います。
通知一覧のページはindexメソッドで実装します。
他のメソッドは不要なので、onlyオプションで指定します。
resources :notifications, only: :index
indexアクションの実装ではpassive_notificationsを使ってでログインユーザーが受け取る側の通知データを取得してインスタンス変数の@notificationsに代入しています。また、page(params[:page]).per(20)の所ではページネーション機能を儲けており、表示件数が20件を超えた時には次のページに表示するようにしています。取得する通知データの中にはcheckedカラムがfalseのもとtrueのものがあります。初見のデータ(checked: false)だけは確認した事を認識させる為にupdateメソッドで(checked: true)に切り替えています。
通知機能はログインしていることが前提になりますので、authenticate_user!を使ってログインしていないユーザーの場合はログイン画面へ遷移してログインを促すようにしています。
  before_action :authenticate_user!

  def index
    @notifications = current_user.passive_notifications.includes({ visitor: { icon_attachment: :blob } },
                                                                 :tweet).page(params[:page]).per(20)
    @notifications.where(checked: false).each do |notification|
      notification.update(checked: true)
    end
  end
Viewファイルを設定して実際に通知機能を表示させる所を制作していきます。
notifications_controllerで取得したインスタンス変数@notificationsにはログインユーザーが受け取る通知機能が全て入っています。この中にはログインユーザーが実行した「いいね」や「コメント」も含まれています。
そこで- notifications = @notifications.where.not(visitor_id: current_user.id)のところで通知を送る側のユーザーがログインユーザーのデータを外すようにしています。
また、checkedカラムがfalseのデータだけを取り出して、trueに書き換えることで通知データを確認したという処理となっています。
= render notificationsでは_notification.html.slimを呼び出して実際の通知内容を表示させるのですが、notificationsと複数形にすることでnotificationsインスタンスの数だけ通知内容をレンダリング(表示)させることができます。
body
  = render partial: "layouts/nav"
  # 自分が実行したいいね、コメントは通知に表示しない
  - notifications = @notifications.where.not(visitor_id: current_user.id)
  - if notifications.exists?
    = render notifications
    = paginate notifications
  - else
    p
      | 通知はありません
具体的な通知データの内容は下記の_notification.html.slimでコードで表示します。
case文を使ってアクションごとに表示内容を切り替えるようにしています。
- visitor = notification.visitor
- visited = notification.visited
.col-md-6.mx-auto
  .form-inline
    span
      = link_to profile_path(visitor) do
        = image_tag visitor.icon, class: "icon_image", size: '50x50'
        strong
          = visitor.name
      = 'さんが'

      - case notification.action
      - when 'follow' then
        ='あなたをフォローしました'
      - when 'favorite' then
        = link_to 'あなたの投稿', notification.tweet, style: "font-weight: bold;"
        = "にいいねしました"
      - when 'retweet' then
        = link_to 'あなたの投稿', notification.tweet, style: "font-weight: bold;"
        = "をリツイートしました"
      - when 'comment' then
        - if notification.tweet.user_id == visited.id
          = link_to "あなたの投稿", notification.tweet, style: "font-weight: bold;"
        - else
          span
            = link_to tweet_path(notification.tweet) do
              =image_tag notification.tweet.user.icon, class: "icon_image", size: '50x50'
              strong
                = notification.tweet.user.name + 'さんの投稿'
        = "にコメントしました"
        p.text-muted.mb-0
          = Comment.find_by(id: notification.comment_id)&.sentence
  .small.text-muted.text-right
    = time_ago_in_words(notification.created_at).upcase
  hr
以上で通知機能実装の解説を終わります。
最後まで読んで頂きありがとうございました。
参考にしたサイト
【Rails】通知機能を誰でも実装できるように解説する【いいね、コメント、フォロー】
【Rails】 アソシエーションを図解形式で徹底的に理解しよう!

