この記事は、Firebase Authenticationの実装例について紹介します。
- FirebaseでTwitter認証を使えるようにする
- Vue.jsでFirebaseを使用した認証ページの作成
- GoでFirebaseを使用したトークン認証の実装
使用技術
- Firebase V9
- Twitter Provider
- Vue3
- Axios
- Vite
- Pinia
- Golang 1.19
- Gin
1. FirebaseでTwitter認証を使えるようにする
1-1. Firebaseプロジェクトの作成
Firebaseの利用を開始するには、まずプロジェクトを作成する必要があります。
基本的な手順は、上記公式ドキュメントをご参照ください。
Firebase コンソールにアクセスし、「プロジェクトを追加」ボタンから、適当な名前のプロジェクトを作成します。
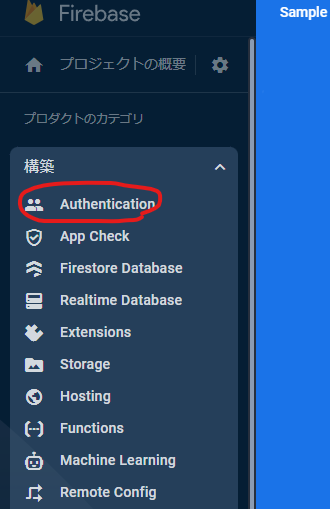
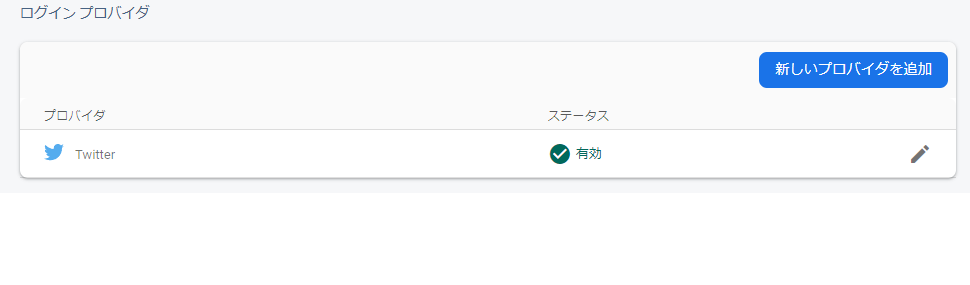
作成完了後、プロジェクトのダッシュボードが表示されるので、サイドメニューから「Authentication」を選択します。
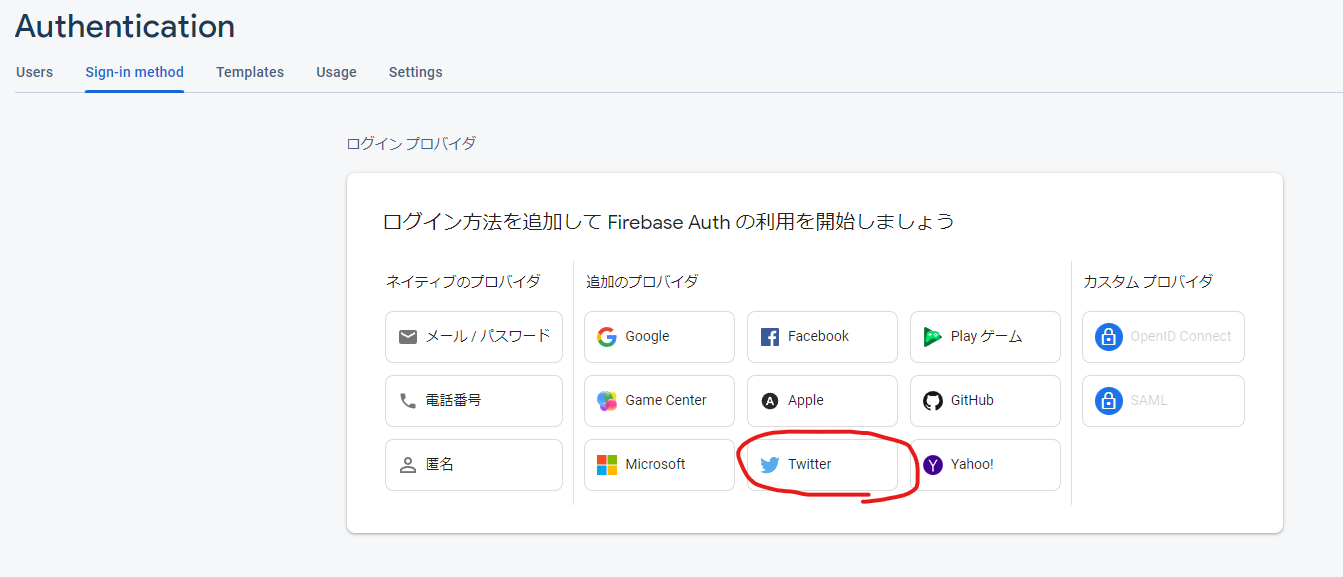
ナビゲーションバーから「Signin-method」を選択。ログイン方法の選択画面が表示されるので、必要なものを選択してください。今回はTwitterで進めていきます。
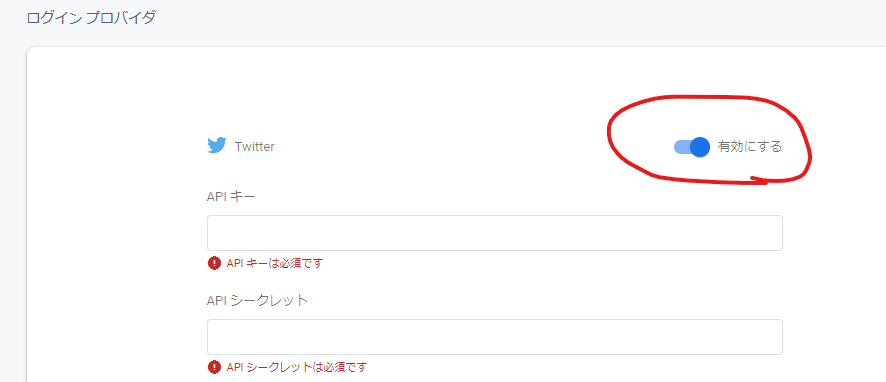
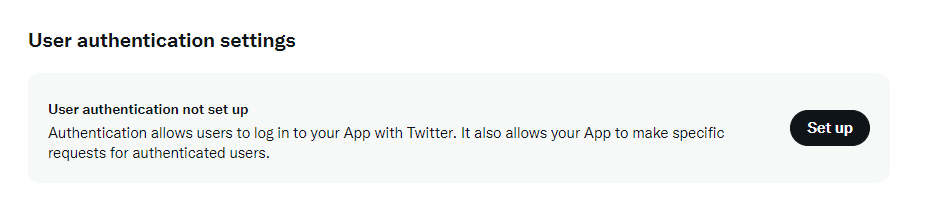
Twitterのボタンを押すと、認証に使用するAPIキーとシークレットキーを求められるので、Twitterから取得する必要があります。
1-2. Twitter開発者用のアプリを作成
上記リンクにアクセスし、手順に従ってTwitter開発者アカウントの作成を行います。
アカウント作成には、Twitterアカウントと電話番号の登録が必要です。一つのアカウントにつき、作成できるプロジェクトは一つまでなので、練習用に別アカウントの作成をおすすめします。
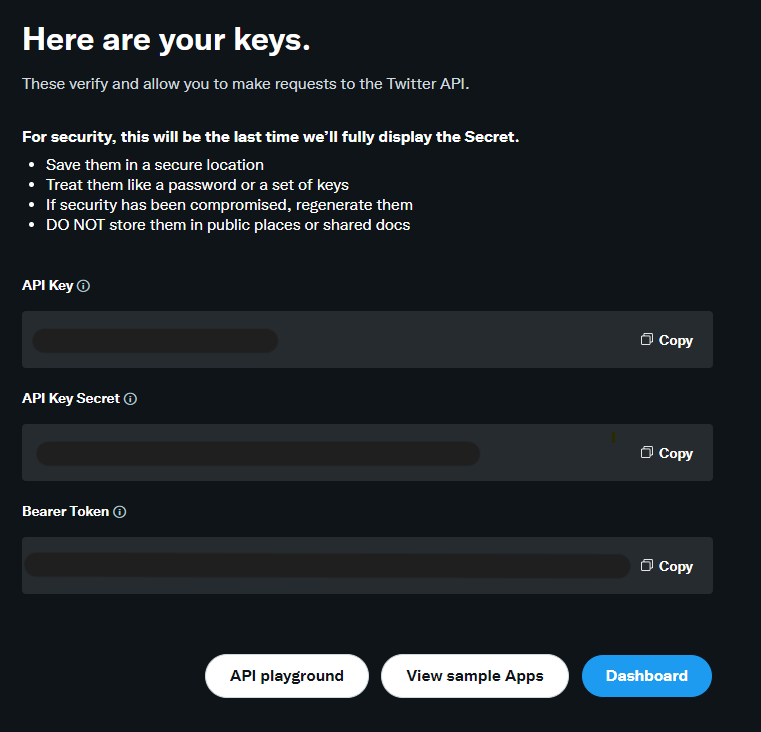
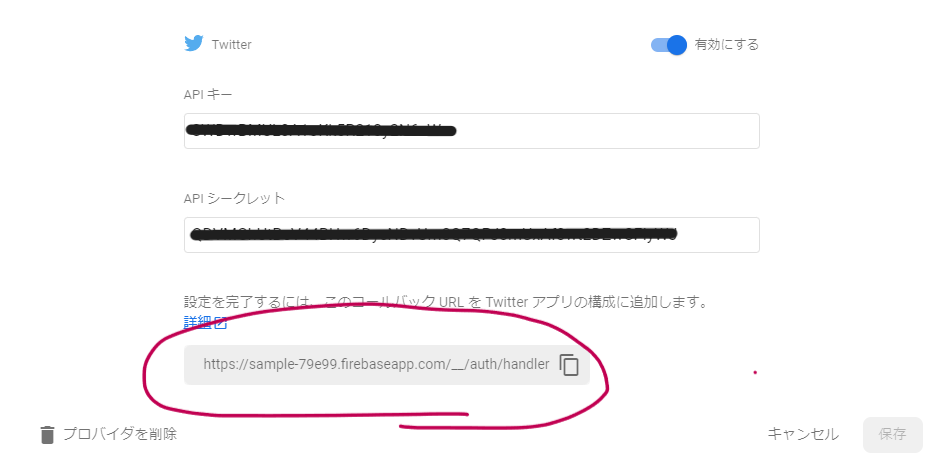
作成が完了すると、APIキーとシークレットキーが表示されるので、先程のAPIキー設定ページにコピペします。
キーの登録が完了すると、Twitterのステータスが有効になります。
1-3. Twitter認証の設定
プロジェクトのトップページ下部のボタンから、認証設定を行います。
callback URIの欄には、TwitterのAPIキーを入力したページに表示されているURLをコピペします。
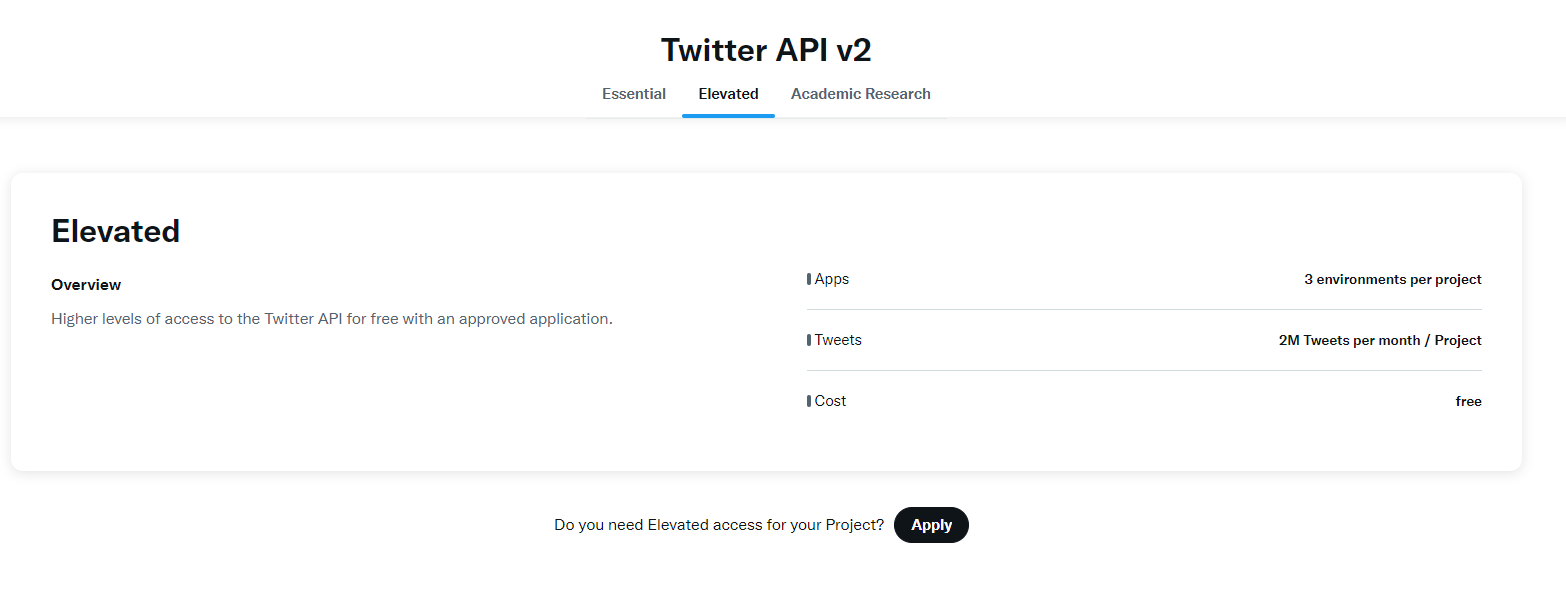
1-4. 上位権限の申請
現在の権限だと、認証リクエストした場合に以下のエラーが発生します。
You currently have Essential access which includes access
to Twitter API v2 endpoints only. If you need access to this endpoint,
you’ll need to apply for Elevated access via the Developer Portal.
そのため、以下画像のページから、上位権限の申請を行います。わりとすぐに承認されると思います。
1-5. Firebaseをアプリ内で使用するためのコードを取得
続いて、Firebaseトップページの</>ボタンから、FirebaseとWebアプリの紐づけを行います。
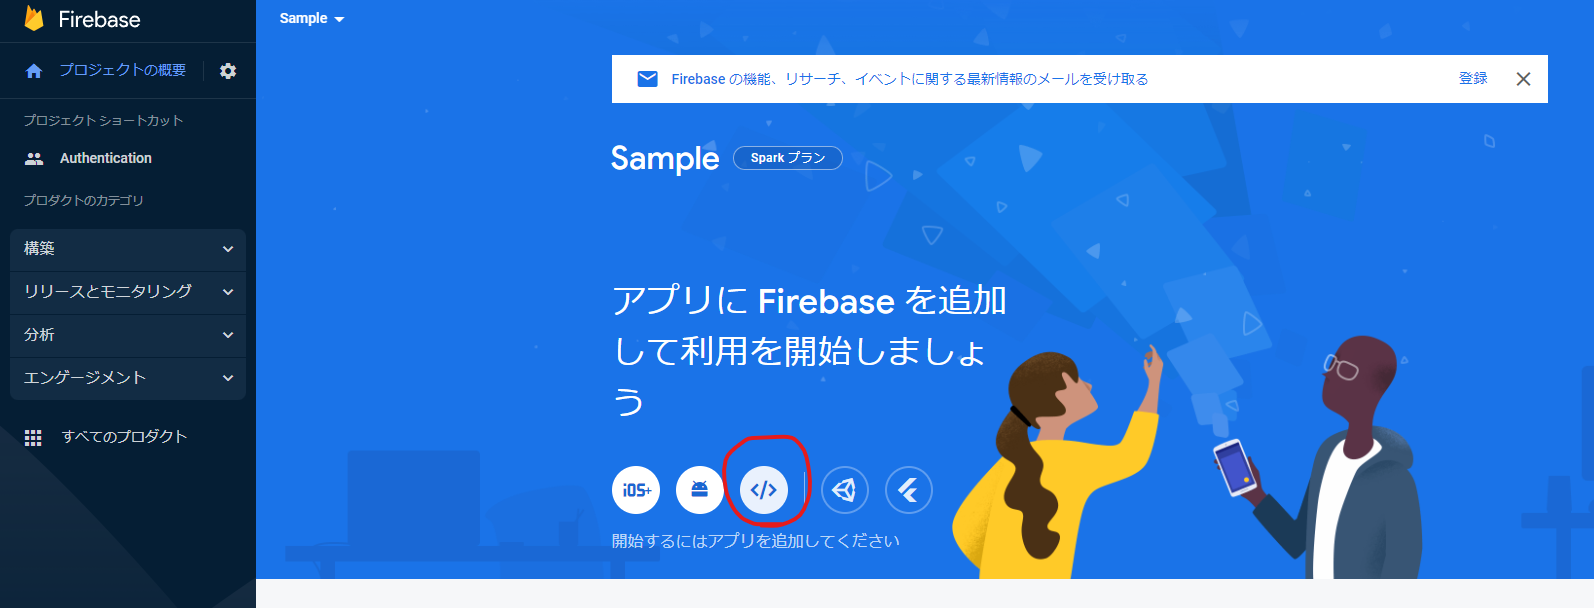
アプリの追加が完了すると、Firebaseの初期化に必要なコードが表示されるので、これを保管しておきます。
以上で、Firebase&Twitterのウェブ上での設定は完了になります。
2. Vue.jsでFirebaseを使用した認証ページの作成
2-0. 資料
下記、公式ドキュメントの手順に従い、進めていきます。
2-1. Firebaseのインストール
まず、npmまたはyarnを使用して、Firebaseのインストールを行います。
$: yarn add firebase
or
$: npm install firebase
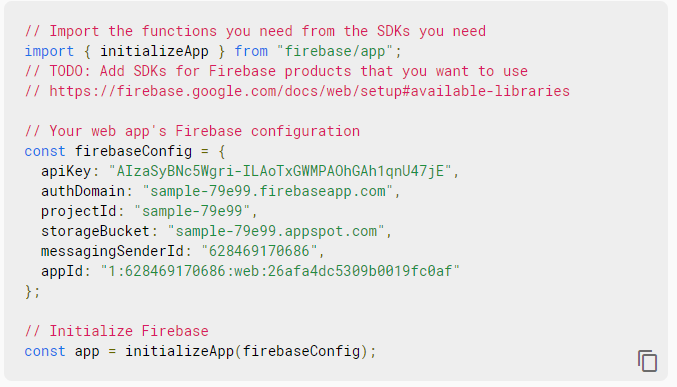
2-2. Firebaseの初期化
続いて、先程取得したFirebaseの初期化に必要なデータをVuejs内に記述します。
const firebaseConfig = {
  apiKey: "AIzaSyBNc5Wgri-ILAoTxGWMPAOhGAh1qnU47jE",
  authDomain: "sample-79e99.firebaseapp.com",
  projectId: "sample-79e99",
  storageBucket: "sample-79e99.appspot.com",
  messagingSenderId: "628469170686",
  appId: "1:628469170686:web:26afa4dc5309b0019fc0af"
}
初期化に使う関数をインポートします。
+ import { initializeApp } from "firebase/app"

const firebaseConfig = {
  apiKey: "AIzaSyBNc5Wgri-ILAoTxGWMPAOhGAh1qnU47jE",
  authDomain: "sample-79e99.firebaseapp.com",
  projectId: "sample-79e99",
  storageBucket: "sample-79e99.appspot.com",
  messagingSenderId: "628469170686",
  appId: "1:628469170686:web:26afa4dc5309b0019fc0af"
}

+ // Initialize Firebase
+ const app = initializeApp(firebaseConfig);
これで、アプリ内でFirebaseの機能が使用できるようになりました。
続いて、Firebase Authenticationの初期化を行います。
2-3. Firebase Auth の初期化
Firebase Authenticationを利用するには、getAuth関数を呼び出します。
import { initializeApp } from "firebase/app"
+ import { getAuth } from "firebase/auth";

const firebaseConfig = {
  apiKey: "AIzaSyBNc5Wgri-ILAoTxGWMPAOhGAh1qnU47jE",
  authDomain: "sample-79e99.firebaseapp.com",
  projectId: "sample-79e99",
  storageBucket: "sample-79e99.appspot.com",
  messagingSenderId: "628469170686",
  appId: "1:628469170686:web:26afa4dc5309b0019fc0af"
}

// Initialize Firebase
const app = initializeApp(firebaseConfig);
+ // Initialize Firebase Auth
+ const auth = getAuth(app);
2-4. ログイン・ログアウト処理の実装
初期化処理が完了したところで、認証ロジックの実装に移ります。
今回は、Store内(Pinia)にログイン・ログアウトの処理、及びログイン状態を記述していきます。
import { defineStore } from 'pinia'
import { auth } from "@/firebase/index.js"
import { signInWithPopup, TwitterAuthProvider, User } from "firebase/auth"
import { ref } from 'vue'

export const useAuthStore = defineStore('auth', () => {
  const currentUser = ref<User>()
  const idToken = ref<string>()

  const signIn = async () => {
    try {
      const provider = new TwitterAuthProvider()
      await signInWithPopup(auth, provider)
      await setCurrentUser()
    } catch (e: any) {
      console.error( "failed to signin", e.message )
    }
  }

  const setCurrentUser = async () => {
    if (!auth.currentUser) return
    currentUser.value = auth.currentUser
    idToken.value = await auth.currentUser.getIdToken()
  }

  const signOut = async () => {
    await auth.signOut()
    loginUser.value = undefined
    idToken.value = undefined
  }

  return {
    idToken,
    signIn,
    signOut
  }
}
ログインフォーム側で、singInメソッドを呼び出します。
<template>
  <div>
    <p>ログイン画面</p>
    <button @click="signIn()">Twitterでログイン</button>
  </div>
</template>

<script setup lang="ts">
import { useAuthStore } from '@/store/authStore.js'

const { signIn } = useAuthStore()
</script>
必要に応じて、フォームのカスタマイズ、ナビゲーションガード、ログイン後の遷移処理等を追加します。(今回は省略とさせてください)
2-5. APIリクエスト内にIDトークンを追加する
ログインに成功すると、getIdToken関数で認証に必要なトークンを取得できるようになります。
これをAPI側に送信するため、リスクエストのAuthorizationヘッダーに含めるようにします。
以下、AxiosのRequestConfig内に追加します。
headers: { ...(authStore.idToken) && { 'Authorization': `Bearer ${authStore.idToken}` } },
以上で、フロント側の実装は完了です。
続いて、API側の実装に移ります。
1. GoでFirebaseを使用したトークン認証の実装
3-0. 資料
3-1. middlewareの設定
ginのmiddleware機能を使用して、特定のエンドポイントへのアクセスに認証処理を強制させます。
以下の例では、authorizedグループのmiddlewareとして、authenticate()関数を設定しています。
func (r *Routing) setRouting() {
  // 各Controllerの初期化
  usersController := controllers.NewUsersController(r.db)
  // 認証不要
  r.gin.POST("/users", func(c *gin.Context) { handler(usersController.Create(c)) })
  // 要認証
  authorized := r.gin.Group("")
  authorized.Use(r.authenticate()) {
    authorized.GET("/users/:id", func(c *gin.Context) { usersController.Show(c) })
  }
}
authenticateメソッドの実装は以下のとおりです。
公式ドキュメントを参考に、IDトークン認証のコードを記述していきます。
func (r *Routing) authenticate() gin.HandlerFunc {
	return func(c *gin.Context) {
		auth_header := c.GetHeader("Authorization")
		idToken := strings.Replace(auth_header, "Bearer ", "", 1)
		token := r.firebaseApp.VerifyIDToken(idToken)
		uid := token.UID
		user, err := gateways.NewUserRepository(r.db).FindByUid(uid)
		if err != nil {
			fmt.Print("不正なリクエスト")
			c.JSON(401, gin.H{"message": "認証に失敗しました"})
		} else {
			c.Next()
		}
	}
}
おわりに
実装は以上になります。FirebaseやTwitterのサイトのUIや実装方法は短期間で変わる可能性があるので、本記事だけでなく、ドキュメントをよく参照するようにしてください。