(2020/07/31 追記)この記事の情報は古いです。こちらが更新記事となります。特にsynchronizeメソッドはもう使うべきではないことに注意してください。
ただしUserDefaultsの基本的な仕組みは変わっていません。
はじめに
この記事ではUserDefaultsを使ったtodoListアプリを作成します。ここで使われるUserDefaults、シリアライズやデシリアライズについても詳しく解説したいと思います。
なるだけXcodeを使った開発を勉強し始めたばかりのような読者層にも配慮した内容にするように努めます。
UserDefaults
最初に、この記事で重要なテーマのひとつであるUserDefaultsについて解説します。
UserDefaultsとは
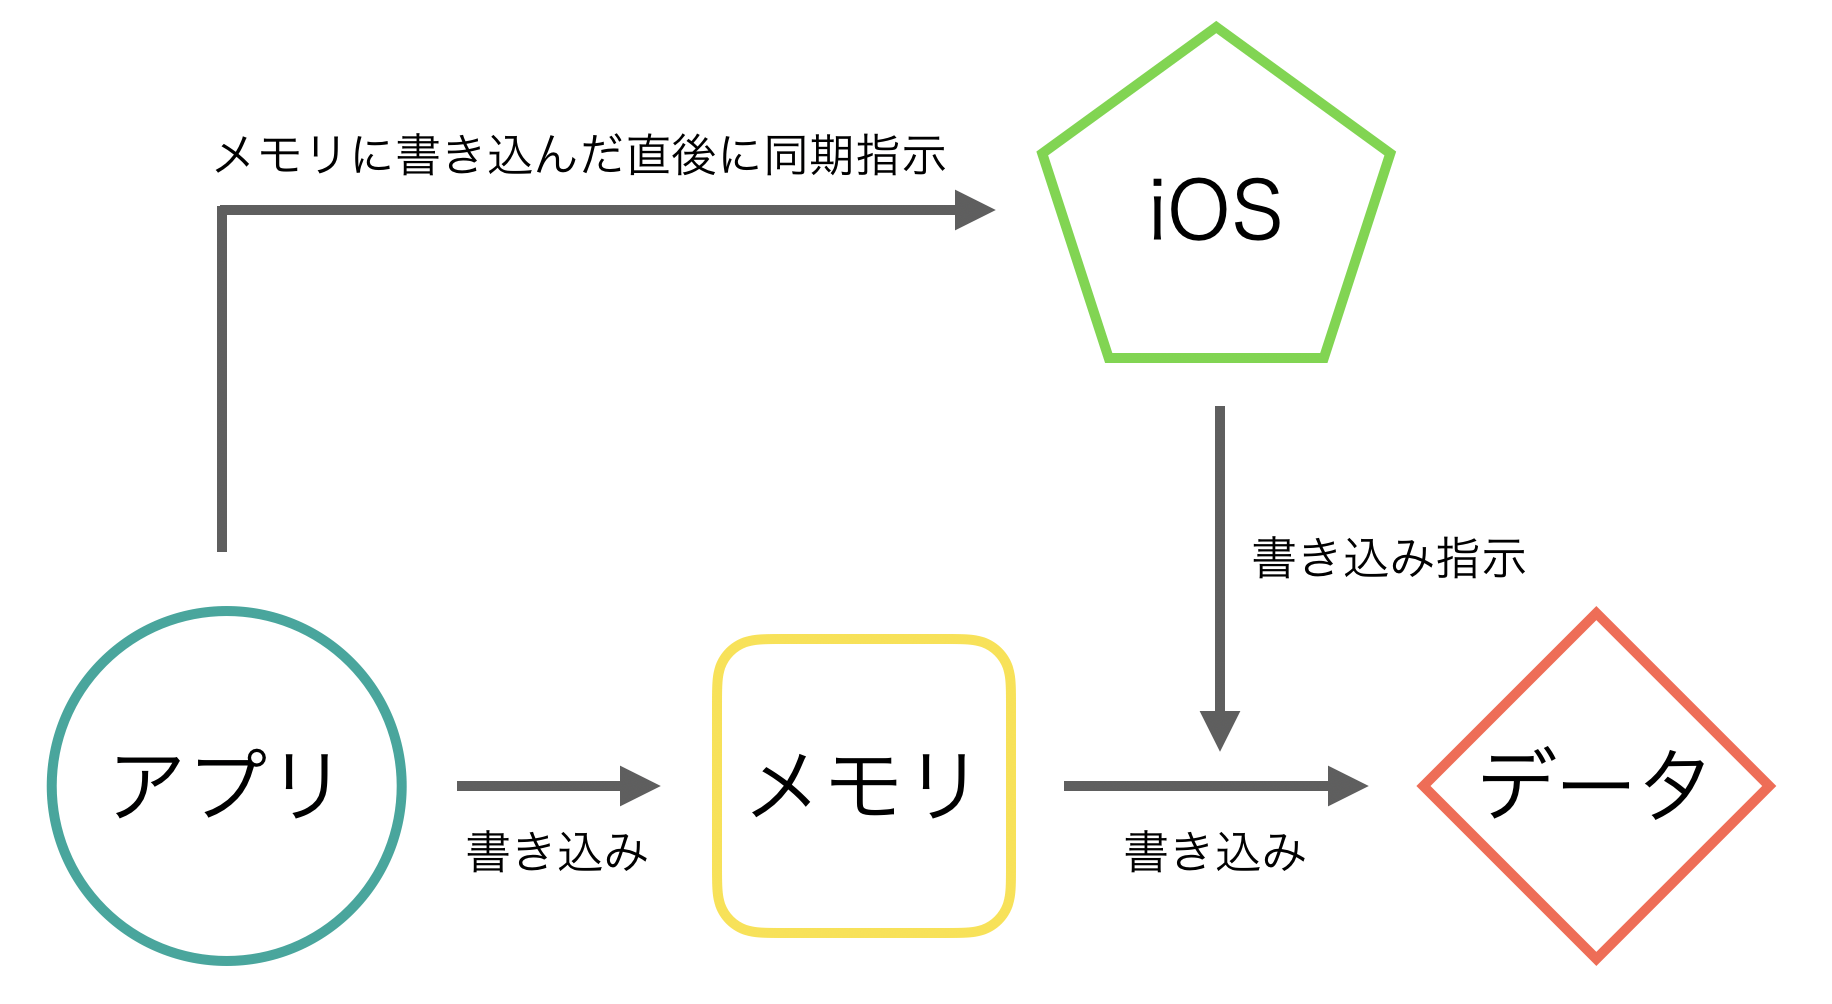
UserDefaultsとは、ユーザーが追加したデータを永続的に記録・保持するための仕組みの1つです。UserDefaultsではデータをローカルストレージのアプリ内部にplist形式として保存します。このplistファイルはアプリ起動時にメモリに読み込まれ、それをアプリが読み込む事により高速処理が可能となっています。このメモリ上に展開されたデータはキャッシュと呼ばれます。

UserDefaultsはデータをplist形式に保存する際、直接plistに書き込むのではなく、一度キャッシュとして値をメモリに保存し、それをplistに反映させています。こうする事で直接書き込むよりも高速な動作となります。反映のタイミングは、特に指定していない場合はiOSが判断しキャッシュとplistを同期させていますが、この同期が行われる前にクラッシュするなどしてアプリが終了してしまうとデータに保存されません。これを防ぐために、同期のタイミングをこちらで明示的に指定します。
ただし、UserDefaultsで扱うデータは軽量なものに留めるべきです。何故なら、上述したように起動時にplistからメモリに展開するため、あまりデータが大きいと時間がかかってしまいます。大容量のデータを扱うならばCore DataやRealmといったものがあります。
シリアライズおよびデシリアライズ
UserDefaultsで保存や参照できる型には様々なものがあり、その中でData型もサポートされています。独自に定義したオブジェクトも保存する事ができますが、それには一旦Data型に変換する必要があります。これがシリアライズと呼ばれる操作です。
一般にオブジェクトの内容をバイナリに変換する事をシリアライズ、逆にバイナリからオブジェクトに変換する事をデシリアライズと言います。swiftではシリアライズやデシリアライズのためのクラスがあり、それぞれNSKeyedArchiverクラスとNSKeyedUnarchiverクラスとなります。

独自に定義したクラスのシリアライズ処理は開発者が自分で実装します。シリアライズされる独自クラスはNSObjectというクラスを継承したものでなければなりません。その理由は次の通りです。
まずNSKeyedArchiverやNSKeyedUnarchiverはともにNSCorderという抽象クラス(に見せかけたもの)のサブクラスです。つまり次のように宣言されています。
class NSKeyedArchiver: NSCoder
class NSKeyedUnArchiver: NSCoder
このNSCorderはメモリと何か他のフォーマットの間でNSObjectというクラスを転送するためのインターフェースを用意しています。抽象的な文章ですが、そのインターフェースがNSKeyedArchiverなりNSKeyedUnarchiverといったものです。なので、これらのインターフェースを用いてシリアライズやデシリアライズする対象は必然的にNSObjectとなります。
では、そもそもNSObjectとはなんでしょうか。Appleの公式ドキュメントを読んでみると次のように書いてあります。
The root class of most Objective-C class hierarchies, from which subclasses inherit a basic interface to the runtime system and the ability to behave as Objective-C objects.
直訳:ほとんどのObjective-Cクラスのヒエラルキーにおける根源的なクラスであり、このサブクラスはruntime systemへの基本的なインターフェースや、Objective-Cオブジェクトとして振る舞う能力を受け継ぎます。
これを全て理解するには、まずruntime systemとは何かを知らなければならず、最早この記事の範囲外であるため、ここではひとまずNSObjectとはObjective-C由来の何かしらの大元のオブジェクトである、という認識で十分です。
また、NSKeyedArchiverやNSKeyedUnarchiverはシリアライズ処理やデシリアライズ処理を行う際に、NSCodingプロトコルのメソッドを呼び出します。このプロトコルのソースコードは次のようなものです。
public protocol NSCoding {

    public func encode(with aCoder: NSCoder)
    public init?(coder aDecoder: NSCoder) // NS_DESIGNATED_INITIALIZER
}
以上をまとめると、独自クラスをシリアライズあるいはデシリアライズし、UserDefaultsを使ってそれを保存したり取り出したりするには、以下ようにNSObjectクラスを継承し、NSCodingプロトコルに準拠させる必要があります。
class MyClass: NSObject, NSCoding
次のセクションではこれを踏まえてtodoリストの情報を格納するクラスを作成し、それをNSObjectとして扱い、さらにData型にシリアライズする事でtodoリストの情報を永続的に記録・保持します。さらにそのデータを、UserDefaultsを駆使してリストの項目に表示させます。
todoアプリの作成
では、todoアプリを作成していきましょう。
ストーリーボードの作成
まず最初にObject LibraryからストーリーボードにTable View Controllerを配置し、これをAttributes InspectorでInitial View Controllerとして設定します。
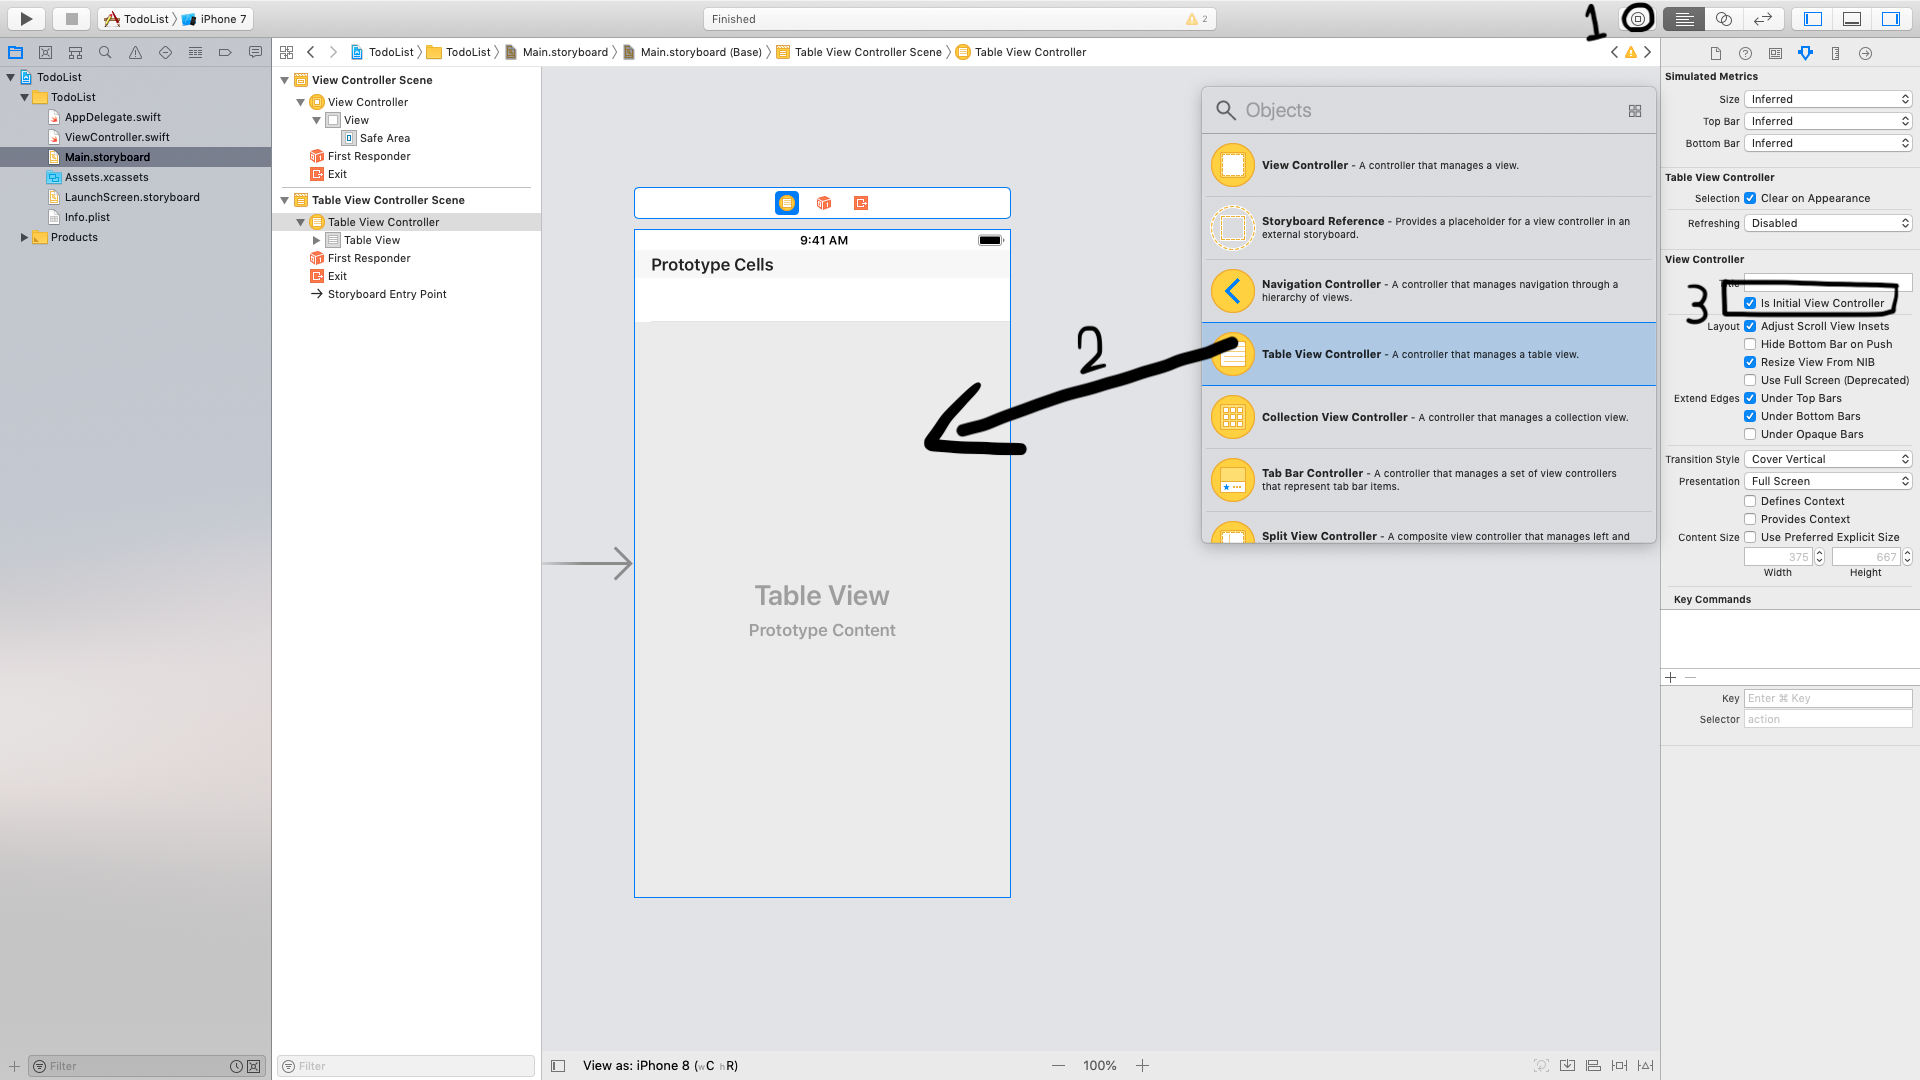
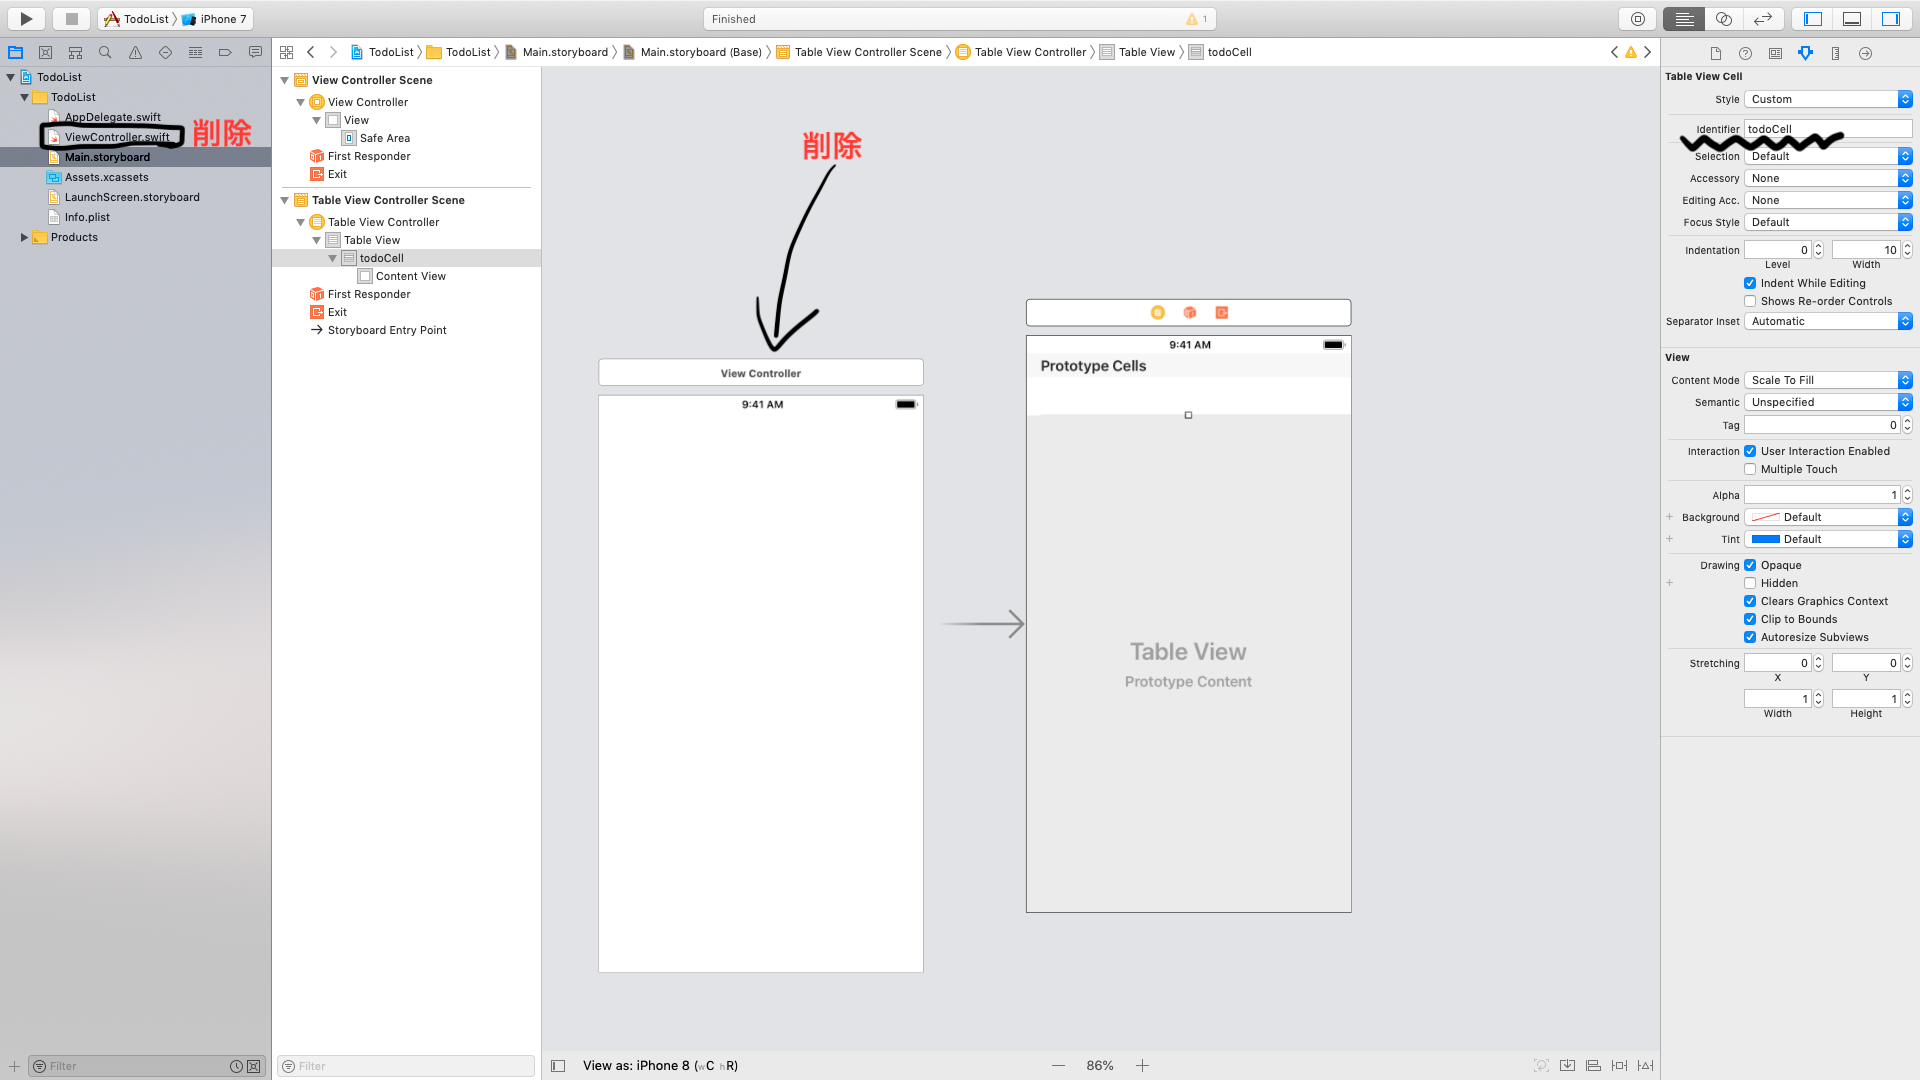
またTable View CellのIdentifierとして"todoCell"と名付けます。ついでに最初に存在していたView ControllerとViewController.swiftは必要ないので消してしまいます。
その後Table View Controller全体を選択した状態で"Editor -> Embed In -> Navigation Controller"と選択してTable View ControllerにNavigation Controllerを埋め込みます(この時にInitial View ControllerはNavigation Controllerに移ります)。
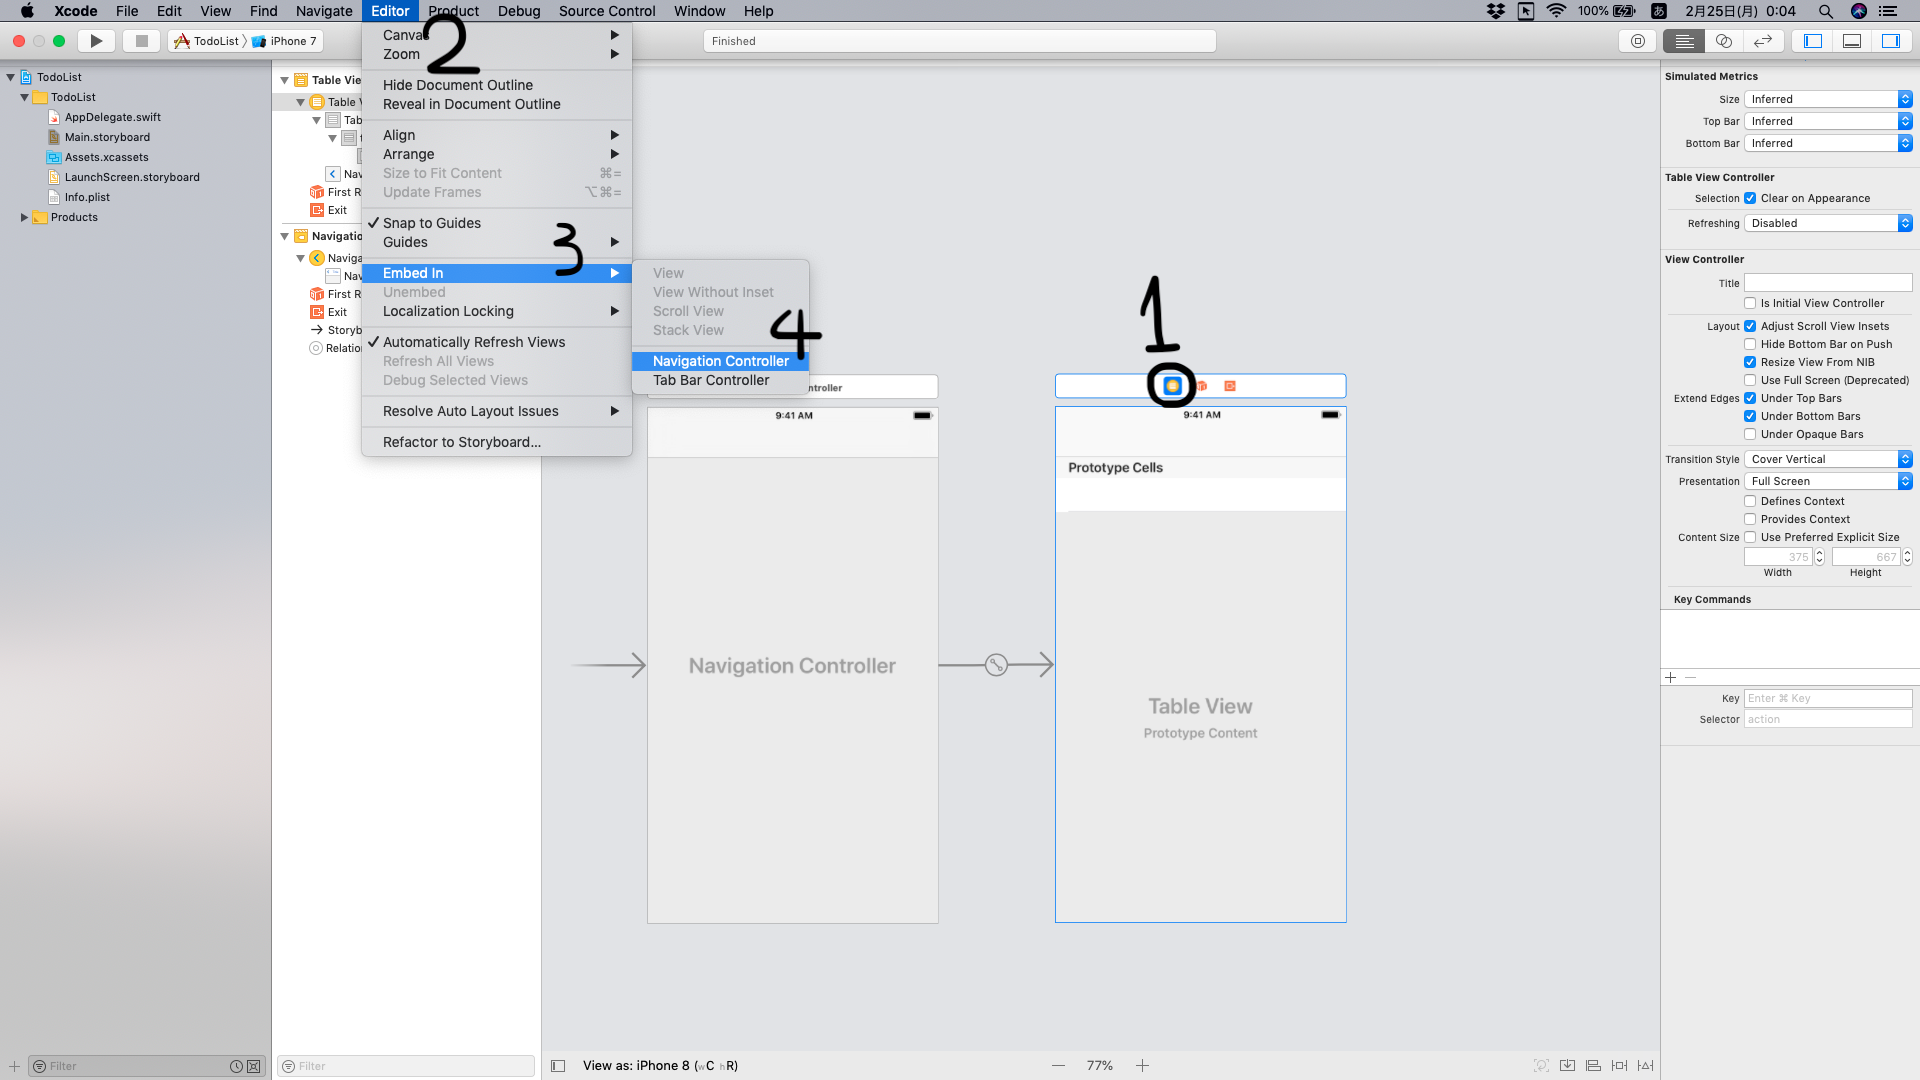
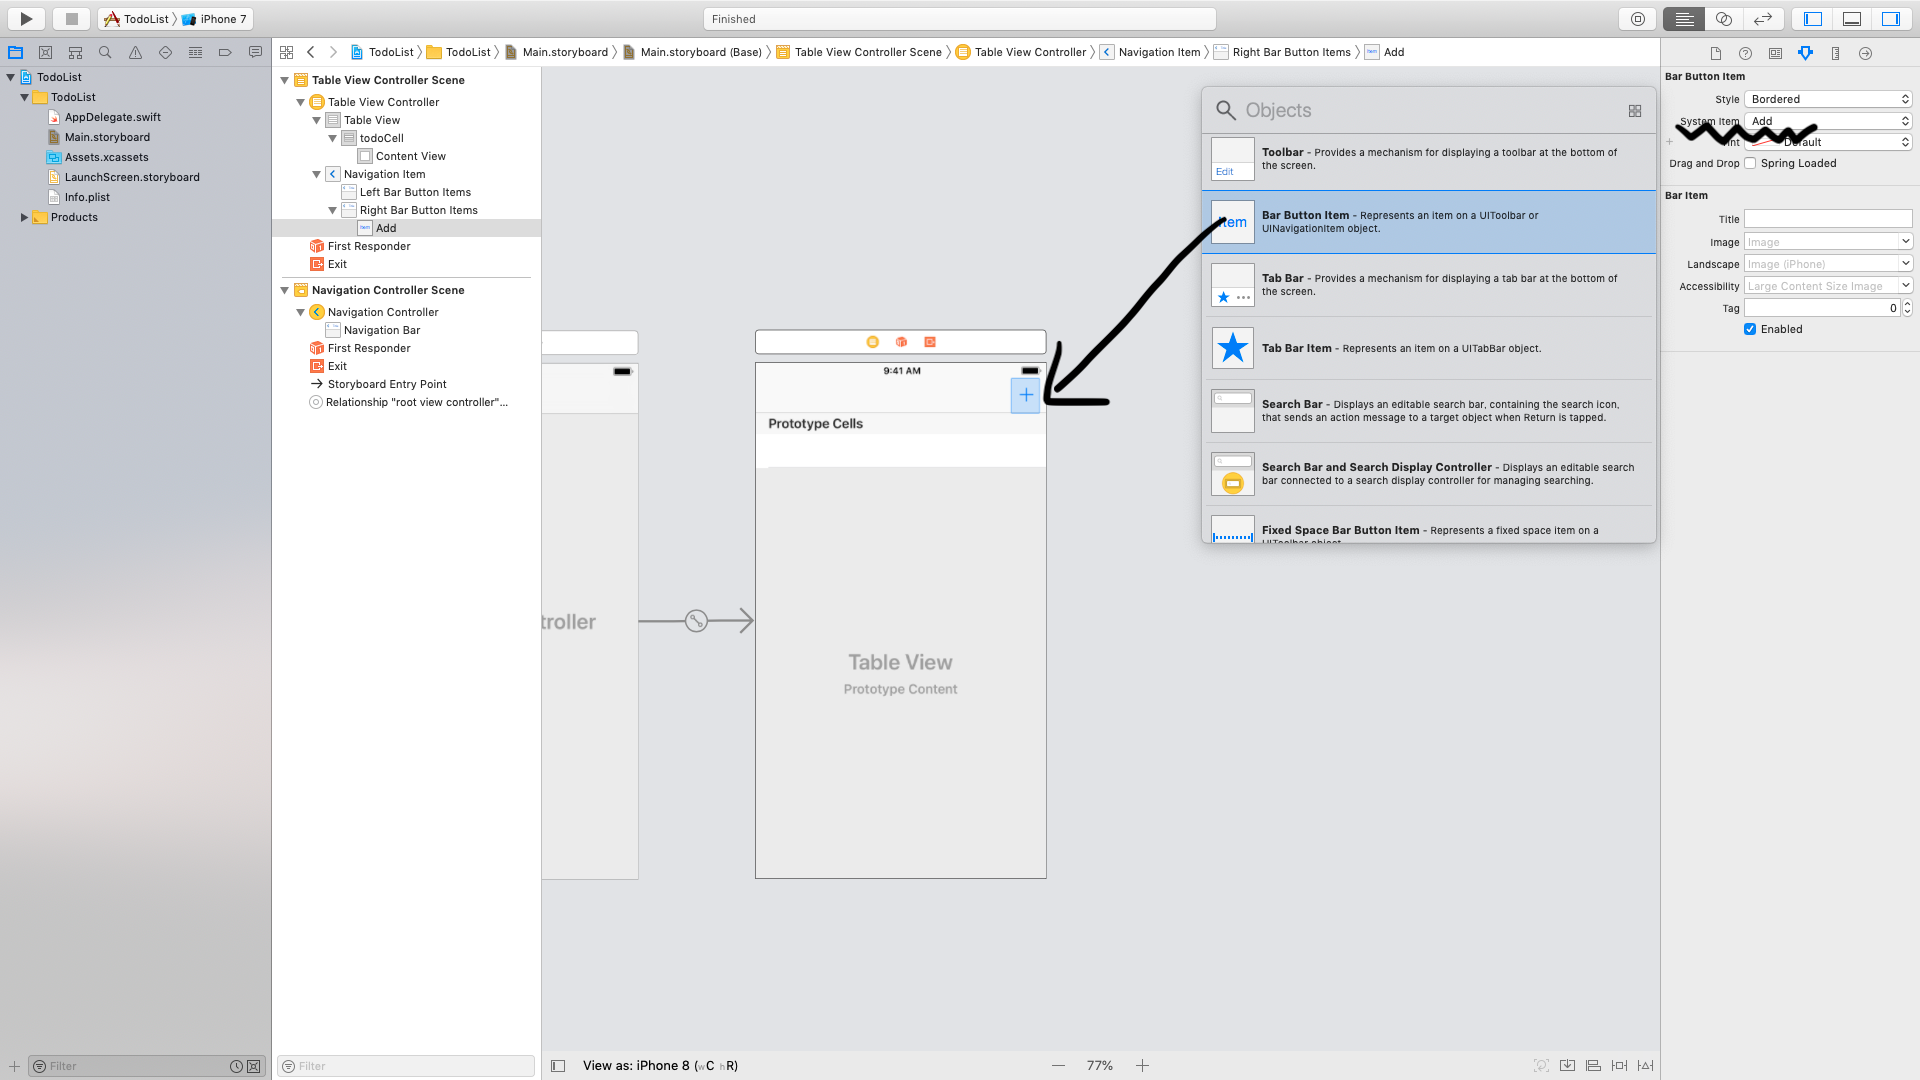
Table View Controllerに現れたNavigation Item Barの中に、Object LibraryからBar Button Itemを取り出し右上に配置します。このItemはリストの追加ボタンにするため、Attributes Inspectorの中のSystem Itemという項目を"Add"に設定します。すると「+」のマークに変更されます。
これでストーリーボードは完了です。
ソースコードの作成
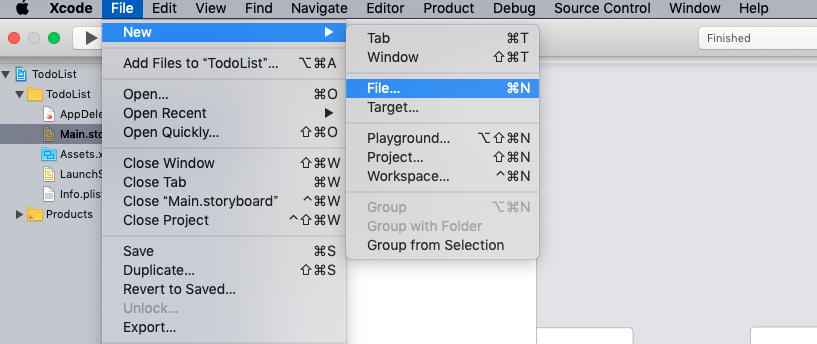
次にソースコードを作成します。最初にTable View Controllerの従うソースコードを作成します。"File -> New -> File..."を選択してください。
下りてきたウィンドウにある"Cocoa Touch Class"というものを選び、"Next"を押します。次の画面ではClassの名前を"TableViewController"とし、"Subclass of"の項目で"UITableViewController"を選んで再び"Next"をクリックします。
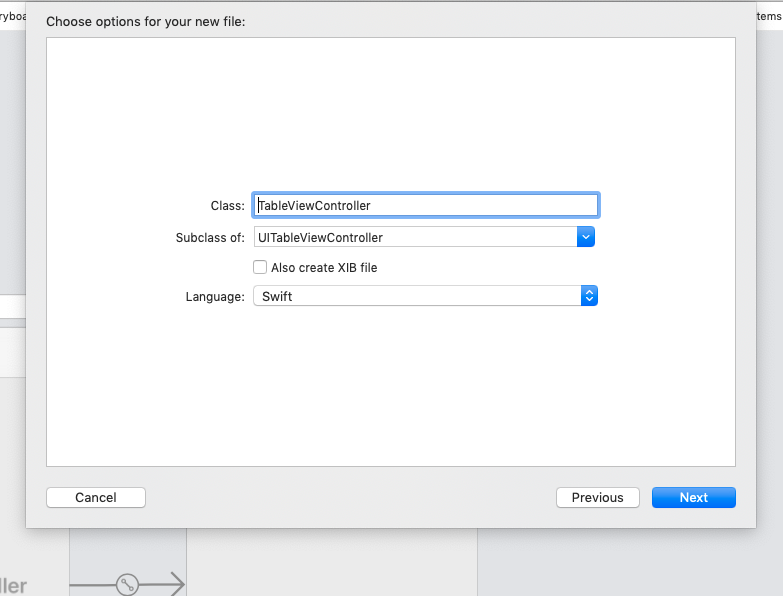
ファイルを保存する場所は特にいじらずにそのまま右下にある"Create"ボタンを押しましょう。
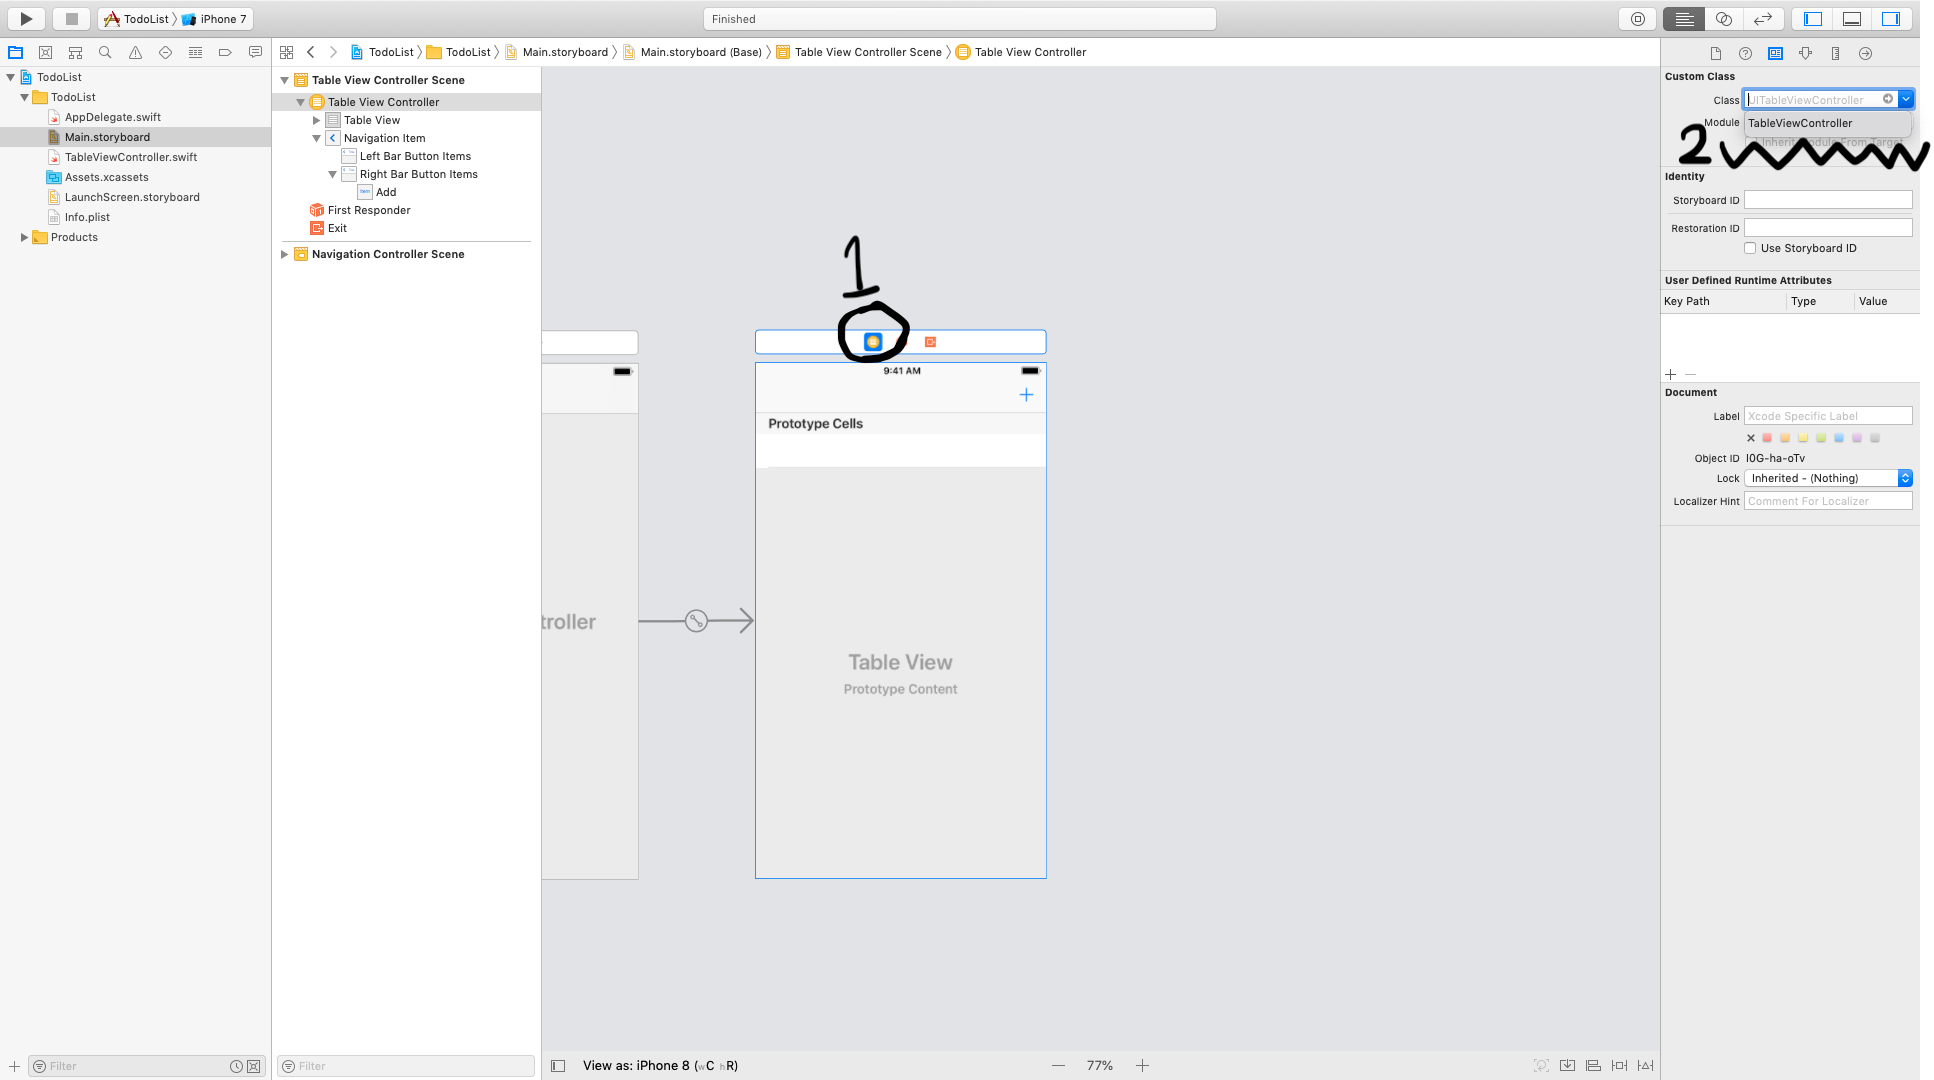
ここでストーリーボードの画面に移り、Table View Controller全体を選択した状態でIdentity Inspectorを開き、Classの項目に先ほど作成した"TableViewController.swift"を選択してストーリーボードとソースコードを紐付けます。
さらに、右上に追加した"add"ボタンもTableViewController.swiftに紐付けます。これには、まずストーリーボードを開いた状態で、optionキーを押しながらTableViewController.swiftをクリックしてAssistant Editorを表示します。

次に、controlキーを押しながら"add"ボタンを隣のAssistant Editorに表示されているTableViewControllerクラス内にドラッグ&ドロップします。ここではtodoList変数の下にドロップすることにします。そして出現したダイアログのそれぞれの項目を、次のように設定します。"Connection"を"Action"に、また"Name"は"addButton"とすることにしましょう。
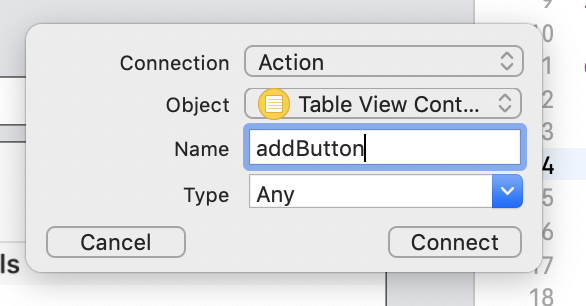
設定したら"Connect"を押します。ひとまず、これはこのままにしておきます。
さて、todoリストのデータを格納するクラスを作るために新しいファイルをもうひとつ用意します。先ほどと同じように"File -> New -> File..."と進んだら、今度は"Swift File"という項目を選びます。そして次の画面でファイル名を"TodoData.swift"として"Create"します。このswiftファイルを開くとほとんど何も書かれておらず、import Foundationとだけあります。この下にtodoリストのデータとしてのクラスを定義します。
import Foundation

class TodoData: NSObject, NSCoding {
    var todoTitle: String?
    var todoDone: Bool = false

    override init() { }

    func encode(with aCoder: NSCoder) {
        aCoder.encode(todoTitle, forKey: "todoTitle")
        aCoder.encode(todoDone, forKey: "todoDone")
    }

    required init?(coder aDecoder: NSCoder) {
        todoTitle = aDecoder.decodeObject(forKey: "todoTitle") as? String
        todoDone = aDecoder.decodeBool(forKey: "todoDone")
    }
}
まずtodoの内容をStringとして格納するtodoTitleというメンバ変数を用意します。その下にあるtodoDoneとは、完了したtodoをタップした時にチェックマークを表示させるためのフラグです。
また親クラスのNSObjectは引数なしのイニシャライザを持つため、これをoverrideする事でlet todoData = TodoData()のようにインスタンスを生成できます。
続くencode関数とrequired init?はNSCodingプロトコルに準拠している事により実装しなければならないメソッドです。encode関数内で、各々の名前をキーとして2つのメンバ変数をエンコードするようにします。最後にrequired init?内でそれぞれをデコードする処理を書きます。
次に作成したTableViewController.swiftを色々書き換えます。最初に複数のtodoを格納するためにtodoListという配列を用意します。この配列は成分としてTodoDataを持ちます。項目は増やしたり削除したりするでしょうから、これはvarで宣言します。

viewDidLoad関数には、起動時に前回までのデータを読み込ませる処理を実装します(この際に、関数内に存在するコメントアウトしてある部分は全て消して構いません)。
override func viewDidLoad() {
    super.viewDidLoad()

    if let storedData = UserDefaults().data(forKey: "todoList") {
        do {
            let unarchivedData = try NSKeyedUnarchiver.unarchiveTopLevelObjectWithData(storedData)
            todoList.append(contentsOf: unarchivedData as! [TodoData])
        } catch {
            print(error)
        }
    }
}
unarchiveTopLevelObjectWithData関数はエラー処理の必要な関数ですので、do-catch構文の中で用います。NSKeyedUnarchiver.unarchiveTopLevelObjectWithDataで"todoList"というキーを持つキャッシュをAny?型にデシリアライズし、それを[TodoData]型にフォースキャストしています。
次は、先ほどストーリーボードと紐付けしたaddButton関数に次のような実装を施します。まず、タップしたらアラートダイアログを出現させ、そこにtodoを打ち込めるようにします。また、ダイアログ内には"OK"ボタンと"cancel"ボタンも設置しましょう。完成図は次のようになります。
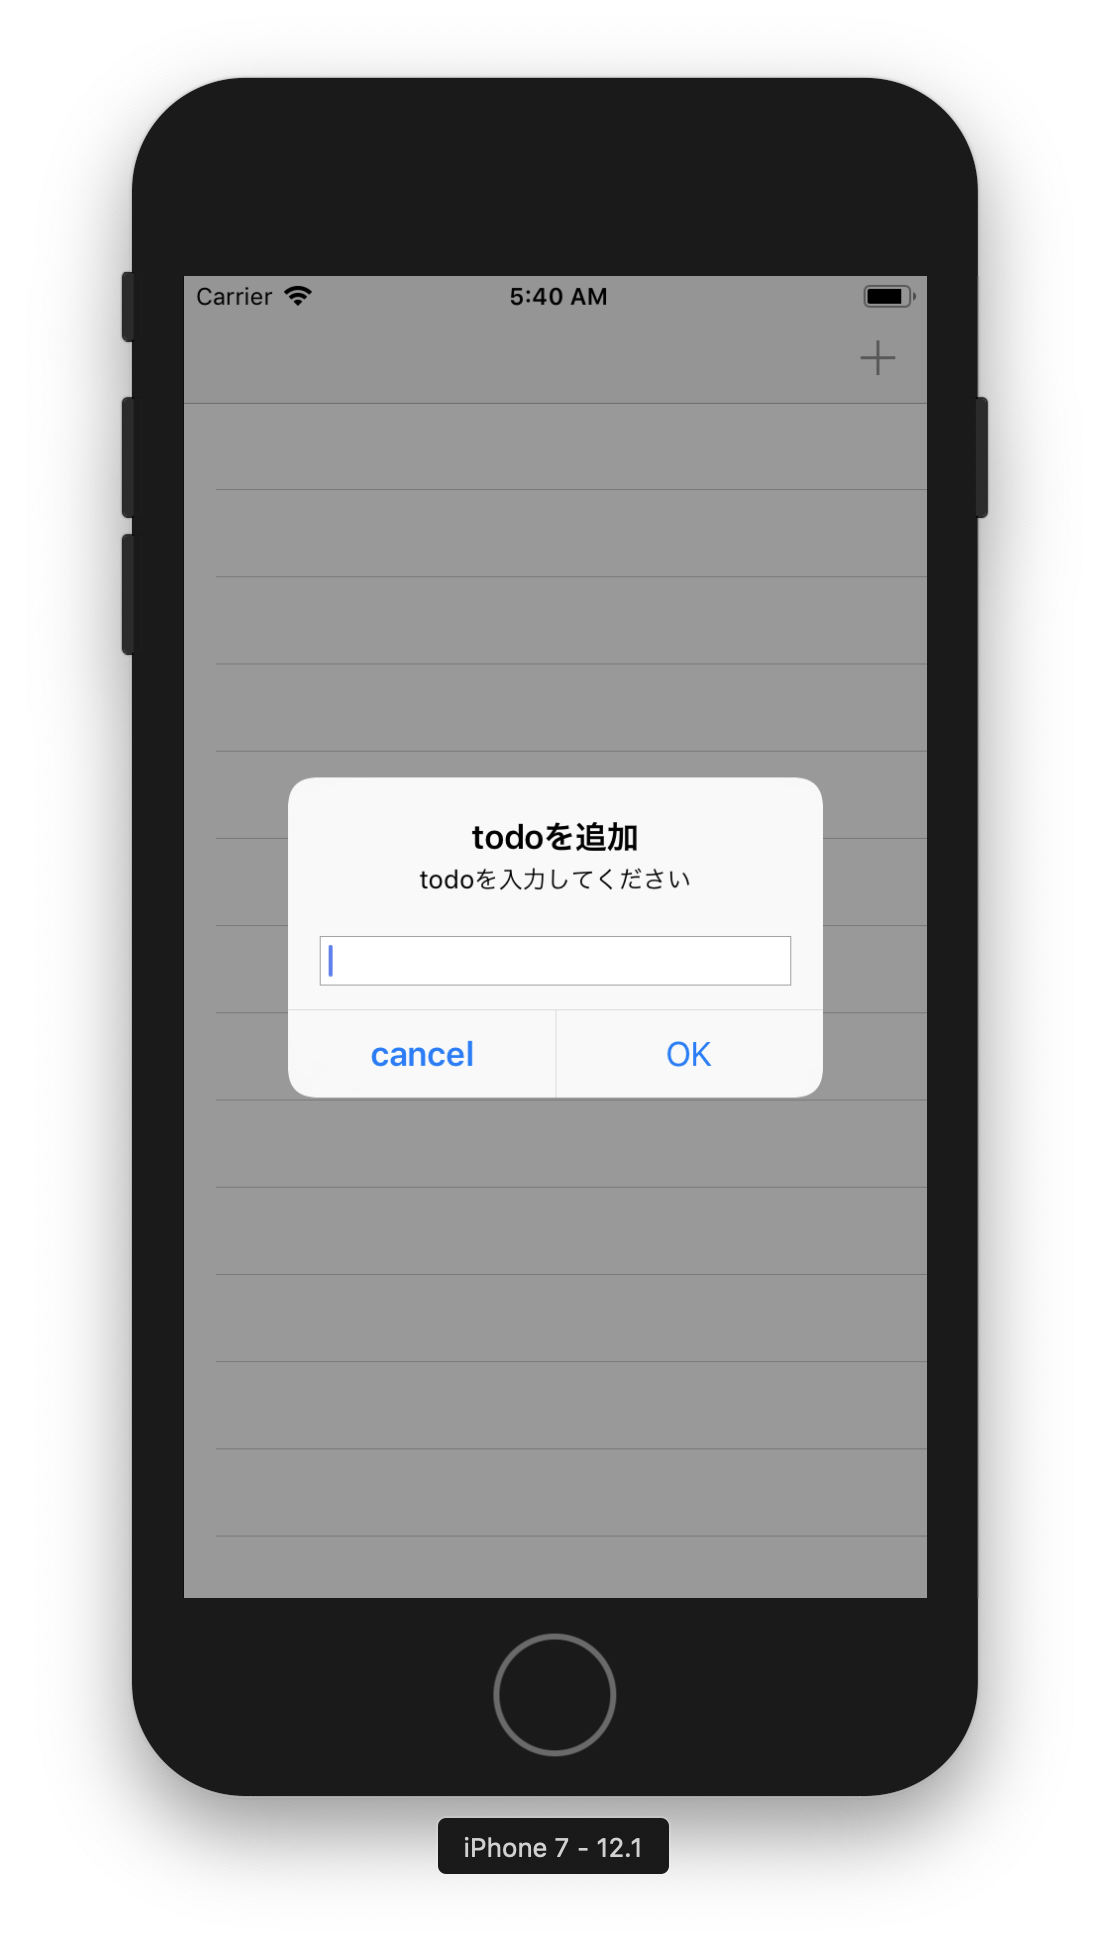
addButton関数は以下のようになります。
@IBAction func addButton(_ sender: Any) {
    let alertController = UIAlertController(title: "todoを追加", message: "todoを入力してください", preferredStyle: .alert)
    alertController.addTextField(configurationHandler: nil)

    let okAction = UIAlertAction(title: "OK", style: .default) { (action: UIAlertAction) in
        if let textField = alertController.textFields?.first {
            let todoData = TodoData()
            todoData.todoTitle = textField.text!
            self.todoList.insert(todoData, at: 0)

            self.tableView.insertRows(at: [IndexPath(row: 0, section: 0)], with: .right)

            let userDefaults = UserDefaults.standard
            do {
                let archivedData: Data = try NSKeyedArchiver.archivedData(withRootObject: self.todoList, requiringSecureCoding: false)
                userDefaults.set(archivedData, forKey: "todoList")
                userDefaults.synchronize()
            } catch {
                print(error)
            }
        }
    }
    let cancelAction = UIAlertAction(title: "cancel", style: .cancel, handler: nil)

    alertController.addAction(okAction)
    alertController.addAction(cancelAction)

    present(alertController, animated: true, completion: nil)
}
特に注目するべきは中段あたりにある
let userDefaults = UserDefaults.standard
do {
    let archivedData: Data = try NSKeyedArchiver.archivedData(withRootObject: self.todoList, requiringSecureCoding: false)
    userDefaults.set(archivedData, forKey: "todoList")
    userDefaults.synchronize()
} catch {
    print(error)
}
という部分です。ここでNSKeyedArchiver.archivedDataを用いてtodoListをシリアライズし、userDefaults.setでキャッシュしuserDefaults.synchronizeで同期させています。requiringSecureCodingはここでは重要ではないのでfalseを設定します。
次にこの2つの関数を少し書き換えます。

numberOfSections関数の返り値を1に、その下のcellの個数を返す関数には配列todoListの要素数であるtodoList.countを返すようにします。
ここから様々なtableView関数をoverrideしていきます。1つめはこれです。
override func tableView(_ tableView: UITableView, cellForRowAt indexPath: IndexPath) -> UITableViewCell {
    let cell = tableView.dequeueReusableCell(withIdentifier: "reuseIdentifier", for: indexPath)

    // Configure the cell...

    return cell
}
この関数ではcellに表示する情報をどこから用意するか、またcellの振る舞いも決めたりします。
これを次のように書き換えます。
override func tableView(_ tableView: UITableView, cellForRowAt indexPath: IndexPath) -> UITableViewCell {
    let cell = tableView.dequeueReusableCell(withIdentifier: "todoCell", for: indexPath)
    let todoData = todoList[indexPath.row]

    cell.textLabel?.text = todoData.todoTitle
    if todoData.todoDone {
        cell.accessoryType = UITableViewCell.AccessoryType.checkmark
    } else {
        cell.accessoryType = UITableViewCell.AccessoryType.none
    }

    return cell
}
cellの識別子として前もって用意しておいた"todoCell"を設定します。そしてcellが持つtextLabelにtodoDataインスタンスのtodoTitleを表示させます。またtodoDoneの値によってcheckmarkをつけるかつけないかをif文で書いています。
2つめでは、リストの項目に変更を加えることを可能にするためにtableView(_ tableView: UITableView, canEditRowAt indexPath: IndexPath) -> Boolをoverrideし、trueを返り値とします。
これを踏まえて3つめではリストの項目を削除する機能をつくります。tableView(_ tableView: UITableView, commit editingStyle: UITableViewCellEditingStyle, forRowAt indexPath: IndexPath)を次のようにoverrideします。
override func tableView(_ tableView: UITableView, commit editingStyle: UITableViewCell.EditingStyle, forRowAt indexPath: IndexPath) {
    if editingStyle == .delete {
        // Delete the row from the data source
        todoList.remove(at: indexPath.row)
        tableView.deleteRows(at: [indexPath], with: .fade)

        let userDefalults = UserDefaults.standard
        do {
            let data: Data = try NSKeyedArchiver.archivedData(withRootObject: self.todoList, requiringSecureCoding: false)
            userDefalults.set(data, forKey: "todoList")
            userDefalults.synchronize()
        } catch {
            print(error)
        }
    }
}
todoListの要素をremoveする形で変更を加えたため、忘れずにtodoListをシリアライズし、データを保存します。
最後に、項目をタップした時にtodoの完了を表すチェックマークをつけたり消したりする操作を実装するためにtableView(_ tableView: UITableView, didSelectRowAt indexPath: IndexPath)を次のように書き換えます。
override func tableView(_ tableView: UITableView, didSelectRowAt indexPath: IndexPath) {
    let todoData = todoList[indexPath.row]
    if todoData.todoDone {
        todoData.todoDone = false
    } else {
        todoData.todoDone = true
    }
    tableView.reloadRows(at: [indexPath], with: .fade)

    let userDefaults = UserDefaults.standard
    do {
        let data = try NSKeyedArchiver.archivedData(withRootObject: self.todoList, requiringSecureCoding: false)
        userDefaults.set(data, forKey: "todoList")
        userDefaults.synchronize()
    } catch {
        print(error)
    }
}
TodoData.todoDoneに変更を加えたため、やはりシリアライズ処理を行ってデータを同期します。
以上で完成です。最後にソースコード全体を表示しておきます。
import UIKit

class TableViewController: UITableViewController {

    var todoList = [TodoData]()
    @IBAction func addButton(_ sender: Any) {
        let alertController = UIAlertController(title: "todoを追加", message: "todoを入力してください", preferredStyle: .alert)
        alertController.addTextField(configurationHandler: nil)

        let okAction = UIAlertAction(title: "OK", style: .default) { (action: UIAlertAction) in
            if let textField = alertController.textFields?.first {
                let todoData = TodoData()
                todoData.todoTitle = textField.text!
                self.todoList.insert(todoData, at: 0)

                self.tableView.insertRows(at: [IndexPath(row: 0, section: 0)], with: .right)

                let userDefaults = UserDefaults.standard
                do {
                    let archivedData: Data = try NSKeyedArchiver.archivedData(withRootObject: self.todoList, requiringSecureCoding: false)
                    userDefaults.set(archivedData, forKey: "todoList")
                    userDefaults.synchronize()
                } catch {
                    print(error)
                }
            }
        }
        let cancelAction = UIAlertAction(title: "cancel", style: .cancel, handler: nil)

        alertController.addAction(okAction)
        alertController.addAction(cancelAction)

        present(alertController, animated: true, completion: nil)
    }

    override func viewDidLoad() {
        super.viewDidLoad()

        if let storedData = UserDefaults().data(forKey: "todoList") {
            do {
                let unarchivedData = try NSKeyedUnarchiver.unarchiveTopLevelObjectWithData(storedData)
                todoList.append(contentsOf: unarchivedData as! [TodoData])
            } catch {
                print(error)
            }
        }

    }

    // MARK: - Table view data source

    override func numberOfSections(in tableView: UITableView) -> Int {
        // #warning Incomplete implementation, return the number of sections
        return 1
    }

    override func tableView(_ tableView: UITableView, numberOfRowsInSection section: Int) -> Int {
        // #warning Incomplete implementation, return the number of rows
        return todoList.count
    }


    override func tableView(_ tableView: UITableView, cellForRowAt indexPath: IndexPath) -> UITableViewCell {
        let cell = tableView.dequeueReusableCell(withIdentifier: "todoCell", for: indexPath)
        let todoData = todoList[indexPath.row]

        cell.textLabel?.text = todoData.todoTitle
        if todoData.todoDone {
            cell.accessoryType = UITableViewCell.AccessoryType.checkmark
        } else {
            cell.accessoryType = UITableViewCell.AccessoryType.none
        }

        return cell
    }

    override func tableView(_ tableView: UITableView, canEditRowAt indexPath: IndexPath) -> Bool {
        // Return false if you do not want the specified item to be editable.
        return true
    }


    override func tableView(_ tableView: UITableView, commit editingStyle: UITableViewCell.EditingStyle, forRowAt indexPath: IndexPath) {
        if editingStyle == .delete {
            // Delete the row from the data source
            todoList.remove(at: indexPath.row)
            tableView.deleteRows(at: [indexPath], with: .fade)

            let userDefalults = UserDefaults.standard
            do {
                let data: Data = try NSKeyedArchiver.archivedData(withRootObject: self.todoList, requiringSecureCoding: false)
                userDefalults.set(data, forKey: "todoList")
                userDefalults.synchronize()
            } catch {
                print(error)
            }
        }
    }
    override func tableView(_ tableView: UITableView, didSelectRowAt indexPath: IndexPath) {
        let todoData = todoList[indexPath.row]
        if todoData.todoDone {
            todoData.todoDone = false
        } else {
            todoData.todoDone = true
        }
        tableView.reloadRows(at: [indexPath], with: .fade)

        let userDefaults = UserDefaults.standard
        do {
            let data = try NSKeyedArchiver.archivedData(withRootObject: self.todoList, requiringSecureCoding: false)
            userDefaults.set(data, forKey: "todoList")
            userDefaults.synchronize()
        } catch {
            print(error)
        }
    }
}
import Foundation

class TodoData: NSObject, NSCoding {
    var todoTitle: String?
    var todoDone: Bool = false

    override init() { }

    func encode(with aCoder: NSCoder) {
        aCoder.encode(todoTitle, forKey: "todoTitle")
        aCoder.encode(todoDone, forKey: "todoDone")
    }

    required init?(coder aDecoder: NSCoder) {
        todoTitle = aDecoder.decodeObject(forKey: "todoTitle") as? String
        todoDone = aDecoder.decodeBool(forKey: "todoDone")
    }
}
おわりに
この記事で多くのことを参考にした本がこれです。
本気ではじめるiPhoneアプリ作り Xcode 9.x + Swift 4.x 対応
2018年の春頃買ったものですが、今では既に古いとされてしまったSwiftの機能もあります。例えばNSKeyedUnarchiver.unarchiveObject(with:)はdeprecateされたものとなりました。その代わりにunarchivedObject(ofClass:from:)などを使いなさいと警告されます。しかし、これはAppleの公式ドキュメントを見ても説明文がありません。
また、今回使ったNSKeyedUnarchiver.unarchiveTopLevelObjectWithDataについてもまだ説明が載っていません。正直、使ってみたらできたというのが今回の記事です。
加えて、runtime systemやNSObjectは自分もあまり実態を知らないので、勉強した暁にはこうしてまた記事を書きたいと思っています。
ありがとうございました。