今回はFirebaseの上にWebアプリを乗っける方法です。(ローカルからホスティングする方法)
修正などがあったら是非お願いします。
Firebaseとは
FirebaseはGoogleが運営しているBaaS,mBaaSのサービス。無料で使える枠でも十分であると思う。。
諸要素は、認証やDB、ストレージ、Hosting,Functionsなどがある。
Firebaseホームページ:https://firebase.google.com/
ローカルにFirebaseをインストール
macを使っています。ターミナルに
npm install -g firebase-tools
を入力してCLIをインストール。
その後
firebase login
でターミナルでFirebaseにログインします。(ブラウザでのログイン&承認)
ターミナルからFirebaseを操作
ではここからFirebaseを動かしていきます。
firebase init
を入力すると以下の画面がでできます。今回はデスクトップに作ります。

Firebaseと書いてあります。笑
HostingなのでHostingを選択。(カーソル移動した後スペースで選択できます)
 するとこの画面となるのでプロジェクトを選択します。
sampleプロジェクトがありますが、[create a new project]を選択します。
するとこの画面となるのでプロジェクトを選択します。
sampleプロジェクトがありますが、[create a new project]を選択します。
 ここではPublic directoryを決定します。ここにHostingしたいソースファイルを入れていきます。例の通りpublicと指定します。
 「単一アプリケーションとして設定するか」との質問があるんので選択してください。ここでは"y"とします。
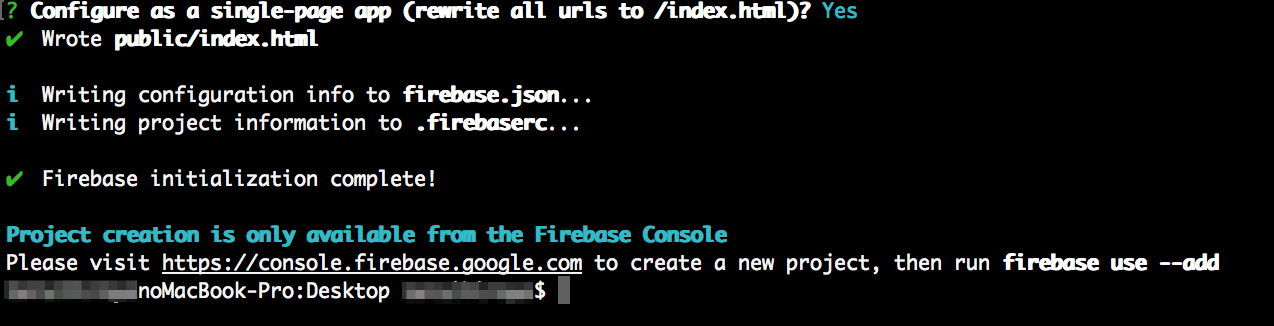 これで設定は完了です!何個かファイルが作られています。[create a new project]を選択していたのでプロジェクトがないとされています。Firebaseのページで作ります(今回はsampleを既に作っています)
いよいよHosting
ここからHostingしていきます。
Hostingの準備
firebase use --add
を入力します。
 どのプロジェクトをHosting先にするのか選択します。ここではsampleをHosting先にします。
 するとstagingなどを聞かれているのでそのままstagingを入力。
 これで準備が整いました!
Hosting
ソースコード
sample.html
<!DOCTYPE html>
<html>
<head>
    <meta http-equiv="Content-Type" content="text/html; charset=UTF-8">
    <script src="https://cdn.firebase.com/js/client/2.3.2/firebase.js"></script>
    <script src="https://ajax.googleapis.com/ajax/libs/jquery/1.11.2/jquery.min.js"></script>
    <script src="https://maxcdn.bootstrapcdn.com/bootstrap/3.3.2/js/bootstrap.min.js"></script>
    <link rel="stylesheet" href="https://maxcdn.bootstrapcdn.com/bootstrap/3.3.2/css/bootstrap.min.css">
    <link rel="stylesheet" type="text/css" href="./chat_user.css">

<script>

    var user = {
        userName:"",
        userPhoto:"",
        userMail:""
    }

  // Initialize Firebase
  function signUp(){
    var provider = new firebase.auth.FacebookAuthProvider();
    firebase.auth().signInWithPopup(provider).then(function(result) {
    // This gives you a Facebook Access Token. You can use it to access the Facebook API.
    var token = result.credential.accessToken;
    // The signed-in user info.
    var user = result.user;
    // ...
    console.log("success!");
    console.log(JSON.stringify(user));

    //コンストラクタ
    console.log(user['displayName']);
    console.log(user['photoURL']);
    console.log(user['email']);
    console.log(user.email);

    var user = new insert(user['displayName'],user['photoURL'],user['email']);
    //名前変更
    var userName = document.getElementById("user_name");
    userName.textContent = user.userName;


  }).catch(function(error) {
   console.log("Failed!");
    // Handle Errors here.
    var errorCode = error.code;
    var errorMessage = error.message;

    console.log(errorCode);
    console.log(errorMessage);
    // The email of the user's account used.
    var email = error.email;
    // The firebase.auth.AuthCredential type that was used.
    var credential = error.credential;
    // ...
  });
  }

//変更箇所
    function insert(name,photo,mail){
        this.userName = name;
        this.userPhoto = photo;
        this.userMail = mail;
   }

</script>
</head>
<body>
    <div class="panel-default">
        <div class="panel-heading">
            <p>リアルタイムチャットサンプル</p>
        </div>
        <button type="button" class="btn btn-primary" onClick="signUp()">Primary</button>
        <div id="scroller" class="panel-body">
            <ul id='messages'>
            </ul>
        </div>
        <div class="panel-footer">
            <div id="user_name"></div>
        </div>
        <div class="panel-footer">
            <input type='text' class="form-control" id="messageInput" placeholder="メッセージ内容を入力してください">
        </div>
    </div>
</body>
    <script src="./chat_user.js"></script>
</html>
chat_user.css
ul,li{
    padding: 0;
    margin: 0;
    list-style-type: none;
    text-align: left;
}
# scroller {
    height: 500px;
    overflow: auto;
}

/*******************************
* 左からの吹き出し
********************************/
.left_balloon {
    position: relative;
    background: #f1f0f0;
    border: 0px solid #777;
    margin: 5px 10px;
    padding: 5px 10px;
    border-radius: 15px;
    width: 400px;
    clear: both;
}

/*******************************
* 右からの吹き出し
********************************/
.right_balloon {
    color: #fff;
    position: relative;
    background: #0084ff;
    border: 0px solid #777;
    margin: 5px 10px;
    padding: 5px 10px;
    border-radius: 15px;
    width: 400px;
    clear: both;
    float: right;
}

/*******************************
* 割り込みを解除
********************************/
.clear_balloon{
  clear: both;
}


.sender_name{
    margin-bottom: -5px;
    padding-left: 20px;
    color: rgba(0, 0, 0, .40);
}
.sender_name.me{
    float: right;
    padding: 0 20px 0 0;
}
chat_user.js
// データベースと接続する
var messagesRef = new Firebase('https://プロジェクトの正式名(URL参照).firebaseio.com/');

var messageField = $('#messageInput');
var nameField = $('#user_name');
//console.log("username==" + nameField.text());
var messageList = $('#messages');

// ENTERキーを押した時に発動する
messageField.keypress(function (e) {
    if (e.keyCode == 13) {
        //フォームに入力された情報
        var nameField = $('#user_name');
        console.log("username==" + nameField.text());
        var username = nameField.text();
        var message = messageField.val();

        //データベースに保存する
        messagesRef.push({name:username, text:message});
        messageField.val('');

        $('#scroller').scrollTop($('#messages').height());
    }
});

// データベースにデータが追加されたときに発動する
messagesRef.limitToLast(10).on('child_added', function (snapshot) {
    //取得したデータ
    var data = snapshot.val();
    var username = data.name || "anonymous";
    var message = data.text;

    //取得したデータの名前が自分の名前なら右側に吹き出しを出す
    if ( username == nameField.text() ) {

        var messageElement = $("<il><p class='sender_name me'>" + username + "</p><p class='right_balloon'>" + message + "</p><p class='clear_balloon'></p></il>");

    } else {

        var messageElement = $("<il><p class='sender_name'>" + username + "</p><p class='left_balloon'>" + message + "</p><p class='clear_balloon'></p></il>");

    }
    //HTMLに取得したデータを追加する
    messageList.append(messageElement)

    //一番下にスクロールする
    messageList[0].scrollTop = messageList[0].scrollHeight;
});
今回のソースコードはFirebaseでリアルタイムチャットを構築するのコードにFB認証を付け加えて、各チャットのユーザー名がFBの名前となります(DBにもしっかり保存される)。
FB認証の方法はこちら。
Publicに入れる
話は戻って、作ったソースファイルをpublicに入れていきます。
publicの作成とともにできていたindex.htmlがあります。そこに作ったファイルをコピー。

そしてコンソールで
firebase deploy
と入力。すると、、

となりHosting終了。