そもそも状態遷移テストとは?
主に仕様で定められている状態遷移表や状態遷移図の通りに遷移するかをテストすることを指します。
ここでは、組み合わせテストケース生成ツールPICTを使ってN-switch coverageを満たすテストを作ります。
N-Switch coverageとは?
下記のようなストップウォッチを想定した仕様を仮定します。
このストップウォッチにはstart,reset,pauseの三つの物理ボタンがあり、仕様上ではpower_off,default,counting,stoppingの4つの状態があるとします。
- 状態がpower_offのとき、startボタンを押すとdefault状態に遷移する
- 状態がdefaultのとき、resetボタンを押すとpower_off状態に遷移する
- 状態がdefaultのとき、startボタンを押すとcounting状態に遷移する
- 状態がcountingのとき、pauseボタンを押すとstopping状態に遷移する
- 状態がcountingのとき、resetボタンを押すとdefault状態に遷移する
- 状態がstoppingのとき、startボタンを押すとcounting状態に遷移する
- 状態がstoppingのとき、resetボタンを押すとdefault状態に遷移する
素直に考えると、1から7までをボタンを押して遷移先をチェックしたらテストができると言えます。
このように、ある状態から、別の状態に移動するだけを確認するテストを0-switch coverageが満たされていると言えます。
それに対して、1-switch coverageは、power_off=>default=>stoppingのように、最初の状態と最後の状態の間にもう一つ状態を挟むパターンを網羅することを意味します。
どうやってN-switch coverageを作るの?
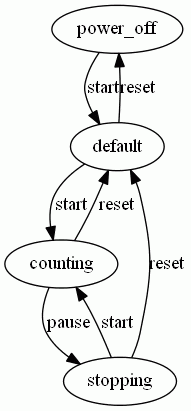
上記の状態遷移の仕様を状態遷移図にすると以下のようになります。
このアプリの状態は必ずpower_offから始まること、power_off=>default=>power_offやdefault=>stopping->counting->defaultのように元の状態に戻りますので、実際にテストをするときには、default,counting,stoppingから開始するということはないので、同じ径路を通っても、バグが出たり出なかったりする可能性もあります。
そこで、常にpower_offの状態から操作した方が質の高いテストになると言えます。
しかし、ストップウォッチのような比較的単純な仕組みであっても複雑なテストになりそうなのに、より複雑な実際のソフトウェアに適用できるわけがないと思うかもしれません。
もし実行できない程大量のテストケースができるような場合は、PICTと呼ばれる組み合わせテストケース生成ツールを使います。
PICTそのものについてはここでは書きませんが、テストでは有名なツールで、バグを検出しやすい組み合わせを生成してくれるツールと理解してもらってよいです。
状態遷移に関するテストでは、「特定の径路で状態遷移をすると、意図しない状態遷移をする」のようなバグを検出しやすくなります。
時間が無い場合は上記のような仕様から直接テストケースを作ることもありますが、丁寧にテストをする場合は、以下のような手順を踏んでテストしていきます。
- 仕様から状態遷移表を作る
- 状態遷移表からデシジョンテーブルを作る
- デシジョンテーブルから状態遷移テストを生成する(ここでPICTを使います)
- 生成した状態遷移テストを実行する(手動でやるか、自動でやるかはお任せです)
1、2のような手順を踏むのは、テストを実行するのは時間がかかるので、テストをする前に仕様自体のバグを検出した方がコストが安く済むからです。
1. 仕様から状態遷移表を作る
仕様から状態遷移表を作ると、以下のように、仕様に記述されていない部分が判明します。("??"で表現しています。)
| state\action | start | pause | reset |
|---|---|---|---|
| power_off | >default | ?? | ?? |
| default | >counting | ?? | ?? |
| counting | ?? | >stopping | >default |
| stopping | >counting | ?? | >default |
ここでは仮に、以下のように??の箇所はボタンを押しても遷移しないとしましょう。
| state\action | start | pause | reset |
|---|---|---|---|
| power_off | >default | >power_off | >power_off |
| default | >counting | >default | >default |
| counting | >counting | >stopping | >default |
| stopping | >counting | >stopping | >default |
2. 状態遷移表からデシジョンテーブルを作る
状態遷移表を作ると、機械的にデシジョンテーブルを作ることができます。
| state | power_off | power_off | power_off | default | default | default | counting | counting | counting | stopping | stopping | stopping |
|---|---|---|---|---|---|---|---|---|---|---|---|---|
| action | start | pause | reset | start | pause | reset | start | pause | reset | start | pause | reset |
| next state | default | power_off | power_off | counting | default | default | counting | stopping | default | counting | stopping | default |
3. デシジョンテーブルから状態遷移テストを生成する(ここでPICTを使います)
デシジョンテーブルを作ると、PICTの設定ファイルを作りやすくなります。
下記では初期状態をpower_offとし、2-swith coverageを満たす、全ての組み合わせを出力します。
{state0, action0, state1, action1, state2, action2, state3, action3, state4} @ 9
上記で全ての組み合わせを出力するように指定しています。
全ての組み合わせを指定すると297パターンになりますが、指定しないと23パターンまで減らすことができます。
N-switchのNの値を増やしたりするのも含めて、テストに許されている工数などを踏まえて、現実的な工数に収まるようにしてください。
state0: power_off
action0: start,pause,reset
state1: power_off,default
action1: start,pause,reset
state2: power_off,default,counting
action2: start,pause,reset
state3: power_off,default,counting,stopping
action3: start,pause,reset
state4: power_off,default,counting,stopping

# You have to use sub model to get all combination.

{state0, action0, state1, action1, state2, action2, state3, action3, state4} @ 9

# for 1st actions
if ([action0] = "start") then
   [state1] = "default";

if ([action0] = "pause") then
   [state1] = "power_off";

if ([action0] = "reset") then
   [state1] = "power_off";

# for 2nd actions
if ([state1] = "power_off" and [action1] = "start") then
   [state2] = "default";

if ([state1] = "power_off" and [action1] = "pause") then
   [state2] = "power_off";

if ([state1] = "power_off" and [action1] = "reset") then
   [state2] = "power_off";

if ([state1] = "default" and [action1] = "start") then
   [state2] = "counting";

if ([state1] = "default" and [action1] = "pause") then
   [state2] = "default";

if ([state1] = "default" and [action1] = "reset") then
   [state2] = "default";

# for 3rd actions
if ([state2] = "default" and [action2] = "start") then
   [state3] = "counting";

if ([state2] = "default" and [action2] = "pause") then
   [state3] = "default";

if ([state2] = "default" and [action2] = "reset") then
   [state3] = "default";

if ([state2] = "counting" and [action2] = "start") then
   [state3] = "counting";

if ([state2] = "counting" and [action2] = "pause") then
   [state3] = "stopping";

if ([state2] = "counting" and [action2] = "reset") then
   [state3] = "default";

# for 4th actions
if ([state3] = "default" and [action3] = "start") then
   [state4] = "counting";

if ([state3] = "default" and [action3] = "pause") then
   [state4] = "default";

if ([state3] = "default" and [action3] = "reset") then
   [state4] = "default";

if ([state3] = "counting" and [action3] = "start") then
   [state4] = "counting";

if ([state3] = "counting" and [action3] = "pause") then
   [state4] = "stopping";

if ([state3] = "counting" and [action3] = "reset") then
   [state4] = "default";

if ([state3] = "stopping" and [action3] = "start") then
   [state4] = "counting";

if ([state3] = "stopping" and [action3] = "pause") then
   [state4] = "stopping";

if ([state3] = "stopping" and [action3] = "reset") then
   [state4] = "default";
4. 生成した状態遷移テストを実行する(手動でやるか、自動でやるかはお任せです)
省略です。
