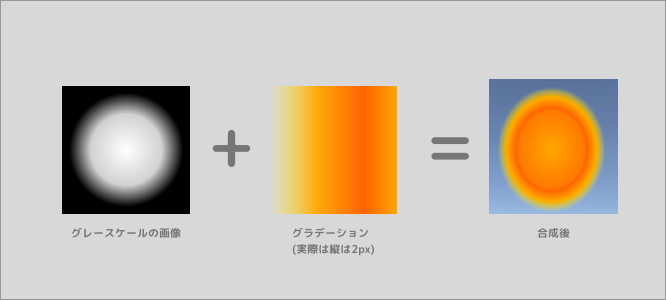
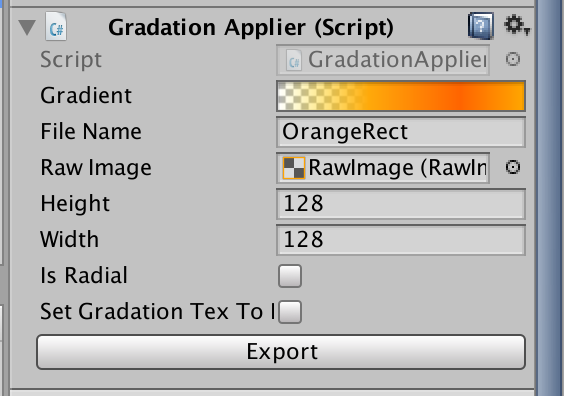
結果
グラデーションの具合の調整をUnityの中でやるために,
グラデーション画像の生成をUnity側でやります.
1. Textureを生成する.
public class GradationTexCreater{

	public GradationTexCreater(){

	}

	public Texture2D Create(Gradient gradient){
		return GradientToTexture (gradient);
	}

	/// <summary>
	/// グラデーションをそのまま画像にする.
	/// </summary>
	public static Texture2D GradientToTexture(Gradient gradient, int width = 256, int height = 1)
	{
		var texture = CreateTexture(width, height);
		for (int h = 0; h < texture.height; h++)
		{
			for (int w = 0; w < texture.width; w++)
			{
				float rate = (float)w / (float)texture.width;
				Color color = gradient.Evaluate(rate);
				texture.SetPixel(w, h, color);
			}
		}

		texture.Apply();
		return texture;
	}
	/// <summary>
	/// グラデーションを円形グラデーションのテクスチャにする..
	/// </summary>
	public static Texture2D GradientToRadialGradationTex(Gradient gradient, int width = 256, int height = 1)
	{
		var texture = CreateTexture(width, height);
		for (int h = 0; h < texture.height; h++)
		{
			for (int w = 0; w < texture.width; w++)
			{
				float u = (float)w / (float)texture.width;
				float v = (float)h / (float)texture.height;
				//Color color = gradient.Evaluate(u);
				Color color = new RadialGradationColorCalclator(gradient).Evaluate(u, v);
				texture.SetPixel(w, h, color);
			}
		}

		texture.Apply();
		return texture;
	}

	/// <summary>
	/// 円形グラデーションのカラーを取得するためのクラス
	/// </summary>
	public class RadialGradationColorCalclator{
		public Color backGroundColor = Color.black;
		public float radius = 0.9f; // グラデーションの伸びる割
		public Gradient gradient;

		public RadialGradationColorCalclator(Gradient gradient){
			this.gradient = gradient;
		}

		// uvでカラーを取得 // 左下が0,0 to 1,1
		public Color Evaluate(float u, float v){
			Vector2 r = RemapMinus1To1 (u, v); // -1 -> 1
			float l = r.magnitude;
			if (l < radius) {
				float t = l / radius;
				return gradient.Evaluate (t);
			} else {
				return backGroundColor;
			}
		}

		Vector2 RemapMinus1To1(float u, float v){
			return new Vector2 (u - 0.5f, v - 0.5f) * 2.0f;
		}
	}


	/// <summary>
	/// グラデーション用の設定でTexture2Dを作成
	/// </summary>
	static Texture2D CreateTexture(int width, int height)
	{
		// Alpha使うのでRGB32にする. 使わないならRGB24
		Texture2D texture = new Texture2D(width, height, TextureFormat.RGBA32, false);
		texture.wrapMode = TextureWrapMode.Clamp;
		return texture;
	}
}
Gradientから画像を生成します.
Gradientについては以下の記事に書きました.
https://qiita.com/Teach/items/3bc616d9f8115e80c31e
Texture2F作成の仕組みは以下です.
- CreateTextureでwidthとheightを指定して生成
- widthとheightの分だけFor分を回し,各pixelごとにSetPixelで色をつける.
フラグメントシェーダーに近い色の付け方です.
2. pngで保存する.
using System.Collections;
using System.Collections.Generic;
using UnityEngine;
using System.IO;


# if UNITY_EDITOR
using UnityEditor;
# endif

public class GradationApplier : MonoBehaviour {

	public Gradient gradient;
	public string fileName = "gradation";

	[HideInInspector]
	public Texture2D texCache;
	public UnityEngine.UI.RawImage rawImage;
	public int height = 128;
	public int width = 128;
	public bool isRadial = false;
	public bool setGradationTexToMaterial = false;

	void OnValidate(){
		if (height < 0)
			height = 0;
		if (width < 0)
			width = 0;

		if(isRadial)
			texCache = GradationTexCreater.GradientToRadialGradationTex (gradient, width, height);
		else
			texCache = GradationTexCreater.GradientToTexture (gradient, width, height);
		if(rawImage !=null)
			rawImage.texture = texCache;
		if(texCache != null)
			texCache.name = fileName;

		if (setGradationTexToMaterial && texCache != null)
			this.GetComponent<SpriteRenderer> ().sharedMaterial.SetTexture ("_GradationTex", texCache);
	}
}

# if UNITY_EDITOR
[CustomEditor(typeof(GradationApplier))]
public class GradationApplierEditor : Editor{

	GradationApplier applier;

	void OnEnable(){
		applier = target as GradationApplier;
	}

	public override void OnInspectorGUI ()
	{
		DrawDefaultInspector ();
		if (GUILayout.Button ("Export")) {
			ExportTexture (applier.texCache);
		}
	}

	public static void ExportTexture(Texture2D tex){
		string path = GetSavePath (tex.name);
		Directory.CreateDirectory (Path.GetDirectoryName (path));
		File.WriteAllBytes(path, tex.EncodeToPNG());
		AssetDatabase.Refresh();
	}

	static string GetSavePath(string fileName){
		var path2 = string.Format ("Export/{0}.png", fileName);
		return Path.Combine (Application.dataPath, path2);
	}
}

# endif
3. シェーダーで合成する
Shader "TSprites/Effect"
{
    Properties
    {
        [PerRendererData] _MainTex ("Sprite Texture", 2D) = "white" {}
        [MaterialToggle] PixelSnap ("Pixel snap", Float) = 0
        [HideInInspector] _RendererColor ("RendererColor", Color) = (1,1,1,1)
        [HideInInspector] _Flip ("Flip", Vector) = (1,1,1,1)
        [PerRendererData] _AlphaTex ("External Alpha", 2D) = "white" {}
        [PerRendererData] _EnableExternalAlpha ("Enable External Alpha", Float) = 0
        _GradationTex("Gradation Texture", 2D) = "white"{}
    }

    SubShader
    {
        Tags
        {
            "Queue"="Transparent"
            "IgnoreProjector"="True"
            "RenderType"="Transparent"
            "PreviewType"="Plane"
            "CanUseSpriteAtlas"="True"
        }

        Cull Off
        Lighting Off
        ZWrite Off
        Blend SrcAlpha OneMinusSrcAlpha

        Pass
        {
        CGPROGRAM
            #pragma vertex vert
            #pragma fragment frag
            #pragma target 2.0
            #pragma multi_compile_instancing
            #pragma multi_compile _ PIXELSNAP_ON
            #pragma multi_compile _ ETC1_EXTERNAL_ALPHA
            #include "UnitySprites.cginc"

            sampler2D _GradationTex;
            float _val_u;

            struct appdata_ts
            {
            	float4 vertex : POSITION;
                float2 texcoord0 : TEXCOORD0;
                float4 color : COLOR;
            };

            struct v2f_ts
            {
            	float4 pos : SV_POSITION;
                float2 uv0 : TEXCOORD0;
                fixed4 color : COLOR;
                UNITY_VERTEX_OUTPUT_STEREO
            };

            v2f_ts vert(appdata_ts IN){
            	v2f_ts OUT;
            	UNITY_INITIALIZE_VERTEX_OUTPUT_STEREO(OUT);

            	OUT.pos = UnityObjectToClipPos(IN.vertex);
            	OUT.uv0 = IN.texcoord0;

            	#ifdef PIXELSNAP_ON
                OUT.pos = UnityPixelSnap (OUT.pos);
                #endif
                OUT.color = IN.color;
                return OUT;
            }

            fixed4 frag(v2f_ts IN) : SV_Target{
            	// Default
                  fixed4 mainColor = SampleSpriteTexture(IN.uv0);
                  // グラデーションの色を求める
                  float2 gradation_uv = float2(mainColor.r, 0);
                  fixed4 finalColor = tex2D(_GradationTex, gradation_uv);

                  finalColor *= IN.color;
                  float finalAlpha = mainColor.a * finalColor.a;
            	  return fixed4(finalColor.rgb, finalAlpha);
            }
        ENDCG
        }
    }
}
SpriteRenderer用のシェーダーです.
まとめ
Photoshop等を使わずUnityだけで作れるという点で,スクリプトから画像を作るのは非常に役立つと思いました.
いろいろなことの自動化に応用できそうで,非常に勉強になりました.
参考

