本記事について
この記事は CoreBluetoothForUnity Advent Calendar 2023 の2日目の記事です。
CoreBluetoothForUnity を使って任意のデータを送受信するためには、BLE の基礎知識が必要です。
01_LightControl サンプルをコードを読みながら、必要な知識を学んでいきます。
前提
- 01_LightControl サンプルを動かすことができること。
環境
- CoreBluetoothForUnity 0.4.3
そもそも BLE とは
以下の記事がわかりやすかったため、こちらをご参照ください!
ChatGPT に「BLEってなんですか?」って聞いても割とわかりやすく教えてくれます。
関連
コンセプト (単語)
最低限の単語を簡単に説明します。ここではなんとなくの理解で大丈夫です。
登場人物
| 単語 | 説明 | 例 |
|---|---|---|
| Central | BLE デバイス。親機。接続する側 | iPhone, Mac, M5Stack 等 |
| Peripheral | BLE デバイス。子機。接続される側 | ↑。Switchコントーラー等のセンサの類等 |
| Service | 提供する機能の単位。 Characteristicの入れ物 |
Light の色を変更する機能 |
| Characteristic | データの保持、読み書きするもの |
上記はすべて識別子として UUID を持っています。
動作
| 単語 | 説明 | 例 |
|---|---|---|
| Advertise | 無線で周囲にデータを発信する | Peripheral が Central に自分の存在を知らせる |
| Scan | 周囲の BLE デバイスを探す | Central が Peripheral を探す |
| Connect | Scan で見つけた Peripheral に接続 |
参考
BLE 通信の流れ
サンプルの LightControl を例に、BLE 通信の流れをざっくり図示します。
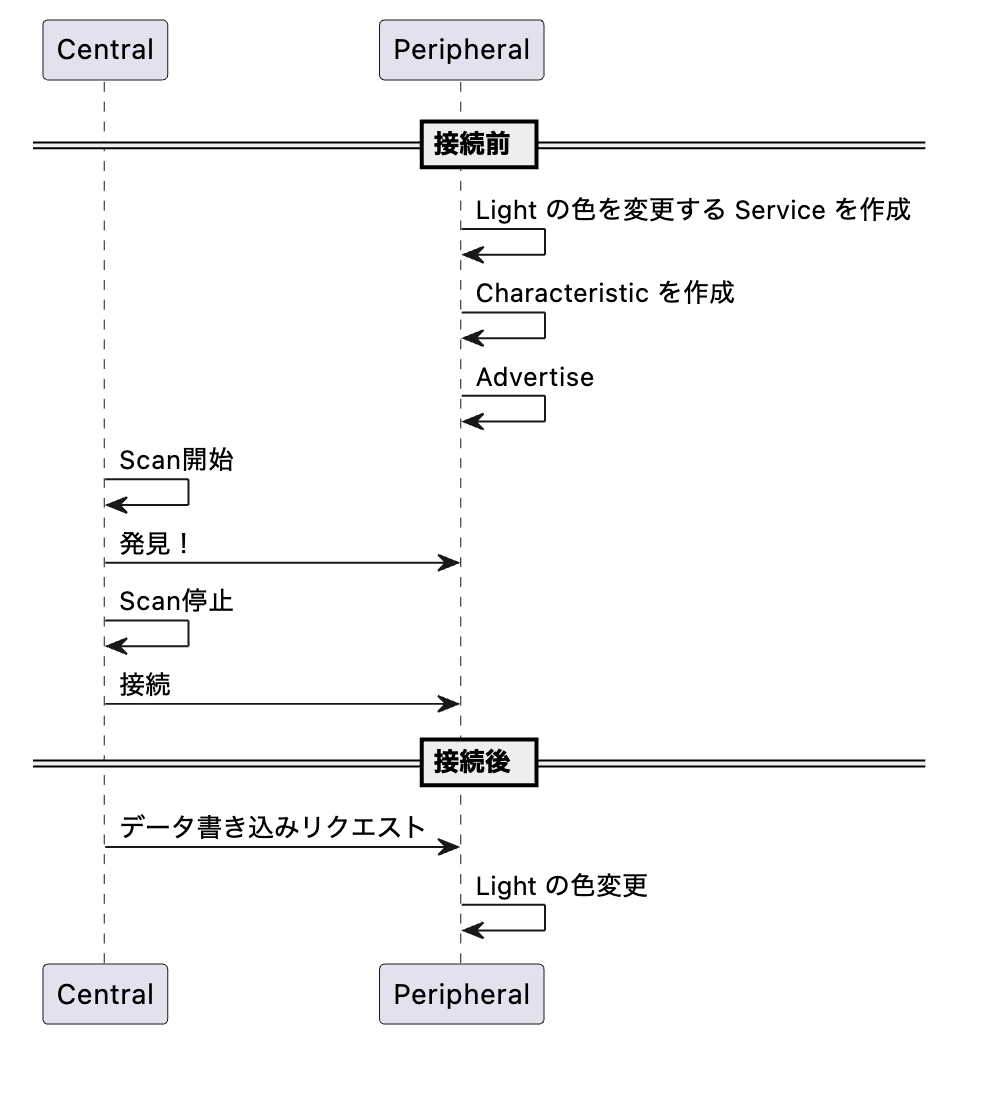
より簡潔に書くと以下です。
1. Peripheral: ここだよ!(Advertise)
2. Central: あっ、見つけた!(Scan)
3. Central: 接続!(Connect)
4. Central: 色書き込み!(Write)
こうみるとシンプルですし、コード量も100行程度とそこまで多くない印象です。
専用単語が多いためその分詰まる点は多いですが、実際に動いているコードを見ることで各単語がどういった役割を持つのかの理解が深められると思います。
Advertise の実装 (Peripheral)
Advertise は Peripheral 側で行います。
CBPeripheralManager の初期化
まず CBPeripheralManager の初期化のコードを見ていきます。
void Start()
{
    var initOptions = new CBPeripheralManagerInitOptions() { ShowPowerAlert = true };
    _peripheralManager = new CBPeripheralManager(this, initOptions);
    _disposables.Add(_peripheralManager);
...
}

void ICBPeripheralManagerDelegate.DidUpdateState(CBPeripheralManager peripheral)
{
    if (peripheral.State == CBManagerState.PoweredOn)
    {
      // Service作成部分
    }
}
初期化時には ICBPeripheralManagerDelegate とオプションを渡しています。
ShowPowerAlert を true にすることで、BLE がオフの場合にアラートを表示してくれます。
ICBPeripheralManagerDelegate は CBPeripheralManager のイベントを受け取るためのインターフェースです。
別のクラスに実装しても問題ありませんが、特別な事情がなければ CBPeripheralManager を保持するクラスが実装しておくのが無難だと思います。
で、CBPeripheralManager をインスタンス化したらそのメソッドを呼ぶ前に DidUpdateState で State が PoweredOn になるまで待機します。これについては以下のドキュメントに記載されています。
Before you call CBPeripheralManager methods, the peripheral manager object must be in the powered-on state
Service, Characteristic の作成
次に Service, Characteristic の作成を見ていきます。
void ICBPeripheralManagerDelegate.DidUpdateState(CBPeripheralManager peripheral)
{
    if (peripheral.State == CBManagerState.PoweredOn)
    {
        if (_lightControlService == null)
        {
            _lightControlService = new CBMutableService(SampleLightControl_Data.ServiceUUID, true);
            var characteristic = new CBMutableCharacteristic(
                SampleLightControl_Data.LightControlCharacteristicUUID,
                CBCharacteristicProperties.Write,
                null,
                CBAttributePermissions.Writeable
            );
            _lightControlService.Characteristics = new CBCharacteristic[] { characteristic };
            _peripheralManager.AddService(_lightControlService);
            _disposables.Add(_lightControlService);
        }
    }
}
Bluetooth の ON, OFF 切り替えても重複して呼ばれないように、_lightControlService が null の場合にのみ作成するようにしています。
_lightControlService = new CBMutableService(SampleLightControl_Data.ServiceUUID, true);
CBService ではなく、CBMutableService です。 (CBService にはコンストラクタがありません。)
引数には Service の UUID と isPrimary を渡しています。
Service と、後で出てくる Characteristic の UUID は以下のように定義されています。
public static class SampleLightControl_Data
{
    // See the following for generating UUIDs:
    // https://www.uuidgenerator.net/
    public static readonly string ServiceUUID = "068C47B7-FC04-4D47-975A-7952BE1A576F";
    public static readonly string LightControlCharacteristicUUID = "2AE0B518-1DF2-4192-9E4A-EDEF2F30B04C";
この UUID はなんでも良いため、コメントの URL のサイトで生成されたものを使用しています。
注意点としては CoreBluetooth では UUID は大文字で扱われるため、必ず大文字で定義してください。
そうしないと UUID を比較するときにマッチしなくなります。
isPrimary に関しては Service を1つのみ定義しているときはtrue一択です。複数 Service 定義するときまで得に気にしなくて良いと思います。
Characteristic の生成は以下です。
var characteristic = new CBMutableCharacteristic(
    SampleLightControl_Data.LightControlCharacteristicUUID,
    CBCharacteristicProperties.Write,
    null,
    CBAttributePermissions.Writeable
);
API Reference - CBMutableCharacteristic
引数には Characteristic の UUID, Properties, Value, Permissions を渡しています。
Read, Write といった読み書きの権限を指定します。
LightControl のサンプルでは、Write (= Central から Peripheral に値を書き込む) 権限を持つ Characteristic を作成しています。
ここの注意点は Value に null を渡す点です。Value に値を渡してしまうと Characteristic の値が固定されて書き込み不可になります。従って、基本的には null 入れておけば良いと思います。詳しくは以下のドキュメントに記載されています。
あとは作成した Characteristic を Serviceに、Service を PeripheralManager いそれぞれ追加で Service の作成完了です。
CBPeripheralManager.AddService を呼ぶと、非同期で Delegate の DidAddService が呼ばれます。
そこで Advertise を開始します。
Advertise の開始
void ICBPeripheralManagerDelegate.DidAddService(CBPeripheralManager peripheral, CBService service, CBError error)
{
    if (error != null)
    {
        Debug.LogError($"[DidAddService] error: {error}");
        return;
    }

    StartAdvertising();
}

void StartAdvertising()
{
    var options = new StartAdvertisingOptions()
    {
        ServiceUUIDs = new string[] { SampleLightControl_Data.ServiceUUID }
    };
    _peripheralManager.StartAdvertising(options);
}
CBPeripheralManager.StartAdvertising で Advertise を開始します。
オプションに渡した ServiceUUIDs は、Central が Scan で探すときの目印になります。
これで Advertise 開始まで完了です。続いて Central 側のコードを見ていきます。
Scan の実装 (Central)
CBCentralManager の初期化
CBPeripheralManager と同じように Central 側でも CBCentralManager を初期化します。
void Start()
{
    var initOptions = new CBCentralManagerInitOptions() { ShowPowerAlert = true };
    _centralManager = new CBCentralManager(this, initOptions);
...
}

void ICBCentralManagerDelegate.DidUpdateState(CBCentralManager central)
{
    if (central.State == CBManagerState.PoweredOn)
    {
      // Scan 開始
...
    }
}
とくにポイントはありません。
Scan の開始
void ICBCentralManagerDelegate.DidUpdateState(CBCentralManager central)
{
    if (central.State == CBManagerState.PoweredOn)
    {
...
        central.ScanForPeripherals(new string[] { SampleLightControl_Data.ServiceUUID });
    }
}
CBCentralManager.ScanForPeripherals で Scan を開始します。引数には探す対象の ServiceUUID を渡します。
Peripheral が見つかったら
ICBCentralManagerDelegate.DidDiscoverPeripheral が呼ばれます。
void ICBCentralManagerDelegate.DidDiscoverPeripheral(CBCentralManager central, CBPeripheral peripheral, int rssi)
{
...
    _peripheral = peripheral;
    peripheral.Delegate = this;
    central.StopScan();
    central.Connect(peripheral);
}
peripheral.Delegate に ICBPeripheralDelegate をセットすることで CBPeripheral のイベントを取得できるようにしています。
そして、Scan をし続けると無駄に電池を消費してしまうため、停止。
続けて Connect で接続を試みます。
接続が成功したら ICBCentralManagerDelegate.DidConnectPeripheral が呼ばれます。
接続 ~ Characteristic 取得
値の読み書きには Characteristic が必要です。
そのため、接続が成功したら Service -> Characteristic の順に取得していきます。
void ICBCentralManagerDelegate.DidConnectPeripheral(CBCentralManager central, CBPeripheral peripheral)
{
...
    peripheral.DiscoverServices(new string[] { SampleLightControl_Data.ServiceUUID });
}

void ICBPeripheralDelegate.DidDiscoverServices(CBPeripheral peripheral, CBError error)
{
...
    foreach (var service in peripheral.Services)
    {
        peripheral.DiscoverCharacteristics(new string[] { SampleLightControl_Data.LightControlCharacteristicUUID }, service);
    }
}

void ICBPeripheralDelegate.DidDiscoverCharacteristics(CBPeripheral peripheral, CBService service, CBError error)
{
...
    foreach (var characteristic in service.Characteristics)
    {
        if (characteristic.UUID == SampleLightControl_Data.LightControlCharacteristicUUID)
        {
            _lightControlCharacteristic = characteristic;
...
            return;
        }
    }
}
Service や Characteristic が配列なのと、非同期なため行数多いですがやってることはシンプルです。
CBPeripheral.DiscoverServices で Service を取得し、CBPeripheral.DiscoverCharacteristics で Characteristic を取得します。
これでキャッシュした Characteristic を使って値の書き込みができるようになりました。
Write の実装 (Central)
void TurnLedOn(Color32 color)
{
    if (_lightControlCharacteristic == null) return;

    var data = SampleLightControl_Data.GetLedOnData(color);
    _peripheral.WriteValue(data, _lightControlCharacteristic, CBCharacteristicWriteType.WithResponse);
}
        /// <summary>
        /// Convert color to byte array.
        /// This data format is same as toio light control.
        /// https://toio.github.io/toio-spec/en/docs/ble_light/#turning-the-indicator-on-and-off
        /// </summary>
        /// <param name="color"></param>
        /// <returns></returns>
        public static byte[] GetLedOnData(Color32 color)
        {
            byte[] buff = new byte[7];
            buff[0] = 3;
            buff[1] = 0;
            buff[2] = 1;
            buff[3] = 1;
            buff[4] = BitConverter.GetBytes(color.r)[0];
            buff[5] = BitConverter.GetBytes(color.g)[0];
            buff[6] = BitConverter.GetBytes(color.b)[0];
            return buff;
        }
CBPeripheral.WriteValue で byte[] を書き込みます。
Write の実装 (Peripheral)
Peripheral 側には Write のリクエストを処理する実装を書きます。
void ICBPeripheralManagerDelegate.DidReceiveWriteRequests(CBPeripheralManager peripheral, CBATTRequest[] requests)
{
    var firstRequest = requests[0];
    foreach (var request in requests)
    {
        if (request.Characteristic.UUID != SampleLightControl_Data.LightControlCharacteristicUUID)
        {
            peripheral.RespondToRequest(firstRequest, CBATTError.RequestNotSupported);
            return;
        }

        if (request.Value.Length != 7)
        {
            peripheral.RespondToRequest(firstRequest, CBATTError.InvalidAttributeValueLength);
            return;
        }
    }

    var color = SampleLightControl_Data.ParseColor(firstRequest.Value);
    _light.color = color;
    peripheral.RespondToRequest(firstRequest, CBATTError.Success);
}
ここは癖があります。
CBPeripheralManagerDelegate.DidReceiveWriteRequests が呼ばれるときには、書き込みが1回でも配列で渡されます。
しかし、1つ目のリクエストにのみレスポンスを返します。これについては以下のようにドキュメントに記載されています。
When you respond to a write request, note that the first parameter of the respond(to:withResult:) method expects a single CBATTRequest object
LightControl のサンプルでは requests は長さ1の配列になります。
そのため、requests[0] の Value の byte[] から色を取得しています。
        public static Color32 ParseColor(byte[] data)
        {
            if (data.Length != 7) return Color.black;

            return new Color32(data[4], data[5], data[6], 255);
        }
以上で LightControl のサンプルの流れを終えました。
おわりに
本記事では LightControl のサンプルを通して BLE 通信の単語や流れを解説しました。
byte配列送るだけなのにめっちゃ大変だな..と思われたでしょうか?
私は思いました!
ただ一度理解してしまえば、あとはほとんど同じコードを使い回せるので、ぜひ BLE 通信を楽しんでください!