本記事の目的
- クラスの定義ができるようになること。
- クラスに関数を作れるようになること。
- コンストラクタを作れるようになること。
前提
JavaScriptの実行環境を作ることができる。
関数使える
演習1 Loggerクラスを生成する。
クラスとは何か?とかの説明は理解しづらいのでさくっと動くものを作っていく。
まず以下のようにhtmlを作る
<!DOCTYPE html>
<html lang='en'>
<head>
    <meta charset='UTF-8'>
    <meta name='viewport' content='width=device-width, initial-scale=1.0'>
    <script type="text/javascript" src='./main.js' defer></script>
    <title>Document</title>
</head>
<body>
    <div class="canvas"></div>
</body>
</html>
同階層にmain.jsを作成し、以下のように記述
// Loggerというclassを定義
class Logger {

    logHelloWorld(){
        console.log("Hello World");
    }
}

// Loggerを生成 (生成したもの,ここではloggerをインスタンスという)
const logger = new Logger();
// LoggerのlogHelloWorldクラスを実行する。
logger.logHelloWorld();
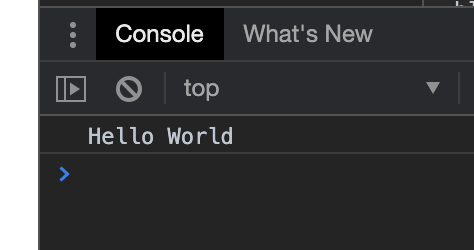
そして、index.htmlを開くと以下のようにconsoleにHello Worldと表示される
順を追って説明していく。
クラスを使うステップは「クラスの定義」と「クラスの実体の生成 (インスタンス化)」の2つ。
まずはクラスを定義する。
class Logger {

    logHelloWorld(){
        console.log("Hello World");
    }
}
ここではLoggerというクラスを定義している。
class クラス名 {
    関数名(){
        関数の中身
    }
}
クラスの関数は通常の関数の作り方と異なっていることに注意。
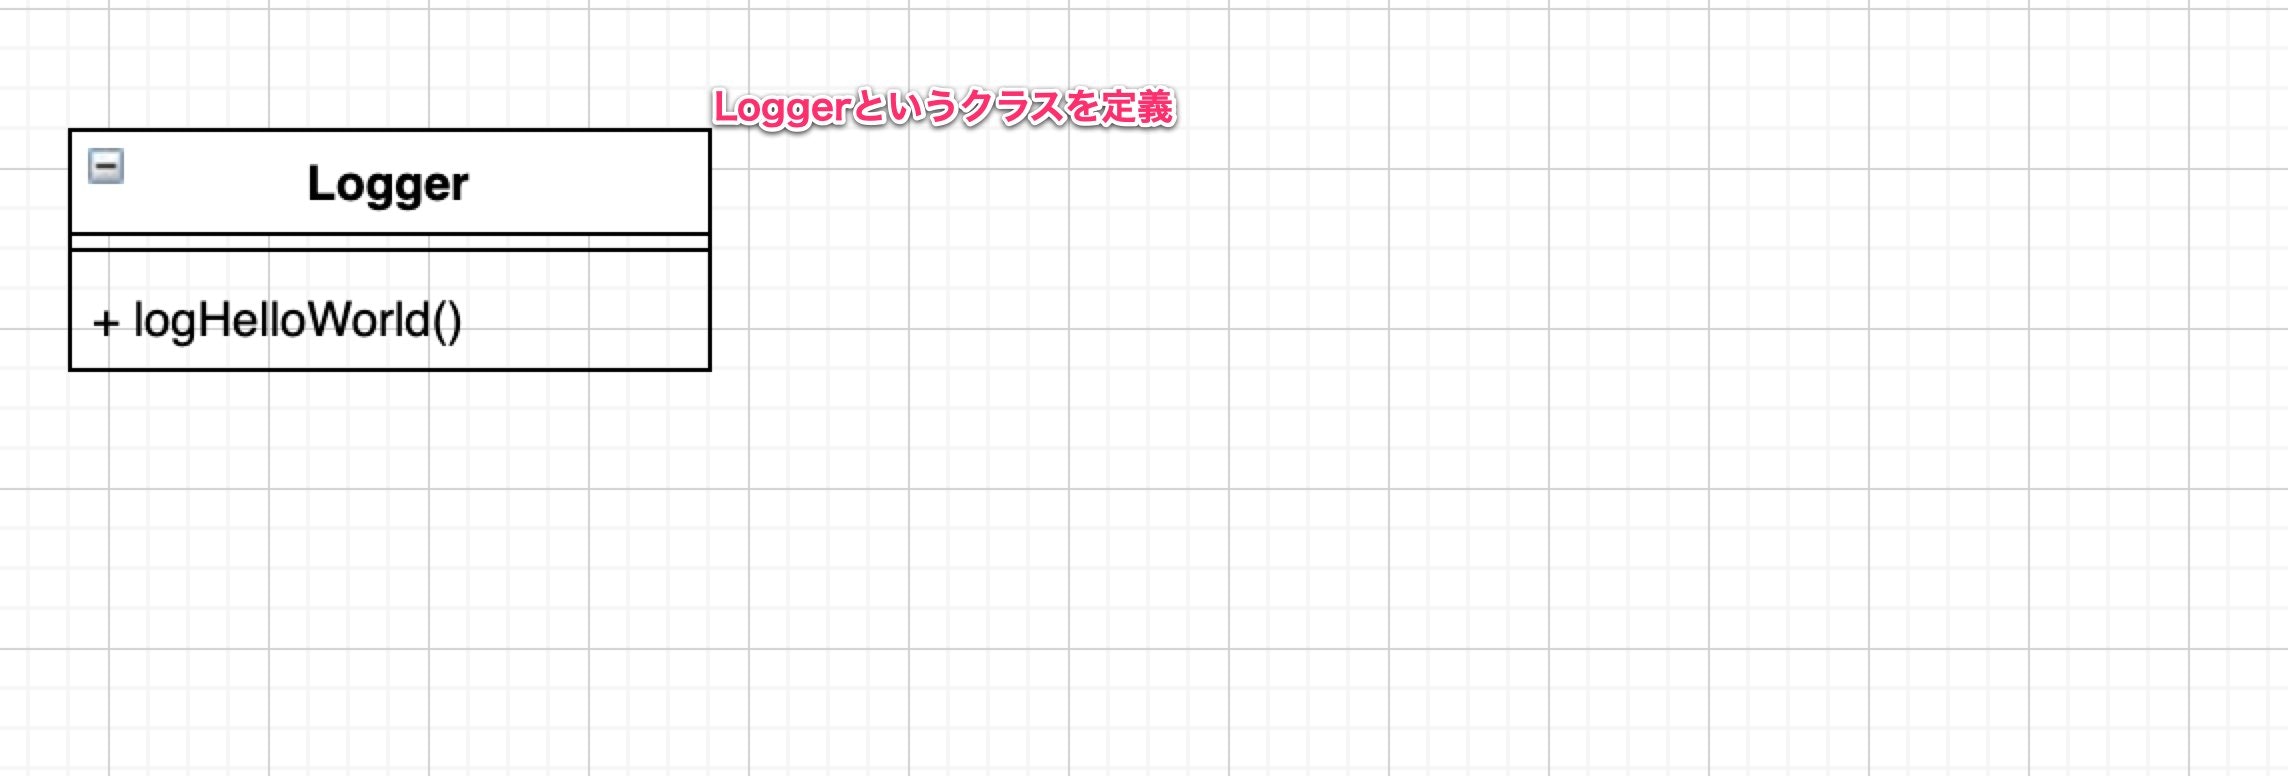
次にクラスの実体の生成 <= これをインスタンス化という。
実体のことをインスタンスという。
const logger = new Logger();
const クラスのインスタンス = new クラス名();
あとはそのインスタンスの関数を呼ぶ
logger.logHelloWorld();
演習2 コンストラクタ
コンストラクタはnewしたときに呼ばれる処理のこと。
コンストラクタの例を以下に示す。
class Logger {
    // コンストラクタ
    constructor(){
        this.lastLogContent = "";
    }

    logHelloWorld(){
        const content = "Hello World";
        console.log(content);
        this.lastLogContent = content;
    }

    // 返り値のある関数の書き方
    getLastLogContent(){
        return this.lastLogContent;
    }
}

const logger = new Logger();
logger.logHelloWorld();
const lastLog = logger.getLastLogContent();
console.log("最後のログの内容は" + lastLog);

コンストラクタの構文
class クラス名 {
    constructor(){
        newしたときに呼び出す処理
    }
}
ここでは
class Logger {
    // コンストラクタ
    constructor(){
        this.lastLogContent = "";
    }
と書くことによってLoggerの中にlastLogContentという「メンバ変数」を定義し、初期値に空文字をいれている。
メンバ変数はクラスの中の変数みたいな意味
メンバ変数をつかうことによってインスタンスが状態を持てるようになる。
メンバ変数の頭にはthis.をつける。
「このクラスのlastLogContent」と示すため。
    logHelloWorld(){
        const content = "Hello World";
        console.log(content);
        this.lastLogContent = content; // <- ここでログの内容を保存し
    }

    // 返り値のある関数の書き方
    getLastLogContent(){
        return this.lastLogContent; // <- あとで取り出せるようにしておいている
    }
なお、引数のある関数は以下の用に作る
class Logger {
    constructor(){
        this.lastLogContent = "";
    }

    logHelloWorld(){
        const content = "Hello World";
        this.log(content); // <- 変更
    }

    // 追加
    log(content){
        console.log(content);
        this.lastLogContent = content;
    }

    getLastLogContent(){
        return this.lastLogContent;
    }
}

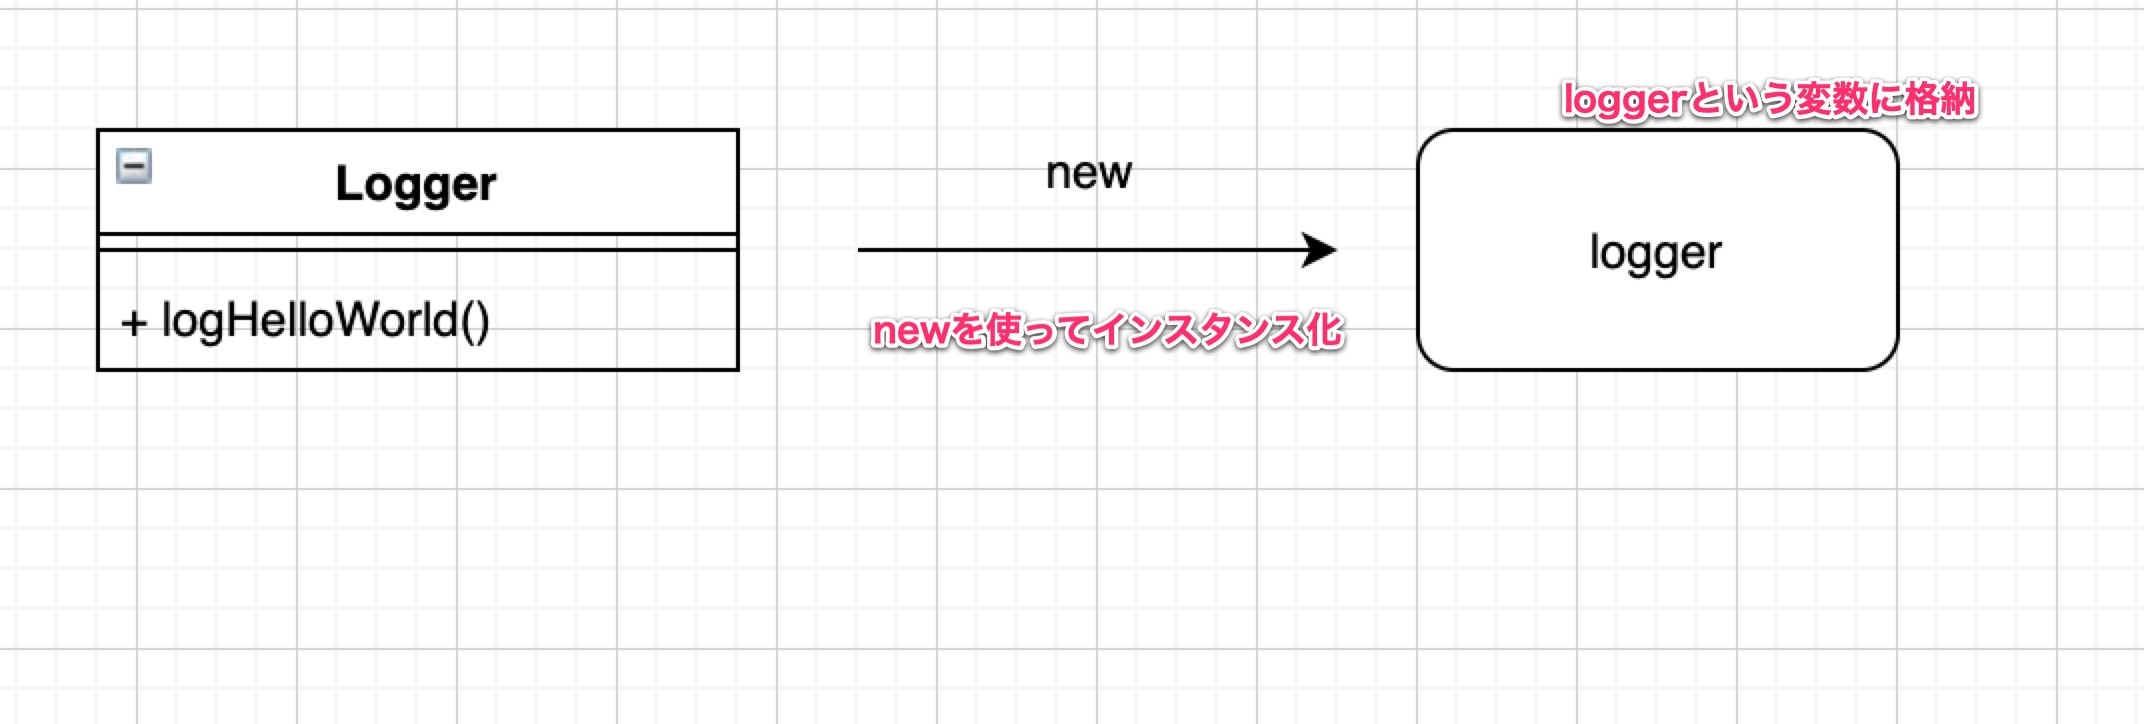
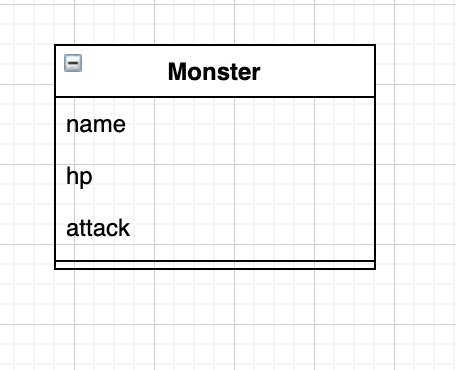
課題1 クラスを作ってみる
図のようなクラスを作成し、sumに適当な値を渡して結果をconsoleに表示せよ。
なお、sumの関数が返すのはaとbの和とする。
演習3 コンストラクタに引数を渡す。
モンスタークラスを作ってみる。
class Monster {
constructor(name, hp, attack){
this.name = name;
this.hp = hp;
this.attack = attack;
}
}
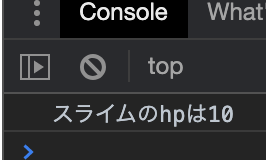
const slime = new Monster("スライム", 10, 5);
console.log(slime.name + "のhpは" + slime.hp);
演習2ではメンバ変数のlastLogContentをgetLastLogContent関数経由でとってきたが、「.」で繋げるだけでも取ってこれる。
演習4 1つのクラスから複数のインスタンスを作る。
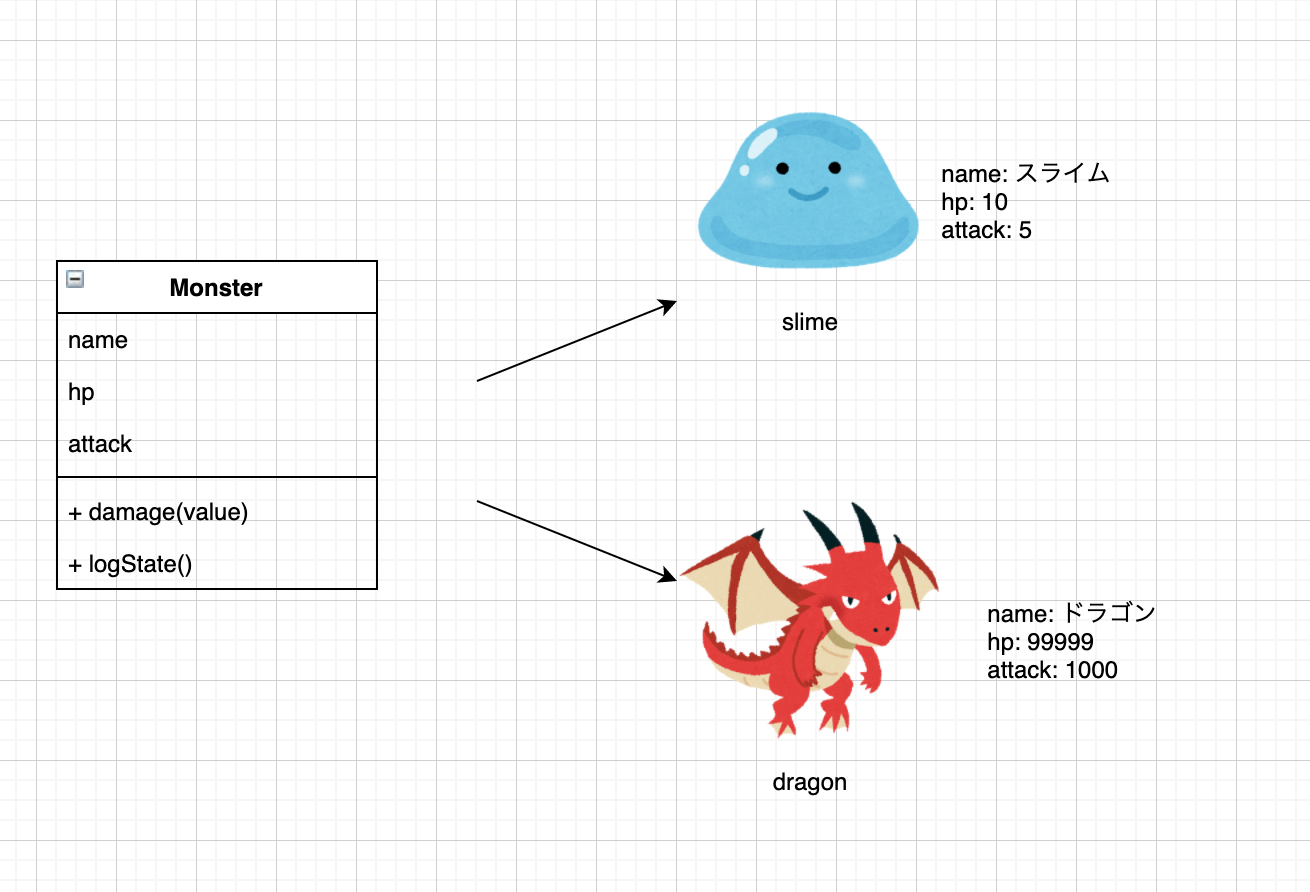
class Monster {
constructor(name, hp, attack){
this.name = name;
this.hp = hp;
this.attack = attack;
}
damage(value){
this.hp -= value;
if (this.hp <= 0)
{
this.hp = 0;
}
}
logState(){
if(this.hp > 0)
{
console.log(this.name + "のhpは" + this.hp);
}else{
console.log(this.name + "は倒れている");
}
}
}
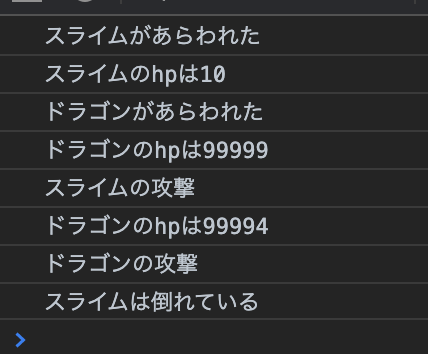
console.log("スライムがあらわれた");
const slime = new Monster("スライム", 10, 5);
slime.logState();
console.log("ドラゴンがあらわれた");
const dragon = new Monster("ドラゴン", 99999, 1000);
dragon.logState();
console.log("スライムの攻撃");
dragon.damage(slime.attack);
dragon.logState();
console.log("ドラゴンの攻撃");
slime.damage(dragon.attack);
slime.logState();
課題2
自分のオリジナルモンスターを作って戦わせてみよ。