某スクールのチーム開発にて某フリマアプリを作成しております。
先日、必須機能実装が完了し、追加機能を実装していくフェーズになりましたので、タイトルに記載いたしました「取り置き機能」を実装しました!
今回は、機能追加を決めるにあたっての背景含めて以下に記載いたします。
今までは既存のコンテンツの実装であったため、様々な記事や情報があったため、自分で実装コンテンツや実装方法を考えるという機会は少し少なかった印象ありましたが、今回はオリジナル機能であったため、実際のアプリユーザのことを考えながら実装をしていくのは、非常に楽しかったです!!
より良いコードの書き方や修正すべき点などご意見ございましたら、是非いただけますと幸いです!
本記事該当Github: https://github.com/Tatsu88-Tokyo/freemarket_sample_60ce
背景:「取り置き機能」を追加機能に選んだ理由
今回、追加機能を選ぶにあたり、ネットで某フリマアプリユーザのコメントをネットで探したり、自分でサイトをいじっていました。
その結果、以下の状況が見えてきたため、今回の「取り置き機能」実装を決断しました。
- 問題・課題:
特定のユーザに販売する際に、出品写真やタイトルなどに”〇〇様向け”などと書くしかできず、他ユーザに購入できないようにするブロックができない。
その状況のため、別ユーザがユーザ名を偽ることで、本来購入をする予定であったユーザが購入できず、別のユーザに購入されてしまうという問題が発生している。
「取り置き機能」実装に関する考え方
今回の機能実装に関して、以下のように考えました。
1. 商品を出品するユーザが、商品に対して”キー”を設定する。
2. その”キー”を持っているユーザは購入をできるが、”キー”を持っていないユーザは購入をできないようにする。
ここで問題となったのは何を"キー”とするかでした。
「出品するユーザが合言葉を設定し、それを入力させる」や「ユーザ名を”キー”とする」などを考えましたが、どれもユニーク性がなかったためボツとし、今回は購入して欲しいユーザのemailアドレスを”キー”とすることにし,”reservation_email”というカラムを追加することにしました。
"reservation_email"の情報によって、入力された情報とログインしているユーザの情報が一致すれば、購入できる/一致しなければ、購入できないようにします。
*実際はemailアドレスを"キー”とするのはプライバシーの観点からあまりよろしくはないと思われますため、可能で有れば、会員番号などを”キー”とするのがベターかと考えます。(今回は会員番号を設定していなかったため、アドレスにしました)
実装内容(イメージ)
今回実装した機能のイメージは以下の通りになってます。
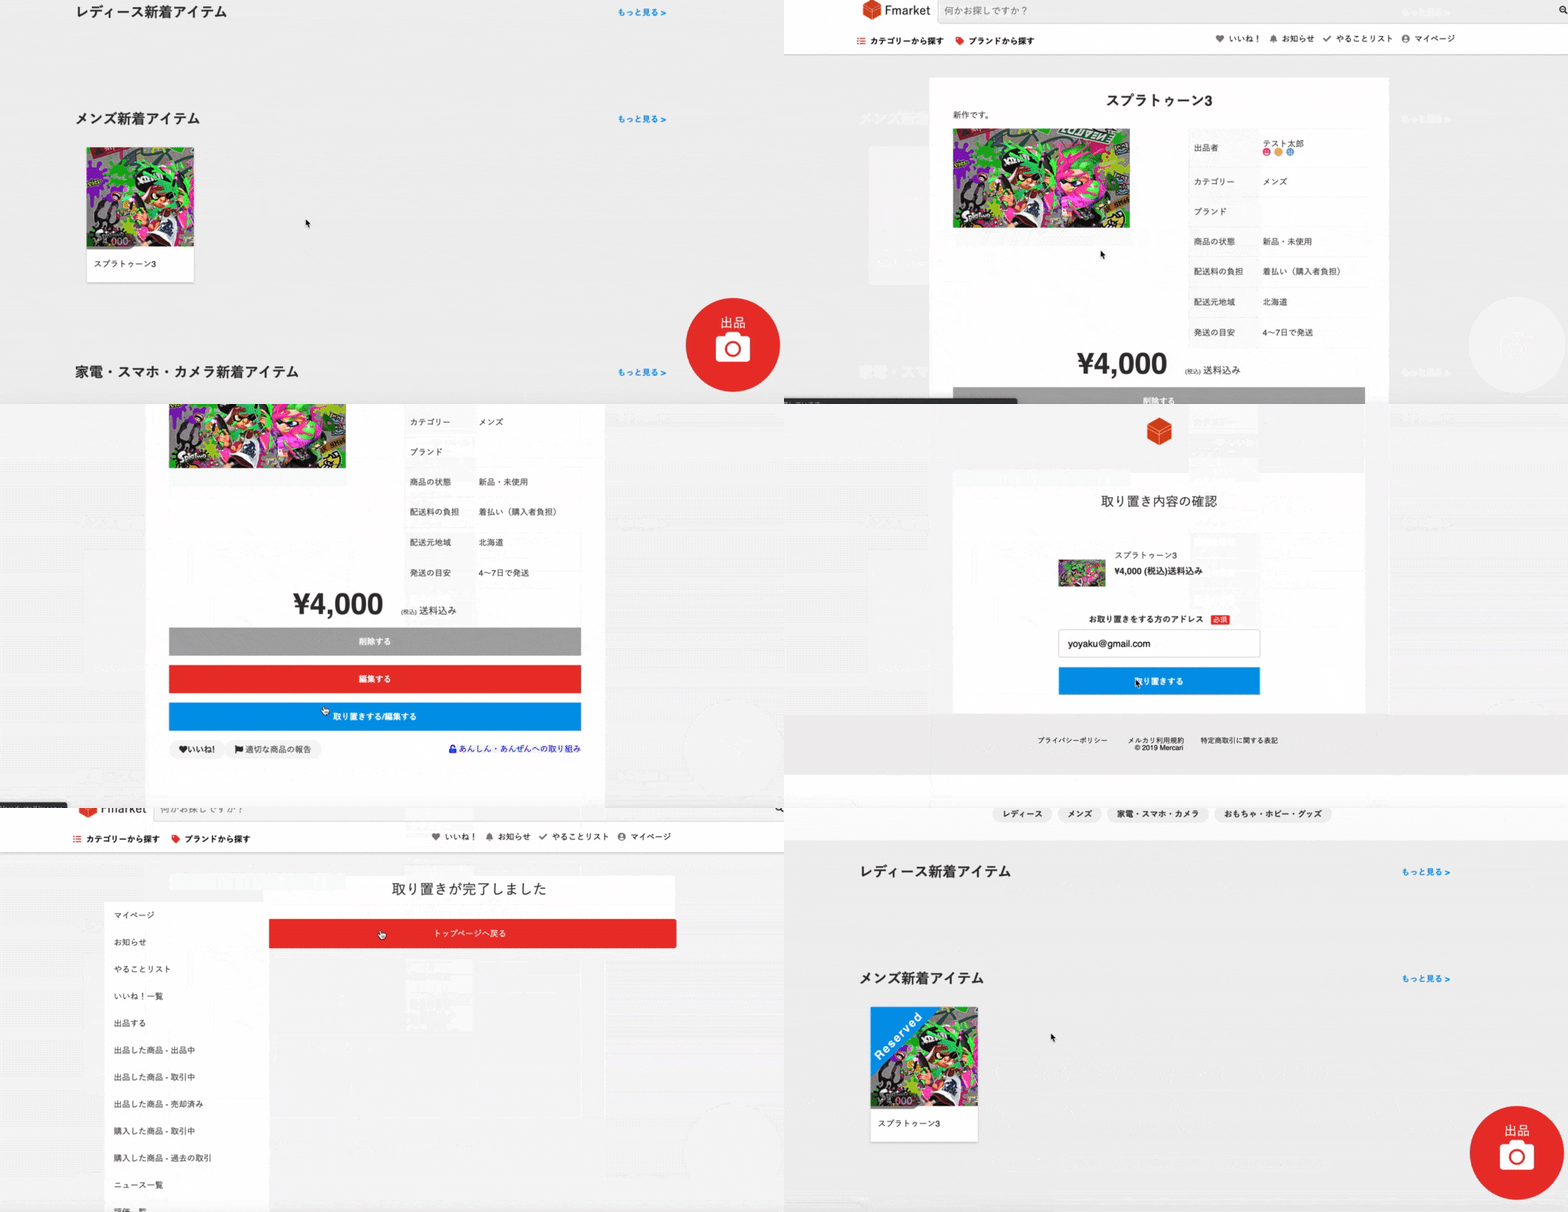
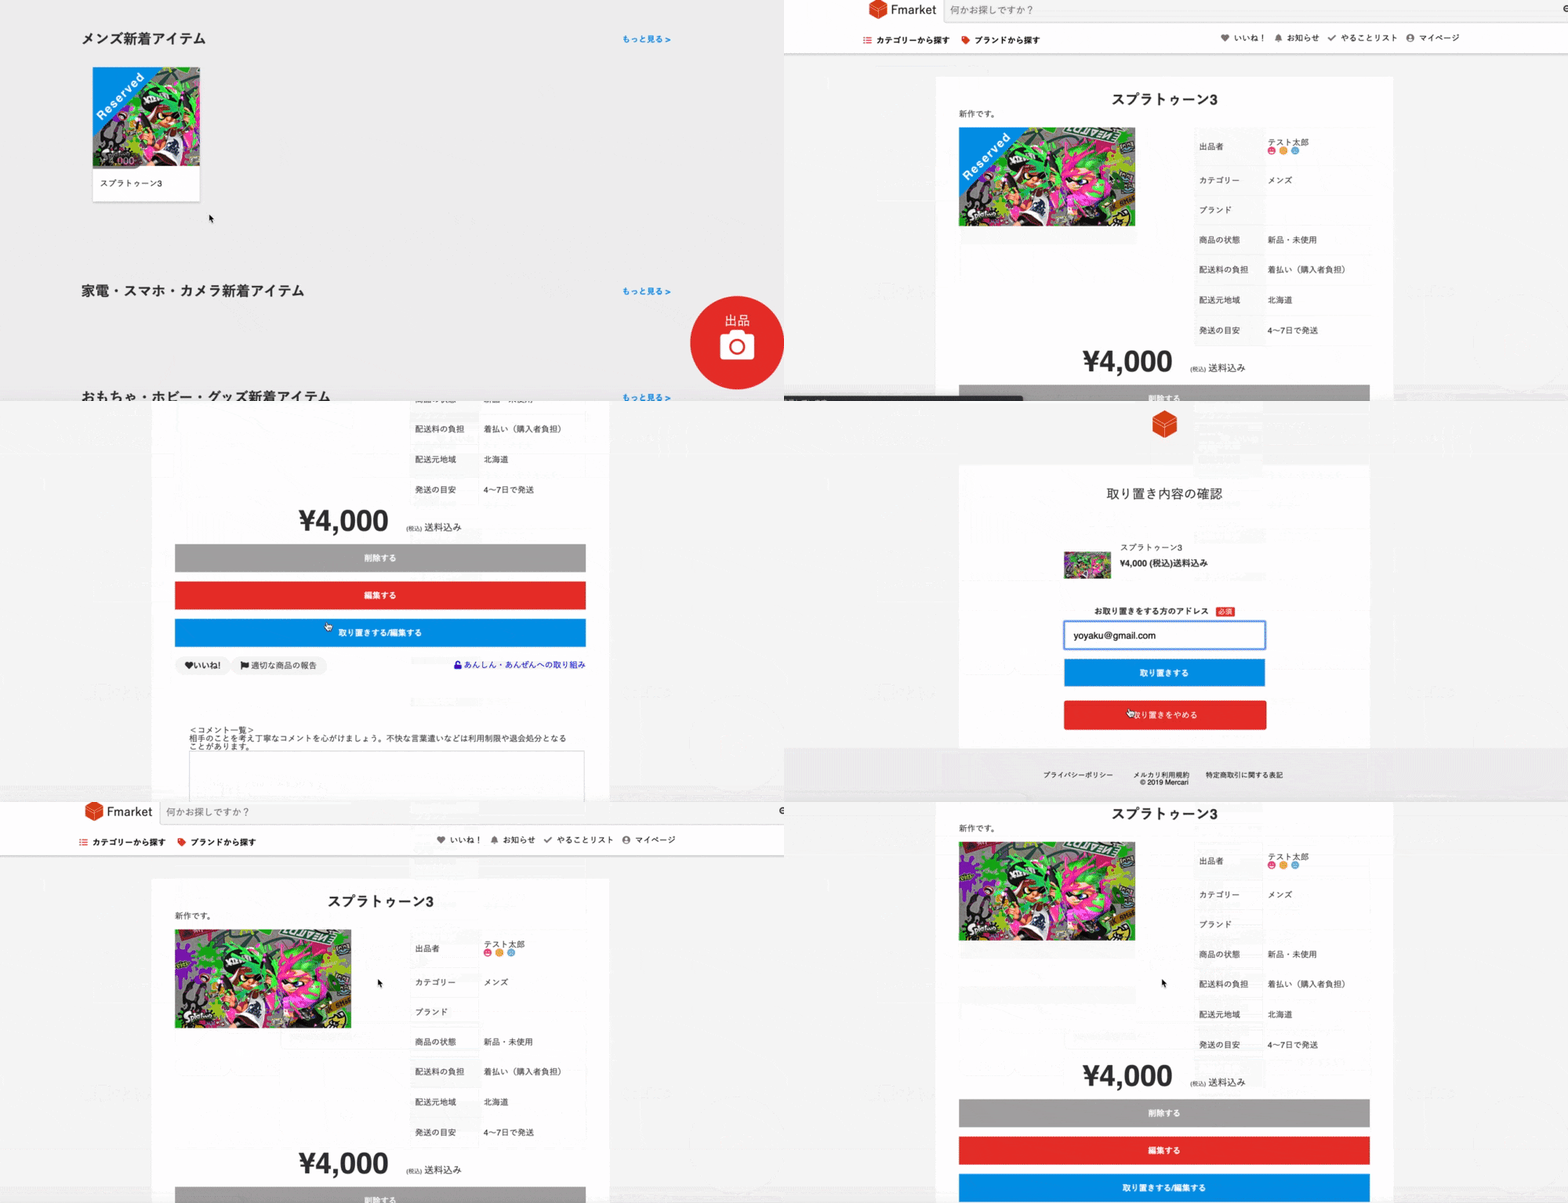
出品ユーザ側機能
機能1:取り置きをする
機能2:取り置きをやめる
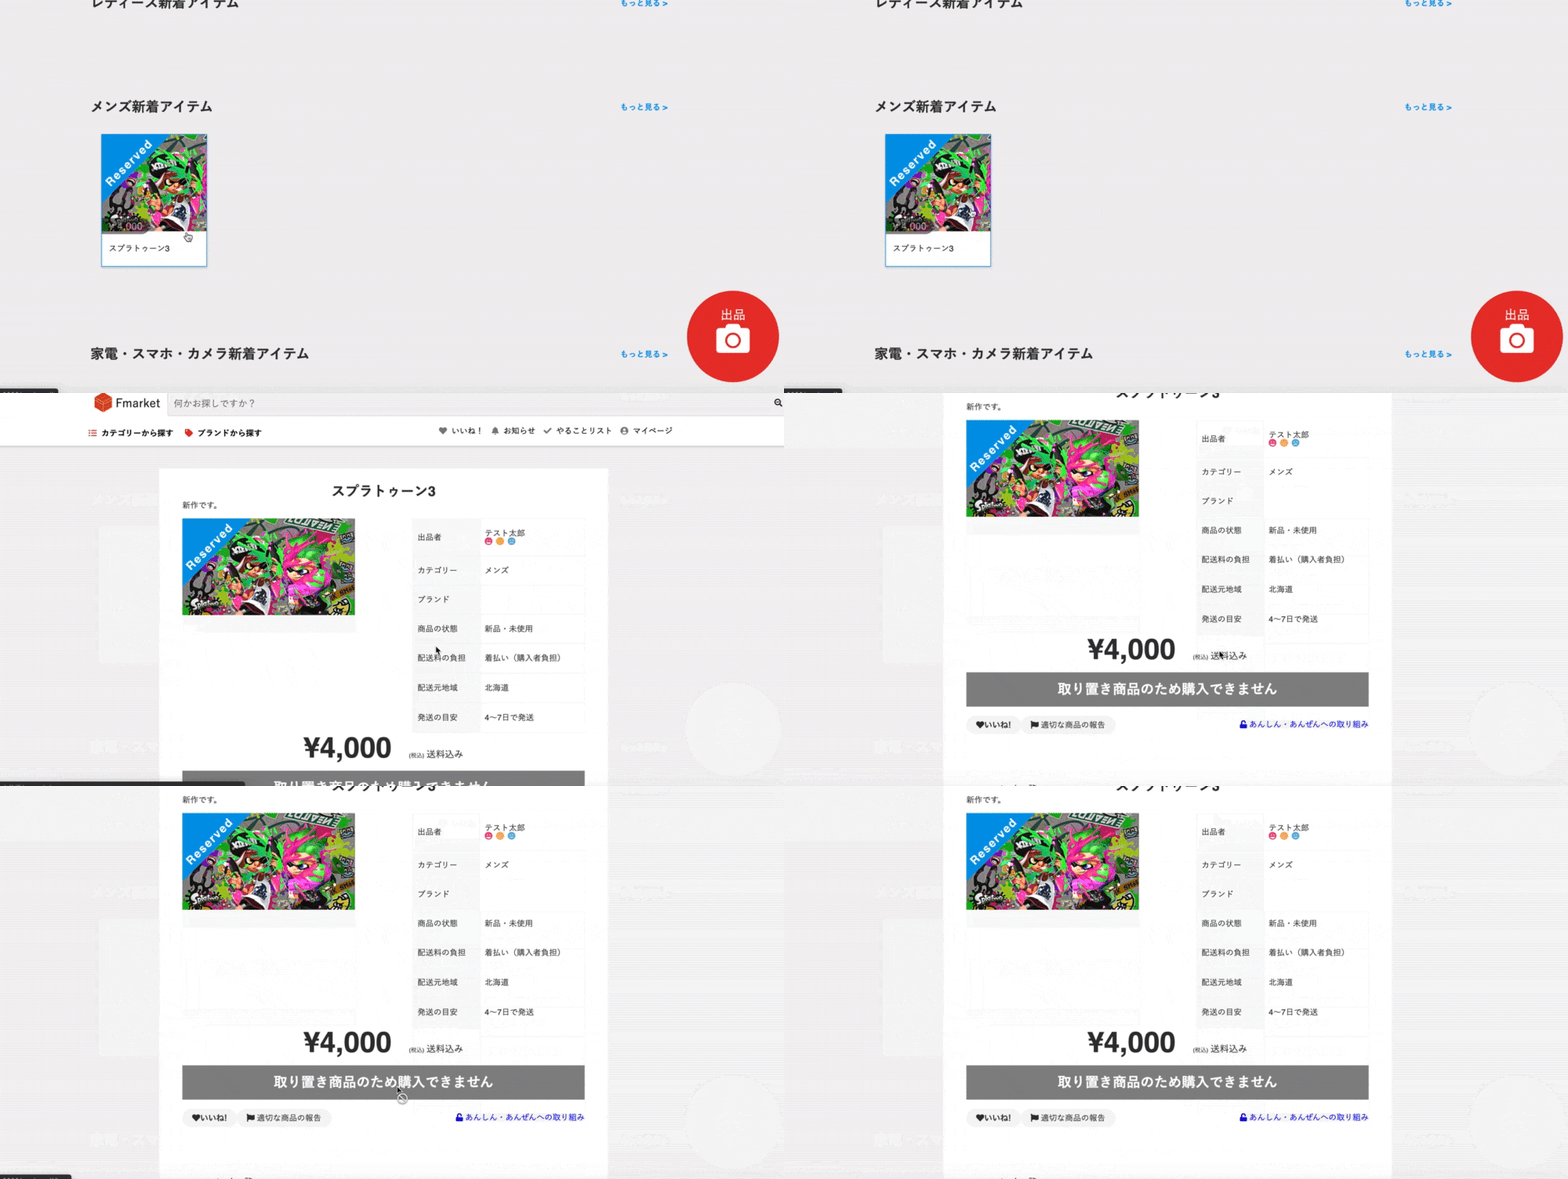
機能3:その他ユーザに購入できないようにする
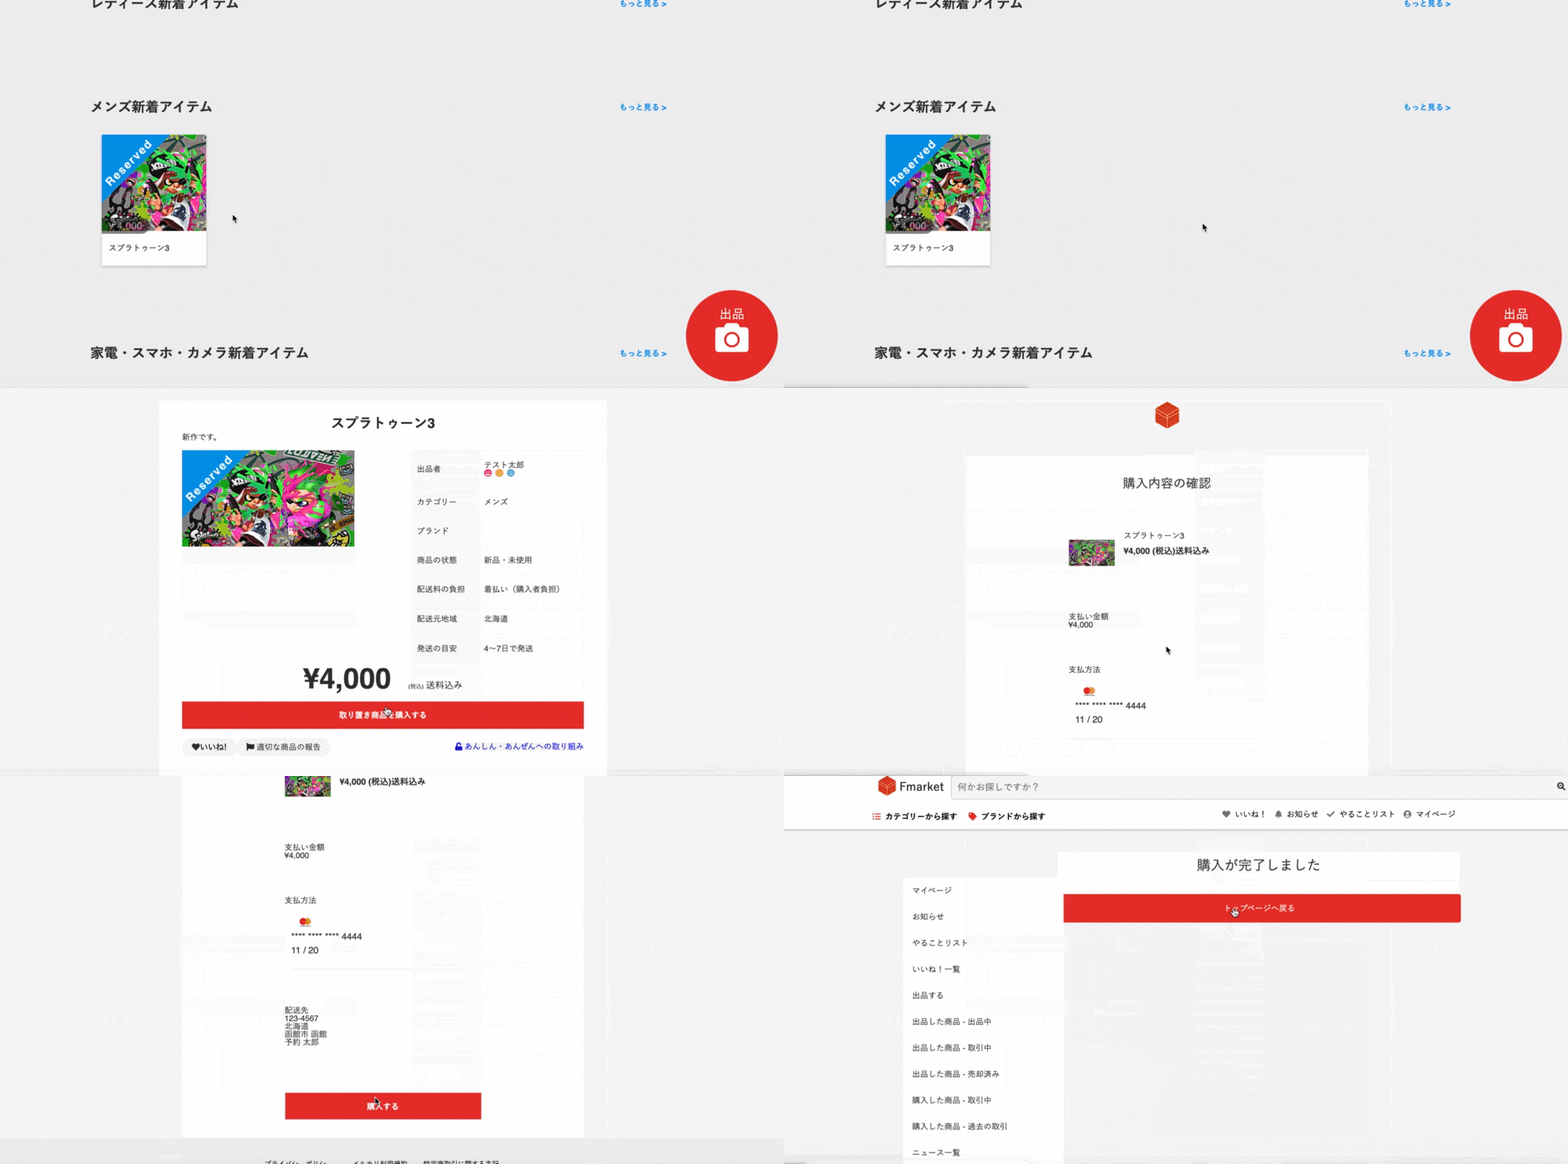
購入ユーザ側機能
機能1:取置き品を購入する
*購入すると以下のように、SOLDとなります。
購入についての実装は、以下の記事をご参照ください。
[HowTo]Pay.jpを用いた商品購入機能実装から商品購入後の設定まで
https://qiita.com/Tatsu88/items/eb420e372077939a4627#%E5%95%86%E5%93%81%E8%B3%BC%E5%85%A5%E7%A2%BA%E8%AA%8D%E3%83%9A%E3%83%BC%E3%82%B8%E3%81%AE%E7%B7%A8%E9%9B%86
機能実装:マイグレーションファイル
マイグレーションファイルは以下のように実装してます。
今回は、t.string :reservation_emailを追加してます。
こちらが、取り置き機能を実現するための要となります。
"reservation_email"の情報によって、入力された情報とログインしているユーザの情報が一致すれば、購入できる/一致しなければ、購入できないようにします。
class CreateProducts < ActiveRecord::Migration[5.0]
  def change
    create_table :products do |t|
      t.string :name, limit: 191,null:false,index: true
      t.integer :price, index: true
      t.text :explain,null:false
      t.integer :postage,null:false
      t.integer :status
      t.integer :shipping_date
      t.integer :size
      t.integer :brand_id
      t.integer :category_id
      t.integer :prefecture
      t.integer :buyer_id
      t.references :user,index: true, foreign_key: true
      t.string :reservation_email
      t.timestamps
    end
  end
end
機能実装:ルーティング
ルーティングは以下のように実装してます。
'reserve'、'reserved',patch 'reserve_cancel'を今回追加してます。
内容としては、予約・予約完了・予約取り消しとなります。
  resources :products do
    member do
      post 'purchase'
      get 'purchased'
      get 'buy'
      get 'reserve'
      patch 'reserved'
      patch 'reserve_cancel'
    end
    resources :comments,only:[:create,:destroy]
  end
機能実装:ビュー
ビューは以下のように実装してます。
基本的に"reservation_email"の情報有無によって表示内容を変えてます。
1. 商品一覧
こちらでは購入済みか取り置き済みかでサムネイルとして表示する写真にラベルを取り付けます。
.product__thumbnail--image
 =image_tag (product.images[0].product_image.url)

# 購入されていれば、"SOLD"のラベルをつけます。
-if product.buyer_id.present?
 .items-box_photo__sold
  .items-box_photo__sold__inner SOLD

# 取り置きされていれば、"Reserved"のラベルをつけます。
-if product.reservation_email.present?
 .items-box_photo__reserved
  .items-box_photo__reserved__inner Reserved
2. 商品詳細
こちらではユーザの状態によって、ビューの表示内容を変えてます。
.product-buy__btn__box
# ログインユーザが出品者の場合の、表示内容
 - if user_signed_in? && current_user.id ==@product.user_id
  = link_to "削除する", product_path(@product.id), method: :delete,class:"product-details-delete__btn"
  = link_to "編集する", edit_product_path(@product.id),class:"product-details-edit__btn"
  = link_to "取り置きする/編集する", reserve_product_path(@product.id),class:"product-details-resorve__btn"

# 購入者向けの表示内容
# 既に購入されている時
 - elsif @product.buyer_id.present?
  = link_to "売り切れました",buy_product_path,class:"disabled-button bold"

# 取り置きされていて、その取り置きを商品を購入することを許可されているユーザの時
 - elsif @product.reservation_email.present? && @product.reservation_email == current_user.email
  = link_to "取り置き商品を購入する",buy_product_path,class:"product-purchase__btn"

# 取り置きされていて、その取り置きを商品を購入することを許可されていないユーザの時
 - elsif @product.reservation_email.present? && @product.reservation_email != current_user.email
  = link_to "取り置き商品のため購入できません",buy_product_path,class:"disabled-button bold"
 - else
  = link_to "購入画面に進む",buy_product_path,class:"product-purchase__btn"
2. 取り置き画面
こちらでは、"reservation_email"というカラムの情報有無によって表示する内容を変えております。
情報が有れば、「取り消す」ボタンが出てきます。
%main.buy-main
  .buy-item-container
    %h2.buy-item-head 取り置き内容の確認
    %section.buy-content.buy-item
      .buy-content-inner
        .buy-item-box
          .buy-item-image
            =image_tag(@product.images[0].product_image.url,class:"buy-image")
          .buy-item-detail
            %p.buy-item-name
              =@product.name
              %p.buy-item-price.bold
                = number_to_currency(@product.price,format: "%u%n",unit:"¥",precision: 0)
                %span.item-shipping-fee.f14.bold
                  (税込)送料込み
        =form_for(@product, url: reserved_product_path,method: :patch) do |f|
          .form-group
            =f.label :お取り置きをする方のアドレス
            %span.form-group__require 必須
            %br/
            = f.email_field :reservation_email, {autofocus: true, autocomplete: "email", placeholder: "PC・携帯どちらでも可",class:'form-group__input'}
            = f.submit '取り置きする', class: "reserve"
        - if @product.reservation_email.present?
          =link_to reserve_cancel_product_path,method: :patch, class:"btn-default btn-red" do
            取り置きをやめる
機能実装:コントローラ
コントローラは以下のように実装してます。
ポイントは以下の通りになってます。
- reservedアクションで入力された”reservation_email”をproductに追加します。
*この”reservation_email”が取置き品を購入するためのキーとなります。 - 取り置きをキャンセルする時と購入がされた後は”reservation_email”のvalueをなくします。
before_action :set_product, only: [:reserved,:reserve,:reserve_cancel,:purchase]

def reserve
end

def reserved

# reservedアクションで入力された”reservation_email”をproductに追加します。
 @product.update(product_params)
 if @product.reservation_email.present?
   else
     render :reserve
  end
end

def reserve_cancel

# ”reservation_email”のvalueをなくします。
 if @product.update(reservation_email:"")
  redirect_to product_path
 else
  redirect_to product_path
  end
end

def purchase
  Payjp.api_key = Rails.application.secrets.payjp_access_key
  charge = Payjp::Charge.create(
    amount: @product.price,
    customer: Payjp::Customer.retrieve(@creditcard.customer_id),
    currency: 'jpy'
  )
# ”reservation_email”がある場合は、valueをなくします。
  if @product.reservation_email.present?
    @product.update(reservation_email:"")
  end
  @product_buyer= Product.find(params[:id])
  @product_buyer.update( buyer_id: current_user.id)
  redirect_to purchased_product_path
end

private
def product_params
      params.require(:product).permit(:name,:category_id,:price,:explain,:size,:brand_id,:status,:postage,:shipping_date,:prefecture,:reservation_email,images_attributes: [:product_image,:_destroy,:id]).merge(user_id: current_user.id)
end

def set_product
  @product = Product.includes(:comments).find(params[:id])
end
参照
【Rails】updateメソッドの使い方を徹底解説!
https://pikawaka.com/rails/update
【Rails】form_forの使い方を徹底解説!
https://pikawaka.com/rails/form_for#form_for%E3%81%A7%E3%81%AE%E4%BF%9D%E5%AD%98%E6%96%B9%E6%B3%95%E3%81%AE%E6%B3%A8%E6%84%8F%E7%82%B9
Railsのモデルの作成、検索、更新、削除のよく使うメソッドのまとめ
https://ruby-rails.hatenadiary.com/entry/20140724/1406142120
以上となります。最後までご覧いただき、ありがとうございました!
今後も学習した事項に関してQiitaに投稿していきますので、よろしくお願いします!
記述に何か誤りなどございましたら、お手数ですが、ご連絡いただけますと幸いです。


