はじめに
FlutterFlowについて
FlutterFlowは、爆速モバイルアプリ開発を実現する、画期的なノーコードツールです。簡単なアプリなら本当にその日のうちにテストフライトまでが完了していると優れたツールです。
他のノーコードツールと違って書ける、Flutterアプリとして吐き出せる、という点が強みです。
また、デフォルトで用意されているウィジェットやアクション以外についても実装することが可能です。
今回もCustom Actionを作成して実装しています。
今回の目標
領収書をPDF化してFirebaseに出力します。
前提
以下の環境で進めます。
- FlutterFlowバージョン等
- FlutterFlow v4.1.40 released April 21, 2024
- Flutter version is 3.19.1
- FlutterFlowでプロジェクトを作成済み & Firebaseのプロジェクトを連携している
パッケージの導入
今回、以下のパッケージを使用します。必要最小限の機能だけで実装しますが、本当はもっといろんなレイアウトを試せます。
書くと長くなってしまうので、詳細は公式に任せます。
Custom Actionの作成
領収書をPDFとして出力することを想定して、複数の引数を渡しています。
完成後のFlutterFlowの画面は次のようになります。(コード全文は後述します。)
実装手順としては以下のとおりです。
- 引数と戻り値の設定
- Dependenciesの設定
- フォントの設定
- コード記述
一つずつ見ていきます。
引数と戻り値の設定
引数には、PDFに記述するための各変数を指定します。ここは好きに設定していただいて構いません。
戻り値は、他のActionでも使用しやすいようにUploadedFileで設定します。
またこのActionでは、領収書に記載する項目を扱いやすくするために引数としてitem型のStruct(Data Schemaで設定したData Type)を使用しています。参考までに、itemは以下のように設定しています。

Dependenciesの設定
FlutterFlowでは、Custom Codeを作成する部分で、Dependenciesという項目があります。ここに記述すると、pubspec.yamlに対象のパッケージが追加されます。
今回はpdfのpdf: ^3.10.8を設定します。これで、使用時にpub.devからパッケージがダウンロードされるようになります。
フォントの設定
コードの中ではフォントをロードしてきて、そのフォントを使ってPDFを作成します。
事前にカスタムフォントを設定しておきましょう。
設定しない場合はデフォルトのフォントが使用されますが、日本語対応はしておりませんので注意が必要です。
コード記述
全文は以下のとおりです。
コード全文
import 'index.dart'; // Imports other custom actions

import 'dart:io';
import 'package:flutter/services.dart' show rootBundle;
import 'package:path_provider/path_provider.dart';
import 'package:pdf/pdf.dart';
import 'package:pdf/widgets.dart' as pw;
import 'package:intl/intl.dart';

Future<pw.Font> loadCustomFont() async {
  final fontData =
      await rootBundle.load("assets/fonts/awesome-fonts.ttf");
  return pw.Font.ttf(fontData);
}

Future<FFUploadedFile> createAndSavePDF(String title, List<ItemStruct> items,
    String issuer, String issueDate, String recipient) async {
  final customFont = await loadCustomFont(); // カスタムフォントをロード
  final numberFormat = NumberFormat('#,##0', 'ja_JP');
  final pdf = pw.Document();

  pdf.addPage(
    pw.Page(
      build: (pw.Context context) => pw.Column(
        children: [
          pw.Text(title, style: pw.TextStyle(fontSize: 24, font: customFont)),
          pw.SizedBox(height: 20),
          pw.Align(
            alignment: pw.Alignment.centerRight,
            child: pw.Text('発行日: $issueDate',
                style: pw.TextStyle(fontSize: 12, font: customFont)),
          ),
          pw.Align(
            alignment: pw.Alignment.centerRight,
            child: pw.Text('販売元: $issuer',
                style: pw.TextStyle(fontSize: 12, font: customFont)),
          ),
          pw.Align(
            alignment: pw.Alignment.centerRight,
            child: pw.Text('購入者: $recipient',
                style: pw.TextStyle(fontSize: 12, font: customFont)),
          ),
          pw.SizedBox(height: 20),
          pw.Table(
            border: pw.TableBorder.all(),
            children: [
              pw.TableRow(
                decoration: pw.BoxDecoration(color: PdfColors.grey300),
                children: [
                  pw.Align(
                    alignment: pw.Alignment.center,
                    child: pw.Text('品目', style: pw.TextStyle(fontSize: 12, font: customFont)),
                  ),
                  pw.Align(
                    alignment: pw.Alignment.center,
                    child: pw.Text('数量', style: pw.TextStyle(fontSize: 12, font: customFont)),
                  ),
                  pw.Align(
                    alignment: pw.Alignment.center,
                    child: pw.Text('単価', style: pw.TextStyle(fontSize: 12, font: customFont)),
                  ),
                  pw.Align(
                    alignment: pw.Alignment.center,
                    child: pw.Text('計', style: pw.TextStyle(fontSize: 12, font: customFont)),
                  ),
                ]
              ),
              ...items.map((item) => pw.TableRow(
                children: [
                  pw.Container(padding: pw.EdgeInsets.all(4), child: pw.Text(item.name, style: pw.TextStyle(font: customFont))),
                  pw.Container(
                    padding: pw.EdgeInsets.all(4),
                    alignment: pw.Alignment.centerRight,
                    child: pw.Text(item.num.toString(), style: pw.TextStyle(font: customFont))
                  ),
                  pw.Container(
                    padding: pw.EdgeInsets.all(4),
                    alignment: pw.Alignment.centerRight,
                    child: pw.Text(item.price.toString(), style: pw.TextStyle(font: customFont))
                  ),
                  pw.Container(
                    padding: pw.EdgeInsets.all(4),
                    alignment: pw.Alignment.centerRight,
                    child: pw.Text("${int.parse(item.price.toString().replaceAll('円', '')) * item.num}円", style: pw.TextStyle(font: customFont))
                  ),
                ]
              )),
            ]
          ),
          pw.SizedBox(height: 20),
          pw.Divider(),
          pw.Align(
            alignment: pw.Alignment.centerRight,
            child: pw.Text(
                '合計: ${items.fold(0, (sum, item) => sum + int.parse(item.price.toString().replaceAll('円', '')) * item.num)}円',
                style: pw.TextStyle(fontSize: 18, font: customFont)),
          ),
        ],
      ),
    ),
  );

  final dir = await getApplicationDocumentsDirectory();
  final file = File('${dir.path}/$title.pdf');
  await file.writeAsBytes(await pdf.save());

  // PDFファイルをアップロードして、FFUploadedFileオブジェクトを生成して返す
  final bytes = await file.readAsBytes();
  FFUploadedFile uploadedFile = FFUploadedFile(
    name: file.path.split('/').last,
    bytes: bytes,
  );

  return uploadedFile; // FFUploadedFileオブジェクトを返す
}
コードの中から抽出していくつか説明します。
Future<pw.Font> loadCustomFont() async {
  final fontData =
      await rootBundle.load("assets/fonts/awesome-fonts.ttf");
  return pw.Font.ttf(fontData);
}
この部分では、先ほど触れたフォントをロードしています。
カスタムフォントとして設定したファイルを元に修正してご使用ください。
    final customFont = await loadCustomFont(); // カスタムフォントをロード
    final numberFormat = NumberFormat('#,##0', 'ja_JP');
    final pdf = pw.Document();
    pdf.addPage(
      pw.Page(
        build: (pw.Context context) => pw.Column(
          children: [
            pw.Text(title, style: pw.TextStyle(fontSize: 24, font: customFont)),
            pw.SizedBox(height: 20),
            pw.Align(
              alignment: pw.Alignment.centerRight,
              child: pw.Text('発行日: $issueDate',
                  style: pw.TextStyle(fontSize: 12, font: customFont)),
            ),

          ...
    );
ここでは、各種設定の後、pdfオブジェクトを作成しています。
pw.Page()の中身で、レイアウトを決定しています。
  final dir = await getApplicationDocumentsDirectory();
  final file = File('${dir.path}/$title.pdf');
  await file.writeAsBytes(await pdf.save());

  // PDFファイルをアップロードして、FFUploadedFileオブジェクトを生成して返す
  final bytes = await file.readAsBytes();
  FFUploadedFile uploadedFile = FFUploadedFile(
    name: file.path.split('/').last,
    bytes: bytes,
  );
最後にPDFをローカルディレクトリに保存した後、FFUploadedFileに変換して返します。
Custom Actionを設定
作成したCustom Actionを実際のActionとして設定します。
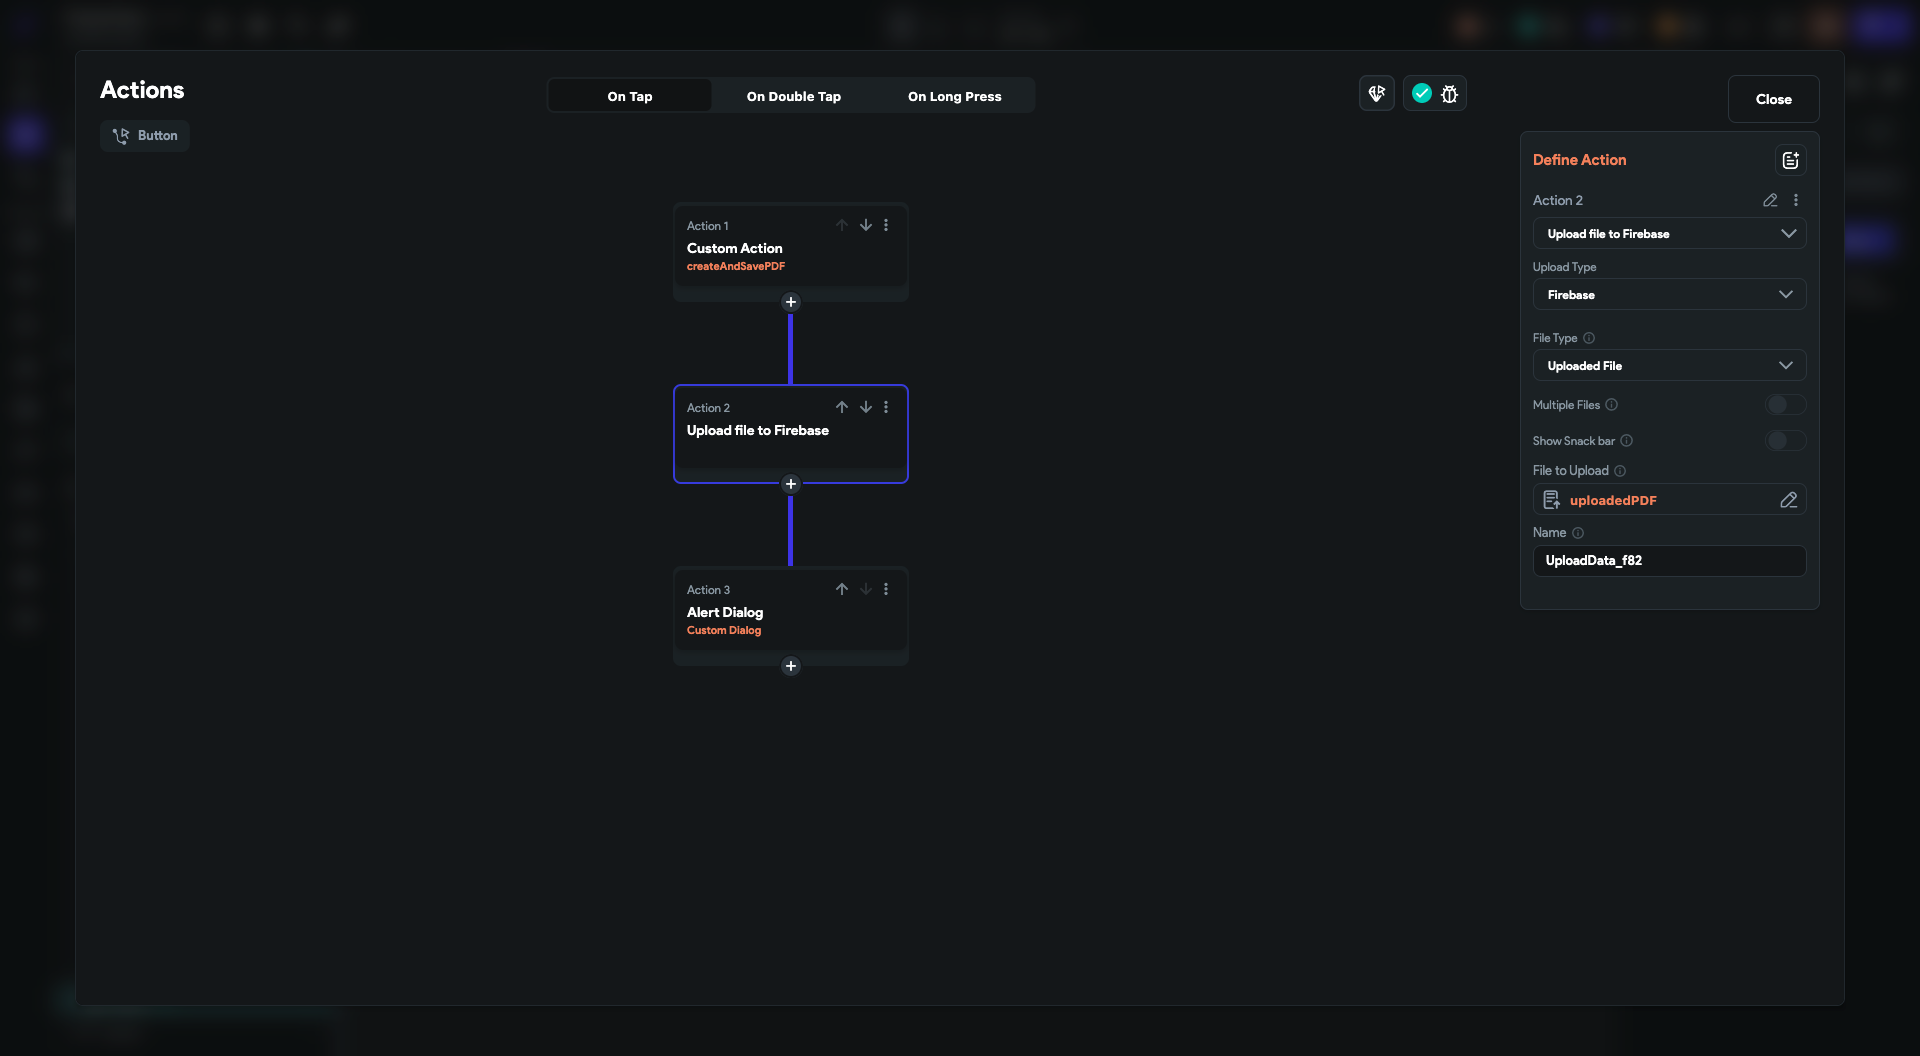
また、使用例として作成したPDFをFirebaseにUploadすることをやってみます。
PDFを作成するCustom Actionの設定
ボタン押下時のアクション等に先ほど作成したActionを追加します。
各変数にPDF内で表示するための値を設定したら、Action Output Variable Nameを設定して終了です。 スクリーンショットではuploadedPDFとしました。

Firebaseにアップロードする
Upload/Save Fileを選択します。File to uploadでは、先ほど作成した名前のはuploadedPDFを設定します。
これでFirebaseにアップロードの準備も完了しました。

あとは好きなところのアクションにこれらを追加してください。
最後に
FlutterFlow、最近もどんどんアップデートされてきていますね。
これからも使い続けたいです。
XでもFlutterFlowに関する投稿をたまにあげてます。見ていただけると泣いて喜びます。


