これはLisp Advent Calendar 2016の7日目の記事です。
どうも。
1日目の記事が好評だったようで嬉しいです。
今回はブログの方に書こうと思ったんですが、カレンダーの記事はQiitaに書くことにしました。
それと12日目はライブラリ紹介になりそうです。お楽しみに。
では本題に入って行きましょう。
OpenID Connectはご存知でしょうか?
ざっくり言えば、OAuthの上位互換の認証方式です。
最近の外部認証方式ではこれが一番安全らしいです(あまり詳しく無いので自信はない)。
これを使うと、いちいち会員登録しなくてもWebサービスなどにSNS(Twitterとか)のアカウントでログイン出来るようになります。
メールアドレス以外に個人情報を必要とするサービスの場合はさらに手続きがあったりしますが…。
今回はこれのクライアント側実装をCommon Lispでやってみました。
GoogleのOpenID Connectのやりかたを参考にしてるので、多分合ってると思います。
フレームワークはCaveman2を利用しました。
まず前準備として、Google API Consoleでプロジェクトを作成します。
プロジェクト名は適当で大丈夫です。
プロジェクトが出来たら、左側のペインから認証情報のページを開き、「OAuth同意画面」を設定します。
最低限、「ユーザーに表示するサービス名」の項目だけ埋めて保存すればOKです。
次に「認証情報」タブに移り、認証情報を作成します。
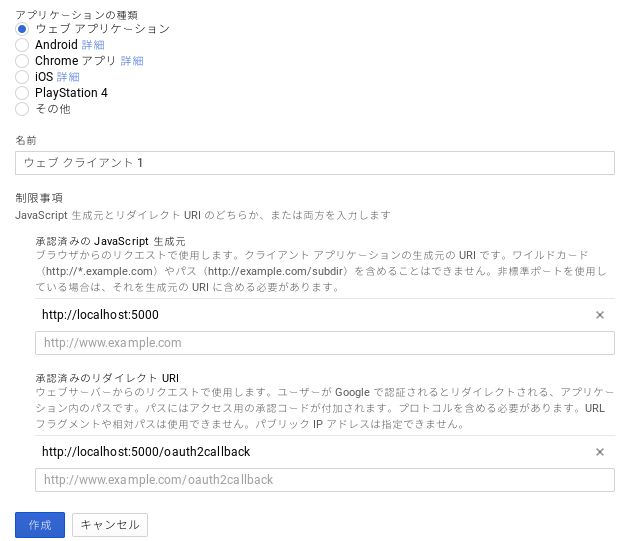
「認証情報を作成」->「OAuthクライアントID」->「ウェブ アプリケーション」と選択していき、制限事項を入力します。
以下のように入力してください。
承認済みのJavaScript生成元にはWebサービスのオリジンURIを入力します。
今回はローカルで動かすのでhttp://localhost:5000としました。
承認済みのリダイレクトURIには認証後リダイレクトされるURIを入力します。
今回はhttp://localhost:5000/oauth2callbackとしました。
これでGoogle側の準備は完了です。
表示されたクライアントIDとクライアントシークレットは後で使うので、まだページは閉じないでください。
ここからWebアプリケーション側のことを書いていきます。
Caveman2以外にもいくつかライブラリを使うので、以下のようにしてインストールしてください。
Roswellじゃない方はquickloadで。
ros install caveman2
ros install dexador
ros install secure-random
ros install cl-base64
ros install jsown
;; 余談ですが、Roswellのinstallコマンドが1行でまとめて書けたらうれしいなと思いました:-)
続いてCaveman2プロジェクトを作成します。
(caveman2:make-project #P"openid-connect" :author "tamamu")
;-> writing openid-connect/openid-connect.asd
;   writing openid-connect/openid-connect-test.asd
;   writing openid-connect/app.lisp
;   writing openid-connect/README.markdown
;   writing openid-connect/.gitignore
;   writing openid-connect/db/schema.sql
;   writing openid-connect/src/config.lisp
;   writing openid-connect/src/db.lisp
;   writing openid-connect/src/main.lisp
;   writing openid-connect/src/view.lisp
;   writing openid-connect/src/web.lisp
;   writing openid-connect/static/css/main.css
;   writing openid-connect/t/openid-connect.lisp
;   writing openid-connect/templates/index.html
;   writing openid-connect/templates/_errors/404.html
;   writing openid-connect/templates/layouts/default.html
cl-projectと同じ要領で、何やらいろいろなファイルが生成されます。
しかし今回いじるファイルはopenid-connect.asdと本体のsrc/web.lisp、そしてテンプレートファイルだけなのでお手軽です。
まず先ほどインストールしたライブラリをプロジェクトの依存関係として記述します。
openid-connect.asdの:depends-onリストに以下のように書き加えてください。
;; for OAuth以下が追加した部分です。
:depends-on (:clack
             :lack
             :caveman2
             :envy
             :cl-ppcre
             :uiop

             ;; for @route annotation
             :cl-syntax-annot

             ;; HTML Template
             :djula

             ;; for DB
             :datafly
             :sxql

             ;; for OAuth
             :dexador
             :cl-base64
             :secure-random
             :jsown)
さらに、src/web.lispの先頭にあるdefpackageの:useリストに:quriを追加してください。
(defpackage openid-connect.web
  (:use :cl
        :caveman2
        :openid-connect.config
        :openid-connect.view
        :openid-connect.db
        :datafly
        :sxql
        :quri)
  (:export :*web*))
これはCaveman2の依存ライブラリなので別途インストールが必要だったりはしません。
ついでに以下の定数もここで定義してしまいましょう。
クライアントIDとクライアントシークレットはコピペで、余白が入らないように注意してください。
(defparameter +google-client-id+
  "クライアントID")
(defparameter +google-client-secret+
  "クライアントシークレット")
(defparameter +google-auth-url+
  "https://accounts.google.com/o/oauth2/auth")
(defparameter +google-token-url+
  "https://accounts.google.com/o/oauth2/token")
(defparameter +google-token-info-url+
  "https://www.googleapis.com/oauth2/v3/tokeninfo")
(defparameter +google-redirect-uri+
  "http://localhost:5000/oauth2callback")
それでは色々とお膳立てが済んだところで、とりあえずログインボタンを作りましょうか。
本当は見た目も凝りたいんですが、目的と外れるので今回は割愛します。
templates/index.htmlに以下のformを追加してください。
<form action="/auth-google" method="post">
  <button>Login with Google</button>
</form>
そしてログイン後に表示されるhtmlファイルも作っておきましょう。
中身はログインしたと判別出来れば何でも良いです。例えばこんな感じで。
{% extends "layouts/default.html" %}
{% block title %}You are logged in!{% endblock %}
{% block content %}
<div id="main">
  Login Successful.
</div>
{% endblock %}
さて、やっとここからCommon Lispコードを書いていきます。
まずは次のユーティリティ関数をsrc/web.lispに追加してください。
;;
;; Utility functions

(defun get-google-auth-url (state-token)
  "Googleアカウントでの認証URLを生成"
  (render-uri
    (make-uri :defaults +google-auth-url+
              :query `(("client_id" . ,+google-client-id+)
                       ("redirect_uri" . ,+google-redirect-uri+)
                       ("scope" . "openid profile email")
                       ("response_type" . "code")
                       ("approval_prompt" . "force")
                       ("access_type" . "offline")
                       ("state" . ,state-token)))))

(defun request-google-token (code)
  "トークンを要請"
  (dex:post +google-token-url+
    :content `(("code" . ,code)
               ("client_id" . ,+google-client-id+)
               ("client_secret" . ,+google-client-secret+)
               ("redirect_uri" . ,+google-redirect-uri+)
               ("grant_type" . "authorization_code"))))

(defun request-google-token-info (id-token)
  "トークン情報を要請"
  (dex:post +google-token-info-url+
    :content `(("id_token" . ,id-token))))

(defun loginp ()
  "ログインしているかどうかを確認"
  (not (null (gethash :user-id *session* nil))))
次にルーティングルールを追加します。
まずはログインの状態によって表示を切り替える部分から。
loginpはセッション情報にユーザIDが格納されている場合にログインされていると判断します。
(defroute "/" ()
  (if (loginp)
    (redirect "/home")
    (render #P"index.html")))

(defroute "/home" ()
  (if (loginp)
    (render #P"home.html")
    (redirect "/")))
次にログインボタンが押された時の動作を記述します。
ルートはtemplates/index.htmlに追加したformのaction属性と合わせてください。
(defroute ("/auth-google" :method :POST) ()
  (let ((state-token
          (cl-base64:usb8-array-to-base64-string
            (secure-random:bytes 32 secure-random:*generator*))))
    (setf (gethash :oauth-google *session*) (acons :state state-token (list)))
    (redirect (get-google-auth-url state-token))))
最後に、認証後にリダイレクトされる先を追加します。
ここが今回の肝となる部分です。
(defroute ("/oauth2callback" :method :GET) (&key |error| |state| |code|)
  ;; エラーが発生した場合はエラーを表示してそのままルートにリダイレクト
  (unless (null |error|)
    (format t "Error: ~A~%" |error|)
    (redirect "/"))
  (let ((session-oauth-google (gethash :oauth-google *session* nil)))
    ;; セッションにステートトークンが存在するか確認
    (if (not (null (assoc :state session-oauth-google)))
      ;; セッションのステートトークンがレスポンスのステートトークンと一致するか確認
      (if (string= (cdr (assoc :state session-oauth-google)) |state|)
        ;; レスポンスに認証コードが存在するか確認
        (if (not (null |code|))
          ;; Googleの認証サーバーにトークンを要請
          (let ((response (jsown:parse (request-google-token |code|))))
            ;; トークンが有効か確認(ライフタイムが残っているか?)
            ;; さらにIDトークンの存在を確認
            (if (and (> (jsown:val response "expires_in") 0)
                     (not (null (jsown:val response "id_token"))))
              ;; IDトークンをGoogleに投げてユーザー情報を取得
              (let ((api-result
                      (jsown:parse (request-google-token-info
                                     (jsown:val response "id_token")))))
                ;; レスポンスの各値を確認
                (if (and (string= (jsown:val api-result "iss")
                                  "accounts.google.com")
                         (string= (jsown:val api-result "azp")
                                  +google-client-id+)
                         (string= (jsown:val api-result "aud")
                                  +google-client-id+)
                         (not (null (jsown:val api-result "email_verified"))))
                  ;; ログイン成功。Gmailアドレスを取り出してセッションの:user-idに格納
                  ;; 本来ならここで登録処理を行ったり、データベースからIDを引き出してきたりするはず
                  (let ((email (jsown:val api-result "email")))
                    (format t "Signin: success Google OAuth '~A'~%" email)
                    (setf (gethash :user-id *session*) email)
                    (redirect "/home"))))))))))
    ;; 認証に失敗した場合はHTTP 401認証エラーコードを投げる
    (throw-code 401))
これでログインが出来るかテストしてみましょう。
プロジェクトディレクトリにパスが通っていればそのままrequire出来ると思います。
(require :openid-connect)
(openid-connect:start :server :woo :port 5000)
そしてブラウザからhttp://localhost:5000を開いてみて下さい。
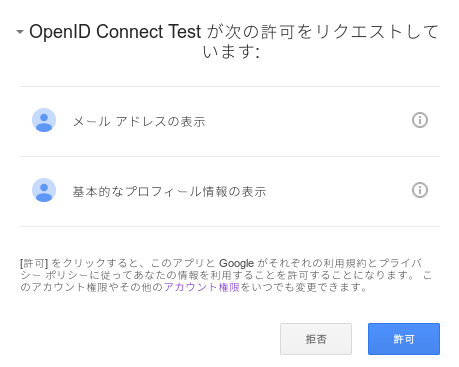
上手く行っていれば、ログインボタンから以下のようなページに飛べると思います。
許可をクリックするとhome.htmlが表示され、ターミナルにメールアドレスが表示されると思います。
終了したい時は以下のようにします。
(openid-connect:stop)
どうでしょうか。思ったより簡単でしょう?
これ、本来ならクライアントライブラリが用意されていて、開発者はただそれを使えばいいんですが、残念ながらCommon Lispには存在しませんでした。
なので僕がライブラリ化しようとも考えましたが、確実にこれで合ってるという保証は出来ないためそれはしていません。
今回は知見の共有ということで。どこか間違いがあればご指摘ください。
これからCaveman2で作られたWebアプリケーションが増えると良いですね!
明日は@hatsugaiさんの記事です。

