目的
AWSでCognitoとALBを使ったオーソライザー認証を実装する機会があった。
その際に認証後のバックエンド側に転送されるヘッダーがAWS特有のものであり、ローカルとクラウド上で実装のコードを分ける必要があった。
現在、AWSをローカルモックするサービスは複数存在するが、本記事の要件であるALBとCognitoでのオーソライザー認証についてはローカルで再現する手順は存在していなかった。
そこでオープンソースに使えるツールを開発することでログイン後にアクセストークンやidTokenを認証必須のエンドポイントに強制的に付与し転送するアプリケーションを作成することにした。
アーキテクチャ・構成
今回はこのツールを実際にどう使うのかについて解説する。
またこのツールは以下のような構成であり、本記事で作成したローカルアプリケーションと合わせて使い方を解説する。
ツールの構成
リンク先にもあるが以下のような構成。
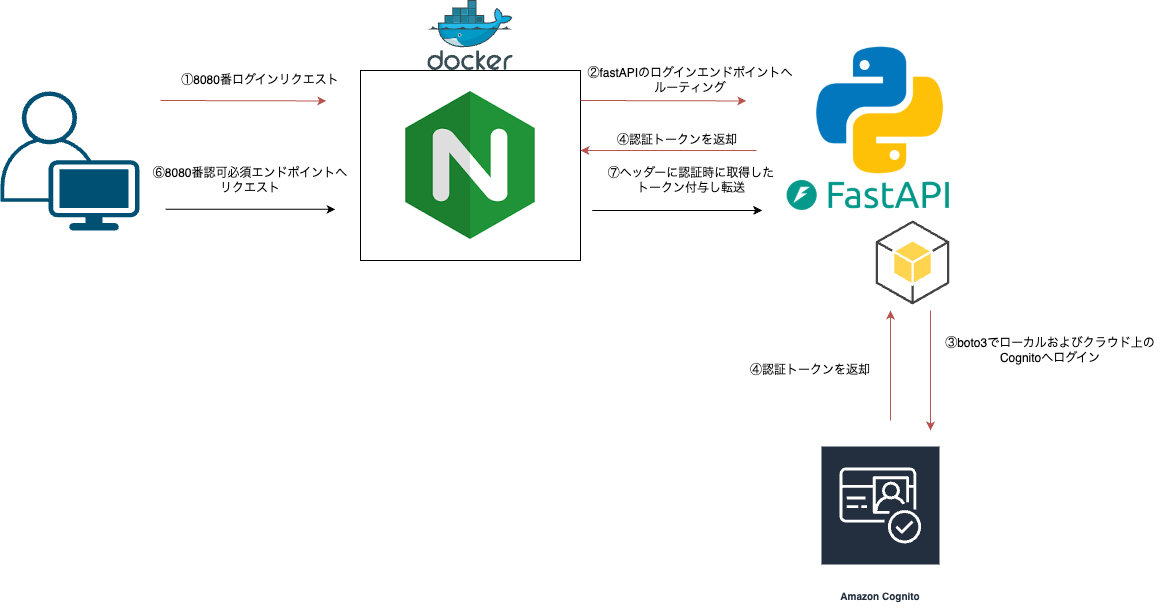
このツールではNginxの起動を行うことで自動で必要なエンドポイントへトークン類を付与して送信する。
またCognito操作はpythonのboto3ライブラリを利用するが主要な機能を呼び出すライブラリを下記に格納している。
上記二つのOSSをcloneすることでNginxとCognitoの利用環境は整った。
本記事ではこれらを利用した擬似的オーソライザー認証を全てローカルで実装することをゴールとする。
サンプルアプリケーションの技術スタック・構成
Python 3.12.2 (FastAPI)
Cognito (moto[server])
-
アプリ構成
以下からアプリをcloneする。
alb-cognito-app/
        |- app/
        |    |- main.py
        |    |_ template/
        |            |- login.html (認証前)
        |            |_ items.html (認証後)
        |
        |_ requirements.txt
fastapi
uvicorn[standard]
boto3
moto[server]
jinja2
アプリケーション・Cognito(ローカル)・Nginx起動
Nginx
Nginx Configuファイル
本記事では8000portのfastapiアプリを8080portでクライアントからアクセスする。
本アプリでは以下のエンドポイントを用意し、location内のpathに記述しているため、任意のアプケーション作成時にはlocationを変更する。
- login: ログイン用endpoint
- ui/login: ログイン画面のルーティング
- items: 認証後の実行されるendpoint
- ui/items: 認証後に遷移する画面のルーティング
events {}
http {
    lua_shared_dict Tokens 60m;
    server {
        listen 80;
        default_type text/html;

        location /ui/login {
            proxy_pass http://host.docker.internal:8000/ui/login;
        }

        location /login {
            proxy_pass http://host.docker.internal:8000/login;

            body_filter_by_lua_block {
                ngx.ctx.response_body = (ngx.ctx.response_body or "") .. (ngx.arg[1] or "")
            }

            log_by_lua_block {
                local json = require "cjson"
                local token_dict = ngx.shared.Tokens
                local data = json.decode(ngx.ctx.response_body)
                if data.AccessToken then
                    token_dict:set("accessToken", data.AccessToken)
                end
                if data.IdToken then
                    token_dict:set("idToken", data.IdToken)
                end
            }
        }

        set $accessToken "";
        set $idToken "";

        access_by_lua_block {
            local token_dict = ngx.shared.Tokens
            ngx.var.accessToken = token_dict:get("accessToken") or "sampleaccess"
            ngx.var.idToken = token_dict:get("idToken") or "sampleaccess"
        }

        location /ui/items {
            proxy_pass http://host.docker.internal:8000/ui/items;
            proxy_set_header x-amzn-oidc-accessToken $accessToken;
            proxy_set_header x-amzn-oidc-data $idToken;
        }

        location /items {
            proxy_pass http://host.docker.internal:8000/items;
            proxy_set_header x-amzn-oidc-accessToken $accessToken;
            proxy_set_header x-amzn-oidc-data $idToken;
        }
    }
}
Nginx起動
以下のコマンドを実行する。
$ pwd
> プロジェクトを実行したいディレクトリ

$ git clone https://github.com/takuyanakahara-hub/alb-cognito-nginx

$ sh set-up.sh
[+] Building 0.8s (8/8) FINISHED                       docker:desktop-linux
 => [internal] load build definition from Dockerfile                   0.0s
 => => transferring dockerfile: 204B                                   0.0s
 => [internal] load metadata for docker.io/openresty/openresty:alpine  0.7s
 => [internal] load .dockerignore                                      0.0s
 => => transferring context: 2B                                        0.0s
 => [1/3] FROM docker.io/openresty/openresty:alpine@sha256:fe29b3dde2  0.0s
 => [internal] load build context                                      0.0s
 => => transferring context: 69B                                       0.0s
 => CACHED [2/3] COPY nginx.conf /etc/nginx/nginx.conf                 0.0s
 => CACHED [3/3] COPY nginx.conf /usr/local/openresty/nginx/conf/ngin  0.0s
 => exporting to image                                                 0.0s
 => => exporting layers                                                0.0s
 => => writing image sha256:5cb98442b27807f049361b1f34ad076ca163309ec  0.0s
 => => naming to docker.io/library/nginx                               0.0s

View build details: docker-desktop://dashboard/build/desktop-linux/desktop-linux/wf277zymv44048ki3hiefw1zi

What's next:
    View a summary of image vulnerabilities and recommendations → docker scout quickview
Cognito起動
ローカルで起動するにあたりmoto_serverを利用する。
今回は下記で3000portで起動する。
(AWS環境を準備してありCognitoがあればその情報を使う)
$ moto_server -p3000
 * Running on http://127.0.0.1:3000/
ここで使うユーザーはあらかじめ準備しておく。
Username = email = "admin@admin.co.jp"
password = "@Password"
アプリケーション作成・起動
fastapiを準備する。
from fastapi import FastAPI, Request
import boto3, base64, hmac, hashlib, os, json
from fastapi.templating import Jinja2Templates
from dotenv import load_dotenv
from pydantic import BaseModel

app = FastAPI()

load_dotenv()

class User(BaseModel):
    email: str
    password: str

templates = Jinja2Templates(directory="templates")

PROFILE_NAME = ""
COGNITO_ENDPOINT = "http://127.0.0.1:3000"
REGION = "ap-northeast-1"
USERPOOL_ID = os.environ.get("USERPOOL_ID")
CLIENT_ID = os.environ.get("CLIENT_ID")
SECRET = os.environ.get("SECRET")

def set_client():
    if PROFILE_NAME != "":
        session = boto3.Session(profile_name=PROFILE_NAME)
    else:
        session = boto3.Session()
    config = boto3.session.Config(proxies={})
    client = session.client(
        "cognito-idp",
        endpoint_url = COGNITO_ENDPOINT,
        region_name = REGION,
        config = config,
    )
    return client

def create_secret_hash(username):
    message, key = (username + CLIENT_ID).encode("utf-8"), SECRET.encode("utf-8")
    hmac_secret = hmac.new(key, message, digestmod=hashlib.sha256)
    secret_hash = base64.b64encode(hmac_secret.digest())
    return secret_hash


@app.post("/login")
async def login(request: User):
    email = request.email
    password = request.password
    client = set_client()

    secret = create_secret_hash(email)
    try:
            response = client.initiate_auth(
                ClientId=CLIENT_ID,
                AuthFlow="USER_PASSWORD_AUTH",
                AuthParameters={
                    "USERNAME": email,
                    "PASSWORD": password,
                    "SECRET_HASH": secret.decode(),
                }
            )
    except Exception as e:
        print("error message: ", e)

    tokens = response.get("AuthenticationResult")
    if len(tokens) > 0:
        return {
            "AccessToken": tokens.get("AccessToken"),
            "IdToken": tokens.get("IdToken")
        }
    else:
        return {
            "message": "UnAuthorization"
        }

@app.get("/items")
async def get_items(request: Request):
    headers = dict(request.headers)
    access_token = headers.get("x-amzn-oidc-accesstoken")
    id_token = headers.get("x-amzn-oidc-data")

    if access_token == "" or id_token == "":
        return {
            "message": "UnAuthorization"
        }
    else:
        return {
            "access_token": access_token,
            "id_token": id_token,
        }


@app.get("/ui/login")
async def login_ui(request: Request):
    return templates.TemplateResponse(request=request, name="login.html")

@app.get("/ui/items")
async def items_ui(request: Request):
    return templates.TemplateResponse(request=request, name="items.html")
<!DOCTYPE html>
<html lang="ja">
<head>
    <meta charset="UTF-8">
    <meta name="viewport" content="width=device-width, initial-scale=1.0">
    <title>ログインフォーム</title>
    <link rel="stylesheet" href="styles.css">
		<style>
			/* 全体のスタイル */
			body {
					font-family: Arial, sans-serif;
					background-color: #f4f4f4;
					display: flex;
					justify-content: center;
					align-items: center;
					height: 100vh;
					margin: 0;
			}

			/* ログインフォームのコンテナ */
			.login-container {
					background: white;
					padding: 20px;
					border-radius: 10px;
					box-shadow: 0 0 10px rgba(0, 0, 0, 0.1);
					width: 320px;
					text-align: center;
					display: flex;
					flex-direction: column;
					align-items: center;
			}

			/* フォームのタイトル */
			h2 {
					margin-bottom: 20px;
					font-size: 24px;
					font-weight: bold;
			}

			/* 入力フィールド */
			.input-group {
					margin-bottom: 15px;
					width: 100%; /* 横幅を100%にして均一に */
					text-align: left;
			}

			.input-group label {
					display: block;
					font-size: 14px;
					margin-bottom: 5px;
			}

			.input-group input {
					width: 100%; /* 横幅100%にして親要素に合わせる */
					padding: 8px;
					border: 1px solid #ccc;
					border-radius: 5px;
					font-size: 14px;
			}

			/* ログインボタン */
			button {
					width: 100%; /* 横幅100%にして親要素に合わせる */
					padding: 10px;
					background-color: #007bff;
					border: none;
					color: white;
					font-size: 16px;
					border-radius: 5px;
					cursor: pointer;
			}

			button:hover {
					background-color: #0056b3;
			}

			/* 登録リンク */
			.register-link {
					margin-top: 10px;
					font-size: 14px;
			}

			.register-link a {
					color: #007bff;
					text-decoration: none;
			}

			.register-link a:hover {
					text-decoration: underline;
			}
		</style>
</head>
<body>
    <div class="login-container">
        <h2>ログイン</h2>
        <form action="#" method="POST">
            <div class="input-group">
                <label for="email">メールアドレス</label>
                <input type="email" id="email" name="email" required>
            </div>
            <div class="input-group">
                <label for="password">パスワード</label>
                <input type="password" id="password" name="password" required>
            </div>
            <button type="submit" onclick="onClick()">ログイン</button>
            <p class="register-link">アカウントをお持ちでないですか? <a href="#">新規登録</a></p>
        </form>
    </div>

		<script>
			async function onClick() {
				const email = document.getElementById("email").value;
				const password = document.getElementById("password").value;

				const data = {"email": email, "password": password}
				try {
					response = await fetch("/login", {
						method: "POST",
						headers: {
							"Content-Type": "application/json"
						},
						body: JSON.stringify(data),
					});
					location.href = "/ui/items"
				} catch (error) {
					console.log(error);
				};
			};
		</script>
</body>
</html>
<!DOCTYPE html>
<html>
    <head>
        <meta charset="UTF-8">
        <meta name="viewport" content="width=device-width, initial-scale=1.0">
        <title>認証後画面</title>
        <style>
            #header-area {
                background: white;
                padding: 20px;
                border-radius: 10px;
                box-shadow: 0 0 10px rgba(0, 0, 0, 0.1);
                width: 600px;
                text-align: center;
                display: flex;
                flex-direction: column;
                align-items: center;
            }
            #header-area p {
                max-width: 100%; /* 親要素の幅に収める */
                word-wrap: break-word; /* 旧仕様でも対応 */
                overflow-wrap: break-word; /* 現行仕様 */
                white-space: normal; /* 自然な折り返し */
                text-align: left; /* 左寄せ(必要なら) */
            }

        </style>
    </head>
    <body>
        <h1>認証後画面です。</h1>
        <p>ALB×Cognito認証ヘッダー</p>
        <div id="header-area">
        </div>
        <script>
            async function initLoading() {
                getItems();
            }

            async function getItems() {
                try {
                    const response = await fetch("http://localhost:8080/items");
                    const res_body = await response.json();
                    console.log(res_body)
                    const div = document.getElementById("header-area");
                    const p_accessToken= document.createElement("p");
                    const p_idToken = document.createElement("p");
                    p_accessToken.textContent = "Cognito AccessToken : " + res_body.access_token;
                    p_idToken.textContent = "Cognito IdToken : " + res_body.id_token;
                    div.appendChild(p_accessToken);
                    div.appendChild(p_idToken);
                } catch (error) {
                    console.log(error);
                }
            }
            window.onload = initLoading;
        </script>
    </body>
</html>
以下のコマンドでサーバー実行
$ uvicorn main:app --reload
結果確認
この状態でnginxの8080portを使い、ログインページにアクセスし、設定したユーザーパスワードでログインすると以下のようになる。
-
ログイン画面(認証前)

-
ログイン後
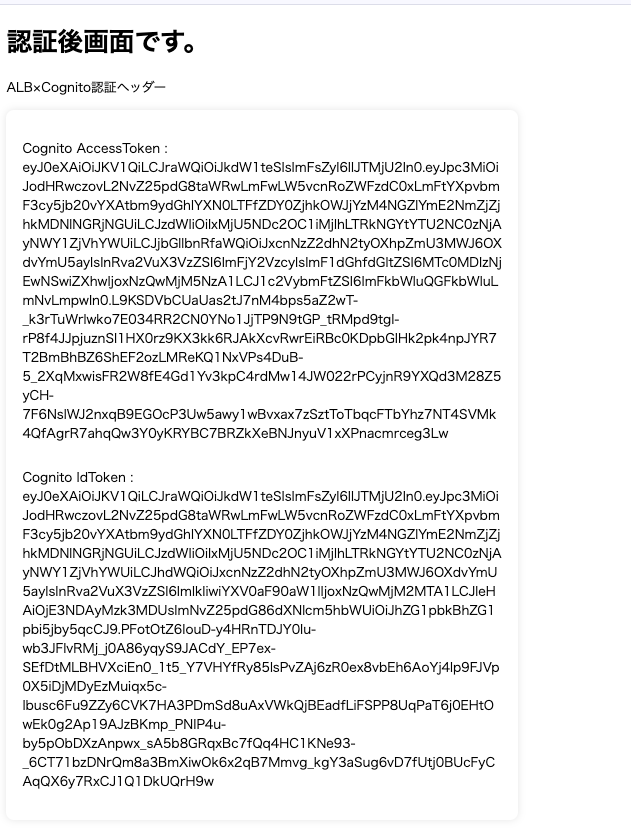
ログイン後では転送されるヘッダーを表示するようにしているがそれが取得できていることがわかる。
(このトークンはローカルCognitoのものなので問題ない)
実際にはトークンや環境変数、クレデンシャルの扱いには十分留意すること。
まとめ
この環境を利用することでローカル、クラウドを問わないALB×Cognitoのオーソライザー認証による開発環境を構築できる。
認証の検証などの部分は全てAWSが担ってくれるので、トークンの存在確認やユーザークレームを独自に取得したいケースなどでは特に役立つと考えている。