 Xin chào các bạn
Bài viết này mình dịch từ ダウンロード・アップロード機能の実装 - AWS上で構築するRESTfulアプリ勉強会~Web開発ワークショップ~【第9回】マニュアル của tác giả @k_shimoji.
Tại sao chúng ta cần chức năng download / upload
Chức năng này là rất phổ biến sử dụng trong các hệ thống, vì vậy chúng ta cần nghiên cứu cách để implement nó. Chúng ta biết rằng rằng các web system chạy trên "HTTP". Việc implement không phải là mục tiêu của bài học này, mục tiêu chính là học cách implement nó. Hiện tại có rất nhiều framework với nhiều layer giúp mình chỉ cần thao tác đơn giản ở layer trên cùng, tuy nhiên mình sẽ đi sâu hơn một tí, qua đó sẽ hiểu sâu hơn về cách làm.
Trước khi bắt đầu lập trình, mình sẽ xem qua về HTTP
Download Công việc
Đầu tiên, định nghĩa download là "Lưu nội dung nhận được từ server vào máy nội bộ của bạn (local) ", Công việc "lưu vào local" thực sự được thực hiện thông qua trình duyệt.
Tuy nhiên những "content nhận được từ server" có cấu trúc như thế nào, chúng ta sẽ cùng xem.
Cấu trúc của HTTP response
HTTP là một giao thức kiểu client/server; client đưa ra các request, và server sẽ trả lời các request này. Cấu trúc các HTTP message vì thế cũng thay đổi theo yếu tố này. Có một định dạng cho HTTP request và cho các response.
"Nội dung nhận được từ server" là phản hồi HTTP được trả về từ server, nó bao gồm những phần liên quan và một phần gọi là "response body".
Những phản hồi sau đây là những phản hồi nhận được khi bạn request đến trang chủ của Yahoo, đây là cấu trúc HTTP response của nó
- Dòng 1: Protocol / version the response code ->
HTTP/1.1 200 OK - 2 dòng sau: (multi-line) response header ->
Server: nginx,Date: Thu, 24 Sep 2015 09:11:53 GMT,Content-Type: text/html; charset=UTF-8... - Một dòng trống
- Sau dòng trống là nội dung của response body ->
<!DOCTYPE HTML PUBLIC "-//W3C//DTD HTML...〜
Cụ thể nó như thế này
HTTP/1.1 200 OK
Server: nginx
Date: Thu, 24 Sep 2015 09:11:53 GMT
Content-Type: text/html; charset=UTF-8
Transfer-Encoding: chunked
Connection: close
P3P: policyref="http://privacy.yahoo.co.jp/w3c/p3p_jp.xml", CP="CAO DSP COR CUR ADM DEV TAI PSA PSD IVAi IVDi CONi TELo OTPi OUR DELi SAMi OTRi UNRi PUBi IND PHY ONL UNI PUR FIN COM NAV INT DEM CNT STA POL HEA PRE GOV"
Cache-Control: private, no-cache, no-store, must-revalidate
Expires: -1
Pragma: no-cache
X-XRDS-Location: https://open.login.yahooapis.jp/openid20/www.yahoo.co.jp/xrds
Vary: Accept-Encoding
X-Frame-Options: SAMEORIGIN

<!DOCTYPE HTML PUBLIC "-//W3C//DTD HTML 4.01 Transitional//EN" "http://www.w3.org/TR/html4/loose.dtd">
<html>
<head>
<meta http-equiv="content-type" content="text/html; charset=utf-8">
<meta http-equiv="content-style-type" content="text/css">
<meta http-equiv="content-script-type" content="text/javascript">
<meta name="description" content="Japan's largest portal site. Search, auctions, news, mail, community, shopping, more than 80 services, including the deployment. We will continue to aim to "life engine" to enrich your life.">
<meta name="robots" content="noodp">
<title>Yahoo! JAPAN</title>

〜以下省略〜
Chỉ có nội dung trong phần body của HTTP response có thể lấy và cho phép "download", không phải những format đã thay đổi này.
Hay nói cách khác, việc "download" cũng giống như việc "lưu những response body nhận được từ server xuống local thông qua trình duyệt."
Để lưu response body thông qua trình duyệt
Nói chung là để "download" thì chúng ta phải thực hiện lưu "response body" trên trình duyệt. Ở ví dụ trên về trang chủ yahoo, nó đã trả về HTML trên response body. Lúc này, trình duyệt ( với một số file ngoại lệ ) lưu chúng xuống máy local, và vẽ lại chúng ở cửa sổ trình duyệt.
Trên trình duyệt, để "hiển thị" response body đã nhận được hoặc để quyết định có lưu hay không.
Có những lời khuyên rằng, không chỉ "response header" chứa các meta-information về phản hồi.
Trong số chúng thì trình duyệt chủ yếu xác định những thành phần như Content-Type và Content-Disposition.
- Content-Type
- Nếu response body là
text/htmlnghĩa là nó là HTML, cũng như trên server side là JSON nếu set làapplication/json.
Một khi trình duyệt đọc đượcContent-Type, Nó sẽ chạy những hành động mặc định cho các nội dung, ví dụ nó sẽ hiển thị nếu "display" là mặc định, lưu nếu "save" là mặc định.
- Nếu response body là
- Content-Disposition
-
attachmenthayinlinetôi sẽ set ở server side. Nếu bạn muốn lưuattachment, mình không cần request tới trình duyệt nếu bạn muốn hiển thịinlinevà nó sẽ được set tại server side. Vì những hành vi mặc định của trình duyệt có chút khác biệt ở mỗi trình duyệt,Content-Typenó có thể được set chỉ khiContent-Dispositioncũng được xác định ở vài trình duyệt đáng tin cậy là "Được phép download."
-
Ở bài học này,
- Mình sẽ set nội dung sao cho có thể download được vào response body
- Nó sẽ set giá trị response header
Chúng ta hãy cùng xem về nội dung cần implement
Chức năng Upload
Với việc upload, nó là cách file được gửi đi
Hãy xem cấu trúc của HTTP request.
Cấu trúc của HTTP request
Cấu trúc của HTTP request tương tự cấu trúc của HTTP response.
File cần di chuyển trong các request được gửi, nó sẽ được gửi bằng cách include nó ở trong một phần được trỏ đến như là "request body".
Request khi bạn thực sự gửi 1 file thông qua hàm upload sẽ được tạo như sau.
Mình ví dụ upload 2 file todolist1.txt, todolist2.txt cùng một lúc.
POST /rest-study/todo_lists/upload.json HTTP/1.1
Host: 10.0.1.206
User-Agent: Mozilla/5.0 (Macintosh; Intel Mac OS X 10.10; rv:42.0) Gecko/20100101 Firefox/42.0
Accept: application/json, text/javascript, */*; q=0.01
Accept-Language: ja,en-US;q=0.7,en;q=0.3
Accept-Encoding: gzip, deflate
Referer: http://10.0.1.206/rest-study/
X-Requested-With: XMLHttpRequest
Content-Length: 779
Content-Type: multipart/form-data; boundary=---------------------------1395431092341454357747073315
Cookie: CAKEPHP=oo6gj167d4fltodm3nre2lskd2
Connection: keep-alive
Pragma: no-cache
Cache-Control: no-cache

-----------------------------1395431092341454357747073315
Content-Disposition: form-data; name="0"; filename="todolist1.txt"
Content-Type: text/plain

Đã upload từ todolist1.txt tới TODO1
Đã upload từ todolist1.txt tới TODO2
Đã upload từ todolist1.txt tới TODO3
Đã upload từ todolist1.txt tới TODO4
Đã upload từ todolist1.txt tới TODO5


-----------------------------1395431092341454357747073315
Content-Disposition: form-data; name="1"; filename="todolist2.txt"
Content-Type: text/plain

Đã upload từ todolist2.txt tới TODO1
Đã upload từ todolist2.txt tới TODO2
Đã upload từ todolist2.txt tới TODO3


-----------------------------1395431092341454357747073315--
HTTP method là POST, Bạn cần truy cập vào URL /rest-study/todo_lists/upload.json.
Chú ý
Content-Type: multipart/form-data; boundary=---------------------------1395431092341454357747073315Content-Length: 779
Có 2 HTTP request header.
Đầu tiên, bạn nên check format của the HTTP request.
- Dòng 1: HTTP method URI protocol / version ->
POST /rest-study/todo_lists/upload.json HTTP / 1.1 - 2 Dòng tiếp theo: (multi-line) request header ->
Host: 10.0.1.206,User-Agent: Mozilla / 5.0 (Macintosh; Intel Mac OS X 10.10; rv: 42.0) Gecko / 20100101 Firefox / 42.0... - Dòng trống
- Sau dòng trống là tất request body ->
-----------------------------1395431092341454357747073315〜
Nó sẽ trở thành
multipart/form-data
Nếu Content-Type không phải multipart/form-data, Ví dụ nó là application/json, thì nó sẽ như dưới đây.
{"todo":"Register the TODO in the Add button","status":0,"assignee":"67"}
Ngoại trừ multipart/form-data, JSON data cần truyền đi sẽ được lưu trữ theo cách của nó tới request body.
Request body truyền trong multipart/form-data có các chuỗi phân cách , ví dụ ----------------------------- Một chuỗi ký tự như Ichisankyu5431092341454357747073315.
Format này được xác định ở request header Content-Type multipart/form-data.
Như cái tên đã nói lên tất cả, request body đã được chia thành rất nhiều phần riêng biệt với rất nhiều chuỗi phân cách.
Và nó trở thành một cấu trúc lưới chứa những request header và request body cho mỗi phần.
Ở bài học này,
- Tiến hành upload file trên Ajax
- Lấy về nội dung file từ request
- Tạo TODO từ những nội dung xuất ra
Bây giờ mình sẽ xem qua các nội dung cần implement.
Tuy nhiên, phần "nhận nội dung file từ request" rất dễ dàng vì PHP và CakePHP đã giải quyết hầu hết chúng rồi!
Bây giờ mình sẽ implement luôn phần "Upload file" trên Ajax. Nội dung chi tiết ở như sau.
Nội dung
Đây là hình ảnh sau khi hoàn tất việc implement
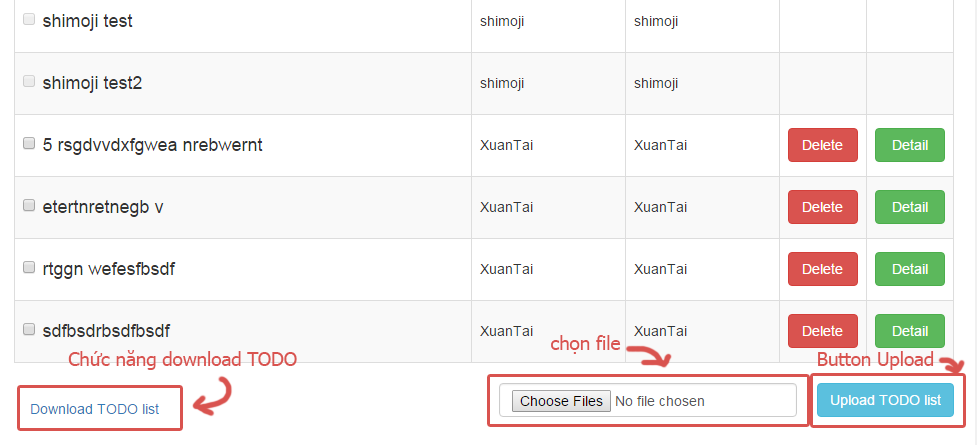
- Link download
- TODO list xuất hiện khi bạn click vào download ở định dạng CSV.
- Chọn file để upload
- Nếu bạn click vào nút "Chọn file", một cửa sổ xuất hiện, các bạn hãy chọn các file bạn muốn upload.
- Upload button
- Chạy việc upload khi bạn click vào.
Cần chú ý rằng, file bạn muốn upload như ở ví dụ sau, nó sẽ là mỗi nội dung TODO một dòng, không kèm theo owner và assigner, và cần được thêm vào vị trí của TODO chưa hoàn thành nghĩa là status bằng 0. Khi bạn thêm TODO, bạn có thể sử dụng chung validation như thêm bằng "Add" button nếu muốn.
- Chạy việc upload khi bạn click vào.
Upload từ todolist1.txt đến TODO1
Upload từ todolist1.txt đến TODO2
Upload từ todolist1.txt đến TODO3
Upload từ todolist1.txt đến TODO4
Upload từ todolist1.txt đến TODO5
Mục lục bài học
- Chuẩn bị
- Bài 1: Download
- Bài 2: Upload
Bây giờ chúng ta bắt đầu nào
Chuẩn bị
Phần chuẩn bị sẽ giống nhau ở mỗi bài, vì vậy tôi đã tổng hợp nó ở một entry riêng. Các bạn vui lòng xem ở link này All 12 times of study sessions in do I have use of Git - RESTful application workshops will be built on AWS ~ Web development workshop ~ - Qiita để chuẩn bị .
- Git: Bây giờ mình sẽ tạo branch
vol/09và làm việc trên nó.
OK, bước đầu đã xong
![]() *** Tôi xin nhắc lại ở bài 5 và bài 6, chúng ta đã có những table bị thay đổi. ***
*** Tôi xin nhắc lại ở bài 5 và bài 6, chúng ta đã có những table bị thay đổi. ***
- Bài 5
- Tạo Table dành cho việc đăng ký thành viên ( Thực hiện cho chức năng login )
- Bài 6
- Thêm một cột cho table TODO list ( Thêm cột Owner và cột assignee cho chức năng phân công công việc)
Các bạn nên tham khảo lại các link sau để rõ hơn.
Tạo Table dành cho việc đăng ký thành viên
Thêm một cột cho table TODO list
Bắt đầu đến với bài 1 thôi:
Bài 1: Download
- Client side
- Thêm download link
- Server side
- Return để xuất nội dung response body vào một CSV file bằng cách đọc TODO từ database
Bây giờ tôi sẽ bắt đầu implement từng cái một.
File format sau khi download về nó sẽ như sau, phân cách bằng các dấu phẩy,
- id
- todo: nội dung của TODO
- status: trạng thái
- owner: tên owner
- assignee: Tên người được phân công
Đây là cấu trúc file mà chúng ta muốn. Dòng đầu tiên sẽ là các title (lúc upload không phải định dạng này nhé, file cần upload chỉ có nội dung mỗi TODO mỗi dòng thôi )
id, todo, status, owner, assignee
1, buy the milk, 1, Taro Yamada, Taro Yamada
2, call home, 1, Tanaka Hanako, Taro Yamada
3, walk the dog, 1, Taro Yamada, Taro Yamada
Các file cần chỉnh sửa
| Thao tác | file | Ý nghĩa |
|---|---|---|
| Sửa | app/Config/routes.php | Thêm tiến trình download vào route |
| Sửa | app/View/Layouts/default.ctp | Thêm nút download |
| Sửa | app/Controller/TodoListsController.php | Các tiến trình bổ sung |
app/Config/routes.php
Mình sẽ thêm URL cho tiến trình download。
〜略〜

 /*
  * API
  */

 // ログイン
 Router::connect('/users/login', array (
 	'controller' => 'users',
 	'action' => 'login',
 	'method' => array (
 		'POST'
 	)
 ));

 // ログアウト
 Router::connect('/users/logout', array (
 	'controller' => 'users',
 	'action' => 'logout',
 	'method' => 'POST'
 ));

 // ログインチェック(ログイン情報取得)
 Router::connect('/users/loggedin', array (
 	'controller' => 'users',
 	'action' => 'loggedIn',
 	'method' => 'GET'
 ));

 // サインアップ
 Router::connect('/users/signup', array (
 	'controller' => 'users',
 	'action' => 'signUp',
 	'method' => array (
 		'POST'
 	)
 ));

+// CSVファイルダウンロード
+Router::Connect('/todo_lists/download', Array(
+	'controller' => 'todo_lists',
+	'action' => 'download',
+	'method' => 'GET'
+));

 Router::mapResources(array (
 	'todo_lists',
 ));

〜以下略〜
- Thêm
/todo_lists/download. - Mình sẽ routing khi truy cập vào
downloadmethod củaTodoListController.phpbằng phương thức GET .
app/View/Layouts/default.ctp
Thêm button "download"
〜略〜

 	<!-- TODO一覧表示のテンプレート -->
 	<script type="text/template" id="todo-composite-template">
 		<div class="row">
 			<div class="col-xs-12">
 				<span class="row form-inline">
 					<div class="input-group col-sm-6 col-xs-12">
 						<label for="new-todo" class="visible-xs">Todo</label>
 						<textarea class="form-control todo-item-text" rows="3" id="new-todo" placeholder="Todo?" autofocus></textarea>
 					</div>
 					<div class="input-group col-sm-3 col-xs-12">
 						<label for="user-list" class="visible-xs">Assignee</label>
 						<select class="form-control" name="assignee" id="user-list"></select>
 					</div>
 					<div class="input-group col-sm-3 col-xs-12">
 						<label class="visible-xs"></label>
 						<input type="button" id="addTodo" class="btn btn-primary btn-md todo-action-button" value="追加">
 					</div>
 				</span>
 			</div>
 		</div>
 		<div class="row">
 			<div class="col-xs-12">
 				<table class="table table-striped table-bordered table-hover">
 					<thead>
 						<tr class="success">
 							<th class="col-sm-6" colspan="2">ToDo</th>
 							<th class="col-sm-2">Owner</th>
 							<th class="col-sm-2">Assignee</th>
 							<th class="col-sm-2" colspan="2"></th>
 						</tr>
 					</thead>
 					<tbody></tbody>
 				</table>
 			</div>
 		</div>
+		<div class="row">
+			<div class="col-xs-6">
+				<a href="/rest-study/todo_lists/download" class="alert alert-default pull-left" id="downloadTodo">Download TODO list</a>
+			</div>
+		</div>
 	</script>

〜以下略〜
- Chỉ thêm một cặp thẻ
<a>, link mình sẽ set thành/rest-study/todo_lists/downloadnhư đã được thêm ởapp/Config/routes.php.
app/Controller/TodoListsController.php
Bắt đầu tiến trình download
〜略〜

 	public function index() {
 		$query = array (
 			'fields' => $this->fields,
 			'order' => "TodoList.id"
 		);
 		$res = $this->TodoList->find('all', $query);
 		// 整形
 		if (count($res) > 0) {
 		    $loginUserId = $this->Auth->user()['id'];
 			foreach ( $res as $key => $row ) {
 			    //「ログインユーザがオーナである」フラグ
 				$res[$key]['TodoList']['owned'] = $row['Owner']['id'] === $loginUserId;
 			    //「ログインユーザが担当である」フラグ
 				$res[$key]['TodoList']['assigned'] = $row['Assignee']['id'] === $loginUserId;
 			}
 		}
 		$this->set(compact('res'));
 		$this->set('_serialize', 'res');
 	}

〜中略〜

 	public function edit($id) {
 		$this->TodoList->id = $id;
 		$data = $this->request->data;
 		$res = $this->TodoList->save($this->request->data);
 		$res = !empty($res);
 		$response = $this->editResponse($res);
 		$this->set(compact('response'));
 		$this->set('_serialize', 'response');
 	}

+	public function download() {
+		//id順で一覧取得
+		$query = array (
+			'fields' => $this->fields,
+			'order' => "TodoList.id"
+		);
+		$res = $this->TodoList->find('all', $query);
+		// CSVファイルに整形
+		if ($res && is_array($res)) {
+			$fp = fopen('php://temp', 'w+');
+			//タイトル
+			$fields = array('id', 'todo', 'status', 'owner' ,'assignee');
+			fputcsv($fp, $fields);
+			//データ
+			foreach ( $res as $record ) {
+			    $fields = array();
+			    $fields[] = $record['TodoList']['id'];
+			    $fields[] = $record['TodoList']['todo'];
+			    $fields[] = $record['TodoList']['status'];
+			    $fields[] = $record['Owner']['name'];
+			    $fields[] = $record['Assignee']['name'];
+				fputcsv($fp, $fields);
+			}
+			//Bắt đầu với pointer
+			rewind($fp);
+			//Đọc file
+			$content = stream_get_contents($fp);
+			//mã hiện tại đang là UTF-8
+			//Excel không đọc được mã này, vì vậy mình sẽ chuyển nó thành SJIS-win
+			//$content =  mb_convert_encoding($content, 'sjis-win', 'UTF-8');
+			fclose($fp);
+			//Không xem view
+			$this->autoRender = false;
+			//Đặt tên file download
+			$this->response->download('todo.csv');
+			$this->response->type('csv');
+			$this->response->body($content);
+		}
+	}
+
 	//Edit response
 	private function editResponse($res){
 		if($res){
 			$response = $res;
 		}else{
 			$this->setStatusValidationError();
 			$respnse = array();
 			if(count($this->TodoList->validationErrors) > 0){
 				$response = $this->editErrors($this->TodoList->validationErrors);
 			}else{
 				$response = $this->editErrors('An error occured.');
 			}
 		}
 		return $response;
 	}

 〜以下略〜
Thêm hàm download
Thu thập data
- Lấy todo list ở
$this->TodoList->find('all', $query);. Nó giống những gì bạn đang làm ở hàmindextrên kia.
Hàm truy cập vào file php
- Sử dụng các hàm sau đây, bạn có thể viết
php;//tempvào cuối csv format data của TODO list.- Tại hàm fopen, php://temp mở kết nối tới file output trên bộ nhớ
- Output của CSV format nằm bên trái hành động của hàm fputcsv.
- Sẽ trả những phần đầu tiên của file pointer ở hàm rewind,
- Đọc lại data là output của hàm stream_get_contents trên mảng.
- Hàm fclose - Manual dùng để đóng file.
 Chú ý
Chú ý
Đây là quy trình
Để "download" file xuống trình duyệt,
- Set nó thành CSV file trong
Content-Type - Xác định tên file với các đính kèm cụ thể cần download ở
Content-Disposition
Bạn cần làm cả 2.
-
$this->response->download('todo.csv');- Mình sẽ sử dụng method
CakeResponse->downloadtrong CakePHP,Content-Disposition: attachment; filename="todo.csv"sẽ được set
- Mình sẽ sử dụng method
-
$this->response->type('csv');- Nếu bạn sử dụng method
CakeResponse->typecủa CakePHP, set thànhContent-Type: text/csv; charset=UTF-8
- Nếu bạn sử dụng method
-
$this->response->body($content)- Nếu bạn sử dụng method
CakeResponse->bodycủa CakePHP, nội dung của response body sẽ được set bằng biến$content.
- Nếu bạn sử dụng method
Trình duyệt sẽ thực hiện việc "download" như trên.
![]() Với việc comment đi phần return của
Với việc comment đi phần return của $this->response->download('todo.csv'); và $this->response->type('csv'), Mình sẽ xem cách xử lý trên các trình duyệt khác nhau, bạn có thể thấy một số sự khác biệt.
Tóm tắt bài học
Let's download the TODO is actually modified.
-
 Sửa
Sửa app/Config/routes.phpnhư hướng dẫn trên. -
Sửa
app/View/Layouts/default.ctpnhư hướng dẫn trên. -
Sửa
app/Controller/TodoListsController.phpnhư hướng dẫn trên. -
Kiểm tra kết quả
-
Commit lên Git
![]() Hiển thị dưới dạng Diff những thay đổi trên Github
Hiển thị dưới dạng Diff những thay đổi trên Github
Chương 9: Bài 1 - Download · suzukishouten-study/rest-study@ccb6d14
Đã xong chức năng download, chuyển qua bài 2 nào !
Bài 2: Upload
- Client side
- Thêm button Upload và phần "Chọn file"
- Thêm phần xử lý Upload bằng ajax
- Server side
- Đọc file được upload lên và thêm vào TODO
Bây giờ mình sẽ implement lần lượt chúng.
File format có thể tải về mỗi dòng một Todo như sau.
Đã upload từ todolist1.txt vào TODO1
Đã upload từ todolist1.txt vào TODO2
Đã upload từ todolist1.txt vào TODO3
Đã upload từ todolist1.txt vào TODO4
Đã upload từ todolist1.txt vào TODO5
Những file bạn cần thay đổi
| Thao tác | file | Ý nghĩa |
|---|---|---|
| Sửa | app/Config/routes.php | Thêm routing cho tiến trình download |
| Sửa | app/View/Layouts/default.ctp | Thêm button upload và chọn file |
| Sửa | app/webroot/js/views/todo-composite-view.js | Thêm tiến trình upload |
| Sửa | app/Controller/TodoListsController.php | Thêm tiến trình upload file |
app/Config/routes.php
Thêm URL cho tiến trình Upload.
〜略〜
 // CSV file downlaod
 Router::Connect('/todo_lists/download', Array(
 	'controller' => 'todo_lists',
 	'action' => 'download',
 	'method' => 'GET'
 ));

+// CSV file upload
+Router::Connect('/todo_lists/upload', Array (
+	'controller' => 'todo_lists',
+	'action' => 'upload',
+	'method' => 'POST'
+));
+
 Router::mapResources(array (
 	'todo_lists',
 ));

 〜以下略〜
app/View/Layouts/default.ctp
Thêm nút chọn file và upload button.
〜略〜
 	<!-- TODO一覧表示のテンプレート -->
 	<script type="text/template" id="todo-composite-template">
 		<div class="row">
 			<div class="col-xs-12">
 				<span class="row form-inline">
 					<div class="input-group col-sm-6 col-xs-12">
 						<label for="new-todo" class="visible-xs">Todo</label>
 						<textarea class="form-control todo-item-text" rows="3" id="new-todo" placeholder="Todo?" autofocus></textarea>
 					</div>
 					<div class="input-group col-sm-3 col-xs-12">
 						<label for="user-list" class="visible-xs">Assignee</label>
 						<select class="form-control" name="assignee" id="user-list"></select>
 					</div>
 					<div class="input-group col-sm-3 col-xs-12">
 						<label class="visible-xs"></label>
 						<input type="button" id="addTodo" class="btn btn-primary btn-md todo-action-button" value="Add TODO">
 					</div>
 				</span>
 			</div>
 		</div>
 		<div class="row">
 			<div class="col-xs-12">
 				<table class="table table-striped table-bordered table-hover">
 					<thead>
 						<tr class="success">
 							<th class="col-sm-6" colspan="2">ToDo</th>
 							<th class="col-sm-2">Owner</th>
 							<th class="col-sm-2">Assigner</th>
 							<th class="col-sm-2" colspan="2"></th>
 						</tr>
 					</thead>
 					<tbody></tbody>
 				</table>
 			</div>
 		</div>
 		<div class="row">
 			<div class="col-xs-6">
 				<a href="/rest-study/todo_lists/download" class="alert alert-default pull-left" id="downloadTodo">Download TODO list</a>
 			</div>
+			<div class="col-xs-6">
+				<form class="form-inline">
+					<input type="file" id="uploadFile" name="uploadFile" multiple class="form-control">
+					<a class="btn btn-info pull-right" id="uploadButton">Upload TODO list</a>
+				</form>
+			</div>
 		</div>
 	</script>

 〜以下略〜
- Dưới link download, có
input type =" file ", bạn sẽ thêm một button ở thẻ<a>.- set
input type="file"làmultipleđể cho phép chọn upload nhiều file.
- set
app/webroot/js/views/todo-composite-view.js
Mình sẽ implement phần Upload bằng AJAX
〜略〜
 		ui : {
 			addTodo : '#addTodo',
 			newTodo : '#new-todo',
-			userList : '#user-list'
+			userList : '#user-list',
+			uploadButton : '#uploadButton',
+			uploadFile : '#uploadFile'
 		},

 		events : {
 			'click @ui.addTodo' : 'onCreateTodo',
+			'click @ui.uploadButton' : 'onClickUploadButton',
 		},

 		initialize: function(options){
 @@ -74,7 +77,34 @@ define(function(require) {
 				message += errors.validationError[key];
 			}
 			alert(message);
-		}
+		},
+
+		onClickUploadButton : function() {
+			var i;
+			var form = new FormData();
+			var files = this.ui.uploadFile[0].files;
+			for ( i = 0; i < files.length; i++) {
+				form.append(i, files[i]);
+			}
+			var that = this;
+			$.ajax({
+				url : "todo_lists/upload.json",
+				type : "POST",
+				data : form,
+				processData : false,
+				contentType : false,
+				dataType : 'json'
+			}).done(function(data) {
+				alert(data);
+			}).always(function(){
+				that.collection.fetch({
+					reset : true
+				});
+				that.ui.uploadFile.attr('type', 'text');
+				that.ui.uploadFile.attr('type', 'file');
+			});
+			return false;
+		},
 	});
 	return TodoCompositeView;
 });

〜以下略〜
- Thêm phần chọn file và upload button vào biến
ui. - Bạn khai báo sự kiện lick vào button Upload vào biến
events - Hàm
OnClickUploadButtonchính là phần upload bằng AJAX mà mình sẽ implement.
Upload bằng Jquery.ajax()
Thời điểm này, phần upload mình sửu dụng hàm ajax của jquery. Đặc điểm của chúng như sau.
- Nó sẽ nhận form data của file được chọn trong html5 của đối tượng
FormData. - Phàn tử để thêm vào FormData là mảng
this.ui.uploadFile[0].files. Nếu bạn chọn 2 file, vì nó được lưu trữ ởthis.ui.uploadFile[0].files[0]vàthis.ui.uploadFile[0]afiles[1]mình sẽ sử dụng vòng lặp for để xử lý. -
that.ui.uploadFile.attr('type', 'text');->that.ui.uploadFile.attr('type', 'file');Bạn đang gặp khó khăn, tuy nhiên nó chỉ xảy ra sau khi upload hoàn tất, bởi mình mình muốn return file tới phần chưa được chọn, có một hack là mình sẽ cho form trở lại từ 'text' sangfile. Nó có thể không hoạt động với trình duyệt.
app/Controller/TodoListsController.php
Nó sẽ xử lý file được upload lên để đưa vào TODO. .
〜略〜
	public function download() {


       〜略〜

	}

+	public function upload() {
+		$files = $this->request->params['form'];
+		$owner = $this->Auth->user()['id'];
+		$numTodos = 0;
+		foreach ( $files as $file ) {
+			$fileName = $file['name'];
+			$filePath = $file['tmp_name'];
+			$todos = file($filePath, FILE_IGNORE_NEW_LINES | FILE_SKIP_EMPTY_LINES);
+			$assignee = $owner;
+			$errors = array ();
+			$lineNo = 1;
+			foreach ( $todos as $todo ) {
+				$data = array ();
+				$data['todo'] = $todo;
+				$data['status'] = 0;
+				$data['owner'] = $owner;
+				$data['assignee'] = $assignee;
+				$res = $this->TodoList->save($data);
+				if ($res) {
+					$numTodos++;
+				} else {
+					if (count($this->TodoList->validationErrors) > 0) {
+						foreach ( $this->TodoList->validationErrors as $validationErrorsOfLine ) {
+							$title = 'file:' . $fileName . ' - line: ' . $lineNo . ': ';
+							foreach ( $validationErrorsOfLine as $validationError ) {
+								$errors[] = array (
+												$title . $validationError
+								);
+							}
+						}
+					}
+				}
+				$this->TodoList->create();
+				$lineNo++;
+			}
+		}
+		if (count($errors) > 0) {
+			$this->TodoList->validationErrors = $errors;
+			$response = $this->editResponse(false);
+			array_unshift($response['errors'], array (
+							'The following error occurred.'
+			));
+			if ($numTodos > 0) {
+				array_unshift($response['errors'], array (
+								$numTodos . ' TODO are registered.'
+				));
+			}
+		} else {
+			$response = $numTodos . ' TODO are registered.';
+		}
+		$this->set(compact('response'));
+		$this->set('_serialize', 'response');
+	}
+
 	//レスポンスを編集
 	private function editResponse($res){
 		if($res){
 			$response = $res;
 		}else{
 			$this->setStatusValidationError();
 			$respnse = array();
 			if(count($this->TodoList->validationErrors) > 0){
 				$response = $this->editErrors($this->TodoList->validationErrors);
 			}else{
 				$response = $this->editErrors('An error occured.');
 			}
 		}
 		return $response;
 	}

〜以下略〜
Nhận file sau khi đã được upload, khai báo để đọc mỗi hàng todo một ( Up tại file vừa download không được nhé vì cấu trúc nó khác, các bạn thêm mỗi hàng một nội dung TODO là được ). Xử lý validation giống như mình đã làm với button "Add" trên màn hình, mình sẽ return messsage nếu có lỗi.
Nhận file đã Upload
- Thông tin của các file được upload sẽ được truyền đến một mảng bằng
$this->request->params['form']. Nếu có 2 file được upload, truyền tới$this->request->params['form'][0]và$this->request->params['form'][1] - Name sẽ nằm ở
$this->request->params['form'][0]['name'], tại$this->request->params['form'][0]['tmp_name'], path của file được upload sẽ được tạo là mọt file lưu trữ tạm thời trên server.
![]() Tên file và nội dung file được lưu ở nhiều phần trong request body vì vậy trình biên dịch có thể dễ dàng đọc nó, php và CakePHP đã giúp tôi làm mọi thứ.
Tên file và nội dung file được lưu ở nhiều phần trong request body vì vậy trình biên dịch có thể dễ dàng đọc nó, php và CakePHP đã giúp tôi làm mọi thứ.
Các hàm truy cập vào file của PHP
- Lưu trữ ở mảng và có thể đọc tất cả các file đã upload bằng hàm file
Đặc điểm
Những gì bạn đang làm,
- Đọc các file được upload cùng nhau
- Mỗi
todotrên 1 dòng cho tất cả các dòng, setstatus = 0,owner = login user id, setassignee = login user id,savevà lưu trữ vào database bằng các method. Và cũng thực hiện các biện pháp validation nó. - Với việc nhúng những số có thể khai báo ở message sẽ được return như một response body.
Tổng kết bài học
Let's try to upload the TODO is actually modified.
-
app/Config/routes.phpsửa như hướng dẫn trên. -
app/View/Layouts/default.ctpsửa như hướng dẫn trên. -
app/webroot/js/views/todo-composite-view.jssửa như hướng dẫn trên. -
app/Controller/TodoListsController.phpsửa như hướng dẫn trên. -
Kiểm tra kết quả.
-
Commit lên Git
![]() Hiển thị dạng Diff trên Github
Hiển thị dạng Diff trên Github
Chương 9 : Bài 2 - Upload · suzukishouten-study/rest-study@3edd59f
Đó là tất cả bài học này
Giới thiệu
Bài viết tiếp theo sẽ là về "refactoring (sửa trên server)".
Mặc dù đây chỉ là một TODO app nhỏ , nhưng khối lượng code đã tăng dần từng chút một.
Lần tới chúng ta sẽ học cách làm sao để dọn dẹp code để chuẩn bị cho các môi trường lớn hơn.
Cảm ơn các bạn
Bài viết đã kết thúc, nếu có bất cứ phản hôi, góp ý hay thắc mắc nào bạn vui lòng comment ở dưới nhé, cảm ơn các bạn đã dõi theo bài viết này và toàn bộ series.