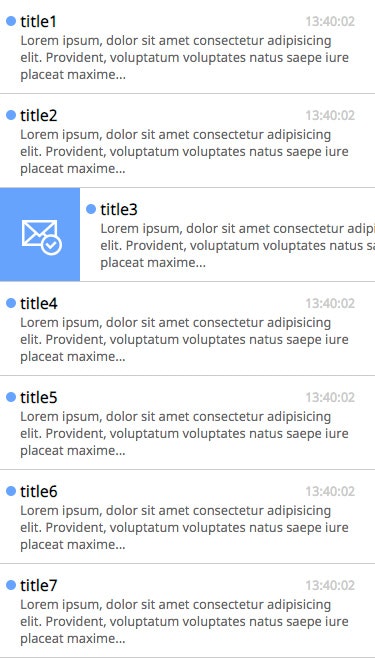
モバイルデバイスならではの UI の代表的なものに、スワイプを利用したものがあります。本日から4日間は、このスワイプを作ったサンプルを紹介します。初日は、メールアプリの様な、スワイプしてアイコンを表示・アイコンタップで既読フラグをたてる実装です。
code: github / $ yarn 1211
 |
 |
|---|
Component 概要図
TouchDown / TouchUp 時に、CSS の transitionDuration を切り替えるのがコツです。要素をスワイプしている間は、0sでタッチ座標に追従、離した瞬間に CSS アニメーションを利用し固定座標へ移動します。
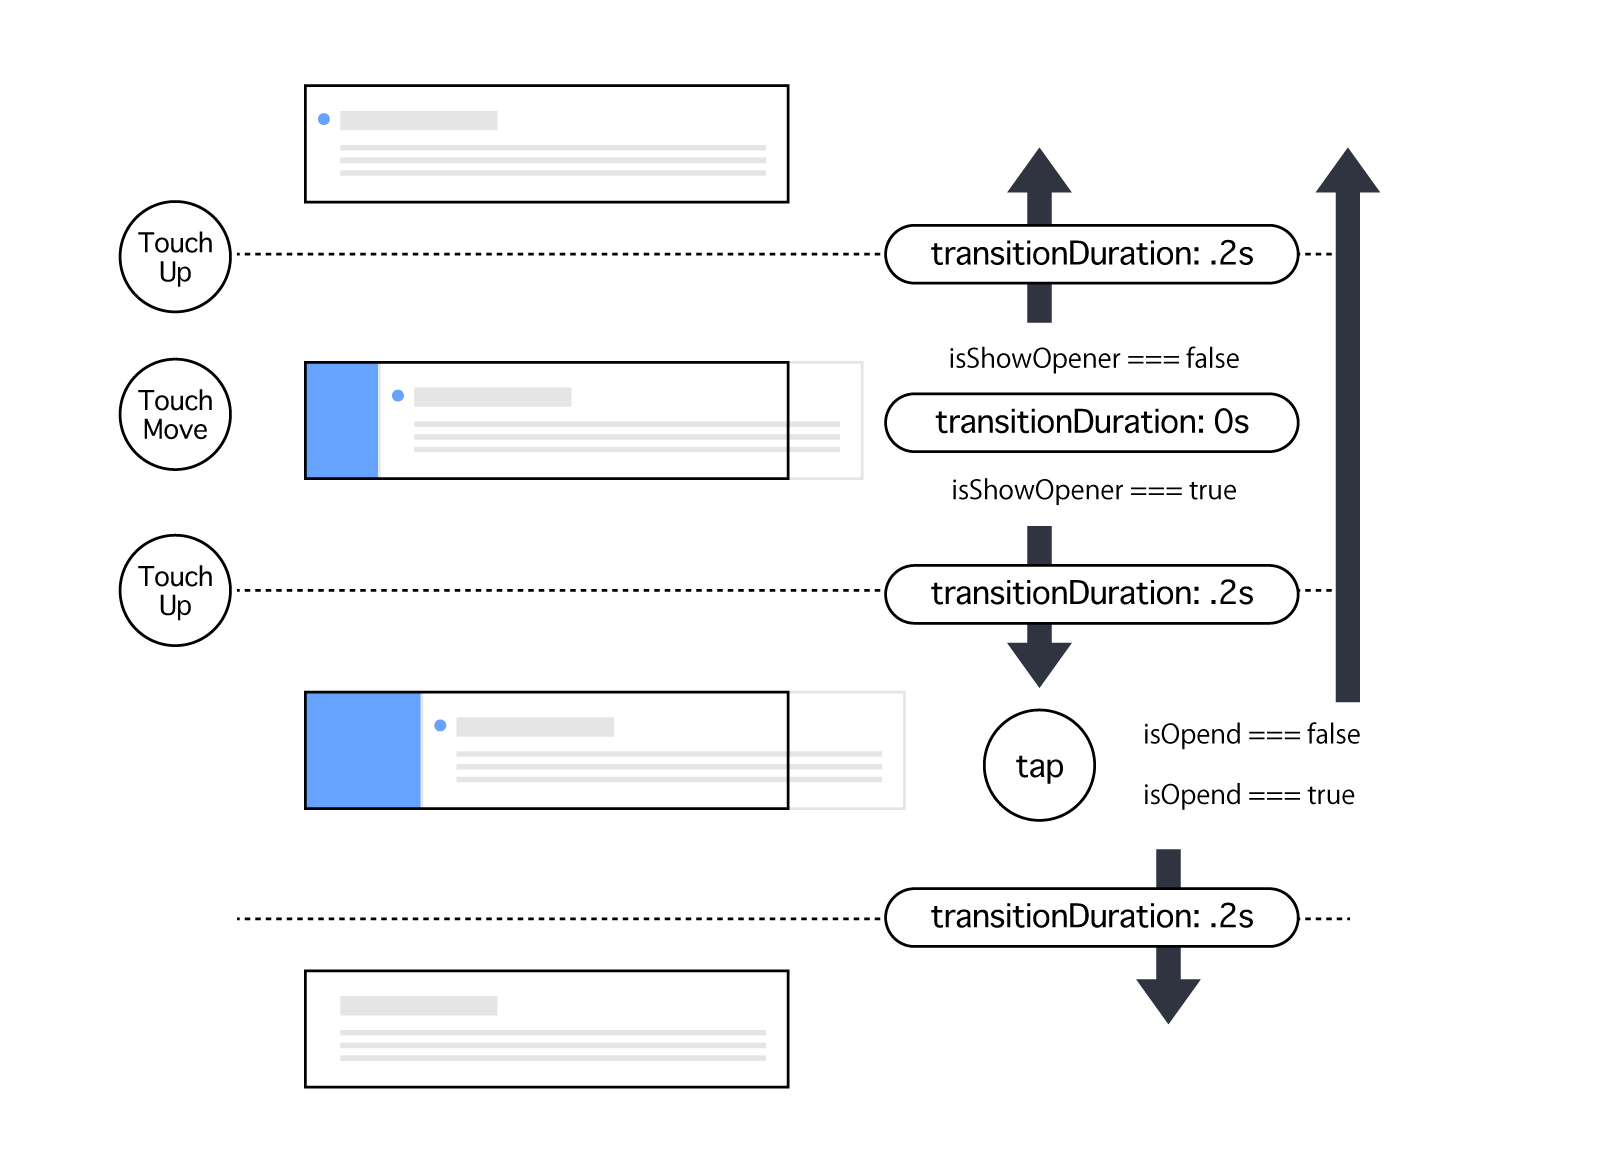
この概要図の通りに実装を見ていきます。
render props + useMemo
タッチ座標の伝播を必要最小限の Component に留めるため、今回も render props を利用します。既読フラグを render props 引数で受け取り、既読フラグ変化時のみ rerender します。
const View = (props: Props) => (
  <SwipeItemOpener
    render={opend => (
      <div className={props.className}>
        <Head
          title={props.title}
          dateLabel={props.dateLabel}
          opend={opend}
        />
        <div className="body">{props.body}</div>
      </div>
    )}
  />
)
SwipeItemOpener コンポーネントは以下の様になっています。containerStyle の変化が頻繁に起こります。
const View = (props: Props) => {
  const {
    opend,
    containerStyle,
    handleTouchDown,
    handleTouchUp,
    handleTouchMove
  } = useSwipeItemOpener()
  return (
    <div
      className={props.className}
      onTouchStart={handleTouchDown}
      onTouchEnd={handleTouchUp}
      onTouchCancel={handleTouchUp}
      onTouchMove={handleTouchMove}
    >
      {useMemo(
        () => (
          <div className="icon">
            <SVGInline
              svg={require('./assets/email.svg')}
            />
          </div>
        ),
        [] // 変化無しのため rerender ブロック
      )}
      <div className="container" style={containerStyle}>
        {useMemo(() => props.render(opend), [opend])}
        // opened 変化時のみ rerender
      </div>
    </div>
  )
}
useSwipeItemOpener
今回定義している Custom Hooks 内訳です。
function useSwipeItemOpener(props?: Props) {
  const [state, update] = useState<State>(...)
  const options = useMemo(...)
  const handleTouchDown = useCallback(...)
  const handleTouchUp = useCallback(...)
  const handleTouchMove = useCallback(...)
  const containerStyle = useMemo(...)
  return {
    opend: state.opend,
    containerStyle,
    handleTouchDown,
    handleTouchUp,
    handleTouchMove
  }
}
触れた瞬間の処理
指の移動量を保持するために、初期タップ時座標を保持します。この時、触られているフラグをオンに、transitionDurtion を 0s にします。
const handleTouchDown = useCallback(
  (event: TouchEvent<HTMLElement>) => {
    event.persist()
    update(_state => {
      if (_state.opend) return _state
      const startX = event.touches[0].clientX
      const opend =
        _state.showOpener && startX < options.threshold
      return {
        ..._state,
        isTouchDown: true,
        startX,
        showOpener: false,
        transitionDuration: 0,
        opend
      }
    })
  },
  []
)
指を動かしている時の処理
初期座標と現在座標の差分を、移動量として保持します。
const handleTouchMove = useCallback(
  (event: TouchEvent<HTMLElement>) => {
    event.persist()
    update(_state => {
      if (_state.opend) return _state
      const offsetX =
        event.touches[0].clientX - _state.startX
      if (offsetX < 0) return _state
      return {
        ..._state,
        isTouchDown: false,
        showOpener: offsetX > options.threshold,
        offsetX
      }
    })
  },
  []
)
離した瞬間の処理
移動量が閾値を超えていた場合、アイコンが見えきる位置に座標を固定。超えていなかった場合、元の座標に戻します。指定の transitionDuration を与えることでアニメーションします。
const handleTouchUp = useCallback(
  (event: TouchEvent<HTMLElement>) => {
    event.persist()
    update(_state => ({
      ..._state,
      isTouchDown: false,
      offsetX: _state.showOpener ? options.threshold : 0,
      startX: 0,
      transitionDuration: 200
    }))
  },
  []
)
開いた状態から閉じる
冒頭の handleTouchDown に戻ります。開いている状態でアイコン以外がタップされた場合、既読処理キャンセルと判定します。アイコンがタップされた場合は、既読フラグをたてます。より実用的にする場合、アイコンタップした後に APIを叩き、レスポンスに応じて閉じると良いでしょう。
const handleTouchDown = useCallback(
  (event: TouchEvent<HTMLElement>) => {
    event.persist()
    update(_state => {
      if (_state.opend) return _state
      const startX = event.touches[0].clientX
      const opend =
        _state.showOpener && startX < options.threshold
      return {
        ..._state,
        isTouchDown: true,
        startX,
        showOpener: false,
        transitionDuration: 0,
        opend
      }
    })
  },
  []
)