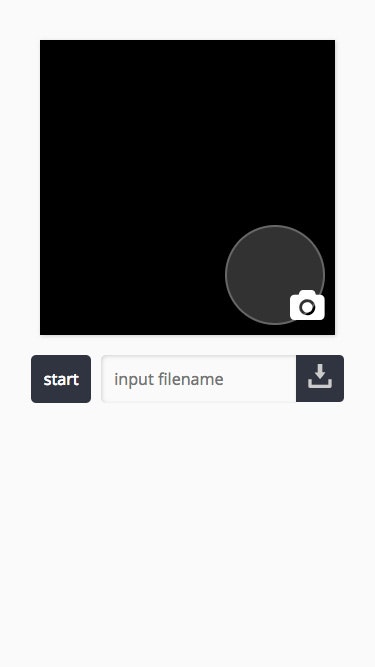
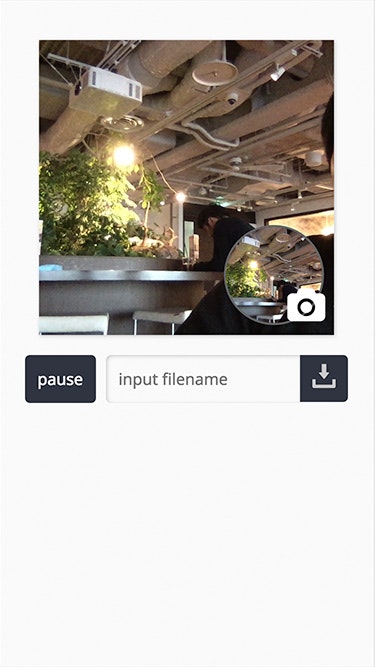
マシン内蔵のカメラを起動し、画像キャプチャを撮るミニアプリです。startボタンでカメラ起動、カメラアイコンでシャッターを押します。画像ファイル名を指定し保存が出来ます。MacBook Pro/Google Chrome のみで動作確認をしています。
code: github / $ yarn 1221
 |
 |
|---|
2つの Context Hooks
今回は2つの Custom Hooks を利用します。video element を扱う Custom Hooks と、キャプチャを行う Custom Hooks です。
components/contexts.ts
import { createContext } from 'react'
import { useVideo } from './useVideo'
import { useCapture } from './useCapture'

export const VideoContext = createContext(
  {} as ReturnType<typeof useVideo>
)
export const CaptureContext = createContext(
  {} as ReturnType<typeof useCapture>
)
useVideo
video element を扱う Custom Hooks 内訳です。Provider マウント時、video element callback に状態更新関数をバインドします。useEffect にある mediaDevices.getUserMedia は、ユーザーにカメラアクセス許可を求め、カメラの準備が整ったらカメラ越しの映像がvideo タグに写り始めます。
components/useVideo.ts
function useVideo(props: Props) {
  const [state, update] = useState<State>(
    merge(defaultState(), {})
  )
  const options = useMemo(
    (): Options =>
      merge(defaultOptions(), {
        width: props.width,
        height: props.height
      }),
    [props.width, props.height]
  )
  useEffect(() => {
    ;(async () => {
      const { mediaDevices } = navigator
      const video = props.videoRef.current
      if (mediaDevices && video !== null) {
        const stream = await mediaDevices.getUserMedia({
          video: {
            width: options.width,
            height: options.height
          },
          audio: false
        })
        video.srcObject = stream
        video.oncanplay = () => {
          update(_state => ({ ..._state, canplay: true }))
        }
        video.onplay = () => {
          update(_state => ({
            ..._state,
            playing: true,
            pause: false
          }))
        }
        video.onpause = () => {
          update(_state => ({
            ..._state,
            playing: false,
            pause: true
          }))
        }
      }
    })()
  }, [])
  const handlePlay = useCallback(
    () => {
      const video = props.videoRef.current
      if (video === null) return
      video.play()
    },
    [props.videoRef]
  )
  const handlePause = useCallback(
    () => {
      const video = props.videoRef.current
      if (video === null) return
      video.pause()
    },
    [props.videoRef]
  )
  return {
    state,
    handlePlay,
    handlePause
  }
}
useCapture
video 画像を canvas に描画し、保存する Custom Hooks です。画像名を状態保持し、form submit にバインドするハンドラーを送出します。canvas 画像を保存する saveCanvas ユーティリティ は昨日のものと同じです。
components/useCapture.ts
function useCapture(props: Props) {
  const [state, update] = useState<State>({
    fileName: props.fileName || ''
  })
  const handleSetFileName = useCallback(
    (event: ChangeEvent<HTMLInputElement>) => {
      const { value } = event.target
      update(_state => ({ ..._state, fileName: value }))
    },
    [state.fileName]
  )
  const handleCapture = useCallback(
    () => {
      const canvas = props.canvasRef.current
      const video = props.videoRef.current
      if (canvas === null || video === null) return
      const context = canvas.getContext('2d')
      if (context === null) return
      context.drawImage(
        video,
        0,
        0,
        props.width,
        props.height
      )
    },
    [
      props.canvasRef,
      props.videoRef,
      props.width,
      props.height
    ]
  )
  const handleSave = useCallback(
    () => {
      const canvas = props.canvasRef.current
      if (canvas === null) return
      saveCanvas({
        canvas,
        fileName: state.fileName
      })
    },
    [props.canvasRef, state.fileName]
  )
  return {
    state,
    canvasRef: props.canvasRef,
    videoRef: props.videoRef,
    width: props.width,
    height: props.height,
    handleSetFileName,
    handleCapture,
    handleSave
  }
}
Context の参照
Context から得られる状態・ハンドラーを、必要なコンポーネントで利用します。
components/ui/index.tsx
const View = (props: Props) => {
  const {
    state,
    handleSetFileName,
    handleSave
  } = useContext(CaptureContext)
  return (
    <div className={props.className}>
      <VideoController className="videoController" />
      <CaptureController
        className="captureController"
        fileName={state.fileName}
        handleSetFileName={handleSetFileName}
        handleSave={handleSave}
      />
    </div>
  )
}
映像と、キャプチャした画像を表示するコンポーネントです。
components/finder/index.tsx
const View = (props: Props) => {
  const {
    canvasRef,
    videoRef,
    width,
    height,
    handleCapture
  } = useContext(CaptureContext)
  return (
    <div className={props.className}>
      <VideoView
        className="videoView"
        videoRef={videoRef}
        width={width}
        height={height}
      />
      <CaptureView
        className="captureView"
        canvasRef={canvasRef}
        width={width}
        height={height}
      />
      <CaptureShutter
        className="captureShutter"
        handleCapture={handleCapture}
      />
    </div>
  )
}