はじめに
建築CGを作る会社で3DCGモデラーをしています。
最近、3ds maxを使う時間が増え、同時にMAXScriptを書く機会も増えました。
自分と同じような非エンジニアが、コピペして簡単に使えるスニペットを挙げていきます。
初中級者向けです。
注) Qiitaのシンタックスハイライトは、MAXScriptに対応していないため、
コードが読みづらいと思いますがご容赦ください。
名前
オブジェクトの名前を指定するときのTips
(
 -- スペースを含む名前のオブジェクトを指定したいときは、シングルクォートで囲う
 -- アスタリスクはワイルドカード
 local curtainWalls = $'CW E *'


 -- 変数を使いたいときは、文字列を作って executeを使う
 -- 変数にどんな文字列が来るかわからないので、念のため、シングルクォートで囲っておく
 local na = "シェイプ"
 local shps = execute ("$'" + na + "*'")
 for sp in shps do(
	format "%\n" sp
 )


)
パス関係
日本語環境では、パスの区切り文字は半角の¥になります。
通常、¥はそのまま使えません。¥¥のように重ねて書く(エスケープする)か、
スラッシュ(/)に置き換える、あるいは頭に@をつけます。
(
-- 特定のファイルを開く doesFileExist でファイルの存在を確認してから開く
 local fullpath = @"C:\Users\Takeharu\Documents\3dsMax\scenes\test1.max"
 if doesFileExist fullpath then loadMAXFile fullpath quiet:true
)
pathConfig
pathConfigを使うと、色々簡単に出来ます。
 -- フルパスからファイル名を抜き出す
  pathConfig.stripPathToLeaf @"c:\temp\test.txt"
  --> "test.txt"

 -- フルパスから親のディレクトリのパスを得る
  pathConfig.removePathLeaf @"c:\temp\test.txt"
  --> "c:\temp"

 -- パスをジョイン
  pathConfig.appendPath (getDir #Scene) "Untitled.max"
  --> "C:\Users\Takeharu\Documents\3dsMax\scenes\Untitled.max"
  -- appendPathを使うと、パスの区切り文字の有る無しを気にせず、ジョインできます。
getDir
特定のシステムディレクトリのパスを簡単に取得出来ます。
 getDir #Scene
 --> "C:\Users\Takeharu\Documents\3dsMax\scenes"

 getDir #renderPresets
 --> "C:\Users\Takeharu\Documents\3dsMax\renderpresets"
My Documents
Windowsのマイドキュメントフォルダの取得
(
 local MyDocuments = (dotNetClass "System.Environment").GetEnvironmentVariable "UserProfile" + @"\Documents"
)
 --> "C:\Users\Takeharu\Documents"
フォルダ内のファイルのリストを得る
getFilesで、パスのパターンを使ってファイルをリストできます。
files = getFiles @"c:\foo\*.max"
-- ワイルドカードでファイルを指定出来ます。
(
 local apath = @"E:\PROJECTS\FURNITURE"
 local files = getFiles (apath+"/*.max")
 for f in files do (format "%\n" f)
)
バッチ処理
公式ヘルプには、getDirectories と組合せて、特定のディレクトリ以下のファイルを再帰的に探索、取得する関数が上がっています。
これを使ってファイルのリストを作り、そのリストをループしてバッチ処理する例。
(
--スクリプトリスナーをクリア
clearListener()

-- ファイルのリストを作る関数
function getFilesRecursive root pattern =(
 dir_array = GetDirectories (root+"/*")
 for d in dir_array do
  join dir_array (GetDirectories (d+"/*"))
 my_files = #()
 for f in dir_array do
  join my_files (getFiles (f + pattern))
 my_files
)


 local files = getFilesRecursive @"Z:\PROJECTS" "*.max"
 for f in files do(
  loadMAXFile f quiet:true
  format "%\n" f
  doSomething()

  redrawViews()
  saveMaxFile f quiet:true
 )
)
選択しているもの
selection とか、$で選択しているものを参照できます。
以下の例では、個々の選択オブジェクトに、固有のモディファイアをあてます。
:sample.ms
(
 for s in selection do(
  local myMod = Uvwmap()
  myMod.maptype = 4
  addmodifier s myMod
 )
)
選択セットに共通のモディファイアを当てる
(
 local myMod = smooth()
  addmodifier selection myMod
)
選択しているオブジェクトのバウンディングボックスを作る
(
 if selection.count > 0 then (
  local cntr = selection.center
  local wdh = selection.max - selection.min
  local mybox = box length:wdh.y width:wdh.x height:wdh.z pos: [cntr.x ,cntr.y ,selection.min.z]
  mybox.name = uniquename "BoundingBox"
 )
)
ヘルパーオブジェクトにまとめる
3ds maxの場合、グループの扱いがちょっと面倒くさいようなので、
オブジェクトをまとめる時、ヘルパーオブジェクトをよく使うらしいです。
たとえば、Revitから変換したモデルだと、大量の同種のオブジェクトが並んでしまいます。
これを整理整頓したくなる人は多いと思います。
手動でもできますが、オブジェクトブラウザが、重くなるのでスクリプトでやったほうが効率がいいです。
(
 local p = Point()
 p.name =  uniqueName "PointHelper"
 -- uniqueName 付けると名前がかぶらないようになる

 for o in geometry do
 (
  o.parent = p
 )
)
ピヴォット
建築だと、床に置くとか、壁に付けるとか、正確に位置合わせしたいときがよくあります。
そんな時、Pivotを簡単に底面とかに位置合わせ出来ると便利です。
(
 if selection != undefined then
 (
  ResetPivot $
  for i in selection do
  (
   local ctr = (i.max + i.min)/2.0
   i.pivot = [ctr.x,ctr.y,i.min.z]
  )
 )
)
UnlinkAll
ファイルリンクしているファイルを、一括でリンク解除したい時
(
 if FileLinkMgr.numLinks > 0 then ( for i=FileLinkMgr.numLinks to 1 by -1 do (try FileLinkMgr.Detach i catch (print "no")) )
)
ルートのオブジェクトのみリストする
(
-- 親がないオブジェクト(ルートオブジェクト)をリストする
local rootNodes = for o in objects where o.parent == undefined  collect o
 -- for文にwhereを使って条件指定する例

)
マテリアルライブラリをリロードして更新
(
 -- ProjectA.matという名前のマテリアルライブラリをロードして、同じ名前のシーンマテリアルを置き換える
 loadMaterialLibrary "ProjectA.mat"
 for mat in currentMaterialLibrary do
  (
   insMats = getClassInstances (classOf mat) target:sceneMaterials
   for ref in insMats where ref.name == mat.name do (
   replaceInstances ref mat
  )
 )
)
MAXScript内での数値の単位
3ds maxでは、2つの単位設定があります。
システム単位と表示用の単位です。
コード内の数値は、システム単位に依存しています。
たとえば、一辺1unitのBoxを作るコードは以下のようになります。
Box width:1 length:1 height:1
こう書くと、システム単位が#metersなら、1m角のBoxが出来ます。
この時、ディスプレイ単位が#metricで、units.MetricTypeが#millimetersなら、1000mm角になります。
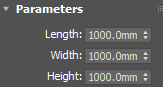
システム単位が#centimetersなら、1cm(10mm)角のBoxが出来ます。
-- スクリプトで確認する
units.SystemType
units.DisplayType
units.MetricType
他のソフトではあまり見ない仕様ですから注意が必要です。
システム単位に依存しない数値をコード内で書きたいなら、
(
 local scl = case units.SystemType of
 (
  #Millimeters: 1.0/units.SystemScale
  #Centimeters: 1.0/(units.SystemScale*10)
  #Meters: 1.0/(units.SystemScale*1000)
  #Kilometers: 1.0/(units.SystemScale*1000*1000)
  default: 1.0
 )

 Box width:(250*scl) length:(250*scl) height:(250*scl)

)
リネーム
uniqueName を付けると名前が重複しないように後ろに数字を追加してくれます。
for c in cameras do c.name = uniqueName "cam"
移動、回転、スケール
in coordsys で座標系を指定出来ます。
about で基点を指定出来ます。
(
 local box1 = Box length:12.5 width:250 height:5 lengthsegs:1 widthsegs:1 heightsegs:1 mapcoords:on isSelected:off

 in coordsys world move box1 [125,0,0]
 in coordsys world about [0,0,0] rotate box1 (eulerangles 0 0 30.0)
 in coordsys local about [0,0,0] scale box1 [0.25,0.5,1]
 -- Set coordsys world とすると、その後は、in coordsysを端折っても、ワールド座標で指定していることになります。
)
 オブジェクトのtranslate を取るなら
 box1.pos

 オブジェクトのrotation を取るなら
 box1.rotation

 オブジェクトのscaleを取るなら
 box1.scale

---------------------------------------------------------------------
 位置情報を設定するなら、
 box1.pos = [2,1,0]
 ※数値は、システムスケールの影響を受けます。

 回転を設定するなら、
 box1.rotation = eulerAngles 0 0 45
 ※回転はいろいろな指定の仕方があります。
 box1.rotation.z_rotation = -90
 box1.rotation = (angleaxis 40 [1,0,0])
 box1.rotation = quat 0 0 0 1 -- zero

 scaleを設定するなら、
 box1.scale = [1,1,1]
Merge
よく使うオブジェクトを保存しておいて、それをマージするコマンドを作っておけば、取り込みが簡単です。
(
 -- マイドキュメントの3ds maxフォルダのsceneフォルダに入っているEnvLight.maxをマージする
 mergeMAXFile (pathConfig.appendPath (getDir #scene) (@"EnvLight.max") ) quiet:true

)
外部のスクリプトファイルを読み込む
fileIn @"C:\Users\Takeharu\OneDrive\maxscript\box_01.ms"
OBJ書き出し
(
 local fullpath = (pathConfig.appendPath (GetDir #export)  (substituteString maxFileName ".max" ".obj"))
 exportFile fullpath #noPrompt selectedOnly:false using:ObjExp
)
FBX Import
(
  -- 開いているmaxファイルと同じ階層のfbxを全部インポートする
    FBXImporterSetParam "Mode" #merge
    FBXImporterSetParam "ScaleConversion" false
    FBXImporterSetParam "SmoothingGroups" true
    FBXImporterSetParam "ConvertUnit" "m"
    FBXImporterSetParam "ScaleConversion" true

    local files = getFiles (maxFilePath + "\*.fbx")
    for f in files do (
        format "%\n" f
        importFile f #noPrompt using:FBXIMP
    )
)
インポートオプションについてはヘルプを参照
マテリアル関係
選択オブジェクトのマテリアルを削除
(
 $.material = undefined
)
テクスチャを現在のmaxファイルのディレクトリにコピー
(
 local maps = getClassInstances Bitmaptexture
 for map in maps do(
  if (doesFileExist map.filename) then
  (
   format "%\n" map.filename
   local fullpath = pathConfig.appendPath maxFilePath (pathConfig.stripPathToLeaf map.filename)
   copyFile map.filename fullpath
  )
 )
)
テキストファイルへ書き出し
文字コードに UTF-8BOMなし を指定して書き出す例
(
  -- log書き出しを関数化
 function WriteLog str =(
  local fullpath = pathConfig.appendPath (getDir #Export) "log.txt"
  -- C:\Users\Takeharu\Documents\3dsMax\exportに
  local fs = openFile (fullpath) encoding:#utf8 writeBOM:false mode:"a"
  if fs != undefined then(
  format "%\n" str to: fs
  close fs
 )
)

WriteLog "Hello!"
)
テキストファイルの読み込み
テキストファイルを読み込んで、一行ずつ配列に入れる例
(
	local textFile = @"Z:\PROJECTS\a_text_file.txt"
	local array_of_line = #()
	local fs = openFile textFile encoding:932 mode:"r"
           -- encodingに要注意!
           -- この例は、日本語のSHIFT JISファイルを読み込む時
	while not (eof fs) do
	(
		local lin = readLine fs
		lin = trimLeft lin
		lin = trimRight lin
		if lin != "" then (
			append array_of_line lin
		)
	)
	close fs

	print array_of_line

)
文字列関係
文字出力のフォーマッティング
-- シーン内のオブジェクトの名前と位置を書き出す
(
 for o in objects do (
  format "% %\n" o.name o.pos
 )
 -- %が後ろに並んだ値と置き換えられる
)
文字列を分割する
-- ファイル名をアンダースコアで分割してリストにする
(
 local strlst = filterString maxFileName "_"

 --> 上記は、今開いているファイルの名前を、アンダースコアで分割して、変数に入れるという意味。(配列になる)
 --> たとえば、"Panasonic_LGB75012LB1.max" という名前の場合、
 --> #("Panasonic", "LGB75012LB1.max") という2つの要素を持つ配列になる
 --> これを要素の参照には、strlst[1]、strlst[2]とインデックスを使う。1が一番目という意味。
)
ゼロパディング
(
 formattedPrint 1 format:"04d"
 --> "0001"
)
時刻文字列
(
 -- 日付と時刻を文字列にする関数
 function getDateTimeString= (
  local ss = StringStream ""
  local t = getLocalTime()
  format "%-%-%_%:%:%"t[1] (formattedPrint t[2] format:"02d") (formattedPrint t[4] format:"02d" ) (formattedPrint t[5] format:"02d") (formattedPrint t[6]
  format:"02d") (formattedPrint t[7] format:"02d") to: ss
  return  (ss as string)
 )

 getDateTimeString()
 --> "2018-06-09_13:54:04"
)
Garbage Collection等
-- 正直、細かいことはよくわからないけど、この辺のを並べておけばキャッシュをクリアできます...。
gc()
freescenebitmaps()
clearUndoBuffer()
ATSOps.Refresh()
UI関係
ツールボタンにする
macroScript ArchLOG_DuplicateIt
category:"MyTools01"
toolTip:"Duplicate Selection"
buttonText:"Duplicate"
(
 copy $
 -- 選択オブジェクトの複製をつくるコマンドの例
)

 -- .mcrにして保存。3ds maxにドラッグ&ドロップ。カスタマイズからツールバーにドラッグ。
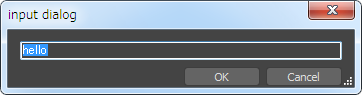
インプットダイアログ
(
 -- dotnetを使ってinputダイアログを出す関数
 function showUserInputDialog defaultString=(
  local theObj = dotNetObject "MaxCustomControls.RenameInstanceDialog" defaultString
  theObj.text ="input dialog"
  local DialogResult = theObj.Showmodal()
  dotnet.compareenums TheObj.DialogResult ((dotnetclass "System.Windows.Forms.DialogResult").OK)
  local NewStringEntered = theobj.InstanceName
  NewStringEntered
 )

 -- 関数を実行
 showUserInputDialog("hello")
)
ファイルオープンダイアログ
(
-- 関数化しておいて使う場合
function getFileWithDialog  = (
 local start_dir = @"Z:\PROJECTS"
 local filename = getOpenFileName \
 caption:"Open Text File..." \
 filename: (pathConfig.appendPath  start_dir "list.txt") \
 types:"Text File(*.txt)|*.txt|Excel(*.csv)|*.csv|All|*.*|" \
 filename
)

local textfile = getFileWithDialog()

)