はじめに
こちらの書籍のまとめになります
Effective Python 第2版 ――Pythonプログラムを改良する90項目 (Brett Slatkin 著、黒川 利明 訳、石本 敦夫 技術監修)
-
全てのパートをまとめているわけではありません
-
個人的に難しくて理解できていなかったり腑に落ちていない箇所は省いています
-
もしくは新たな気づきは特にないなと感じたところも省略しています
-
コードに関しては書籍のものを丸々掲載するでなく、改変しています(その過程も個人的に有意義な時間でした)
-
そのような理由からこのブログでは多くの部分を削ってしまっています。オリジナルの書籍はかなり勉強になるなと思いました。興味ある人は是非読んでください。
-
このページでは本書の8章中盤〜10章をまとめています。他の章はこちらを参照ください
DecimalとFraction
- AtCoderのB問題くらいですごく問われる印象ある、同じに2進数の限界知ってるかどうって話題
- 2進数だとどうしても丸め込みで誤差出てくるので、小さなスケールでの精度を求められる場合、
int/floatじゃなくdeciaml使う
from decimal import Decimal


# Bad
rate = 1.45
seconds = 3 * 60 + 42
cost = rate * seconds / 60
print(cost)

# Good
rate = Decimal('1.45')
seconds = Decimal(3 * 60 + 42)
cost = rate * seconds / Decimal(60)
print(cost)
[out]
5.364999999999999
5.365
- Deciamlのコンストラクタに渡す値の型に気を付ける
# 渡す値がintならOK
print(Decimal(10))

# 渡す値がfloatだとNG
print(Decimal(1.45))

# 渡す値がstringならOK
print(Decimal('1.45'))
[out]
10
1.4499999999999999555910790149937383830547332763671875
1.45
- 当たり前だけど無理数は10進数でも表記できない。正確に扱いたいときは分数(fractions)を使う
- 関係ないけど、自分が作ってる野球データの可視化サイトでイニング数(1と1/3とか)を表すのにこれがピッタシで使ったことあります。
from fractions import Fraction


# stringを渡してもintを渡してもOK
print(Fraction('1/3') + Fraction(2, 3))   # -> 1
最適化の前にプロファイル
- パフォーマンスのネックになっている部分を洗い出したい際にプロファイルが非常に有効
- profileとCProfileの両方があるが、Pure Pythonの場合、オーバーヘッドが大きくて結果が歪む、プログラムに影響の少ないCProfileを使う
from bisect import bisect_left, bisect_right


def my_sort(data):
    """リストをソートして返却、最悪ケースO(N^2)
    """
    result = []
    for value in data:
        flag = True
        for i, r in enumerate(result):
            if r > value:
                result.insert(i, value)
                flag = False
                break
        if flag:
            result.append(value)
    return result


def binary_search_sort(data):
    """リストをソートして返却、最悪ケースO(NlogNs)
    """
    result = []
    for value in data:
        idx = bisect_left(result, value)
        result.insert(idx, value)
    return result
[out]
[0, 0, 1, 1, 3, 3, 4, 5]
[0, 0, 1, 1, 3, 3, 4, 5]
- 上記、2つの関数のパフォーパンスをみる
- ncalls ... 関数がコールされた回数
- tottime ... 他の関数呼び出しに費やした時間を除いた関数実行に費やした秒数
- cumtime ... 他関数の実行時間も含めた累積経過時間
- cumtime percall ... 他関数の実行時間も含めた関数が1回あたりに呼び出されて実行に要した平均秒数
from random import randint
from cProfile import Profile
from pstats import Stats


random_data = [randint(0, 10**4) for _ in range(10**4)]

test_bad = lambda: my_sort(random_data)
test_good = lambda: binary_search_sort(random_data)

profiler_bad = Profile()
profiler_good = Profile()

profiler_bad.runcall(test_bad)
profiler_good.runcall(test_good)

stats_bad = Stats(profiler_bad)
stats_bad.strip_dirs()
stats_bad.sort_stats('cumulative')
print(stats_bad.print_stats())

print()
stats_good = Stats(profiler_good)
stats_good.strip_dirs()
stats_good.sort_stats('cumulative')
print(stats_good.print_stats())
[out]
         10003 function calls in 0.882 seconds

   Ordered by: cumulative time

   ncalls  tottime  percall  cumtime  percall filename:lineno(function)
        1    0.000    0.000    0.882    0.882 2687152126.py:8(<lambda>)
        1    0.867    0.867    0.882    0.882 2254850365.py:14(my_sort)
     9994    0.015    0.000    0.015    0.000 {method 'insert' of 'list' objects}
        6    0.000    0.000    0.000    0.000 {method 'append' of 'list' objects}
        1    0.000    0.000    0.000    0.000 {method 'disable' of '_lsprof.Profiler' objects}


<pstats.Stats object at 0x107223d60>

         20003 function calls in 0.015 seconds

   Ordered by: cumulative time

   ncalls  tottime  percall  cumtime  percall filename:lineno(function)
        1    0.000    0.000    0.015    0.015 2687152126.py:9(<lambda>)
        1    0.001    0.001    0.015    0.015 2254850365.py:4(binary_search_sort)
    10000    0.012    0.000    0.012    0.000 {method 'insert' of 'list' objects}
    10000    0.002    0.000    0.002    0.000 {built-in method _bisect.bisect_left}
        1    0.000    0.000    0.000    0.000 {method 'disable' of '_lsprof.Profiler' objects}


<pstats.Stats object at 0x10728e2c0>
-
print_callersメソッドを使うことで、関数の関係性も併せて表示してくれるのでよりボトルネックの発見に繋がりやすい
print(stats_good.print_callers())
[out]
   Ordered by: cumulative time

Function                                          was called by...
                                                      ncalls  tottime  cumtime
2687152126.py:9(<lambda>)                         <-
2254850365.py:4(binary_search_sort)               <-       1    0.001    0.015  2687152126.py:9(<lambda>)
{method 'insert' of 'list' objects}               <-   10000    0.012    0.012  2254850365.py:4(binary_search_sort)
{built-in method _bisect.bisect_left}             <-   10000    0.002    0.002  2254850365.py:4(binary_search_sort)
{method 'disable' of '_lsprof.Profiler' objects}  <-


<pstats.Stats object at 0x10728e2c0>
FIFOキューにはちゃんとcollections.dequeを使う
-
listのpop(0)は非常に処理が遅くなる- 先端を除いた後に、全要素を1つずつ前に戻す必要がある
- 結果的に$O(N^2)$の計算量が発生する
- 対して
dequeの計算量オーダーは線形$O(N)$
ソート済みシーケンスの探索にはbisectを考える
- AtCoderお馴染み二分探索
- 詳しい説明は他で色々出てると思うので割愛
優先度付きキューでheapqの使い方を知っておく
- AtCoderでお馴染みの優先度付きキュー(二分ヒープ)を効率的に使えという話。データ構造自体の説明は他で色々出てると思うので割愛
- いちいちソート(計算量は$O(NlogN)$)が発生するようなケースでは使えるかも?というのは頭に入れといたほうがいい気がする
- ちなみに色々な言語で二分ヒープは最初から使いやすいようにあらかじめ用意されている。下記参照
bytes型のゼロコピー処理にはmemoryviewとbytearrayを考える
- 組み込み関数
memoryview- オブジェクトを参照して返す。無駄なコピーが発生しないし、高速に処理することも可能になる
- メモリビューを作成するためには、対象のオブジェクトがバッファプロトコルをサポートしている必要がある
import time

sample = b'hello world! ' * (10**8)
sample_mv = memoryview(sample)

t1 = time.time()
a = sample[:10**8]

t2 = time.time()
a = sample_mv[:10**8]

t3 = time.time()

# この2つの読み込み速度は全然違う
# 大規模メモリを何度も読み込むような処理の場合、memoryviewの使用を検討する
print(f'Normal: {t2 - t1:.8f} sec.')
print(f'MemoryView: {t3 - t2:.8f} sec.')
[out]
Normal: 0.03210282 sec.
MemoryView: 0.00117517 sec.
-
bytes型とbytearray型の違い
| 変更 | 反復 | シーケンス | |
|---|---|---|---|
| bytes | イミュータブル | 可能 | 可能 |
| bytearray | ミュータブル | 可能 | 可能 |
sample = b'hello'
sample_array = bytearray(sample)

try:
    sample[0] = b'\x79'
    print('Success bytes.')
    print(sample)
except TypeError as e:
    print(f'TypeError: {e}')

print()

try:
    # bytearray型は値をbytes型でなく整数型で扱う
    sample_array[0] = 0x79
    print('Success bytearray.')
    print(sample_array)
except TypeError as e:
    print(f'TypeError: {e}')
[out]
TypeError: 'bytes' object does not support item assignment

Success bytearray.
bytearray(b'yello')
第九章 テストとデバッグ
出力のデバッグにreprを使う
-
printだとstringなのかintなのかよく分からない
print(1, '1')
[out]
1 1
- なので
reprを使うべき
print(repr(1), repr('1'))
- 尚、
%rフォーマット文字列と%演算子、またはf文字列を!r型変換で使った場合と等価
print('%r' % 1, '%r' % '1')

int_value, str_value = 1, '1'
print(f'{int_value!r} {str_value!r}')
[out]
1 '1'
1 '1'
- クラスのインスタンスをそのまま
printしてもデバッグの役には立たない
class Book:
    def __init__(self, name, kind):
        self.name = name
        self.kind = kind


book = Book(name='Effective Python Edition2', kind='tech')
print(book)
[out]
<__main__.Book object at 0x112cc6400>
-
__repr__を使う
class Book:
    def __init__(self, name, kind):
        self.name = name
        self.kind = kind

    def __repr__(self):
        return f'Book({self.__dict__})'


book = Book(name='Effective Python Edition2', kind='tech')
print(book)
[out]
Book({'name': 'Effective Python Edition2', 'kind': 'tech'})
関係する振る舞いをTestCaseサブクラスで検証する
- 組み込みのassert文よりもメッセージがわかりやすい
# sample_test.py

from unittest import TestCase, main


class SampleTestCase(TestCase):
    def test_sample_helper(self):
        expected = 12
        self.assertEqual(expected, 3)

    def test_sample_statement(self):
        expected = 12
        assert expected == 3


if __name__ == '__main__':
    main()
[out]
FF
======================================================================
FAIL: test_sample_helper (__main__.SampleTestCase)
----------------------------------------------------------------------
Traceback (most recent call last):
  File "/Users/takayoshi.makabe/jupyter/sample_test.py", line 7, in test_sample_helper
    self.assertEqual(expected, 3)
AssertionError: 12 != 3

======================================================================
FAIL: test_sample_statement (__main__.SampleTestCase)
----------------------------------------------------------------------
Traceback (most recent call last):
  File "/Users/takayoshi.makabe/jupyter/sample_test.py", line 11, in test_sample_statement
    assert expected == 3
AssertionError

----------------------------------------------------------------------
Ran 2 tests in 0.000s

FAILED (failures=2)
setUpとtearDown
- 各テストメソッドを実行する前にテスト環境をセットアップしなければならないことがある
- 例えば各メソッド実行のたびに新規ディレクトリを作成し、テスト後はそれを削除して次のメソッドをテストしなければならないなどあるかもしれない
- そういった時に
setUp、及びtearDownが使える。これらをオーバーライドすることで、各テストの動作環境を分離することが可能になる
| 関数名 | 実行タイミング | 関数の種類 |
|---|---|---|
| setUp | テスト関数実行前 | インスタンスメソッド |
| tearDown | テスト関数実行後 | インスタンスメソッド |
| setUpClass | クラスの呼び出し前 | クラスメソッド |
| tearDownClass | クラスの呼び出し後 | クラスメソッド |
| setUpModule | モジュールの呼び出し前 | クラスとは独立 |
| tearDownModule | モジュールの呼び出し後 | クラスとは独立 |
# my_test.py

import unittest
from unittest import TestCase, main


def setUpModule():
    """モジュール呼び出し前に一度だけ
    """
    print('* Module setup')


def tearDownModule():
    """モジュール呼び出し後に一度だけ
    """
    print('* Module clean-up')


class MyTestCase(TestCase):
    @classmethod
    def setUpClass(cls):
        """Class呼び出し前に一度だけ
        """
        print('* Class setup')

    @classmethod
    def tearDownClass(cls):
        """Class呼び出し後に一度だけ
        """
        print('* Class claen-up')

    def test_good(self):
        print('test good case.')
        self.assertEqual(3, 3)

    def test_bad(self):
        print('test bad case.')
        self.assertNotEqual(3, 4)

    def setUp(self):
        """テスト実行前に一度だけ
        """
        print('* Test setup')

    def tearDown(self):
        """テスト実行後に一度だけ
        """
        print('* Test clean-up')


if __name__ == '__main__':
    main()
$ python my_test.py

[out]
* Module setup
* Class setup
* Test setup
test bad case.
* Test clean-up
.* Test setup
test good case.
* Test clean-up
.* Class claen-up
* Module clean-up

----------------------------------------------------------------------
Ran 2 tests in 0.000s

OK
pdbで対話的にデバッグ
- VSCodeのデバッグモードと同じようなことをPythonのインタラクティブシェルで実現できるよって話
- 以下のコードの振る舞いをデバッグしたいとする
def eratosthenes_sieve(n: int) -> list[bool]:
    """素数であるか判定する
    """
    is_prime = [True] * (n + 1)
    is_prime[0] = is_prime[1] = False
    for p in range(2, n + 1):
        # ここにブレークポイントを挟む
        breakpoint()
        if is_prime[p]:
            for q in range(2 * p, n + 1, p):
                is_prime[q] = False
    return is_prime


if __name__ == '__main__':
    is_prime = eratosthenes_sieve(10)
    print(is_prime)
- 変数の値を確認することが可能
(Pdb) is_prime
[False, False, True, True, True, True, True, True, True, True, True]
-
以下のコマンドでさらに詳しく調査することができる
-
where:プログラムのどこにいるか、どういう呼び出し順でそこに至ったかを表示する -
up:変数スコープを関数呼び出し元に移す。 -
down:変数スコープを関数呼び出しスタックの1段下にうつす。
-
-
以下のコマンドでプログラム実行を制御、それぞれの詳しい挙動は割愛
-
step、next、return、continue、quit
-
第十章 協働作業(コラボレーション)
docstringについて
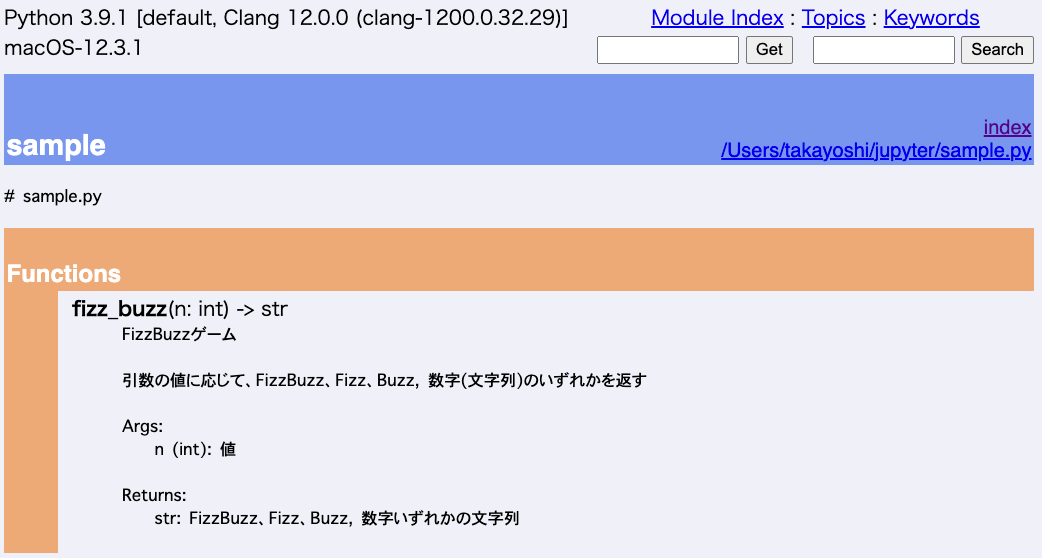
- コマンドラインから組み込みモジュール
pydocを使って、Pythonドキュメンテーションをホストするローカルサーバを実行できる - 例えば以下のようなモジュールがあったとする
# sample.py

def fizz_buzz(n: int) -> str:
    """ FizzBuzzゲーム

    引数の値に応じて、FizzBuzz、Fizz、Buzz, 数字(文字列)のいずれかを返す

    Args:
        n (int): 値

    Returns:
        str: FizzBuzz、Fizz、Buzz, 数字いずれかの文字列
    """
    if i % 15 == 0:
        return "FizzBuzz"
    elif i % 3 == 0:
        return "Fizz"
    elif i % 5 == 0:
        return "Buzz"
    else:
        return str(i)


if __name__ == '__main__':
    for i in range(16):
        print(fizz_buzz(i))
- 以下のようにコマンド操作
$ python -m pydoc -p 1234
Server ready at http://localhost:1234/
Server commands: [b]rowser, [q]uit
server> b   # bと入力するとサーバが起動
- アクセスすると標準モジュールや追加パッケージ、先ほど定義したモジュール内の関数のdocstringが確認できる
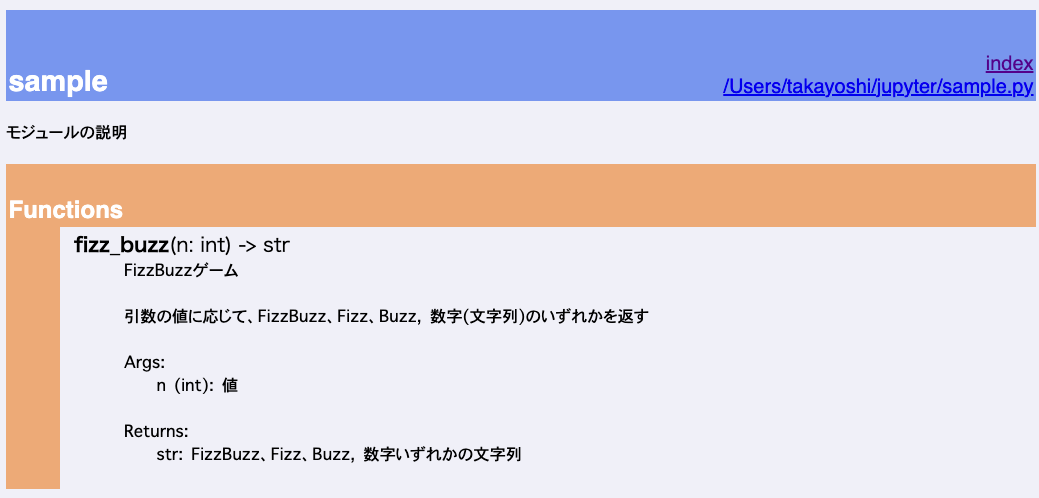
- モジュールのトップレベルに
"""を使い、モジュール全体に対してのdocstringを追加することも可能
"""
モジュールの説明
"""

def fizz_buzz(n: int) -> str:
    """ FizzBuzzゲーム

    引数の値に応じて、FizzBuzz、Fizz、Buzz, 数字(文字列)のいずれかを返す

    Args:
        n (int): 値

    Returns:
        str: FizzBuzz、Fizz、Buzz, 数字いずれかの文字列
    """
    if i % 15 == 0:
        return "FizzBuzz"
    elif i % 3 == 0:
        return "Fizz"
    elif i % 5 == 0:
        return "Buzz"
    else:
        return str(i)


if __name__ == '__main__':
    for i in range(16):
        print(fizz_buzz(i))
パッケージについて
- 大前提として、モジュールが大量に作られ混雑してきた場合、パッケージにまとめることを検討する
ディレクトリ
. ├── main.py └── mypackage ├── hello.py └── hoge.py
# main.py

from mypackage.hello import hello
from mypackage.hoge import hoge


hello()
hoge()
- 上の例だと
import packageでインポートして関数を使おうとするとAttributeError: module 'mypackage' has no attribute 'hello'が発生する -
__init__.pyを用意することで初期化処理を定義することができる - 例えば以下のようにすることで、
import mypackageでインポートできるようになる
ディレクトリ
. ├── main.py └── mypackage ├── __init__.py ├── hello.py └── hoge.py
### __init__.py

from .hello import hello
from .hoge import hoge
# main.py

import mypackage


mypackage.hello()
mypackage.hoge()
- 以下のようにすると頭に
_がつくプライベートな属性はインポートできない仕様
# __init__.py

from .hello import hello
from .hoge import *
# hoge.py

def hoge():
    print("hoge")


def _fuga():
    print("fuga")
# main.py
import mypackage


mypackage.hello()
mypackage.hoge()
mypackage._fuga()   # -> AttributeError
-
__init__.pyでfrom .hoge import hoge, _fugaと明示的に書けばfrom .hoge import *でもエラーでない- 実はこれはパッケージの特殊属性
__all__に明示的にプライベートな属性を追加しているのと同義(多分)
- 実はこれはパッケージの特殊属性
- なので、こう書くことでも
from .hoge import *でインポート可能
# hoge.py
__all__ = ["hoge", "_fuga"]


def hoge():
    print("hoge")


def _fuga():
    print("fuga")
- なので以下のように書くと
mainから一気に*でインポートすることも可能
# __init__.py

from .hoge import *
from .hello import hello

__all__ = ["hello", "hoge", "_fuga"]
# hoge.py

__all__ = ["hoge", "_fuga"]


def hoge():
    print("hoge")


def _fuga():
    print("fuga")
# main.py

from mypackage import *


hello()
hoge()
_fuga()
【注意事項】
- 完成されたAPIとして、外部に提供する際は使いやすさを考慮して、
__all__を使うが、チーム内開発では多用すべきでない。- 開発チームはそれぞれのモジュールの繋がりを意識しているので、逆にややこしい可能性?
-
import *はコードが分かりにくくなるだけでなく、名前が重複するバグにも繋がりかねないので、可能であれば避ける
自作の例外について
- あらかじめ予想されるエラーについては、既存のものを使うよりも自作のエラーを定義した方が、分かりやすくなるケースもある
class MyError(Exception):
    """ MyError is a custom exception class.
    """
warningsを活用して共同作業を効率化させる
- 使える警告カテゴリと警告フィルタの詳細は以下の公式ドキュメントが一番分かりやすい
import warnings


def test_func():
    """取り敢えず以下の3つの警告カテゴリで試す"""

    # 全ての警告カテゴリクラスの基底クラス
    warnings.warn("This is a warning", Warning)
    # 開発者向け、__main__によって引き起こされない限り無視
    warnings.warn("This is a deprecation", DeprecationWarning)
    # 将来その機能が廃止される警告
    warnings.warn("This is a future", FutureWarning)


if __name__ == "__main__":
    test_func()
$ python tmp.py

/hoge/tmp.py:8: Warning: This is a warning
  warnings.warn("This is a warning", Warning)
/hoge/tmp.py:10: DeprecationWarning: This is a deprecation
  warnings.warn("This is a deprecation", DeprecationWarning)
/hoge/tmp.py:12: FutureWarning: This is a future
  warnings.warn("This is a future", FutureWarning)


# -Wオプションを付けることで警告が出ている行数が分かりやすい
$ python -W error tmp.py

Traceback (most recent call last):
  File "/hoge/tmp.py", line 16, in <module>
    test_func()
  File "/hoge/tmp.py", line 8, in test_func
    warnings.warn("This is a warning", Warning)
Warning: This is a warning

FAIL: 1


$ python -W ignore tmp.py

# 何も出力されない
mypyと型ヒント
- よりコードの安全性を高める
# main.py

a: int
b: int

a = 1
b = "2"
print(a + b)
# エラー
$ python -m mypy --strict main.py
main.py:5: error: Incompatible types in assignment (expression has type "str", variable has type "int")
Found 1 error in 1 file (checked 1 source file)
FAIL: 1