Spring bootの学習で前回エラーメッセージの表示方法を学んだので、アウトプットも兼ねて投稿します。
手順は以下の通りです。
①プロジェクト作成時、validationライブラリを使用する。
②modelクラスを作成し、バリデーションチェック用のアノテーションを使用する。
③ControllerクラスのPostメソッドで、@Validated、BindingResultを使用する。
④エラーメッセージ用のファイルを作成。
⑤作成したファイルに表示させたいメッセージを記載。
⑥application.propertiesに最後にファイルのルートを記載。
①プロジェクト作成時、validationライブラリを使用する。
まず初めに、プロジェクト作成時にライブラリ依存関係の選択で「Validation」を追加する。

②modelクラスを作成し、バリデーションチェック用のアノテーションを使用する
例)
package com.example.demo.model;

import java.math.BigDecimal;
import java.time.LocalDate;

import javax.validation.constraints.Min;
import javax.validation.constraints.NotBlank;
import javax.validation.constraints.NotNull;
import javax.validation.constraints.Pattern;
import javax.validation.constraints.Size;

import org.springframework.format.annotation.DateTimeFormat;
import org.springframework.format.annotation.DateTimeFormat.ISO;
import org.springframework.format.annotation.NumberFormat;

import lombok.Getter;
import lombok.Setter;

@Getter
@Setter
public class Sample {

	//必須入力、文字列が60文字まで
	@NotBlank
	@Size(max = 60)
	private String name;

	//必須入力、文字列が254文字まで
	@NotBlank
	@Size(max = 254)
	private String address;

	//必須入力、半角数字かハイフン
	@NotBlank
	@Pattern(regexp = "[0-9-]*")
	private String phoneNumber;

	//必須乳録、1000円以上、数値へ変換
	@NotNull
	@Min(1000)
	@NumberFormat(pattern = "#,###")
	private BigDecimal price;

	//必須入力、日付へ変換
	@NotNull
	@DateTimeFormat(iso = ISO.DATE)
	private LocalDate paymentDeadline;

}
各アノテーションの解説
◆@NotBlank
空白、空欄などの値が未記入であるかどうかを管理してくれるアノテーション。
◆@NotNull
@NotBlankと同様、空白、空欄などの値が未記入であるかどうかを管理してくれるアノテーション。
@NotBlankとの違いは、スペースなどの空文字を許容するかどうかにある。
◆@Size
文字列の長さを管理してくれるアノテーション。
※今回の場合は60文字まで入力が可能。
◆@NumberFormat, @DateTimeFormat
値の形式を管理するアノテーション。
@NumberFormat は数値の形式を、
@DateTimeFomatは日付や時刻などの形式を管理している。
◆@Min,@Max
データ型の値の最大値、最小値を管理するアノテーション。
③ControllerクラスのPostメソッドで、@Validated、BindingResultを使用する。
Viewから送られてきたmodelに対し、@Validatedと、BindingResultクラスで管理し、modelクラスで指定した通りになっているか確認。
package com.example.demo.controller;

import org.springframework.stereotype.Controller;
import org.springframework.validation.BindingResult;
import org.springframework.validation.annotation.Validated;
import org.springframework.web.bind.annotation.GetMapping;
import org.springframework.web.bind.annotation.ModelAttribute;
import org.springframework.web.bind.annotation.PostMapping;

import com.example.demo.model.Sample;

@Controller
public class HomeController {

	@GetMapping("/")
	public String index(@ModelAttribute Sample sample) {

		return "index";
	}

	@PostMapping("/")
	public String confirm(@Validated @ModelAttribute Sample sample, BindingResult result) {

		if(result.hasErrors()) {
			return "index";
		}

		return "confirm";
	}

}
解説
@PostMapping("/")
	public String confirm(@Validated @ModelAttribute Sample sample, BindingResult result) {

		if(result.hasErrors()) {
			return "index";
		}

		return "confirm";
	}
@Validatedでviewから送られてきたmodelにエラーがあるかをチェック、BindingResultクラスのhasErrors()にエラーの内容が入るので、
エラーがあればif文で引っかかり、 viewに戻す処理をしている。
※ViewにあたるHTMLのコードは長いので省略。
④エラーメッセージ用のファイルを作成、⑤作成したファイルに表示させたいメッセージを記載。
src/main/resources内にエラーメッセージ用のプロパティファイルを、以下のような配置で作成。
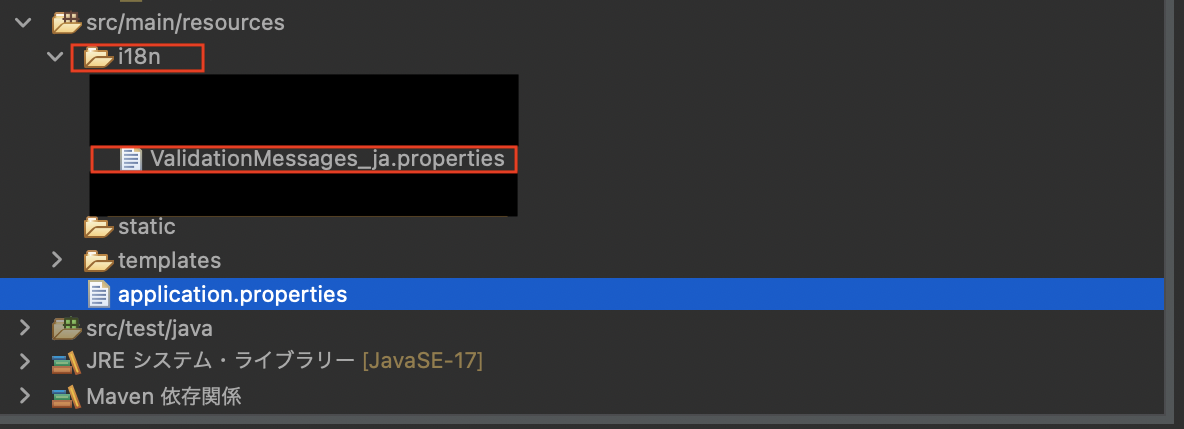
①ValidationMessages_ja.properties
#個別メッセージ
Pattern.invoice.phoneNumber = {0}は、半角の数字かハイフンで入力してください(例:03-1234-5678)
Min.invoice.price = {0}は、{1}円以上の値を入力してください。

#共通メッセージ
NotBlank = {0}を入力してください。
NotNull = {0}を入力してください
Size = {0}は、{2}文字以上、{1}文字以下で入力してください。
Min = {0}は、{1}文字以上の値を入力してください

#typeMismatch:個別メッセージ
typeMismatch.sample.price = {0}が不正な値です
typeMismatch.sample.paymentdeadline = {0}は、"2022-01-01"形式で入力してください
解説
◆メッセージを作成する上で、一番優先順位が高く評価される書き方は、
アノテーション名.バインド名.フィールド名 = 内容
と書く書き方。
他にも沢山あるがここでは省略。
◆{0}には、フィールド名、{1},{2}...の0以降にはアノテーションの引数の値が入る。
例)
@NotBlank
@Size(max = 60, min = 10)
private String name;

//Size = {0}は、{2}文字以上、{1}文字以下で入力してください。
//{0} = address
//{1} = 60
//{2} = 10
◆typeMismatchは、
@DateTimeFormatやN@umberFormatで定めた形式通りでないとエラーが出るようになる。
⑥application.propertiesに最後にファイルのルートを記載。
最後にapplication.propertiesファイルに下記を記載して完了!
spring.messages.basename=i18n/messages,i18n/ValidationMessages
spring.messages.fallback-to-system-locale=false
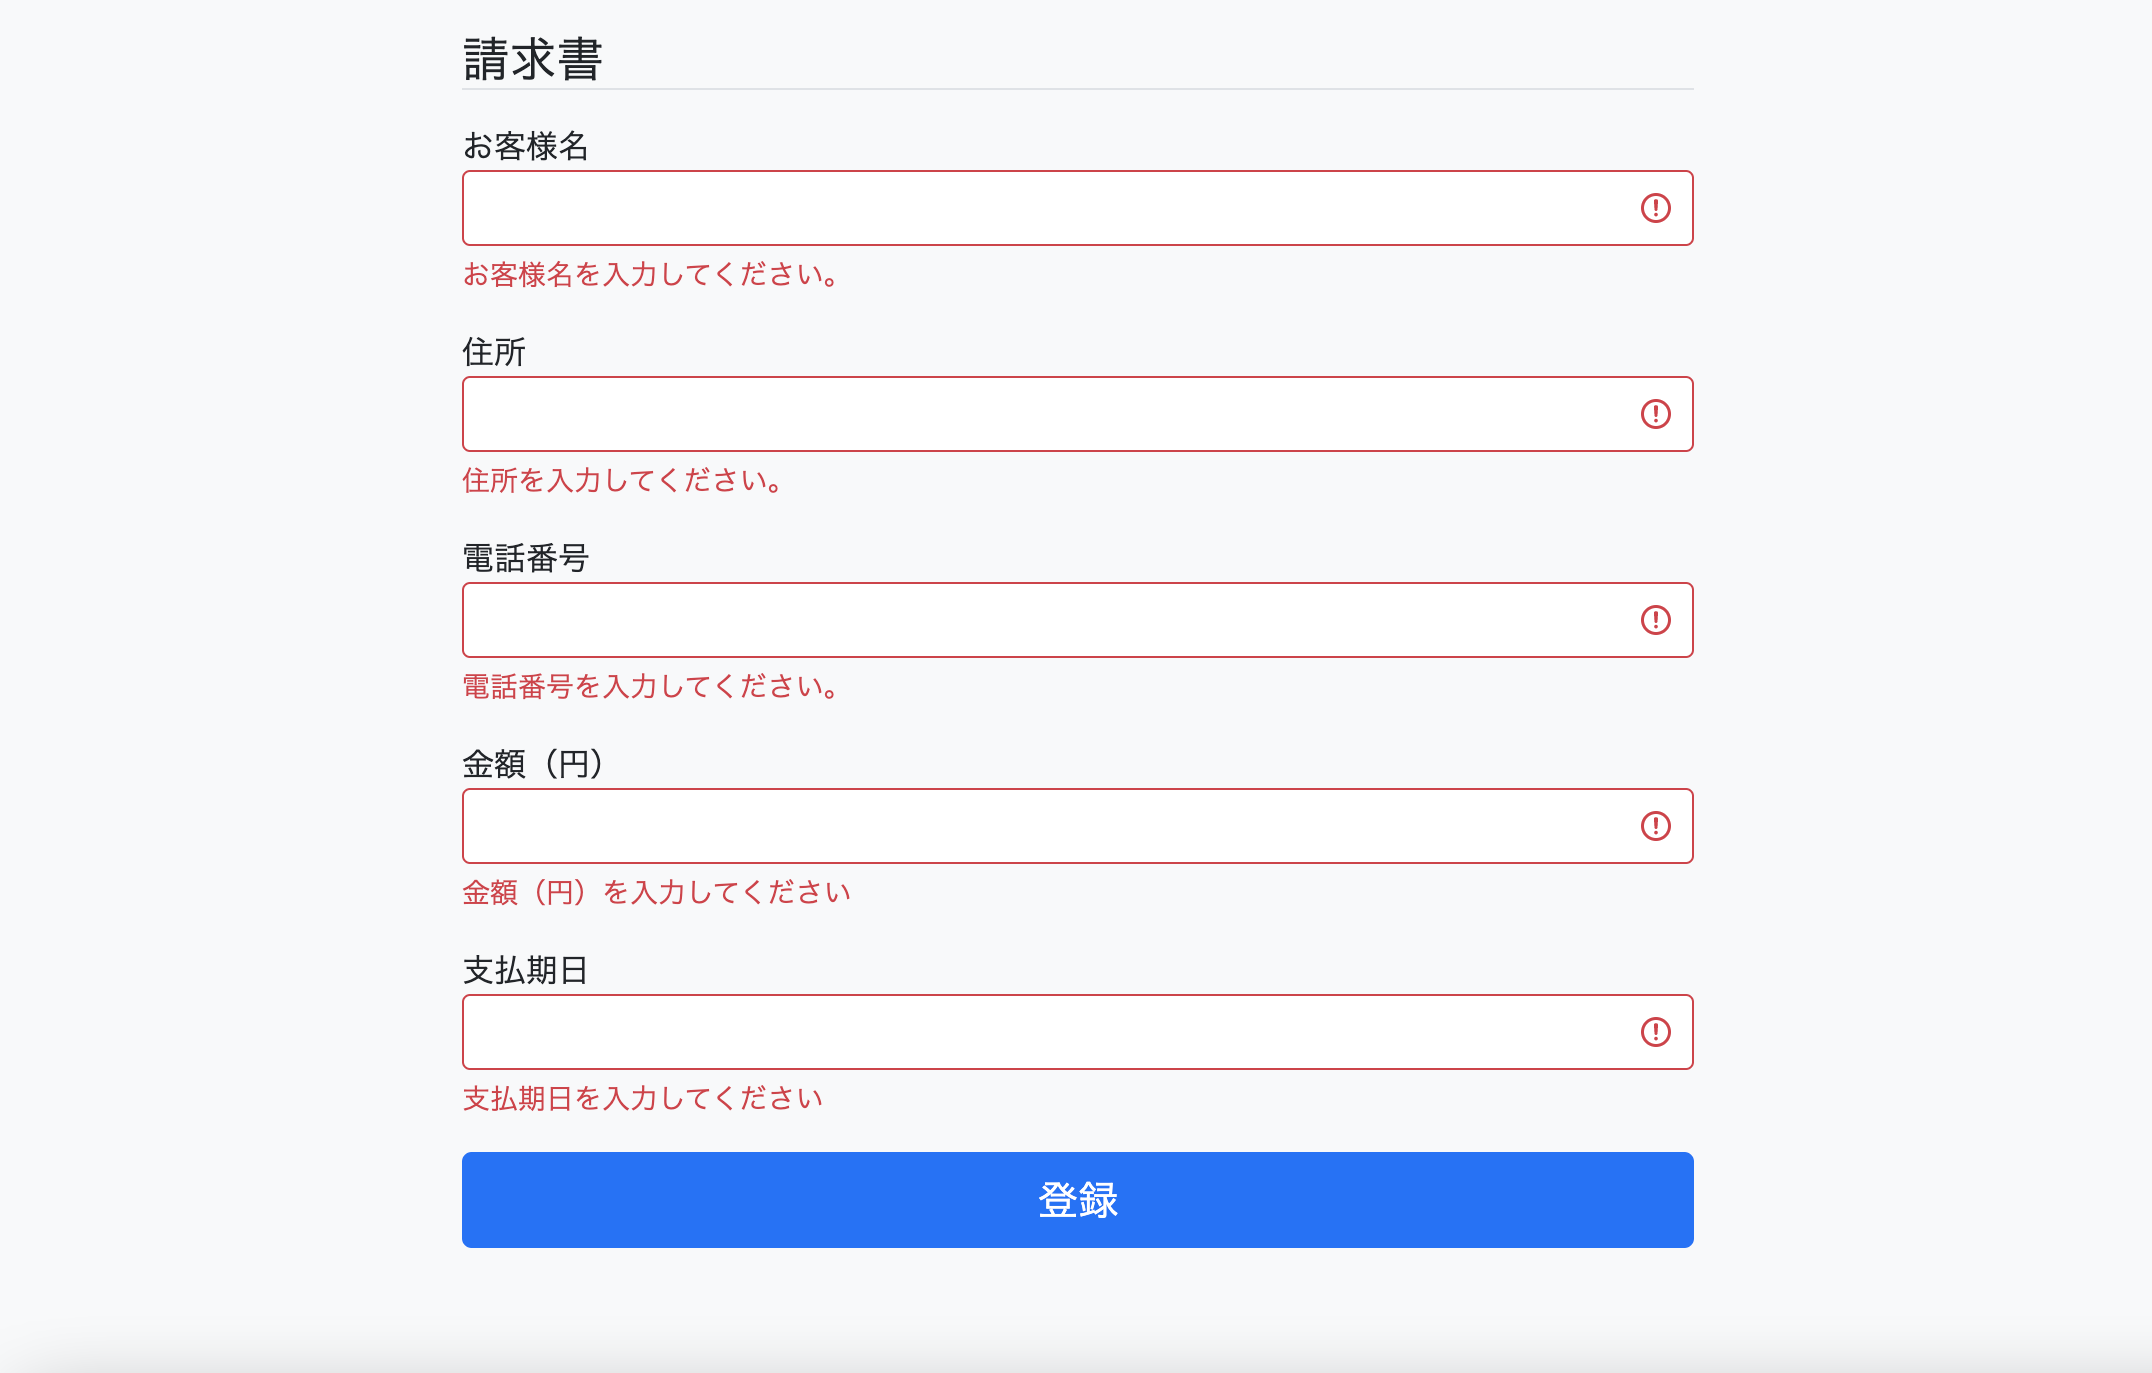
こちらの手順を利用してで問い合わせフォームを作成し、何も入力せず登録を押すと
以下のような形でエラーが表示できます。
補足
{0} に入るフィールド名は、src/main/resources内にmessages.propertiesというファイルを作成し、以下の通りで記載をし配置しておくと変更することもできます。
name=お客様名
address=住所
phoneNumber=電話番号
price=金額(円)
paymentDeadline=支払期日
register=登録
confirmationMessage=登録が正常に完了しました。
<!DOCTYPE html>
<html xmlns:th="http://www.thymeleaf.org">
<head>
<meta charset="UTF-8">
<meta name="viewport" content="width=device-width, initial-scale=1">
<link th:href="@{/webjars/bootstrap/css/bootstrap.min.css}" rel="stylesheet">
<title>Title</title>
</head>
<body class="bg-light">
	<div class="container">
		<div class="row justify-content-center">
			<div class="col-md-8">
				<h4 class="border-bottom my-3" th:text="#{invoice}"></h4>
				<p class="text-danger" th:text="#{confirmationMessage}"></p>

				<div th:object="${invoice}">
					novalidate>

					<div class="mb-3">
						<label for="name" th:text="#{name}"></label>
						<input type="text" class="form-control" th:field="*{name}" disabled>

					</div>

					<div class="mb-3">
						<label for="address" th:text="#{address}"></label>
						<input type="text"class="form-control" th:field="*{address}" disabled>
					</div>

					<div class="mb-3">
						<label for="phone" th:text="#{phoneNumber}"></label>
						<input type="tel"class="form-control" th:field="*{phoneNumber}" disabled>
					</div>

					<div class="mb-3">
						<label for="price" th:text="#{price}"></label>
						<input type="text"class="form-control" th:field="*{price}" disabled>
					</div>

					<div class="mb-3">
						<label for="paymentDeadline" th:text="#{paymentDeadline}"></label>
						<input type="tel"class="form-control" th:field="*{paymentDeadline}" disabled>
					</div>

				</div>
			</div>
		</div>
	</div>

<script th:src="@{/webjars/bootstrap/js/bootstrap.bundle.min.js}"></script>
</body>
コードはthymeleafを使用しており、
#{項目名} で表示が可能です。
###参考文献
Spring boot2 入門から基礎まで