◆ 目次
・はじめに(Reduxとは)
・Reduxの管理の仕組み
・定義方法
・実践してみよう
◆ はじめに(reduxとは)
Reduxとは、Reactとは別でグローバルステートを管理するライブラリ。
【 グローバルステート 】
アプリケーション全体で管理するステート。ReactでいうuseContext。
【 ローカルステート 】
特定のコンテキスト内のみで管理するステート。ReactでいうuseState。
◆ Reduxの管理の仕組み
・Store
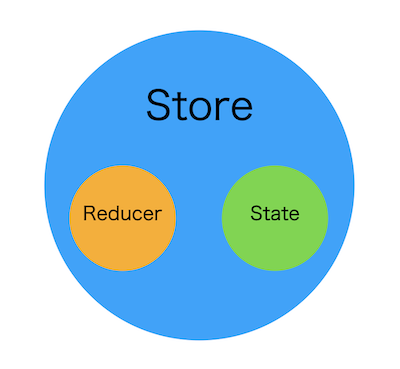
Reduxのデータの保存場所。
状態を保管するステートと、ステートを更新する関数(Reducer)を持っている。
・Disptach
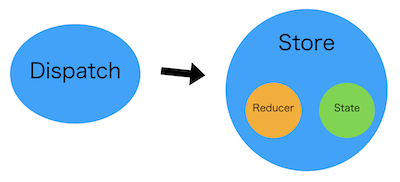
Reducerを呼び出すために実行する関数。
Dispatchを呼び出すことでReducerが実行され、ステートが更新される。
・全体的な流れ
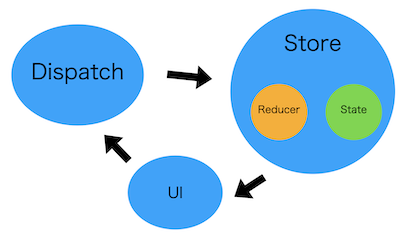
① 初期値のステートがUIに表示される。Dispatchを実行するためのイベントをUIで実行する。
↓
② Dispatchを実行したことでReducerが呼び出される。ステートが更新される。
↓
③ 更新されたステートが画面に表示される。
◆ 定義方法
・更新関数の定義
import { createSlice } from "@reduxjs/toolkit";

const Example = createSlice({
  // Sliceの名前
  name: 'example',
  // ステートの初期値 ※プロパティ名は任意
  initialState: 0,
  // 更新関数をオブジェクトで定義
  reducers: {
  // 定義したいメソッドを記載
  }
})

// アクションクリエイターの定義
const { /* 定義したメソッド */ } = example.actions;
/*
 * 【アクションクリエイター】
 * Dispatch(更新関数を呼び出す関数)の引数に指定する※Actionを定義する関数のこと
 * createSliceでは、アクションクリエイターが自動で作成される。
 */

export { /* アクションクリエイター名 */ }
export default example.reducer;
※Actionとは
Actionとは、ユーザーが行なった操作をオブジェクトで表現したものと考えれば良い。
Action : {
  type: "アクションの種類",
  payload: "アクション時に利用するデータ"
}
・Storeの定義
import { reducer } from "更新関数を定義したファイルの階層"
import { configureStore } from "@reduxjs/toolkit"

export default configureStore({
  reducer: {
    // 先ほど定義した更新関数をオブジェクト内に定義 ※プロパティ名は任意
    example: reducer
  }
});
・Dispatchの取得
import { useDispatch } from "react-redux";

const Example = () => {
  const dispatch = useDispatch();
}
・ステートの取得
import { useSelector } from "react-redux";

const Example = () => {
  const state = useSelector(state => state);
}

/*
 * useSlector
 *
 * 引数にはコールバック関数を定義する。
 * コールバック関数の引数のstateは、Reduxで現在管理しているState(グローバルステート)を表している。
 * 今回のExampleコンポーネントでは、管理しているStateをそのまま出力している。
 */
・Storeへのアクセス
import { Provider } from "react-redux";
import store from "configureStoreを用いてStoreを定義したファイルの階層"

const App = () => {
  return (
    <Provider store={store}>
      {/* Storeへのアクセスを可能にしたいコンポーネントをchildrenに設定 */}
      <Example></Example>
    </Provider>
  )
}
◆ 実践してみよう
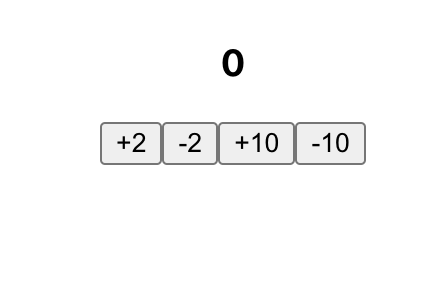
ボタンを押すとボタンに書かれた数字分、表示された数字が加減されるものを作成します。
①更新関数の定義
import { createSlice } from "@reduxjs/toolkit";

const counter = createSlice({
  // Sliceの名前
  name: 'counter',
  // 初期値の値
  initialState: 0,
  // 更新関数の定義
  reducers: {
  // プラスの時のメソッド
    add(state, {type, payload}) {
      return state + payload;
    },
  // マイナスの時のメソッド
    minus(state, {type, payload}) {
      return state - payload;
    }
  }
})

// アクションクリエイターの定義
const { add, minus } = counter.actions

// アクションクリエイターとReducerのexport
export { add, minus }
export default counter.reducer;
②Storeの定義
import { reducer } from "reducerを定義したファイルの階層"
import { configureStore } from "@reduxjs/toolkit"

export default configureStore({
  reducer: {
    counter: reducer
  }
});
③ボタンコンポーネントの作成
import { add, minus } from "アクションクリエイターを定義したファイルの階層";
import { useDispatch } from "react-redux";

const CounterButton = ({ calcType, step }) => {
  // dispatchの取得
  const dispatch = useDispatch();
  // dispatch呼び出し用のイベントハンドラの定義
  const clickhandler = () => {
  // アクションクリエイター(calctTypeの値に応じて条件分岐)
  // アクションクリエイターによって作成したActionを引数に格納し、dispatchの引数に指定して実行
    const action = calcType === "+" ? add(step) : minus(step);
    dispatch(action);
  }

  return (
    <button onClick={clickHandler}>{calcType}{step}</button>
  )
}

export default CounterButton;
④表示用のコンポーネントの作成
import { useSelector } from "react-redux";

const CounterResult = () => {
  // ステートの取得
  const state = useSelector(state => state);

  return (
    <p>{state}</p>
  )
}
export default CounterResult;
⑤画面表示
・App.js
import { Provider } from "react-redux";
import store  from "storeを定義したファイルの階層";
import CounterButton from "定義したファイルの階層";
import CounterResult from "定義したファイルの階層";

const App = () => {
  return (
    <>
      <Provider store={store}>
        <CounterResult />
        <CounterButton calcType={"+"} step={2}/>
        <CounterButton calcType={"-"} step={2}/>
        <CounterButton calcType={"+"} step={10}/>
        <CounterButton calcType={"-"} step={10}/>
      </Provider>
    </>
  )
}
以上で完成です。