概要

GitHub に公開されているサンプルノートブックを試してみた際の手順やポイントをまとめます。
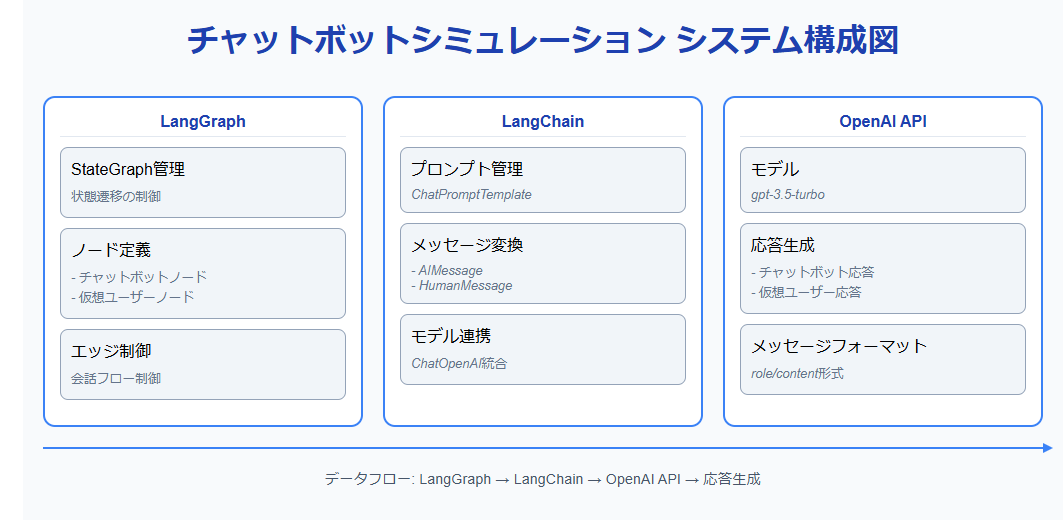
このノートブックでは、チャットボットと仮想ユーザを組み合わせた対話シミュレーションを行う方法を解説しています。
- 目的: チャットボットの性能を自動でテストし、改善点を検証する
- 使用ツール: LangGraph, LangChain, OpenAI API
- シナリオ例: 「5年前のアラスカ旅行の返金を求めるユーザ」と「航空会社のサポート担当ボット」が会話を行う
この記事では、このノートブックの動作を再現しつつ、ポイントを整理して解説します。
必要なパッケージ
以下のライブラリをインストールします。
pip install -U langgraph langchain langchain_openai openai
また、OPENAI_API_KEY が必要となるため、環境変数に設定するか以下のようにコードで設定してください。
import getpass
import os

def _set_if_undefined(var: str):
    if not os.environ.get(var):
        os.environ[var] = getpass.getpass(f"Please provide your {var}")

_set_if_undefined("OPENAI_API_KEY")
実装の流れ
1. サポート担当(チャットボット)の用意
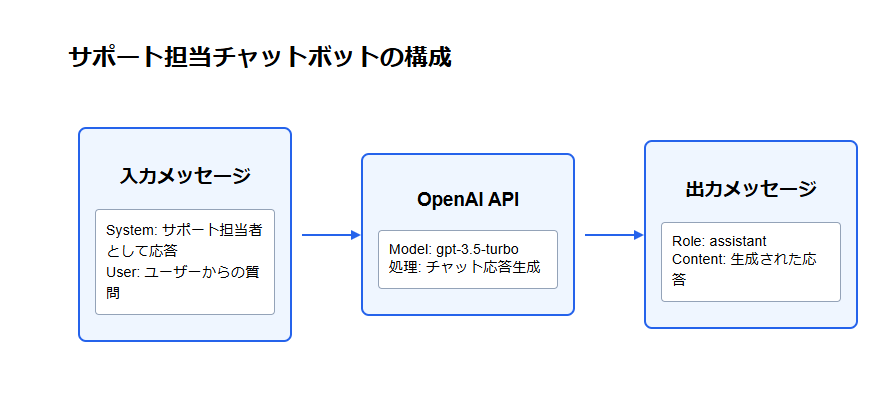
OpenAI API を使い、チャットボットの応答を生成する関数を定義します。
import openai
from typing import List

def my_chat_bot(messages: List[dict]) -> dict:
    system_message = {
        "role": "system",
        "content": "You are a customer support agent for an airline."
    }
    messages = [system_message] + messages

    completion = openai.chat.completions.create(
        messages=messages,
        model="gpt-3.5-turbo"
    )
    return completion.choices[0].message.model_dump()
-
messages引数は OpenAI のフォーマット(roleとcontentを含む辞書のリスト)です。 - 応答は
{'role': 'assistant', 'content': '...応答...'}の形式で返ります。
2. 仮想ユーザの定義

仮想ユーザは LangChain を使って定義します。以下のように設定すると、ユーザ役が指定したシナリオに基づいて応答を返します。
from langchain_core.prompts import ChatPromptTemplate, MessagesPlaceholder
from langchain_openai import ChatOpenAI

system_prompt_template = """You are a customer of an airline company.
You are interacting with a user who is a customer support person.

{instructions}

When you are finished with the conversation, respond with a single word 'FINISHED'"""

prompt = ChatPromptTemplate.from_messages(
    [
        ("system", system_prompt_template),
        MessagesPlaceholder(variable_name="messages"),
    ]
)

instructions = """Your name is Harrison. You are trying to get a refund for the trip you took to Alaska.
You want them to give you ALL the money back.
This trip happened 5 years ago."""

prompt = prompt.partial(name="Harrison", instructions=instructions)
model = ChatOpenAI()
simulated_user = prompt | model
3. ノードの定義
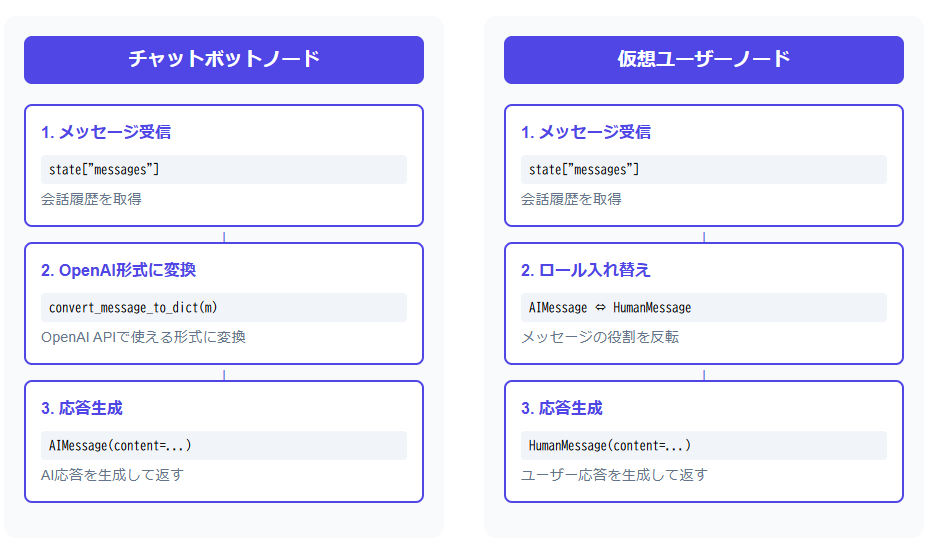
LangGraph のノードは、状態(state)を受け取り、メッセージを追加して返す関数です。
チャットボットノード
from langchain_community.adapters.openai import convert_message_to_dict
from langchain_core.messages import AIMessage

def chat_bot_node(state):
    messages = state["messages"]
    openai_messages = [convert_message_to_dict(m) for m in messages]
    result = my_chat_bot(openai_messages)
    return {"messages": [AIMessage(content=result["content"])]}
仮想ユーザノード
仮想ユーザ側は、ロール(AIMessage ⇔ HumanMessage)の入れ替えが必要です。
from langchain_core.messages import AIMessage, HumanMessage

def _swap_roles(messages):
    new_messages = []
    for m in messages:
        if isinstance(m, AIMessage):
            new_messages.append(HumanMessage(content=m.content))
        else:
            new_messages.append(AIMessage(content=m.content))
    return new_messages

def simulated_user_node(state):
    messages = state["messages"]
    swapped = _swap_roles(messages)
    response = simulated_user.invoke({"messages": swapped})
    return {"messages": [HumanMessage(content=response.content)]}
4. 会話終了条件の定義
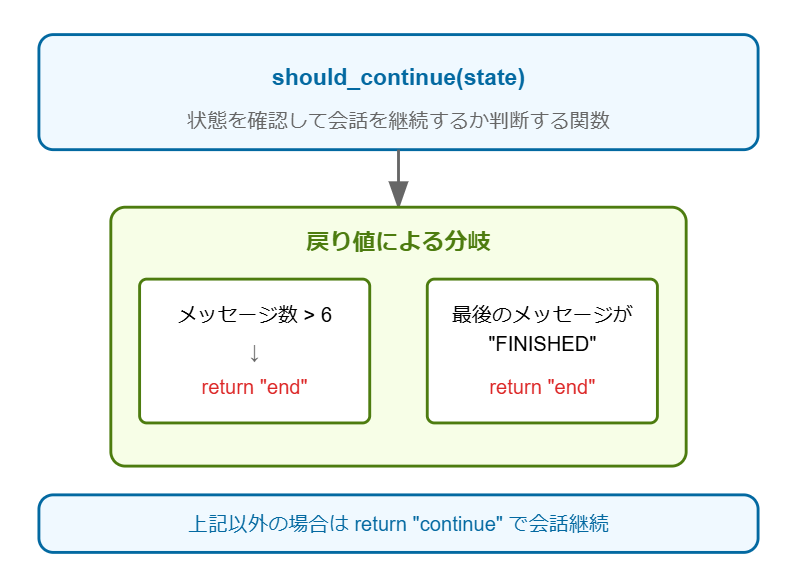
会話終了を判断するロジックを定義します。
def should_continue(state):
    messages = state["messages"]
    if len(messages) > 6:
        return "end"
    elif messages[-1].content == "FINISHED":
        return "end"
    else:
        return "continue"
5. グラフを構築

ノードとエッジを定義し、シミュレーションを構築します。
from langgraph.graph import END, StateGraph, START
from langgraph.graph.message import add_messages
from typing import Annotated
from typing_extensions import TypedDict

class State(TypedDict):
    messages: Annotated[list, add_messages]

graph_builder = StateGraph(State)
graph_builder.add_node("user", simulated_user_node)
graph_builder.add_node("chat_bot", chat_bot_node)

graph_builder.add_edge("chat_bot", "user")
graph_builder.add_conditional_edges(
    "user",
    should_continue,
    {
        "end": END,
        "continue": "chat_bot",
    },
)
graph_builder.add_edge(START, "chat_bot")

simulation = graph_builder.compile()
6. 実行

以下のコードでシミュレーションを実行します。
for chunk in simulation.stream({"messages": []}):
    if END not in chunk:
        print(chunk)
        print("----")
出力例:
{'chat_bot': AIMessage(content='How can I help you today?')}
----
{'user': HumanMessage(content='Hi, my name is Harrison...')}
----
{'chat_bot': AIMessage(content='I understand you want a refund...')}
----
...
{'user': HumanMessage(content='FINISHED')}
----

まとめ

LangGraph と LangChain を使うことで、
- 自動化: 実際のチャットボットと疑似ユーザ間の会話を再現可能
- テスト効率化: 特定の条件で終了するスクリプトを容易に記述可能
- 応用性: 複数のシナリオを設定し、多角的にボットの性能を検証可能
といった利点が得られます。
本記事が、チャットボットのテストや評価を効率化したい方の参考になれば幸いです。ぜひ試してみてください!