
はじめに
こんにちは、皆さん!今回は、Fletフレームワークを使用して作成したポモドーロタイマーアプリをご紹介します。時間管理に悩んでいる方や、Pythonでクロスプラットフォームアプリ開発に興味がある方は、ぜひ最後までお読みください。
ポモドーロ・テクニックとは?
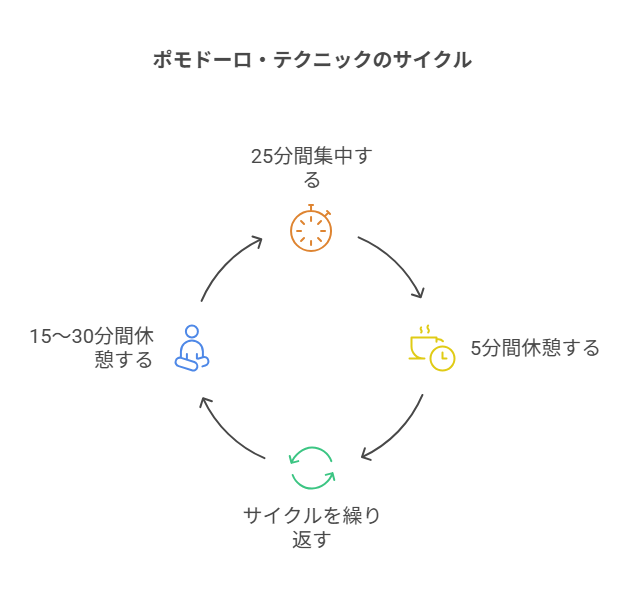
ポモドーロ・テクニックは、フランチェスコ・シリロによって開発された時間管理法です。基本的なコンセプトは以下の通りです:
- 25分の集中作業(1ポモドーロ)
- 5分の短い休憩
- 4ポモドーロごとに15〜30分の長い休憩
このサイクルを繰り返すことで、脳に適切な休息を与えながら効率的に作業を進めることができます。多くの研究で集中力と生産性の向上に効果があるとされています。
Fletフレームワークの魅力
Fletは、Pythonでマルチプラットフォームのアプリケーションを簡単に作成できるフレームワークです。Flutterの技術を活用しており、以下の特徴があります:
- シンプルなAPI: フロントエンド開発の経験がなくても直感的に使えます
- リアクティブUI: 状態変化に応じて画面が自動更新されます
- クロスプラットフォーム: デスクトップ、モバイル、Webなど様々な環境で動作
- 美しいマテリアルデザイン: モダンで見栄えの良いUIコンポーネントが揃っています
アプリケーションの主な機能
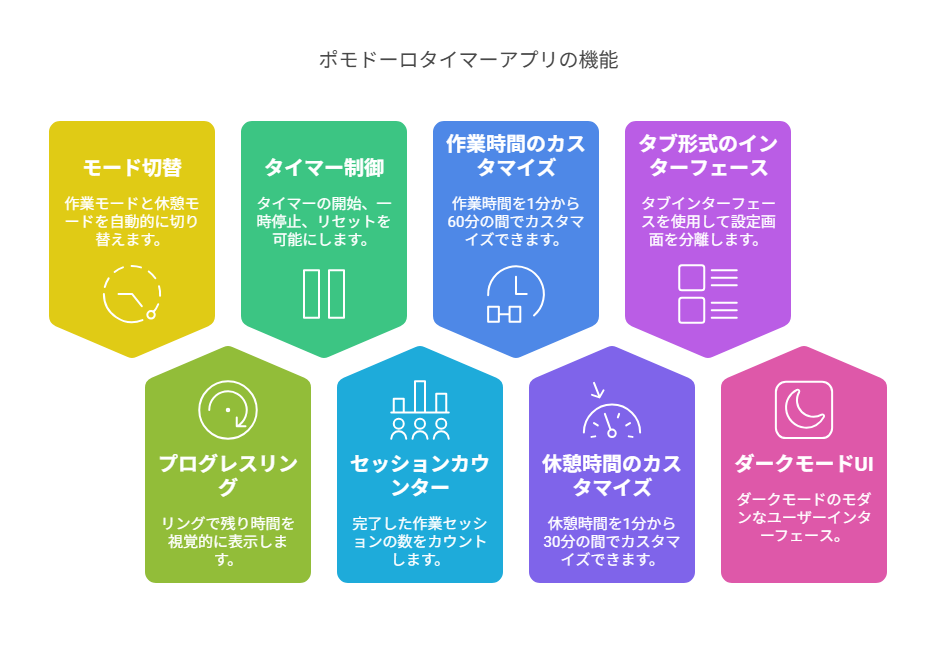
今回実装したポモドーロタイマーアプリには、以下の機能が含まれています:
- 作業モードと休憩モードの自動切り替え
- ビジュアル的なプログレスリングによる残り時間の表示
- タイマーの開始、一時停止、リセット機能
- セッション数のカウント機能
- 作業時間のカスタマイズ(1分〜60分、1分刻み)
- 休憩時間のカスタマイズ(1分~30分、1分刻み)
- タブ形式のインターフェースによる設定画面の分離
- ダークモードのモダンなUI

コードの詳細実装
以下が完全な実装コードです。コメントを含めて詳細に解説していますので、Fletを使ったアプリ開発の参考にしてください。
import flet as ft
import time
from threading import Thread

def main(page: ft.Page):
    # アプリ基本設定
    page.title = "ポモドーロタイマー"
    page.padding = 20
    page.theme_mode = ft.ThemeMode.DARK
    page.bgcolor = "#1E1E1E"
    page.scroll = ft.ScrollMode.AUTO

    # 状態管理変数
    timer_running = False
    is_work_mode = True
    current_seconds = 25 * 60  # 初期は25分
    session_count = 0

    # --- タイマー画面用ウィジェット ---
    # タイマー表示用テキスト
    timer_text = ft.Text(
        "25:00",
        size=80,
        weight=ft.FontWeight.BOLD,
        color="#FF4F4F",
        text_align=ft.TextAlign.CENTER,
    )
    # モード表示用テキスト
    mode_text = ft.Text(
        "作業モード",
        size=24,
        weight=ft.FontWeight.BOLD,
        color=ft.Colors.WHITE,
        text_align=ft.TextAlign.CENTER,
    )
    # プログレスリング
    progress_ring = ft.ProgressRing(
        width=300,
        height=300,
        stroke_width=20,
        color="#FF4F4F",
        bgcolor="#333333",
        value=1,
    )
    # セッション数表示
    session_text = ft.Text(
        "今日のセッション数: 0",
        size=16,
        color=ft.Colors.WHITE70,
        text_align=ft.TextAlign.CENTER,
    )
    # コントロールボタン
    start_stop_button = ft.ElevatedButton(
        text="開始",
        icon=ft.Icons.PLAY_ARROW,
        style=ft.ButtonStyle(bgcolor={"": "#4CAF50"}, padding=20),
        width=150,
        height=50,
    )
    reset_button = ft.ElevatedButton(
        text="リセット",
        icon=ft.Icons.REFRESH,
        style=ft.ButtonStyle(bgcolor={"": "#F44336"}, padding=20),
        width=150,
        height=50,
    )
    mode_button = ft.ElevatedButton(
        text="モード切替",
        icon=ft.Icons.SWAP_HORIZ,
        style=ft.ButtonStyle(bgcolor={"": "#2196F3"}, padding=20),
        width=150,
        height=50,
    )

    # --- 設定画面用ウィジェット ---
    # 作業時間スライダー
    work_time_slider = ft.Slider(
        min=1,
        max=60,
        divisions=59,
        value=25,
        label="{value}分",
        width=300,
        inactive_color="#333333",
        active_color="#FF4F4F",
    )
    # 休憩時間スライダー
    break_time_slider = ft.Slider(
        min=1,
        max=30,
        divisions=29,
        value=5,
        label="{value}分",
        width=300,
        inactive_color="#333333",
        active_color="#4FB0FF",
    )
    # 設定パネル(設定タブ内に表示)
    settings_content = ft.Column(
        controls=[
            ft.Text("タイマー設定", size=20, weight=ft.FontWeight.BOLD, color=ft.Colors.WHITE),
            ft.Divider(height=1, color=ft.Colors.WHITE24),
            ft.Text("作業時間", size=16, color=ft.Colors.WHITE70),
            work_time_slider,
            ft.Text("休憩時間", size=16, color=ft.Colors.WHITE70),
            break_time_slider,
        ],
        horizontal_alignment=ft.CrossAxisAlignment.CENTER,
        spacing=10,
    )

    # --- 関数定義 ---
    def format_time(seconds):
        minutes = int(seconds // 60)
        sec = int(seconds % 60)
        return f"{minutes:02d}:{sec:02d}"

    def update_timer_display():
        nonlocal current_seconds, timer_running
        timer_text.value = format_time(current_seconds)
        total_seconds = work_time_slider.value * 60 if is_work_mode else break_time_slider.value * 60

        if is_work_mode:
            progress_ring.color = "#FF4F4F"
            mode_text.value = "作業モード"
        else:
            progress_ring.color = "#4FB0FF"
            mode_text.value = "休憩モード"

        progress_ring.value = current_seconds / total_seconds if total_seconds > 0 else 0

        start_stop_button.text = "開始" if not timer_running else "一時停止"
        start_stop_button.icon = ft.Icons.PLAY_ARROW if not timer_running else ft.Icons.PAUSE
        start_stop_button.bgcolor = "#4CAF50" if not timer_running else "#FFA726"

        page.update()

    def run_timer():
        nonlocal timer_running, current_seconds, is_work_mode, session_count
        start_time = time.time()
        last_update_time = start_time
        total_seconds = work_time_slider.value * 60 if is_work_mode else break_time_slider.value * 60

        while timer_running and current_seconds > 0:
            now = time.time()
            elapsed = int(now - start_time)
            total_seconds = work_time_slider.value * 60 if is_work_mode else break_time_slider.value * 60
            remaining = max(0, total_seconds - elapsed)
            if int(now - last_update_time) >= 1:
                last_update_time = now
                current_seconds = remaining
                update_timer_display()
            time.sleep(0.1)

        if timer_running and current_seconds <= 0:
            timer_running = False

            start_stop_button.text = "開始"
            start_stop_button.icon = ft.Icons.PLAY_ARROW
            start_stop_button.bgcolor = "#4CAF50"

            if is_work_mode:
                is_work_mode = False
                current_seconds = int(break_time_slider.value * 60)
                session_count += 1
                session_text.value = f"今日のセッション数: {session_count}"
                mode_text.value = "休憩モード"
                timer_text.color = "#4FB0FF"
                progress_ring.color = "#4FB0FF"
            else:
                is_work_mode = True
                current_seconds = int(work_time_slider.value * 60)
                mode_text.value = "作業モード"
                timer_text.color = "#FF4F4F"
                progress_ring.color = "#FF4F4F"

            update_timer_display()

            def close_snackbar(e):
                page.snack_bar.open = False
                page.update()
            page.show_snack_bar(
                ft.SnackBar(
                    content=ft.Text("タイマーが終了しました!" + (" 休憩しましょう" if not is_work_mode else " 作業を始めましょう")),
                    action=ft.SnackBarAction("OK", close_snackbar),
                    open=True,
                )
            )

    def toggle_timer(e):
        nonlocal timer_running
        if not timer_running:
            start_stop_button.text = "一時停止"
            start_stop_button.icon = ft.Icons.PAUSE
            start_stop_button.bgcolor = "#FFA726"
            page.update()
            timer_running = True
            thread = Thread(target=run_timer)
            thread.daemon = True
            thread.start()
        else:
            start_stop_button.text = "開始"
            start_stop_button.icon = ft.Icons.PLAY_ARROW
            start_stop_button.bgcolor = "#4CAF50"
            page.update()
            timer_running = False

    def reset_timer(e):
        nonlocal timer_running, current_seconds, is_work_mode
        if timer_running:
            start_stop_button.text = "開始"
            start_stop_button.icon = ft.Icons.PLAY_ARROW
            start_stop_button.bgcolor = "#4CAF50"
            page.update()
        timer_running = False
        is_work_mode = True
        current_seconds = int(work_time_slider.value * 60)
        update_timer_display()

    def toggle_mode(e):
        nonlocal is_work_mode, current_seconds, timer_running
        if timer_running:
            start_stop_button.text = "開始"
            start_stop_button.icon = ft.Icons.PLAY_ARROW
            start_stop_button.bgcolor = "#4CAF50"
            page.update()
        timer_running = False
        is_work_mode = not is_work_mode
        if is_work_mode:
            current_seconds = int(work_time_slider.value * 60)
            mode_text.value = "作業モード"
            timer_text.color = "#FF4F4F"
            progress_ring.color = "#FF4F4F"
        else:
            current_seconds = int(break_time_slider.value * 60)
            mode_text.value = "休憩モード"
            timer_text.color = "#4FB0FF"
            progress_ring.color = "#4FB0FF"
        update_timer_display()

    def change_work_time(e):
        nonlocal current_seconds
        if is_work_mode and not timer_running:
            mins = int(e.control.value)
            current_seconds = mins * 60
            update_timer_display()

    def change_break_time(e):
        nonlocal current_seconds
        if not is_work_mode and not timer_running:
            mins = int(e.control.value)
            current_seconds = mins * 60
            update_timer_display()

    work_time_slider.on_change = change_work_time
    break_time_slider.on_change = change_break_time

    start_stop_button.on_click = toggle_timer
    reset_button.on_click = reset_timer
    mode_button.on_click = toggle_mode

    # --- タブ構築 ---
    # タイマータブの内容
    timer_tab_content = ft.Column(
        controls=[
            ft.Row(
                controls=[mode_text],
                alignment=ft.MainAxisAlignment.CENTER,
            ),
            ft.Container(
                content=ft.Stack(
                    controls=[
                        progress_ring,
                        ft.Container(content=timer_text, alignment=ft.alignment.center),
                    ]
                ),
                alignment=ft.alignment.center,
                margin=ft.margin.only(top=20, bottom=20),
            ),
            session_text,
            ft.Row(
                controls=[reset_button, start_stop_button, mode_button],
                alignment=ft.MainAxisAlignment.CENTER,
                spacing=20,
            ),
        ],
        horizontal_alignment=ft.CrossAxisAlignment.CENTER,
        spacing=20,  # 間隔を広めにして余裕を確保
    )

    # 設定タブの内容
    settings_tab_content = settings_content

    # タイマータブの内容を Container でラップする
    timer_tab_wrapped = ft.Container(
        content=timer_tab_content,
        margin=ft.margin.only(left=20, right=20, top=20, bottom=20)  # 左右・上下に余白を指定
    )

    # タブ本体を作成(ラップしたコンテンツを利用)
    tabs = ft.Tabs(
        selected_index=0,
        tabs=[
            ft.Tab(text="タイマー", content=timer_tab_wrapped),
            ft.Tab(text="設定", content=settings_tab_content),
        ]
    )

    page.add(tabs)
    update_timer_display()

ft.app(target=main)
コードの詳細解説
1. アプリケーションの基本構造
このポモドーロタイマーは以下のようなシンプルな構造で設計されています:
- メインページの設定: ダークモードのUIとスクロール機能対応
- 状態管理変数: タイマーの状態、モード、残り時間などを管理
- UI要素の定義: タイマー表示、プログレスリング、操作ボタンなど
- 機能の実装: タイマー制御、モード切替、設定変更などのロジック
- タブインターフェース: タイマーと設定画面の切り替え機能
2. プログレスリングによる視覚的フィードバック
progress_ring = ft.ProgressRing(
    width=300,
    height=300,
    stroke_width=20,
    color="#FF4F4F",  # 作業モード時は赤系の色
    bgcolor="#333333",
    value=1,
)
プログレスリングは残り時間をビジュアル的に表示する重要な要素です。作業モードではレッドカラー(#FF4F4F)、休憩モードではブルーカラー(#4FB0FF)に変わり、直感的にモードの切り替えを把握できます。
3. マルチスレッドによるタイマー制御
def toggle_timer(e):
    nonlocal timer_running
    if not timer_running:
        # タイマー開始
        start_stop_button.text = "一時停止"
        start_stop_button.icon = ft.Icons.PAUSE
        start_stop_button.bgcolor = "#FFA726"
        page.update()
        timer_running = True
        thread = Thread(target=run_timer)
        thread.daemon = True
        thread.start()
    else:
        # タイマー停止
        start_stop_button.text = "開始"
        start_stop_button.icon = ft.Icons.PLAY_ARROW
        start_stop_button.bgcolor = "#4CAF50"
        page.update()
        timer_running = False
タイマー処理はメインスレッドをブロックしないよう別スレッドで実行されます。Threadクラスを使ってタイマー機能を実装し、daemon=Trueに設定することで、アプリケーションが終了するときに確実にスレッドも終了するようにしています。
4. モード切替機能
def toggle_mode(e):
    nonlocal is_work_mode, current_seconds, timer_running
    if timer_running:
        start_stop_button.text = "開始"
        start_stop_button.icon = ft.Icons.PLAY_ARROW
        start_stop_button.bgcolor = "#4CAF50"
        page.update()
    timer_running = False
    is_work_mode = not is_work_mode
    if is_work_mode:
        current_seconds = int(work_time_slider.value * 60)
        mode_text.value = "作業モード"
        timer_text.color = "#FF4F4F"
        progress_ring.color = "#FF4F4F"
    else:
        current_seconds = int(break_time_slider.value * 60)
        mode_text.value = "休憩モード"
        timer_text.color = "#4FB0FF"
        progress_ring.color = "#4FB0FF"
    update_timer_display()
作業モードと休憩モードを手動で切り替える機能です。モードに応じて色とテキストが変わり、スライダーで設定された時間に更新されます。
5. タブインターフェース
tabs = ft.Tabs(
    selected_index=0,
    tabs=[
        ft.Tab(text="タイマー", content=timer_tab_wrapped),
        ft.Tab(text="設定", content=settings_tab_content),
    ]
)
タブを使用することで、タイマー画面と設定画面を分離し、シンプルで使いやすいインターフェースを実現しています。ユーザーは簡単にタイマー操作と設定の切り替えができます。
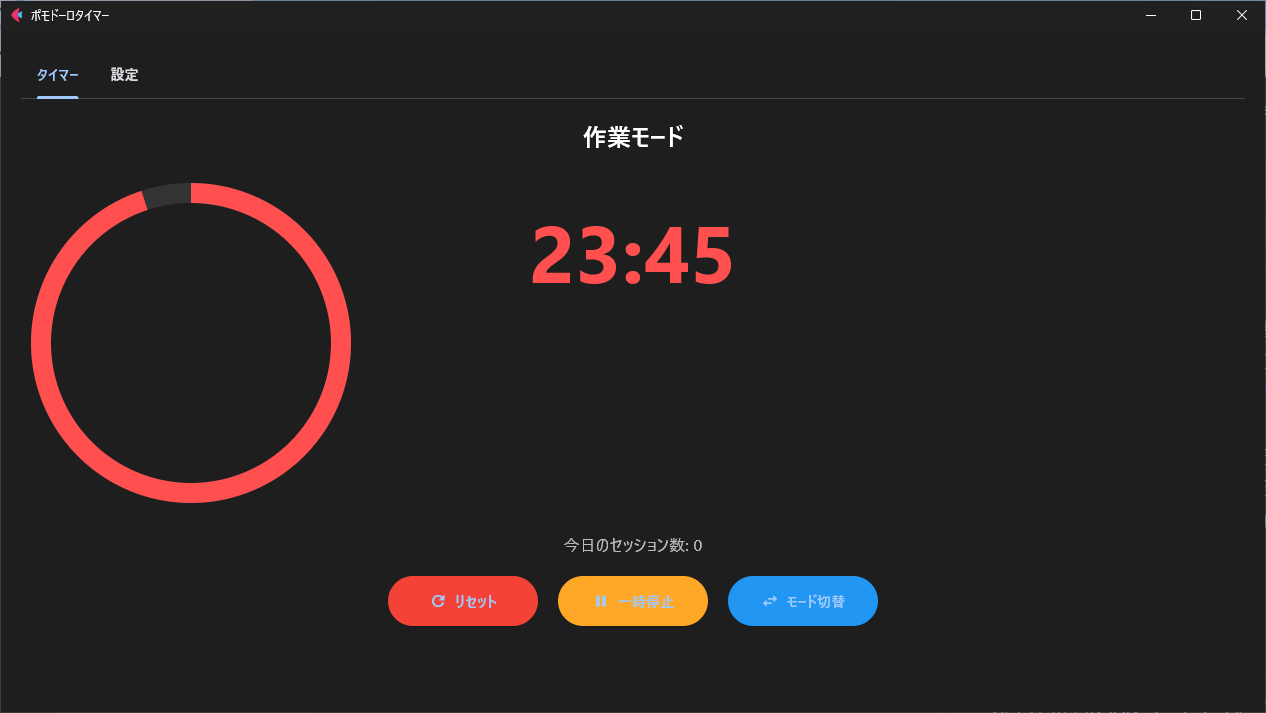
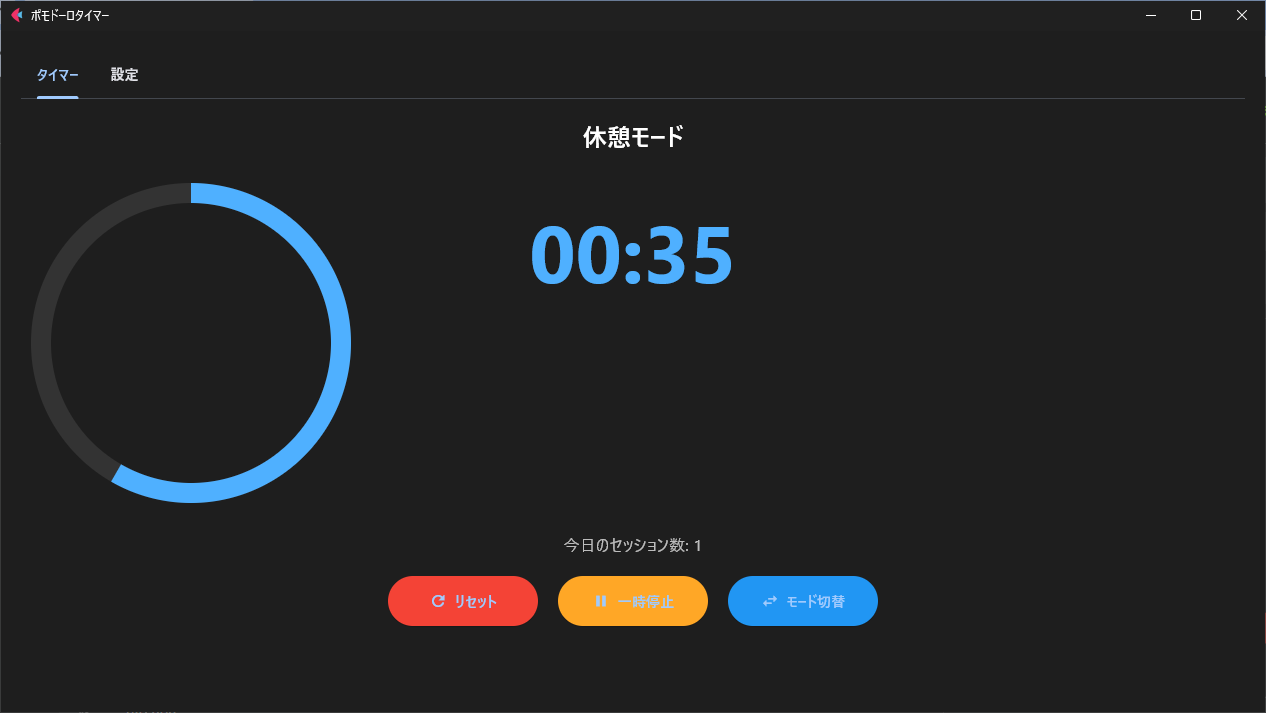
アプリケーションの使い方
このポモドーロタイマーアプリケーションは、以下のように使用できます:
- アプリを起動すると、初期状態では25分の作業モードがセットされています
- 「タイマー」タブと「設定」タブを切り替えて操作できます
- 「開始」ボタンをクリックするとタイマーが開始します
- タイマー実行中は「一時停止」ボタンでタイマーを停止できます
- 「リセット」ボタンを押すと、作業モードの初期状態に戻ります
- 「モード切替」ボタンで作業モードと休憩モードを手動で切り替えることもできます
- 「設定」タブでは、作業時間(1分〜60分)と休憩時間(1分〜30分)を調整できます
- タイマーが0になると自動的にモードが切り替わり、通知が表示されます
- セッション数は画面上部に表示され、作業セッションを完了するたびにカウントアップします
Fletフレームワークの特徴とメリット
Fletを使ったアプリケーション開発の主なメリットは以下の通りです:
- 学習コストの低さ: Pythonのみの知識でマルチプラットフォームアプリが開発できます
-
リアクティブな状態管理:
page.update()メソッドを呼び出すだけで画面が更新されます - 豊富なUIコンポーネント: プログレスリング、スライダー、タブなど様々なコンポーネントが用意されています
-
レスポンシブ対応:
ft.ScrollMode.AUTOの設定により、画面サイズに応じたスクロール機能が自動的に有効になります - スタイリングのしやすさ: 色やサイズ、マージンなどの設定が直感的で簡単です
特にPythonはデータサイエンス、機械学習、自動化スクリプトなどで広く使われているため、FletはそうしたPythonユーザーがGUIアプリケーションを簡単に作成できる優れた選択肢となっています。
まとめと今後の展望

Fletフレームワークを使用したポモドーロタイマーアプリは、シンプルながらも効果的な時間管理ツールです。マルチスレッド処理とリアクティブなUIにより、快適な使用感を実現しています。
今後の展望として、以下のような機能を追加することも考えられます:(時間あれば・・・)
- 長い休憩(15分)の実装(4セッションごとなど)
- タスクリストの追加機能
- 統計機能(1日のセッション数のグラフ表示など)
- カスタムサウンドや通知設定
- データの永続化(セッション履歴の保存など)
- ショートカットキーの実装
- テーマカスタマイズ(ライトモード/ダークモード切替など)
Fletは比較的新しいフレームワークですが、その直感的なAPIとクロスプラットフォーム対応により、Pythonでのアプリケーション開発の新しい選択肢として注目されています。ぜひこのコードを参考に、自分だけのカスタムアプリケーションを作成してみてください!
実行方法
このアプリケーションを実行するには、以下のパッケージをインストールする必要があります:
pip install flet
その後、上記のコードをpomodoro_timer.pyとして保存し、以下のコマンドで実行します:
python pomodoro_timer.py
お役に立てば幸いです!
参考リンク
免責事項
本記事の作成にあたり、文章や図解の生成にClaude Sonnetを活用しました。最終的な編集と確認は筆者が行っています。