はじめに
SVGを使用してインタラクティブなキャラクターを作成する実装方法を解説します。マウスインタラクションによる感情表現や、自然な目の動きの実装など、キャラクターをより生き生きとさせるテクニックを紹介します。
実装のポイント
- SVGの基本構造設計
- 感情表現の実装(喜怒哀楽)
- インタラクティブな目の動きの制御
- アニメーションとトランジション
- イベントハンドリング
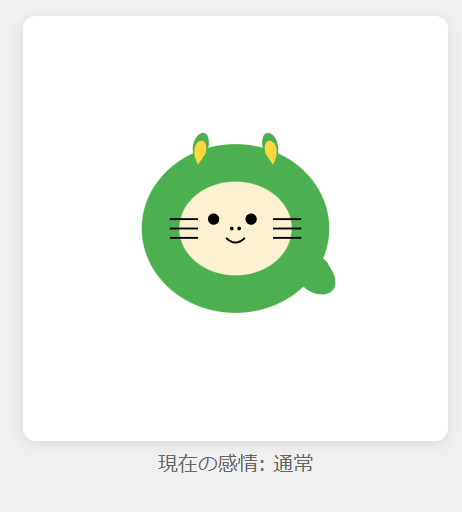
完成イメージ


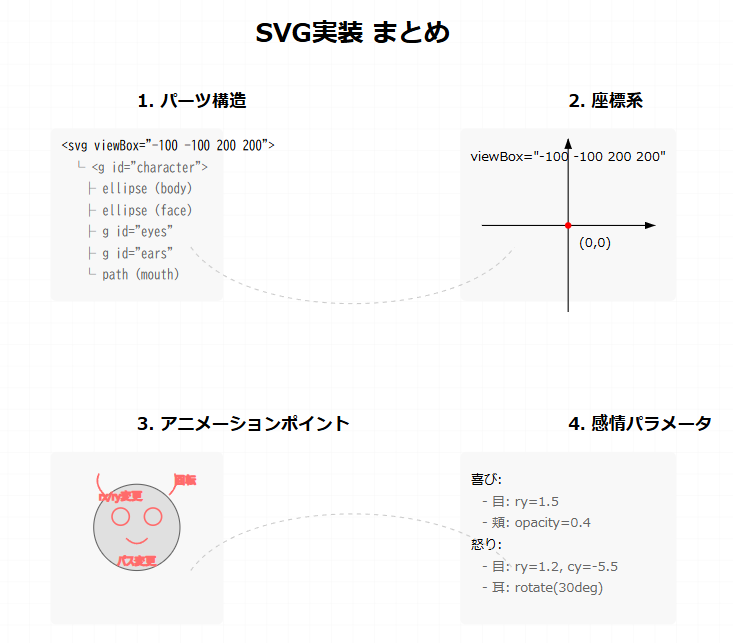
1. 基本構造の設計
1.1 SVGの基本構造
<svg viewBox="-100 -100 200 200" xmlns="http://www.w3.org/2000/svg">
    <!-- インタラクションエリア -->
    <rect id="interaction-area" x="-100" y="-100" width="200" height="200" fill="transparent" />

    <g id="character">
        <!-- 本体(楕円) -->
        <ellipse cx="0" cy="0" rx="50" ry="45" fill="#4CAF50" />
        <!-- 顔部分 -->
        <ellipse cx="0" cy="0" rx="30" ry="25" fill="#FDF1D2" />

        <!-- 目 -->
        <g id="eyes">
            <ellipse class="eye" id="leftEye" cx="-10" cy="-5" rx="3" ry="3" fill="#000" />
            <ellipse class="eye" id="rightEye" cx="10" cy="-5" rx="3" ry="3" fill="#000" />
        </g>

        <!-- その他のパーツ -->
    </g>
</svg>
1.2 パーツの配置とグループ化
- 中心を原点(0,0)として配置
- 関連するパーツをグループ化
- クラスとIDを適切に付与
2. 感情表現の実装
2.1 状態管理
const states = {
    NORMAL: 'normal',
    HAPPY: 'happy',
    SAD: 'sad',
    ANGRY: 'angry'
};

let currentState = states.NORMAL;
2.2 感情切り替えの実装
function setEmotion(emotion) {
    switch(emotion) {
        case states.HAPPY:
            mouth.setAttribute('d', 'M -8 5 Q 0 15 8 5');
            // 目を細める(笑顔)
            eyes.forEach(eye => {
                eye.setAttribute('rx', '3');
                eye.setAttribute('ry', '1.5');  // 横長の目
            });
            cheeks.forEach(cheek => cheek.setAttribute('opacity', '0.4'));
            break;

        case states.SAD:
            mouth.setAttribute('d', 'M -8 8 Q 0 0 8 8');
            // 目を丸く大きく
            eyes.forEach(eye => {
                eye.setAttribute('rx', '3');
                eye.setAttribute('ry', '3.5');  // やや縦長の目
                eye.setAttribute('cy', '-4');  // 目を少し上げる
            });
            // 耳を下げる
            ears.forEach(ear => {
                const isLeft = ear.id === 'leftEar';
                ear.style.transform = 'rotate(-20deg)';
                ear.style.transformOrigin = isLeft ? '-20px -32px' : '20px -32px';
            });
            break;

        case states.ANGRY:
            // 怒り表現の実装
            // ...省略
    }
}
3. インタラクティブな目の動きの実装
3.1 マウス追従による目の動き
interactionArea.addEventListener('mousemove', (e) => {
    if (!e.target || !eyes.length) return;

    const rect = e.target.getBoundingClientRect();
    const x = e.clientX - rect.left;
    const y = e.clientY - rect.top;

    // SVG座標系に変換
    const svgX = (x / rect.width) * 200 - 100;
    const svgY = (y / rect.height) * 200 - 100;

    // 目の移動範囲を制限
    const maxEyeMove = 2;

    // 各目の動きを計算
    eyes.forEach((eye) => {
        const baseX = eye.id === 'leftEye' ? -10 : 10;
        const centerX = baseX;
        const centerY = -5;

        // カーソルと目の中心との角度を計算
        const dx = svgX - centerX;
        const dy = svgY - centerY;
        const angle = Math.atan2(dy, dx);

        // 移動量を計算(距離が遠いほど目が大きく動く)
        const distance = Math.min(Math.hypot(dx, dy) / 30, 1);
        const moveX = Math.cos(angle) * maxEyeMove * distance;
        const moveY = Math.sin(angle) * maxEyeMove * distance;

        // 目の位置を更新
        eye.setAttribute('cx', (centerX + moveX).toString());
        eye.setAttribute('cy', (centerY + moveY).toString());
    });
});
3.2 まばたきアニメーション
function blink() {
    eyes.forEach(eye => {
        const currentRy = parseFloat(eye.getAttribute('ry'));
        eye.setAttribute('ry', '0.1');
        setTimeout(() => eye.setAttribute('ry', currentRy.toString()), 100);
    });
}

// 定期的なまばたき
setInterval(blink, 3000);
4. イベントハンドラの実装
4.1 マウスイベントの設定
// ホバー時
interactionArea.addEventListener('mouseenter', () => {
    if (!isPressed) setEmotion(states.HAPPY);
});

// 右クリック時
interactionArea.addEventListener('mousedown', (e) => {
    if (e.button === 2) {
        setEmotion(states.SAD);
    }
});

// 左クリック時
interactionArea.addEventListener('mousedown', (e) => {
    if (e.button === 0) {
        isPressed = true;
        setEmotion(states.ANGRY);
    }
});
4.2 タッチデバイス対応
interactionArea.addEventListener('touchstart', (e) => {
    e.preventDefault();
    isPressed = true;
    setEmotion(states.ANGRY);
});

interactionArea.addEventListener('touchend', (e) => {
    e.preventDefault();
    isPressed = false;
    setEmotion(states.HAPPY);
    setTimeout(() => {
        if (!isPressed) setEmotion(states.NORMAL);
    }, 1000);
});
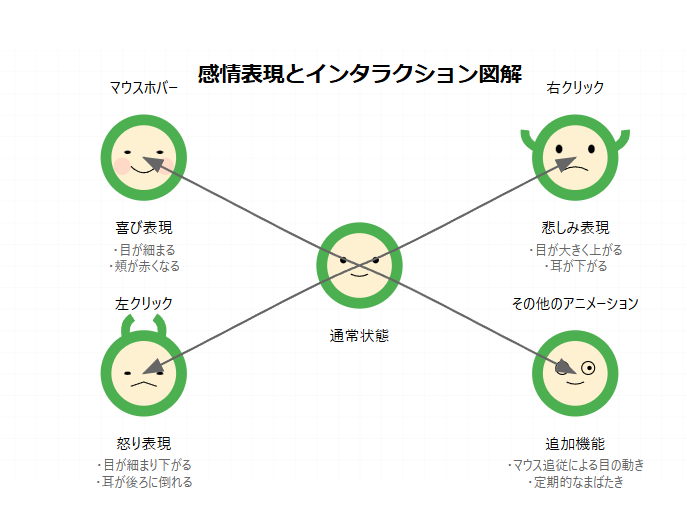
インタラクションと感情表現の対応
| インタラクション | 感情表現 | 目の変化 | その他の変化 |
|---|---|---|---|
| マウスホバー | 喜び | 横長(ry: 1.5) | 頬が赤くなる |
| 左クリック | 怒り | 細め(ry: 1.2)、下向き | 耳が後ろに倒れる |
| 右クリック | 悲しみ | 大きく(ry: 3.5)、上向き | 耳が下がる |
| 通常時 | 通常 | 丸い(rx=ry: 3) | - |
まとめ
SVGとJavaScriptを組み合わせることで、豊かな感情表現とインタラクションを持つキャラクターを実装できます。特に以下の点がポイントとなります:
- SVG要素の適切な構造化
- 感情に応じた目の形状制御
- 自然な目の追従動作
- スムーズなアニメーション処理
発展的な実装案
- 音声効果の追加
- より複雑なアニメーションパターン
- 状態遷移のスムーズな補間
- 物理演算を用いた動き
参考資料
- SVG 1.1仕様: https://www.w3.org/TR/SVG11/
- MDN SVGドキュメント: https://developer.mozilla.org/ja/docs/Web/SVG