はじめに
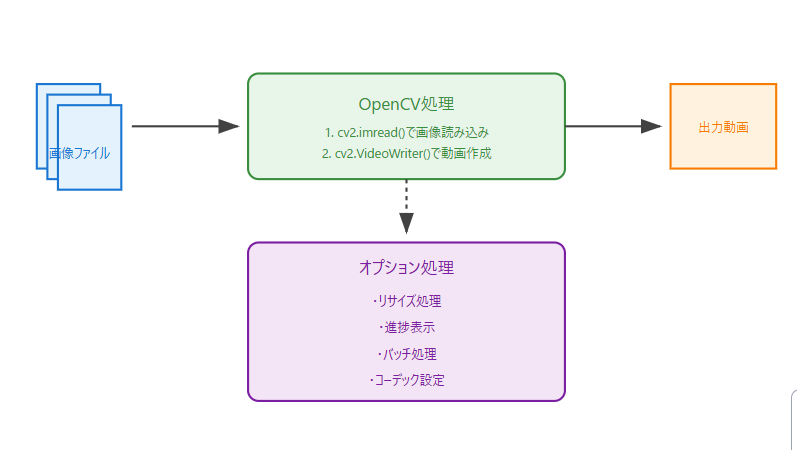
複数の静止画から動画を作成したいケースは多いと思います。この記事では、OpenCVを使用して静止画から動画を作成する方法を解説します。シンプルで高速な処理が可能なため、大量の画像を扱う場合に特に有効です。
環境準備
必要なライブラリをインストールします:
pip install opencv-python
pip install tqdm  # 進捗表示用(オプション)
基本的な実装

1. シンプルな動画作成
import cv2
import glob
import os

def create_video(image_folder, output_path, fps=30):
    # 画像ファイルの取得(.jpg, .png対応)
    images = []
    for ext in ('*.jpg', '*.png'):
        images.extend(glob.glob(os.path.join(image_folder, ext)))
    images = sorted(images)

    if not images:
        print("画像が見つかりません")
        return

    # 最初の画像から動画サイズを取得
    frame = cv2.imread(images[0])
    height, width, layers = frame.shape

    # 動画ファイルの設定
    fourcc = cv2.VideoWriter_fourcc(*'mp4v')
    video = cv2.VideoWriter(output_path, fourcc, fps, (width, height))

    # 各画像を動画に追加
    for image in images:
        frame = cv2.imread(image)
        video.write(frame)

    video.release()
    print(f"動画を保存しました: {output_path}")
2. 進捗表示付きの実装
from tqdm import tqdm

def create_video_with_progress(image_folder, output_path, fps=30):
    images = sorted(glob.glob(os.path.join(image_folder, '*.jpg')))

    if not images:
        print("画像が見つかりません")
        return

    frame = cv2.imread(images[0])
    height, width, layers = frame.shape

    fourcc = cv2.VideoWriter_fourcc(*'mp4v')
    video = cv2.VideoWriter(output_path, fourcc, fps, (width, height))

    for image in tqdm(images, desc="動画作成中"):
        frame = cv2.imread(image)
        video.write(frame)

    video.release()
3. リサイズ機能付きの実装
import numpy as np

def resize_frame(frame, target_size=(1920, 1080)):
    """アスペクト比を保持しながらリサイズ"""
    h, w = frame.shape[:2]
    aspect = w / h

    if aspect > target_size[0] / target_size[1]:
        # 幅に合わせてリサイズ
        new_w = target_size[0]
        new_h = int(new_w / aspect)
    else:
        # 高さに合わせてリサイズ
        new_h = target_size[1]
        new_w = int(new_h * aspect)

    resized = cv2.resize(frame, (new_w, new_h))

    # 黒背景に中央配置
    result = np.zeros((target_size[1], target_size[0], 3), dtype=np.uint8)
    y_offset = (target_size[1] - new_h) // 2
    x_offset = (target_size[0] - new_w) // 2
    result[y_offset:y_offset+new_h, x_offset:x_offset+new_w] = resized

    return result

def create_video_with_resize(image_folder, output_path, target_size=(1920, 1080), fps=30):
    images = sorted(glob.glob(os.path.join(image_folder, '*.jpg')))

    if not images:
        print("画像が見つかりません")
        return

    fourcc = cv2.VideoWriter_fourcc(*'mp4v')
    video = cv2.VideoWriter(output_path, fourcc, fps, target_size)

    for image in tqdm(images, desc="動画作成中"):
        frame = cv2.imread(image)
        if frame is None:
            print(f"警告: {image} を読み込めませんでした")
            continue

        resized_frame = resize_frame(frame, target_size)
        video.write(resized_frame)

    video.release()
    print(f"動画を保存しました: {output_path}")
使用例
# 基本的な使用方法
create_video("images", "output.mp4")

# リサイズ機能付きで使用(フルHD)
create_video_with_resize("images", "output_hd.mp4", target_size=(1920, 1080))

# 進捗表示付きで使用
create_video_with_progress("images", "output_with_progress.mp4")
トラブルシューティング
1. 生成された動画が再生できない場合
コーデックを変更することで解決できる場合があります:
# H264コーデックを使用
fourcc = cv2.VideoWriter_fourcc(*'avc1')  # または 'H264'
2. メモリエラーが発生する場合
バッチ処理を導入してメモリ使用量を抑えることができます:
def create_video_memory_efficient(image_folder, output_path, batch_size=10):
    images = sorted(glob.glob(os.path.join(image_folder, '*.jpg')))

    frame = cv2.imread(images[0])
    height, width, layers = frame.shape

    fourcc = cv2.VideoWriter_fourcc(*'mp4v')
    video = cv2.VideoWriter(output_path, fourcc, 30, (width, height))

    # バッチ処理でメモリ使用量を抑える
    for i in range(0, len(images), batch_size):
        batch = images[i:i+batch_size]
        for image in batch:
            frame = cv2.imread(image)
            video.write(frame)

    video.release()
3. よくある問題と解決策
-
画像の読み込みエラー
- 画像パスに日本語が含まれていないか確認
- ファイルのパーミッションを確認
- 対応していない画像形式でないか確認
-
出力動画のサイズが大きすぎる
- fpsを調整(30→24など)
- リサイズ機能を使用して解像度を下げる
- 圧縮率の高いコーデックを使用
-
処理が遅い場合
- バッチサイズを調整
- 画像を事前にリサイズ
- マルチプロセス処理の導入を検討
まとめ
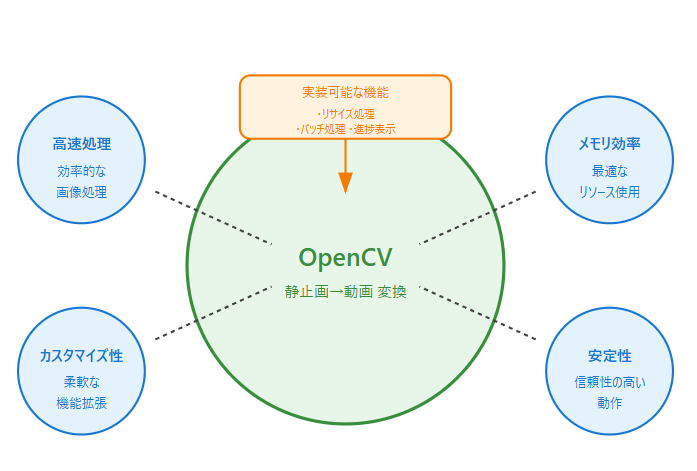
OpenCVを使用することで、以下のような利点があります:
- シンプルなコードで動画作成が可能
- 処理が高速
- メモリ効率が良い
- カスタマイズ性が高い
参考リンク
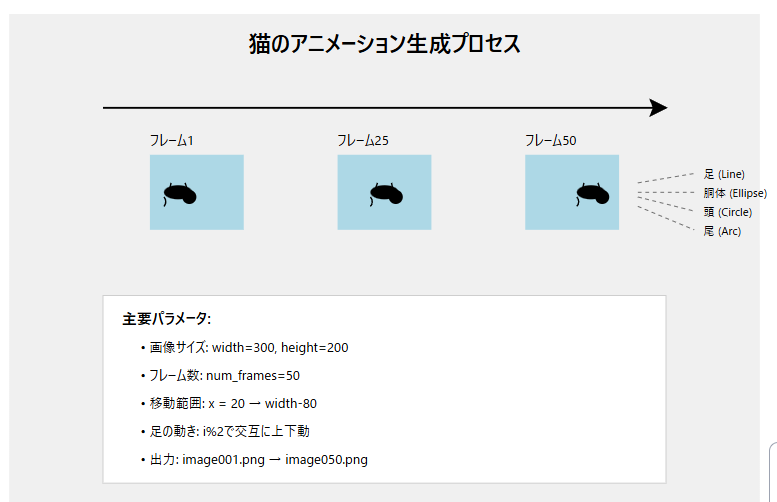
参考: 静止画像を生成するプログラム
import numpy as np
import matplotlib.pyplot as plt
import matplotlib.patches as patches
from PIL import Image

# 画像サイズ
width, height = 300, 200
num_frames = 50  # フレーム数

# 猫の移動範囲(横方向)
x_positions = np.linspace(20, width - 80, num_frames)

# 画像を保存するリスト
image_files = []

# 画像を生成
for i in range(num_frames):
    fig, ax = plt.subplots(figsize=(width / 50, height / 50), dpi=50)
    ax.set_xlim(0, width)
    ax.set_ylim(0, height)
    ax.set_xticks([])
    ax.set_yticks([])
    ax.axis("off")

    # 背景色
    ax.set_facecolor("lightblue")

    # 猫の胴体
    body = patches.Ellipse((x_positions[i], 100), 60, 30, color="black")
    ax.add_patch(body)

    # 頭
    head = patches.Circle((x_positions[i] + 35, 110), 15, color="black")
    ax.add_patch(head)

    # 足(交互に動かす)
    leg1_y = 85 if i % 2 == 0 else 75
    leg2_y = 75 if i % 2 == 0 else 85
    ax.plot([x_positions[i] - 20, x_positions[i] - 15], [leg1_y, 60], color="black", linewidth=3)
    ax.plot([x_positions[i] + 20, x_positions[i] + 15], [leg2_y, 60], color="black", linewidth=3)

    # 尾
    tail = patches.Arc((x_positions[i] - 30, 110), 30, 30, angle=0, theta1=30, theta2=150, color="black", linewidth=3)
    ax.add_patch(tail)

    # 画像を保存
    filename = f"image{i+1:03d}.png"
    plt.savefig(filename, bbox_inches='tight', pad_inches=0.1)
    plt.close(fig)
    image_files.append(filename)

# 生成した画像を確認
image_files[:5]  # 最初の5枚を表示