はじめに

アプリケーションの信頼性を向上させる
OpenAIの新機能「Structured Outputs」を実際に触ってみた備忘録です。この機能は、LLMの出力を指定したJSONスキーマに厳密に従わせることができるため、安定したアプリケーション開発に非常に役立ちます。
「こんな感じのJSONで返してね」というプロンプトを書く必要はほぼなくなります。スキーマを定義することで、指定した構造に従った応答を得られる信頼性が大幅に向上します。
Structured Outputsとは?

Structured Outputsは、モデルが指定されたJSONスキーマに従った応答を生成する信頼性を大幅に高める機能です。従来のJSON modeの進化版と考えるとわかりやすいでしょう。
JSON modeとの違い
| 機能 | Structured Outputs | JSON Mode |
|---|---|---|
| 有効なJSONを出力 | ✅ | ✅ |
| スキーマに準拠 | ✅ | ❌ |
| 対応モデル | gpt-4o-mini, gpt-4o-2024-08-06以降 | gpt-3.5-turbo, gpt-4-* and gpt-4o-* models |
従来のJSON modeでは「JSONとして有効な出力」を保証するだけで、特定のスキーマに準拠することは保証されませんでした。Structured Outputsでは、必要なフィールドが必ず含まれ、余計なフィールドが含まれないことが保証されます。
新しいResponses APIを使ってみる
最近リリースされた「Responses API」を使うと、Structured Outputsをよりシンプルに扱えます。早速試してみましょう。
環境準備
Google Colabで試す場合は以下のようなセットアップが必要です:
# パッケージのインストール
!pip install -U openai openai-agents

# 環境変数の準備 (左端の鍵アイコンでOPENAI_API_KEYを設定)
import os
from google.colab import userdata
os.environ["OPENAI_API_KEY"] = userdata.get("OPENAI_API_KEY")

# クライアントの準備
from openai import OpenAI
client = OpenAI()
カレーコメント分析の実装例
例として、SNSのカレーに関するコメントを分析し、情報をグラフ構造に格納するアプリケーションを考えてみます。
実装コード
まず、簡易的なグラフ構造クラスを実装します:
class SimpleGraph:
    def __init__(self):
        self.nodes = {}
        self.edges = {}

    def add_node(self, node_id, node_type, properties=None):
        if properties is None:
            properties = {}
        self.nodes[node_id] = {
            "type": node_type,
            "properties": properties
        }
        print(f"ノード追加: {node_id} ({node_type})")

    def add_edge(self, source_id, target_id, edge_type, properties=None):
        if properties is None:
            properties = {}
        edge_id = f"{source_id}_{target_id}_{edge_type}"
        self.edges[edge_id] = {
            "source": source_id,
            "target": target_id,
            "type": edge_type,
            "properties": properties
        }
        print(f"エッジ追加: {source_id} --[{edge_type}]--> {target_id}")

    def display(self):
        print("\n=== ノード ===")
        for node_id, node_data in self.nodes.items():
            print(f"{node_id} ({node_data['type']}): {node_data['properties']}")

        print("\n=== エッジ ===")
        for edge_id, edge_data in self.edges.items():
            print(f"{edge_data['source']} --[{edge_data['type']}]--> {edge_data['target']}: {edge_data['properties']}")
次に、カレーコメント分析クラスを実装します:
class CurryCommentAnalyzer:
    def __init__(self):
        from openai import OpenAI
        self.client = OpenAI()
        self.graph = SimpleGraph()  # 簡易的なグラフ構造

    def add_comment(self, user: str, comment: str):
        import json

        # スキーマの準備
        schema = {
            "format": {
                "type": "json_schema",
                "name": "curry_analysis",
                "schema": {
                    "type": "object",
                    "properties": {
                        "restaurant": {"type": "string"},
                        "menu_item": {"type": "string"},
                        "ingredients": {
                            "type": "array",
                            "items": {"type": "string"}
                        },
                        "sentiment": {
                            "type": "string",
                            "enum": ["ポジティブ", "ネガティブ", "中立"]
                        },
                        "rating": {"type": ["number", "null"]}
                    },
                    "required": ["restaurant", "menu_item", "ingredients", "sentiment", "rating"],
                    "additionalProperties": False
                },
                "strict": True
            }
        }

        # 入力メッセージの準備
        messages = [
            {"role": "developer", "content": """
            カレーに関する情報を抽出します。
            抽出する情報:
            1. 言及されているレストラン名
            2. 新しいメニュー項目
            3. 使用されている材料
            4. コメントの感情(ポジティブ/ネガティブ/中立)
            5. 評価(もし明示されていれば、なければnull)
            """},
            {"role": "user", "content": f"ユーザー: {user}\nコメント: {comment}"}
        ]

        try:
            # Responses APIを使用した推論の実行
            response = self.client.responses.create(
                model="gpt-4o",
                input=messages,
                text=schema
            )

            # JSONとして解析
            analysis = json.loads(response.output_text)

            # グラフへの追加処理
            if analysis['restaurant']:
                self.graph.add_node(analysis['restaurant'], "Restaurant", {"name": analysis['restaurant']})
                self.graph.add_edge(user, analysis['restaurant'], "COMMENTED_ON", {
                    "sentiment": analysis.get('sentiment', ''),
                    "rating": analysis.get('rating', '')
                })

            if analysis['menu_item']:
                self.graph.add_node(analysis['menu_item'], "MenuItem", {"name": analysis['menu_item']})
                if analysis['restaurant']:
                    self.graph.add_edge(analysis['restaurant'], analysis['menu_item'], "HAS_MENU_ITEM")

            if analysis['ingredients']:
                for ingredient in analysis['ingredients']:
                    self.graph.add_node(ingredient, "Ingredient", {"name": ingredient})
                    if analysis['menu_item']:
                        self.graph.add_edge(analysis['menu_item'], ingredient, "CONTAINS")

            print(f"コメントを分析し、グラフに追加しました: {analysis}")
            return analysis

        except Exception as e:
            print(f"Error: {e}")
            return None
使用例
# 実行例
analyzer = CurryCommentAnalyzer()

# テストケース
test_cases = [
    {
        "user": "田中",
        "comment": "昨日カレーハウスAで食べたビーフカレーが美味しかった!特に玉ねぎとニンジンがたっぷり入っていて、スパイスも効いていた。★★★★☆の4点あげたい!"
    },
    {
        "user": "佐藤",
        "comment": "スパイスキングのチキンカレーは辛すぎて食べられなかった。ターメリックとチリパウダーの味が強すぎる。次は選ばないかな..."
    }
]

# テスト実行
for case in test_cases:
    analyzer.add_comment(case['user'], case['comment'])

# グラフの表示
analyzer.graph.display()
実行結果
以下のような出力が得られます:
ノード追加: カレーハウスA (Restaurant)
エッジ追加: 田中 --[COMMENTED_ON]--> カレーハウスA
ノード追加: ビーフカレー (MenuItem)
エッジ追加: カレーハウスA --[HAS_MENU_ITEM]--> ビーフカレー
ノード追加: 玉ねぎ (Ingredient)
エッジ追加: ビーフカレー --[CONTAINS]--> 玉ねぎ
ノード追加: ニンジン (Ingredient)
エッジ追加: ビーフカレー --[CONTAINS]--> ニンジン
ノード追加: スパイス (Ingredient)
エッジ追加: ビーフカレー --[CONTAINS]--> スパイス
コメントを分析し、グラフに追加しました: {'restaurant': 'カレーハウスA', 'menu_item': 'ビーフカレー', 'ingredients': ['玉ねぎ', 'ニンジン', 'スパイス'], 'sentiment': 'ポジティブ', 'rating': 4}
ノード追加: スパイスキング (Restaurant)
エッジ追加: 佐藤 --[COMMENTED_ON]--> スパイスキング
ノード追加: チキンカレー (MenuItem)
エッジ追加: スパイスキング --[HAS_MENU_ITEM]--> チキンカレー
ノード追加: ターメリック (Ingredient)
エッジ追加: チキンカレー --[CONTAINS]--> ターメリック
ノード追加: チリパウダー (Ingredient)
エッジ追加: チキンカレー --[CONTAINS]--> チリパウダー
コメントを分析し、グラフに追加しました: {'restaurant': 'スパイスキング', 'menu_item': 'チキンカレー', 'ingredients': ['ターメリック', 'チリパウダー'], 'sentiment': 'ネガティブ', 'rating': None}
ポイント解説
1. スキーマの定義
Structured Outputsの核となるのはスキーマ定義です。
schema = {
    "format": {
        "type": "json_schema",
        "name": "curry_analysis",  # スキーマの名前(任意)
        "schema": {
            "type": "object",
            "properties": {
                # プロパティの定義
                "restaurant": {"type": "string"},
                "menu_item": {"type": "string"},
                "ingredients": {
                    "type": "array",
                    "items": {"type": "string"}
                },
                "sentiment": {
                    "type": "string",
                    "enum": ["ポジティブ", "ネガティブ", "中立"]  # 列挙型の指定も可能
                },
                "rating": {"type": ["number", "null"]}  # 複数の型を許容
            },
            "required": ["restaurant", "menu_item", "ingredients", "sentiment", "rating"],  # 必須フィールド
            "additionalProperties": False  # 追加のプロパティを許可しない
        },
        "strict": True  # 厳密モードを有効化
    }
}
ここで重要なのは:
-
required:必須フィールドの指定 -
additionalProperties: false:追加のプロパティを禁止 -
strict: true:厳密モードの有効化 -
enum:許容される値の列挙 -
type: ["number", "null"]:複数の型を許容する場合の記法
2. Responses APIの使用
response = self.client.responses.create(
    model="gpt-4o",
    input=messages,  # 入力メッセージのリスト
    text=schema      # スキーマ定義
)

# 結果はoutput_textから取得
analysis = json.loads(response.output_text)
従来のChat Completions APIとの主な違いは:
-
client.chat.completions.create()→client.responses.create() -
messages→input -
response_format→text -
response.choices[0].message.content→response.output_text
3. developerロールの活用
messages = [
    {"role": "developer", "content": "カレーに関する情報を抽出します..."},
    {"role": "user", "content": f"ユーザー: {user}\nコメント: {comment}"}
]
従来のAPIのsystemロールに相当するdeveloperロールが新しく導入されています。これにより、システム指示とユーザー入力の区別がより明確になります。
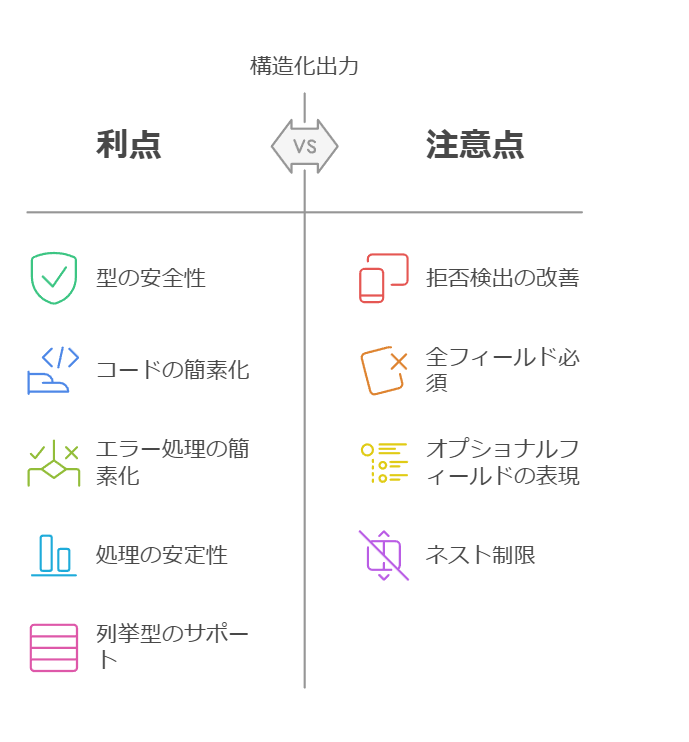
Structured Outputsの利点
- 型の安全性: スキーマ通りの応答が保証されるため、型チェックが不要になる
- コードの簡素化: 「JSONで返してね」といったプロンプトが不要
- エラー処理の簡素化: 不正なJSON形式を考慮する必要がない
- 処理の安定性: 常に同じ構造の出力が得られる
- 列挙型のサポート: 値の選択肢を制限できる
- 拒否検出の改善: 拒否応答も専用フィールドで検出可能
注意点
-
対応モデル: 現時点では
gpt-4o-mini、gpt-4o-2024-08-06以降のモデルでのみサポート -
全フィールド必須: スキーマ内のすべてのフィールドは
requiredとして指定する必要がある -
オプショナルフィールドの表現: オプショナルにしたい場合は
nullを許容する型として定義する - ネスト制限: オブジェクトは5レベルまでのネスト、100プロパティまで
従来のChat Completions APIとの比較
従来のAPIでの実装例と比較してみましょう:
# 従来のChat Completions API
response = client.chat.completions.create(
    model="gpt-4o",
    messages=[
        {"role": "system", "content": "カレーに関する情報を抽出します..."},
        {"role": "user", "content": f"ユーザー: {user}\nコメント: {comment}"}
    ],
    response_format={
        "type": "json_schema",
        "schema": {
            "type": "object",
            "properties": {
                # スキーマ定義
            },
            "required": ["restaurant", "menu_item", "ingredients", "sentiment", "rating"],
            "additionalProperties": False
        }
    }
)

analysis = json.loads(response.choices[0].message.content)
まとめ
Structured Outputsは、OpenAIのモデルを実際のアプリケーション開発で使用する際の信頼性を大幅に向上させる機能です。新しいResponses APIと組み合わせることで、より直感的かつ安定した実装が可能になります。
特に以下のようなケースで有用です:
- 構造化されたデータを抽出する場合
- データベースに格納するデータを生成する場合
- 特定のフォーマットを厳守する必要がある場合
- UIに表示するための一貫した構造が必要な場合
参考リンク
※本記事は2025年3月時点の情報に基づいています。API仕様は変更される可能性がありますので、最新の公式ドキュメントを参照してください。
過去記事
以前の記事では、プロンプトエンジニアリングで「JSON形式で回答してください」と指示してデータを抽出していました。本記事では、その手法をOpenAIの新機能「Structured Outputs」で置き換え、より型安全で一貫性のある実装方法を試してみました。


