はじめに
SVGは2次元のベクターグラフィックスを描画するための規格ですが、適切な技術を組み合わせることで、3Dライクな表現を実現することができます。この記事では、SVGを使って簡単な3D表現を実装する方法を紹介します。
1. シンプルな3Dボックスを作る
まずは一番基本的な3Dの表現として、立方体を作成してみましょう。
<svg xmlns="http://www.w3.org/2000/svg" width="200" height="200" viewBox="0 0 200 200">
    <!-- 上面 -->
    <path d="M50 50 L100 25 L150 50 L100 75 Z"
          fill="#e74c3c" stroke="#c0392b"/>

    <!-- 前面 -->
    <path d="M50 50 L50 100 L100 125 L100 75 Z"
          fill="#e67e22" stroke="#d35400"/>

    <!-- 右面 -->
    <path d="M100 75 L150 50 L150 100 L100 125 Z"
          fill="#f1c40f" stroke="#f39c12"/>
  </svg>
このコードのポイント:
- 3つの
path要素で立方体の面を表現 -
fillとstrokeで面と輪郭の色を指定 -
viewBoxで描画領域を適切に設定
2. SVGアニメーションを使う
SVGのネイティブアニメーション機能を使うこともできます。
<svg xmlns="http://www.w3.org/2000/svg" width="200" height="200" viewBox="0 0 200 200">
    <g>
      <!-- 上面 -->
      <path d="M50 50 L100 25 L150 50 L100 75 Z"
            fill="#e74c3c" stroke="#c0392b">
        <animateTransform
          attributeName="transform"
          type="rotate"
          from="0 100 75"
          to="360 100 75"
          dur="4s"
          repeatCount="indefinite"/>
      </path>

      <!-- 前面 -->
      <path d="M50 50 L50 100 L100 125 L100 75 Z"
            fill="#e67e22" stroke="#d35400">
        <animateTransform
          attributeName="transform"
          type="rotate"
          from="0 100 75"
          to="360 100 75"
          dur="4s"
          repeatCount="indefinite"/>
      </path>

      <!-- 右面 -->
      <path d="M100 75 L150 50 L150 100 L100 125 Z"
            fill="#f1c40f" stroke="#f39c12">
        <animateTransform
          attributeName="transform"
          type="rotate"
          from="0 100 75"
          to="360 100 75"
          dur="4s"
          repeatCount="indefinite"/>
      </path>
    </g>
</svg>
3. 3Dバーグラフを作る
実践的な例として、3Dバーグラフを作成してみましょう。
<!DOCTYPE html>
<html>
<head>
<title>3D Bar Graph</title>
<style>
.graph-container {
  margin: 50px auto;
  width: 400px;
}
</style>
</head>
<body>
  <div class="graph-container">
    <svg xmlns="http://www.w3.org/2000/svg" width="400" height="300" viewBox="0 0 400 300">
      <g transform="translate(50, 50)">
        <!-- 座標軸 -->
        <g stroke="black" stroke-width="1">
          <!-- Y軸 -->
          <line x1="0" y1="200" x2="0" y2="0"/>
          <!-- X軸 -->
          <line x1="0" y1="200" x2="200" y2="200"/>
          <!-- Z軸 -->
          <line x1="0" y1="200" x2="-50" y2="150"/>

          <!-- 軸ラベル -->
          <text x="-10" y="-10">Y</text>
          <text x="210" y="220">X</text>
          <text x="-60" y="140">Z</text>
        </g>

        <!-- 3D柱体 -->
        <g transform="skewY(-30)">
          <!-- データ1 -->
          <g transform="translate(20, 0)">
            <rect x="0" y="50" width="40" height="150"
                  fill="#3498db" opacity="0.8"/>
            <!-- 側面 -->
            <path d="M40 50 L50 45 L50 190 L40 200 Z"
                  fill="#2980b9" opacity="0.8"/>
            <!-- 上面 -->
            <path d="M0 50 L40 50 L50 45 L10 45 Z"
                  fill="#2980b9" opacity="0.8"/>
          </g>

          <!-- データ2 -->
          <g transform="translate(80, 0)">
            <rect x="0" y="100" width="40" height="100"
                  fill="#2ecc71" opacity="0.8"/>
            <path d="M40 100 L50 95 L50 190 L40 200 Z"
                  fill="#27ae60" opacity="0.8"/>
            <path d="M0 100 L40 100 L50 95 L10 95 Z"
                  fill="#27ae60" opacity="0.8"/>
          </g>

          <!-- データ3 -->
          <g transform="translate(140, 0)">
            <rect x="0" y="70" width="40" height="130"
                  fill="#e74c3c" opacity="0.8"/>
            <path d="M40 70 L50 65 L50 190 L40 200 Z"
                  fill="#c0392b" opacity="0.8"/>
            <path d="M0 70 L40 70 L50 65 L10 65 Z"
                  fill="#c0392b" opacity="0.8"/>
          </g>
        </g>
      </g>
    </svg>
  </div>
</body>
</html>
4. インタラクティブな3Dメニュー
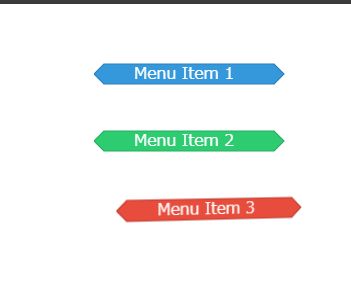
最後に、ホバーエフェクトのある3Dメニューを作成してみましょう。
<!DOCTYPE html>
<html>
<head>
<title>3D Interactive Menu</title>
<style>
.menu-container {
  perspective: 1000px;
  width: 300px;
  margin: 50px auto;
}

.menu-item {
  margin: 10px 0;
  transform-style: preserve-3d;
  transition: transform 0.3s ease;
}

.menu-item:hover {
  transform: translateX(20px) rotateY(20deg);
}
</style>
</head>
<body>
  <div class="menu-container">
    <div class="menu-item">
      <svg xmlns="http://www.w3.org/2000/svg" width="200" height="50" viewBox="0 0 200 50">
        <!-- メニュー項目の背景 -->
        <path d="M10 10 L180 10 L190 20 L180 30 L10 30 L0 20 Z"
              fill="#3498db" stroke="#2980b9"/>
        <!-- テキスト -->
        <text x="40" y="25" fill="white">Menu Item 1</text>
      </svg>
    </div>

    <div class="menu-item">
      <svg xmlns="http://www.w3.org/2000/svg" width="200" height="50" viewBox="0 0 200 50">
        <path d="M10 10 L180 10 L190 20 L180 30 L10 30 L0 20 Z"
              fill="#2ecc71" stroke="#27ae60"/>
        <text x="40" y="25" fill="white">Menu Item 2</text>
      </svg>
    </div>

    <div class="menu-item">
      <svg xmlns="http://www.w3.org/2000/svg" width="200" height="50" viewBox="0 0 200 50">
        <path d="M10 10 L180 10 L190 20 L180 30 L10 30 L0 20 Z"
              fill="#e74c3c" stroke="#c0392b"/>
        <text x="40" y="25" fill="white">Menu Item 3</text>
      </svg>
    </div>
  </div>
</body>
</html>
実装時の注意点
-
ブラウザの互換性
- SVG名前空間(xmlns属性)の指定を忘れずに
- CSS transformsの対応状況を確認
- 必要に応じてプレフィックスを追加
-
パフォーマンス最適化
- 複雑な形状は
path要素を使用 - アニメーションは必要最小限に
-
requestAnimationFrameの活用を検討
- 複雑な形状は
-
アクセシビリティ
- SVG要素に適切な
aria-labelを設定 -
title要素でツールチップを提供 - キーボード操作への対応
- SVG要素に適切な
以上のコードをベースに、さらに発展させた3D表現を試してみてください。より複雑な3D表現が必要な場合は、Three.jsなどの3Dライブラリの使用も検討することをお勧めします。


