FastAPIのOpenAPIコールバック機能について記事を書きました。APIが処理を完了後に外部APIへ通知を送る仕組みを解説しています。実際の請求書システムを例に、具体的な実装方法も紹介。UMLとMermaidで図解もつけたので、ご参考になれば幸いです。📝
はじめに

この記事は、FastAPIの公式ドキュメントの「OpenAPI Callbacks」セクションを学習した際の備忘録として作成しました。自分自身の理解を深めるとともに、同じ機能を実装したい方の参考になれば幸いです。
FastAPIは、Pythonで高速なWeb APIを構築するための現代的なフレームワークです。この記事では、FastAPIにおけるOpenAPIコールバックの実装方法について解説します。
「コールバック」という用語はプログラミングの文脈によって意味が異なりますが、REST APIにおけるコールバックとは「あるAPIが処理を完了した後に、別のAPIに通知を送信する仕組み」を指します。FastAPIではこの機能を標準サポートしており、しかもOpenAPI仕様に準拠したドキュメントも自動生成してくれます。この強力な機能を一緒に見ていきましょう。
OpenAPIコールバックとは何か?
APIのコールバックとは、あなたのAPIが外部APIにリクエストを送信する機能を指します。これは通常、あなたのAPIを利用する開発者が作成した外部APIへの呼び出しです。
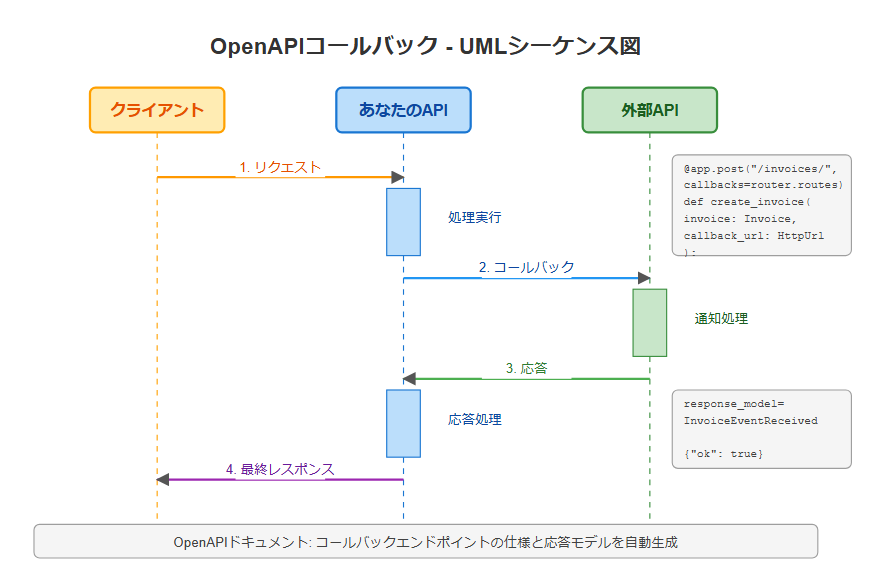
このプロセスを「コールバック」と呼ぶ理由は、以下のような流れになるからです:
- 外部開発者があなたのAPIにリクエストを送る
- あなたのAPIが処理を行う
- あなたのAPIが外部APIに「コールバック」(リクエストを送り返す)
コールバックの重要な点は、外部APIがどのような形であるべきかをドキュメント化することです。どのようなパスやボディ形式、レスポンス形式が期待されるかなどを明確にする必要があります。
実際のシナリオ:請求書作成システム
具体的な例を通じて説明しましょう。
あなたが請求書を作成するAPIを開発しているとします。この請求書には、id、title(オプション)、customer、totalの情報が含まれます。
APIの利用者(外部開発者)は、POSTリクエストであなたのAPIに請求書を作成します。そして、あなたのAPIは:
- 請求書を顧客に送信
- 支払いを回収
- 外部開発者のAPIに通知を送信(コールバック)
この最後のステップがコールバックです。
基本的なFastAPIアプリの構造
まずは、コールバックなしの基本的なAPIアプリから見ていきましょう:
from typing import Union

from fastapi import APIRouter, FastAPI
from pydantic import BaseModel, HttpUrl

app = FastAPI()


class Invoice(BaseModel):
    id: str
    title: Union[str, None] = None
    customer: str
    total: float


@app.post("/invoices/")
def create_invoice(invoice: Invoice, callback_url: Union[HttpUrl, None] = None):
    """
    請求書を作成する。

    これは外部開発者が請求書を作成できるようにするAPIです。

    このパスオペレーションは:
    * 請求書を顧客に送信します
    * 顧客から支払いを回収します
    * 外部開発者のAPIにコールバックとして通知を送信します
    """
    # 請求書の送信、支払い回収、通知(コールバック)の送信ロジック
    return {"msg": "Invoice received"}
上記のコードは特に目新しくないでしょう。ただし、外部APIへのコールバックは実装されていません。
コールバックの実装とドキュメント化
コールバック自体の実装はアプリによって大きく異なります。実際のコードは簡単なものかもしれません:
callback_url = "https://example.com/api/v1/invoices/events/"
httpx.post(callback_url, json={"description": "Invoice paid", "paid": True})
しかし、重要なのは外部開発者が正しく外部APIを実装できるよう、適切にドキュメント化することです。FastAPIでは、コールバックのドキュメントも自動生成できます。
1. コールバック用のAPIRouterを作成
まず、コールバック用のAPIRouterを作成します:
class InvoiceEvent(BaseModel):
    description: str
    paid: bool


class InvoiceEventReceived(BaseModel):
    ok: bool


invoices_callback_router = APIRouter()
2. コールバックパスオペレーションの作成
次に、コールバックパスオペレーションを作成します:
@invoices_callback_router.post(
    "{$callback_url}/invoices/{$request.body.id}", response_model=InvoiceEventReceived
)
def invoice_notification(body: InvoiceEvent):
    pass
このコードはいくつか特徴があります:
- 実際のコードは必要ありません(
passで十分)。これはドキュメント生成用です。 - パスにはOpenAPI 3の式が含まれており、元のリクエストのパラメータや内容を参照できます。
3. コールバックルーターの追加
最後に、メインのパスオペレーションにコールバックルーターを追加します:
@app.post("/invoices/", callbacks=invoices_callback_router.routes)
def create_invoice(invoice: Invoice, callback_url: Union[HttpUrl, None] = None):
    # 前と同じ実装...
    return {"msg": "Invoice received"}
コード例
以下がコード例です:
from typing import Union

from fastapi import APIRouter, FastAPI
from pydantic import BaseModel, HttpUrl

app = FastAPI()


class Invoice(BaseModel):
    id: str
    title: Union[str, None] = None
    customer: str
    total: float


class InvoiceEvent(BaseModel):
    description: str
    paid: bool


class InvoiceEventReceived(BaseModel):
    ok: bool


invoices_callback_router = APIRouter()


@invoices_callback_router.post(
    "{$callback_url}/invoices/{$request.body.id}", response_model=InvoiceEventReceived
)
def invoice_notification(body: InvoiceEvent):
    pass


@app.post("/invoices/", callbacks=invoices_callback_router.routes)
def create_invoice(invoice: Invoice, callback_url: Union[HttpUrl, None] = None):
    """
    請求書を作成する。

    これは外部開発者が請求書を作成できるようにするAPIです。

    このパスオペレーションは:
    * 請求書を顧客に送信します
    * 顧客から支払いを回収します
    * 外部開発者のAPIにコールバックとして通知を送信します
    """
    # 請求書の送信、支払い回収、通知(コールバック)の送信ロジック
    return {"msg": "Invoice received"}
動作の流れ
実際の動作を想像してみましょう:
-
外部開発者があなたのAPIに以下のようなリクエストを送信します:
- URL:
https://yourapi.com/invoices/?callback_url=https://www.external.org/events - ボディ:
{"id": "2expen51ve", "customer": "Mr. Richie Rich", "total": "9999"}
- URL:
-
あなたのAPIは請求書を処理し、ある時点でコールバックリクエストを外部APIに送信します:
- URL:
https://www.external.org/events/invoices/2expen51ve - ボディ:
{"description": "Payment celebration", "paid": true}
- URL:
-
外部APIからは以下のようなレスポンスを期待します:
- ボディ:
{"ok": true}
- ボディ:
ドキュメントの確認

アプリを起動し、http://127.0.0.1:8000/docsにアクセスすると、Swagger UIにコールバックセクションが表示され、外部APIがどのような形式であるべきかが示されます。
Windowsでのローカル実行方法
このサンプルコードをWindows環境でローカルに試してみましょう。ここでは、FastAPIサーバーとコールバックを受け取るクライアントの両方を実装します。
事前準備
まず、必要なパッケージをコマンドプロンプトまたはPowerShellでインストールします:
# PowerShellの場合
pip install fastapi uvicorn httpx

# コマンドプロンプトの場合も同じコマンド
pip install fastapi uvicorn httpx
仮想環境を使用する場合は以下のように準備できます:
# 仮想環境の作成(プロジェクトフォルダで実行)
python -m venv venv

# 仮想環境の有効化(PowerShellの場合)
.\venv\Scripts\Activate.ps1

# コマンドプロンプトの場合
# .\venv\Scripts\activate.bat

# 必要なパッケージのインストール
pip install fastapi uvicorn httpx
サーバーコード (main.py)
from typing import Union
import httpx
from fastapi import APIRouter, FastAPI
from pydantic import BaseModel, HttpUrl

app = FastAPI()


class Invoice(BaseModel):
    id: str
    title: Union[str, None] = None
    customer: str
    total: float


class InvoiceEvent(BaseModel):
    description: str
    paid: bool


class InvoiceEventReceived(BaseModel):
    ok: bool


invoices_callback_router = APIRouter()


@invoices_callback_router.post(
    "{$callback_url}/invoices/{$request.body.id}", response_model=InvoiceEventReceived
)
def invoice_notification(body: InvoiceEvent):
    pass


@app.post("/invoices/", callbacks=invoices_callback_router.routes)
async def create_invoice(invoice: Invoice, callback_url: Union[HttpUrl, None] = None):
    """
    請求書を作成する。

    これは外部開発者が請求書を作成できるようにするAPIです。

    このパスオペレーションは:
    * 請求書を顧客に送信します
    * 顧客から支払いを回収します
    * 外部開発者のAPIにコールバックとして通知を送信します
    """
    print(f"請求書を受け取りました: {invoice.model_dump()}")

    # 実際のコールバック処理(外部APIに通知を送信)
    if callback_url:
        try:
            # 非同期HTTPクライアントでリクエスト送信
            async with httpx.AsyncClient() as client:
                callback_endpoint = f"{callback_url}/invoices/{invoice.id}"
                print(f"コールバック送信先: {callback_endpoint}")

                # コールバックリクエスト送信
                response = await client.post(
                    callback_endpoint,
                    json={"description": "請求書の支払いが完了しました", "paid": True}
                )
                print(f"コールバックレスポンス: {response.status_code} {response.text}")
        except Exception as e:
            print(f"コールバック送信エラー: {e}")

    return {"msg": "Invoice received"}


if __name__ == "__main__":
    import uvicorn
    uvicorn.run(app, host="127.0.0.1", port=8000)
コールバックを受け取るクライアント側のコード (callback_server.py)
コールバックを受け取るための簡単なFastAPIサーバーを実装します:
from fastapi import FastAPI, Request
from pydantic import BaseModel

app = FastAPI()

class InvoiceEvent(BaseModel):
    description: str
    paid: bool

@app.post("/callback/invoices/{invoice_id}")
async def receive_invoice_callback(invoice_id: str, event: InvoiceEvent):
    print(f"コールバックを受信しました - 請求書ID: {invoice_id}")
    print(f"イベント内容: {event.model_dump()}")
    return {"ok": True}

if __name__ == "__main__":
    import uvicorn
    uvicorn.run(app, host="127.0.0.1", port=8001)
動作を確認する手順
- まず、コールバックを受信するサーバーを起動します(PowerShellまたはコマンドプロンプトで):
# 一つ目のコマンドプロンプト/PowerShellウィンドウで実行
python callback_server.py
- 次に、別のウィンドウを開いて、メインのFastAPIサーバーを起動します:
# 二つ目のコマンドプロンプト/PowerShellウィンドウで実行
python main.py
- 請求書を作成するリクエストを送信します(Windows PowerShellでのcURLの使用):
# PowerShellの場合(改行が \ ではなく ` になることに注意)
curl -X POST "http://127.0.0.1:8000/invoices/?callback_url=http://127.0.0.1:8001/callback" `
  -H "Content-Type: application/json" `
  -d '{\"id\": \"invoice123\", \"customer\": \"田中太郎\", \"total\": 12500}'

# または1行で書く場合
curl -X POST "http://127.0.0.1:8000/invoices/?callback_url=http://127.0.0.1:8001/callback" -H "Content-Type: application/json" -d "{\"id\": \"invoice123\", \"customer\": \"田中太郎\", \"total\": 12500}"

# コマンドプロンプトの場合(" をエスケープする必要がある)
# curl -X POST "http://127.0.0.1:8000/invoices/?callback_url=http://127.0.0.1:8001/callback" -H "Content-Type: application/json" -d "{\"id\": \"invoice123\", \"customer\": \"田中太郎\", \"total\": 12500}"


または、より簡単な方法として、Python scriptを使用する場合(三つ目のウィンドウで実行):
# test_request.py
import httpx

# メインAPIに請求書作成リクエストを送信
response = httpx.post(
    "http://127.0.0.1:8000/invoices/",
    params={"callback_url": "http://127.0.0.1:8001/callback"},
    json={
        "id": "invoice123",
        "customer": "田中太郎",
        "total": 12500
    }
)

print(f"ステータスコード: {response.status_code}")
print(f"レスポンス: {response.json()}")
このPythonスクリプトを実行するには:
# 三つ目のコマンドプロンプト/PowerShellウィンドウで実行
python test_request.py
- 両方のコマンドプロンプト/PowerShellウィンドウのログを確認すると、以下のような流れが見えます:
- メインサーバーのウィンドウ:
請求書を受け取りました: {...} - メインサーバーのウィンドウ:
コールバック送信先: http://127.0.0.1:8001/callback/invoices/invoice123 - コールバックサーバーのウィンドウ:
コールバックを受信しました - 請求書ID: invoice123 - コールバックサーバーのウィンドウ:
イベント内容: {'description': '請求書の支払いが完了しました', 'paid': True} - メインサーバーのウィンドウ:
コールバックレスポンス: 200 {"ok":true}
これでコールバックの完全なフローが確認できました!
コールバックを検証するためのテスト方法
より実践的な方法として、FastAPIのテストクライアントを使ってテストすることもできます:
# test_callbacks.py
from fastapi.testclient import TestClient
from fastapi import FastAPI
from main import app as main_app
from callback_server import app as callback_app

# メインアプリのテストクライアント
client = TestClient(main_app)

def test_invoice_with_callback(monkeypatch):
    # コールバックの呼び出しをモック化
    callback_called = False

    def mock_callback(*args, **kwargs):
        nonlocal callback_called
        callback_called = True
        return {"ok": True}

    # コールバックエンドポイントをモックに置き換え
    with TestClient(callback_app) as callback_client:
        callback_client.post = mock_callback

        # 請求書作成リクエスト
        response = client.post(
            "/invoices/",
            params={"callback_url": "http://test-callback-url.com/callback"},
            json={
                "id": "test_invoice",
                "customer": "テスト顧客",
                "total": 9999
            }
        )

        assert response.status_code == 200
        assert callback_called, "コールバックが呼び出されませんでした"

if __name__ == "__main__":
    test_invoice_with_callback(None)
    print("テスト成功!")
まとめ

FastAPIのOpenAPIコールバック機能を使用すると、あなたのAPIから外部APIへの呼び出し方法を明確にドキュメント化できます。これにより、APIユーザー(外部開発者)は、あなたのAPIとの連携を容易に行うことができます。
この記事では、ドキュメント化だけでなく、実際に動作するコールバック実装も含めたコード例を提供しました。このように、FastAPIではRESTful APIにおけるコールバックパターンを簡単に実装できます。
この機能は以下のような場合に特に有用です:
- Webhookの実装
- イベント駆動型アーキテクチャ
- 非同期処理と通知
- 外部システムとの統合
FastAPIの他の機能と同様に、コールバック機能も型安全で自動ドキュメント化されるため、APIの開発と利用の両方が容易になります。
おわりに
今回は公式ドキュメントの内容をベースに、実際に動かせるサンプルコードを追加して解説しました。FastAPIは細部まで設計が行き届いたフレームワークで、毎回学ぶたびに新しい発見があります。
コールバック機能は特にマイクロサービスアーキテクチャやイベント駆動型のシステムを構築する際に役立ちそうです。