https://github.com/1adrianb/face-alignment
https://www.adrianbulat.com/downloads/FaceAlignment/FaceAlignment.pdf
How far are we from solving the 2D & 3D Face Alignment problem? (and a
dataset of 230,000 3D facial landmarks)二次元及び三次元の顔認証における位置合わせ問題をどれぐらい解決できますか? (23万件のランドマークデーターセット)
顔認証におけるランドマーク座標取得に関するメモになります。
防備録の類に該当するものなので新規性はないです。
環境構築
python環境について
Python環境はminicondaにて構築を行った
conda create -n test python=3.6
git clone
git clone https://github.com/1adrianb/face-alignment.git
pip installによるライブラリ構築
pip install face-alignment
ライブラリの構築
pip install -r requirements.txt
python setup.py install
動作テスト(まずは一枚だけ)
helenデーターセットのうちの一枚のlandmark情報取得を試みる。
サンプルコードを実行してみる。
import face_alignment
from skimage import io

fa = face_alignment.FaceAlignment(face_alignment.LandmarksType._2D, flip_input=False)

input = io.imread('./100032540_1.jpg')
preds = fa.get_landmarks(input)
python test.py
$ python ./test.py
Downloading: "https://www.adrianbulat.com/downloads/python-fan/s3fd-619a316812.pth" to /home/rocm5/.cache/torch/checkpoints/s3fd-619a316812.pth
100%|█████████████████████████████████████████████████████████████████████████████████████████████████████████████████████████████████████████████████████████████████████████████████████████████████████████████████████████████████████████████████████████████████████████████████████████████████████████████████████████████████████████████████████████████████████████████████████████| 85.7M/85.7M [00:43<00:00, 2.07MB/s]
Traceback (most recent call last):
  File "./test.py", line 4, in <module>
    fa = face_alignment.FaceAlignment(face_alignment.LandmarksType._2D, flip_input=False)
  File "/home/rocm5/face-alignment/face_alignment/api.py", line 69, in __init__
    self.face_detector = face_detector_module.FaceDetector(device=device, verbose=verbose)
  File "/home/rocm5/face-alignment/face_alignment/detection/sfd/sfd_detector.py", line 28, in __init__
    self.face_detector.to(device)
  File "/home/rocm5/miniconda3/envs/test/lib/python3.6/site-packages/torch/nn/modules/module.py", line 432, in to
    return self._apply(convert)
  File "/home/rocm5/miniconda3/envs/test/lib/python3.6/site-packages/torch/nn/modules/module.py", line 208, in _apply
    module._apply(fn)
  File "/home/rocm5/miniconda3/envs/test/lib/python3.6/site-packages/torch/nn/modules/module.py", line 230, in _apply
    param_applied = fn(param)
  File "/home/rocm5/miniconda3/envs/test/lib/python3.6/site-packages/torch/nn/modules/module.py", line 430, in convert
    return t.to(device, dtype if t.is_floating_point() else None, non_blocking)
  File "/home/rocm5/miniconda3/envs/test/lib/python3.6/site-packages/torch/cuda/__init__.py", line 178, in _lazy_init
    _check_driver()
  File "/home/rocm5/miniconda3/envs/test/lib/python3.6/site-packages/torch/cuda/__init__.py", line 99, in _check_driver
    http://www.nvidia.com/Download/index.aspx""")
AssertionError:
Found no NVIDIA driver on your system. Please check that you
have an NVIDIA GPU and installed a driver from
http://www.nvidia.com/Download/index.aspx
このまま動かすとNVIDIAのCUDAドライバ(つまりはCUDA環境)はないのかと怒られてしまうのでNVIDIA環境を構築していない場合注意が必要です
よって実行デバイスのフラグをCPUで今回渡すことで解決する
fa = face_alignment.FaceAlignment(face_alignment.LandmarksType._2D, device='cpu')
GPUで動かすときは何も入れなくてもGPU扱いになります
今回は
import face_alignment
from skimage import io

fa = face_alignment.FaceAlignment(face_alignment.LandmarksType._2D, flip_input=False,device='cpu')

input = io.imread('./100032540_1.jpg')
preds = fa.get_landmarks(input)
最終的な保存も含めて上みたいな感じで動かしたいと思います
ただこれだ帰ってくるのはランドマーク座標を含むarrayだけが帰ってくるので動作確認をするにはこの座標を画像出力してやる必要があります。
それについて非常に詳しく書いてくれている方がいらっしゃいました。
https://naokiwatanabe.blogspot.com/2019/07/how-far-are-we-from-solving-2d-3d-face.html
上記のコードを参考にさせてもらい、動作確認をします。
import face_alignment
from skimage import io
from PIL import Image
import numpy as np
import face_alignment
from matplotlib import pyplot as plt


fa = face_alignment.FaceAlignment(face_alignment.LandmarksType._2D, flip_input=False,device='cpu')

input = io.imread('./100032540_1.jpg')
preds = fa.get_landmarks(input)
#io.imsave('output.jpg',preds)


fig, ax = plt.subplots(figsize=(8,6), dpi=80, facecolor='w')
fig.tight_layout()
plt.gca().set_aspect('equal', adjustable='box')
ax.scatter(preds[0][:, 0], 270-preds[0][:, 1])
ax.scatter([0, 210, 0, 210], [0, 0, 270, 270], c='w')
for ix, (w, h) in enumerate(preds[0]):
    w, h = int(w), int(h)
    ax.annotate(str(ix), (w, 270-h))
plt.show()

ちゃんと座標が取れていることがわかります、ありがとうございました。
次にオーバーレイ(座標の上書きをした画像)を生成したいと思います
上記の記事にも書いてありますがこのlandmark座標は実装がただのarrayなわけではなくtorchのチュートリアルのように一筋縄では行きません。
import face_alignment
from skimage import io
from PIL import Image
import numpy as np
import face_alignment
from matplotlib import pyplot as plt
import pandas as pd

def show_lan(image,landmark):
    plt.imshow(image)
    plt.scatter(landmark[:][0],landmark[:][1],s=10,marker='.',c='r')
    plt.pause(0.001)


fa = face_alignment.FaceAlignment(face_alignment.LandmarksType._2D, flip_input=False,device='cpu')

input = io.imread('./100032540_1.jpg')
preds = fa.get_landmarks(input)
#preds.ndim
#io.imsave('output.jpg',preds)
plt.figure()
show_lan(input,preds)
plt.show()
なぜならpred_typeと言う構造体でlandmarkが出力されている為ただの二次元座標のリストというわけではないからです。
| pred_type = collections.namedtuple('prediction_type', ['slice', 'color']) |
|:--|
| pred_types = {'face': pred_type(slice(0, 17), (0.682, 0.780, 0.909, 0.5)), |
|               'eyebrow1': pred_type(slice(17, 22), (1.0, 0.498, 0.055, 0.4)), |
|               'eyebrow2': pred_type(slice(22, 27), (1.0, 0.498, 0.055, 0.4)), |
|               'nose': pred_type(slice(27, 31), (0.345, 0.239, 0.443, 0.4)), |
|               'nostril': pred_type(slice(31, 36), (0.345, 0.239, 0.443, 0.4)), |
|               'eye1': pred_type(slice(36, 42), (0.596, 0.875, 0.541, 0.3)), |
|               'eye2': pred_type(slice(42, 48), (0.596, 0.875, 0.541, 0.3)), |
|               'lips': pred_type(slice(48, 60), (0.596, 0.875, 0.541, 0.3)), |
|               'teeth': pred_type(slice(60, 68), (0.596, 0.875, 0.541, 0.4)) |
|               } |
なので少々工夫する必要があります。
※参考元
https://naokiwatanabe.blogspot.com/2019/07/matplotlib.html
https://github.com/1adrianb/face-alignment/blob/master/examples/detect_landmarks_in_image.py
import face_alignment
import collections
import imageio
import matplotlib as mpl
from skimage import io
from PIL import Image
import numpy as np
from matplotlib import pyplot as plt
import pandas as pd

def show_lan(image,landmark):
    plt.imshow(image)
    plt.scatter(landmark[:][0],landmark[:][1],s=10,marker='.',c='r')
    plt.pause(0.001)


fa = face_alignment.FaceAlignment(face_alignment.LandmarksType._2D, flip_input=False,device='cpu')

input = io.imread('./100032540_1.jpg')
preds = fa.get_landmarks(input)[-1]


# 2D-Plot
plot_style = dict(marker='None',
                  markersize=4,
                  linestyle='-',
                  lw=2)

pred_type = collections.namedtuple('prediction_type', ['slice', 'color'])
pred_types = {'face': pred_type(slice(0, 17), (0.682, 0.780, 0.909, 0.5)),
              'eyebrow1': pred_type(slice(17, 22), (1.0, 0.498, 0.055, 0.4)),
              'eyebrow2': pred_type(slice(22, 27), (1.0, 0.498, 0.055, 0.4)),
              'nose': pred_type(slice(27, 31), (0.345, 0.239, 0.443, 0.4)),
              'nostril': pred_type(slice(31, 36), (0.345, 0.239, 0.443, 0.4)),
              'eye1': pred_type(slice(36, 42), (0.596, 0.875, 0.541, 0.3)),
              'eye2': pred_type(slice(42, 48), (0.596, 0.875, 0.541, 0.3)),
              'lips': pred_type(slice(48, 60), (0.596, 0.875, 0.541, 0.3)),
              'teeth': pred_type(slice(60, 68), (0.596, 0.875, 0.541, 0.4))
              }
fig, ax = plt.subplots(facecolor='w', figsize=(4.50, 4.50), dpi=100, frameon=False)  # 入力サイズ×DPIの大きさになります。
fig.tight_layout(pad=0)
ax.imshow(np.ones(shape=input.shape)) # Without filling in white, drawn image is enlarged and upside-down
ax.imshow(input)

for pred_type in pred_types.values():
    ax.plot(preds[pred_type.slice, 0],
            preds[pred_type.slice, 1],
            color=pred_type.color, **plot_style)

ax.axis('off')
plt.subplots_adjust(top = 1, bottom = 0, right = 1, left = 0,
            hspace = 0, wspace = 0)

# Save figure
plt.savefig('land.jpg', dpi=100, pad_inches=0)

# Translate figure into array and save it
fig.canvas.draw()
X = np.array(fig.canvas.renderer._renderer)[:,:,:-1]
print(X.shape)
imageio.imwrite('test.jpg', X)
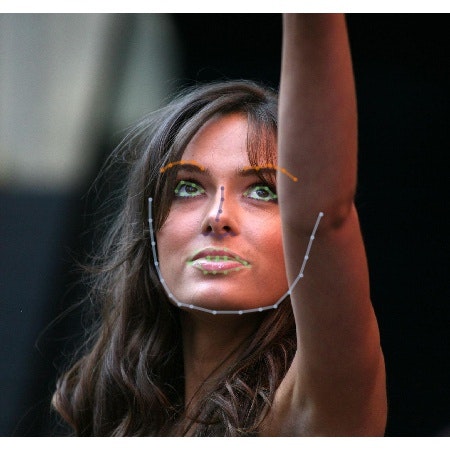
上記のブログの方がやられていた方法でオーバーレイすると以下のように線ベースのオーバーレイになります
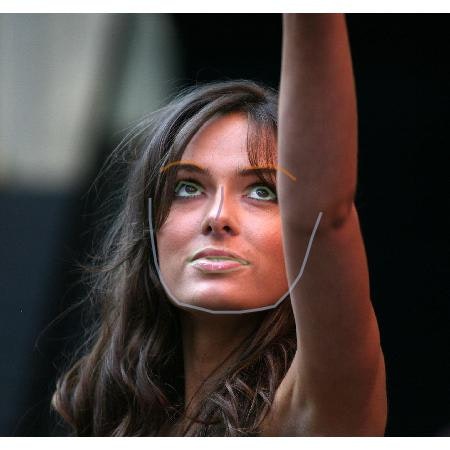
点ベースでのオーバーレイもあると嬉しい時は
plot_style = dict(marker='.',
                  markersize=4,
                  linestyle='-',
                  lw=2)
plot_styleの部分のmarkerをドットにします。時と場合によって変えると良さそうです。
非常に参考になりました。
動画から連番で取得する方法
youtube-dl "hoge url"
必要に応じてライセンスなどに留意しつつ導入します。
ffmpegでの連番画像の取得
もしffmpegが入っていない場合は
sudo apt install ffmpegで入れることができます。
mkdir output
ffmpeg -i ./test.mp4  -vcodec png -r 30 ./output/output_%03d.png
ファイル内から全部ランドマークデーターをとったうえで取得する方法
公式リポジトリには
import face_alignment
from skimage import io

fa = face_alignment.FaceAlignment(face_alignment.LandmarksType._2D, flip_input=False)

preds = fa.get_landmarks_from_directory('./output')
ディレクトリごとランドマークを取得する方法が示されていますのでこれを参考に実装を組み替えます。
face_alignment.FaceAlignmentとは違ってget_landmarks_from_directoryには参考になる実装がないので
実コードから読み解きます
  def get_landmarks_from_directory(self, path, extensions=['.jpg', '.png'], recursive=True, show_progress_bar=True):

         detected_faces = self.face_detector.detect_from_directory(path, extensions, recursive, show_progress_bar)

         predictions = {}
         for image_path, bounding_boxes in detected_faces.items():
             image = io.imread(image_path)
             preds = self.get_landmarks_from_image(image, bounding_boxes)
             predictions[image_path] = preds

         return predictions
実際はなかで.get_landmarks_from_imageをfor文で回して辞書に入れているだけですがおかげでそのままコードが流用できません。
/face-alignment/face_alignment/api.pyの195行目を修正して
preds = self.get_landmarks_from_image(image, bounding_boxes)
から
preds = self.get_landmarks_from_image(image, bounding_boxes)[-1]
と直します
これが終わったら
import face_alignment
import collections
import imageio
import matplotlib as mpl
from skimage import io
from PIL import Image
import numpy as np
from matplotlib import pyplot as plt
import pandas as pd
def show_lan(image,landmark):
plt.imshow(image)
plt.scatter(landmark[:][0],landmark[:][1],s=10,marker='.',c='r')
plt.pause(0.001)
fa = face_alignment.FaceAlignment(face_alignment.LandmarksType._2D, flip_input=False,device='cpu')
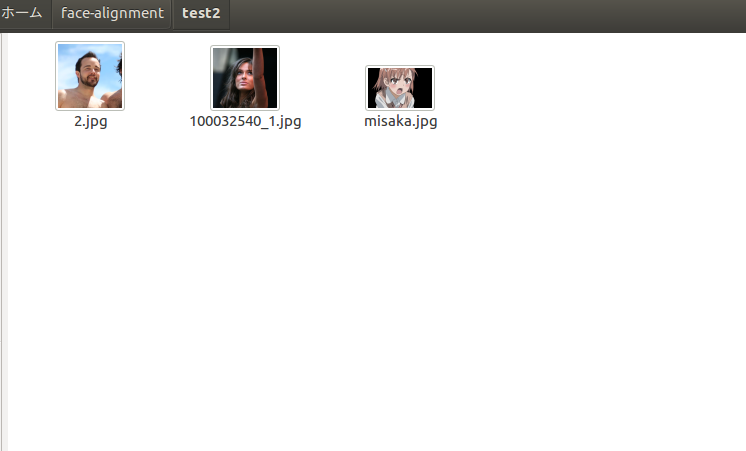
predss = fa.get_landmarks_from_directory('./test2')
# 2D-Plot
plot_style = dict(marker='None',
markersize=4,
linestyle='-',
lw=2)
pred_type = collections.namedtuple('prediction_type', ['slice', 'color'])
pred_types = {'face': pred_type(slice(0, 17), (0.682, 0.780, 0.909, 0.5)),
'eyebrow1': pred_type(slice(17, 22), (1.0, 0.498, 0.055, 0.4)),
'eyebrow2': pred_type(slice(22, 27), (1.0, 0.498, 0.055, 0.4)),
'nose': pred_type(slice(27, 31), (0.345, 0.239, 0.443, 0.4)),
'nostril': pred_type(slice(31, 36), (0.345, 0.239, 0.443, 0.4)),
'eye1': pred_type(slice(36, 42), (0.596, 0.875, 0.541, 0.3)),
'eye2': pred_type(slice(42, 48), (0.596, 0.875, 0.541, 0.3)),
'lips': pred_type(slice(48, 60), (0.596, 0.875, 0.541, 0.3)),
'teeth': pred_type(slice(60, 68), (0.596, 0.875, 0.541, 0.4))
}
imglist=[]
i=0
for names in predss:
imglist.append(names)
for preds in predss.values():
input = io.imread(imglist[i])
fig, ax = plt.subplots(facecolor='w', figsize=(4.50, 4.50), dpi=100, frameon=False) # 入力サイズ×DPIの大きさになります。
fig.tight_layout(pad=0)
ax.imshow(np.ones(shape=input.shape)) # Without filling in white, drawn image is enlarged and upside-down
ax.imshow(input)
for pred_type in pred_types.values():
ax.plot(preds[pred_type.slice, 0],
preds[pred_type.slice, 1],
color=pred_type.color, **plot_style)
ax.axis('off')
plt.subplots_adjust(top = 1, bottom = 0, right = 1, left = 0,
hspace = 0, wspace = 0)
plt.savefig('./landoutput/land%d.jpg'%i, dpi=100, pad_inches=0)
i=i+1
以上のような実装でフォルダ内の画像をひととおりランドマーク情報を付与できます

動画から取得した連番画像の様な顔画像が含まれてないデーターセットに対する実装
顔画像が含まれてない画像が混ざっている場合、上記の方法だけでは動作しない為api.pyを更に書き直します。
def get_landmarks_from_directory()※189行目あたりを以下ように書き直します
    def get_landmarks_from_directory(self, path, extensions=['.jpg', '.png'], recursive=True, show_progress_bar=True):
        detected_faces = self.face_detector.detect_from_directory(path, extensions, recursive, show_progress_bar)

        predictions = {}
        for image_path, bounding_boxes in detected_faces.items():
            image = io.imread(image_path)
            preds = self.get_landmarks_from_image(image, bounding_boxes)
            if preds!=None:
                predictions[image_path] = preds[-1]

        return predictions
以下のように人間の顔が混ざっていないエラー画像セットに対して
無関係な画像は一切出力せずに返すことができます。

実行時間について
1200*1200の画像において
CPU実行ではXeon(R) CPU E5-2603 v4 @ 1.70GHz × 6 で3.19s/it
GPU実行だとGTX1080Tiで1枚あたり7.19s/itと二倍ぐらい違いがあるので推論といえどもGPUでやったほうが幸せになれます。
また大量の画像を処理する場合推論自体より画像の出力のほうが時間がかかりますので
./dir_test.py:51: RuntimeWarning: More than 20 figures have been opened. Figures created through the pyplot interface (`matplotlib.pyplot.figure`) are retained until explicitly closed and may consume too much memory. (To control this warning, see the rcParam `figure.max_open_warning`).
またメモリ食いまくるぞ!_と警告されますので注意が必要です
ちなみに一気に3000枚処理したら数十GBぐらいは簡単に食うので危険です。
改善方法の検討が必要だと思いますがSSDのスワップ領域を使っても10000枚ぐらいまでなら数百GBあれば済みそうな感じなので
事前に調整すればいけそうです。