はじめに
画像編集ソフト Photoshop には、画像のはめ込み(透視変換) を簡単に行う機能があります。しかし、有料ソフト(月額:3280円)であるため、ちょっとした画像処理をしたい場合にはコストが高いと感じることもあるのではないでしょうか?
そこで、自分でこの機能、実装できないか?と思い立ち、ChatGPTを活用しながら、Python × OpenCV を使って、はめ込み画像を出力するスクリプトを作成してみました。(図1)
この記事では、実装したスクリプトの詳細について紹介します。
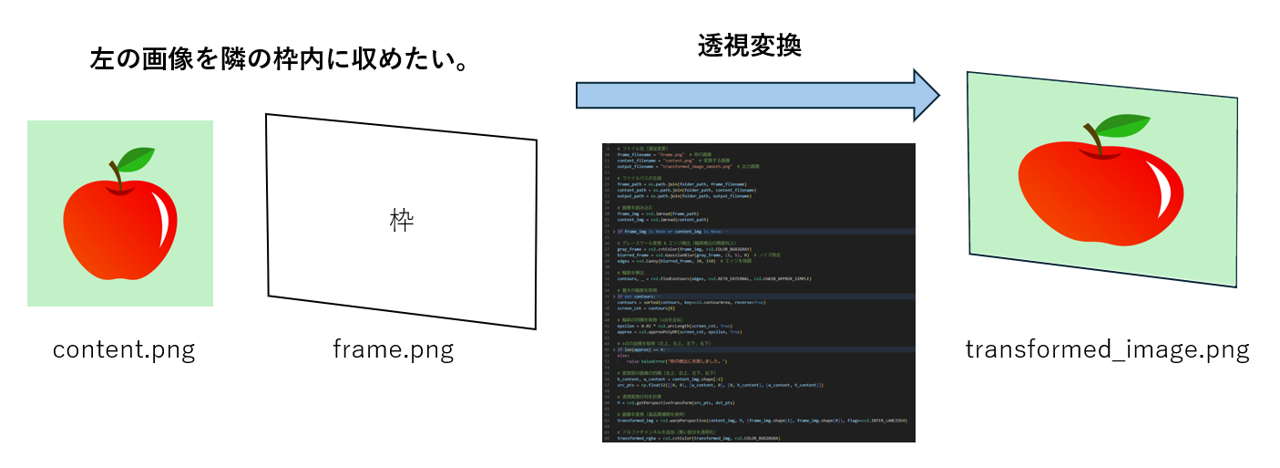
図1. 変換後の画像(frame.png は PPT で作成)
使用技術
- Python 3.13.2
- OpenCV
- NumPy
スクリプトの概要
このスクリプトでは、以下の手順で画像を処理します。
-
frame.png(枠の画像)を読み込み、エッジ検出で枠を特定する -
content.png(変換対象の画像)を透視変換する -
frame.pngを基に、枠外を透明化 - 枠線の除去(モルフォロジー処理を利用)
使用するファイルとフォルダ構成
このスクリプトを使用するためには、以下のようなフォルダ構成を用意してください。
Homography_transformation/ ← フォルダを作成
│── frame.png ← 透視変換の基準となる枠画像
│── content.png ← 変換する画像
│── Homography_transformation.py ← 本スクリプト
-
frame.png… 変換の基準となる四角形の枠画像(エッジ検出に利用)
枠画像はPPTなどで作成してください。平行四辺形の他に、台形にも対応しています。
図1中にある、"枠"というテキストは不要です。 -
content.png… 変換対象の画像
⚠️注意: folder_path の値については、ご自身の環境に合わせて変更してください。
# フォルダパス(変更必須)
folder_path = r"C:\path\to\Homography_transformation"
出力ファイルについて
スクリプトを実行すると、変換後の画像が output_filename に指定した名前で保存されます。デフォルトの設定では、以下の場所に出力されます。
Homography_transformation/
│── transformed_image.png ← 変換後の画像(透視変換 + 枠外透明化)
必要なライブラリのインストール
事前に以下のライブラリをインストールしてください。
pip install opencv-python numpy matplotlib
スクリプトの実行方法
以下のコードを実行すると、透視変換された「はめ込み画像」が出力されます。
-
frame.pngとcontent.pngをフォルダに配置 -
ターミナル(コマンドプロンプト)を開き、スクリプトのあるフォルダへ移動
Windows の場合(コマンドプロンプト)
cd C:\path\to\Homography_transformationMac/Linuxの場合(ターミナル)
cd /path/to/Homography_transformation⚠️ 注意:これを実行しないと、以下のエラーが出る可能性があります:
python: can't open file 'Homography_transformation.py': [Errno 2] No such file or directory
-
スクリプトを実行
Windowspython Homography_transformation.pyMac/Linux
python3 Homography_transformation.py -
transformed_image.pngがHomography_transformation/フォルダに出力される
スクリプト
import cv2
import numpy as np
import os
import matplotlib.pyplot as plt

# フォルダパス(変更必須)
folder_path = r"C:\path\to\Homography_transformation"

# ファイル名(適宜変更)
frame_filename = "frame.png"  # 枠の画像
content_filename = "content.png"  # 変換する画像
output_filename = "transformed_image.png"  # 出力画像

# ファイルパスの生成
frame_path = os.path.join(folder_path, frame_filename)
content_path = os.path.join(folder_path, content_filename)
output_path = os.path.join(folder_path, output_filename)

# 画像を読み込む
frame_img = cv2.imread(frame_path)
content_img = cv2.imread(content_path)

if frame_img is None or content_img is None:
    raise FileNotFoundError("枠の画像または変換する画像が見つかりません。")

# グレースケール変換 & エッジ検出(輪郭検出の精度向上)
gray_frame = cv2.cvtColor(frame_img, cv2.COLOR_BGR2GRAY)
blurred_frame = cv2.GaussianBlur(gray_frame, (5, 5), 0)  # ノイズ除去
edges = cv2.Canny(blurred_frame, 30, 150)  # エッジを強調

# 輪郭を検出
contours, _ = cv2.findContours(edges, cv2.RETR_EXTERNAL, cv2.CHAIN_APPROX_SIMPLE)

# 最大の輪郭を取得
if not contours:
    raise ValueError("枠の輪郭を検出できませんでした。")
contours = sorted(contours, key=cv2.contourArea, reverse=True)
screen_cnt = contours[0]

# 輪郭の四隅を取得(4点を近似)
epsilon = 0.02 * cv2.arcLength(screen_cnt, True)
approx = cv2.approxPolyDP(screen_cnt, epsilon, True)

# 4点の座標を取得(左上, 右上, 左下, 右下)
if len(approx) == 4:
    dst_pts = np.float32([point[0] for point in approx])
    dst_pts = dst_pts[np.argsort(dst_pts[:, 1])]  # Y座標でソート(上->下)
    if dst_pts[0][0] > dst_pts[1][0]:  # 左右の順番を調整
        dst_pts[[0, 1]] = dst_pts[[1, 0]]
    if dst_pts[2][0] > dst_pts[3][0]:  # 左右の順番を調整
        dst_pts[[2, 3]] = dst_pts[[3, 2]]
else:
    raise ValueError("枠の検出に失敗しました。")

# 変換前の画像の四隅(左上、右上、左下、右下)
h_content, w_content = content_img.shape[:2]
src_pts = np.float32([[0, 0], [w_content, 0], [0, h_content], [w_content, h_content]])

# 透視変換行列を計算
M = cv2.getPerspectiveTransform(src_pts, dst_pts)

# 画像を変換(高品質補間を使用)
transformed_img = cv2.warpPerspective(content_img, M, (frame_img.shape[1], frame_img.shape[0]), flags=cv2.INTER_LANCZOS4)

# アルファチャンネルを追加(黒い部分を透明化)
transformed_rgba = cv2.cvtColor(transformed_img, cv2.COLOR_BGR2BGRA)
transformed_rgba[:, :, 3] = 255  # 初期状態はすべて不透明

# マスク作成(枠の外側を透明に)
mask = np.zeros_like(gray_frame, dtype=np.uint8)  # 全て黒(透明)
cv2.fillPoly(mask, [approx], 255)  # 枠の内側だけ白(保持)

# **枠の線を透明化**
contour_mask = np.zeros_like(mask)  # 枠線用のマスク
cv2.drawContours(contour_mask, [approx], -1, 255, thickness=10)  # 枠線を透明に

# **モルフォロジー処理で枠を消す**
kernel = np.ones((3,3), np.uint8)
contour_mask = cv2.dilate(contour_mask, kernel, iterations=1)  # 枠を膨張させる
contour_mask = cv2.erode(contour_mask, kernel, iterations=2)  # 収縮させて不要な部分を消す

# 枠の線を透明に
mask[contour_mask == 255] = 0  # 枠線部分を透明にする

# **エッジをぼかして自然に**
mask = cv2.GaussianBlur(mask, (5, 5), 0)

# マスクを適用(枠の外と枠線を透明に)
transformed_rgba[:, :, 3] = cv2.bitwise_and(transformed_rgba[:, :, 3], mask)

# 画像を保存(透明対応PNG)
cv2.imwrite(output_path, transformed_rgba, [cv2.IMWRITE_PNG_COMPRESSION, 0])

print(f"画像の保存が完了しました: {output_path}")
まとめ
この記事では、Python × OpenCV を使って画像のはめ込み(透視変換)を行うスクリプト について紹介しました。
✔ 枠画像(frame.png)を基準に、透視変換を実行
✔ エッジ検出を活用して、枠を自動で認識
✔ 枠の線や不要な領域を透明化
このスクリプトを活用することで、ポスター合成、看板デザインのシミュレーション、画像の視点補正など、さまざまな応用が可能です。 必要があれば、用途に合わせて変更してみてください。
質問やフィードバックがあれば、お気軽にコメントをお願いします。