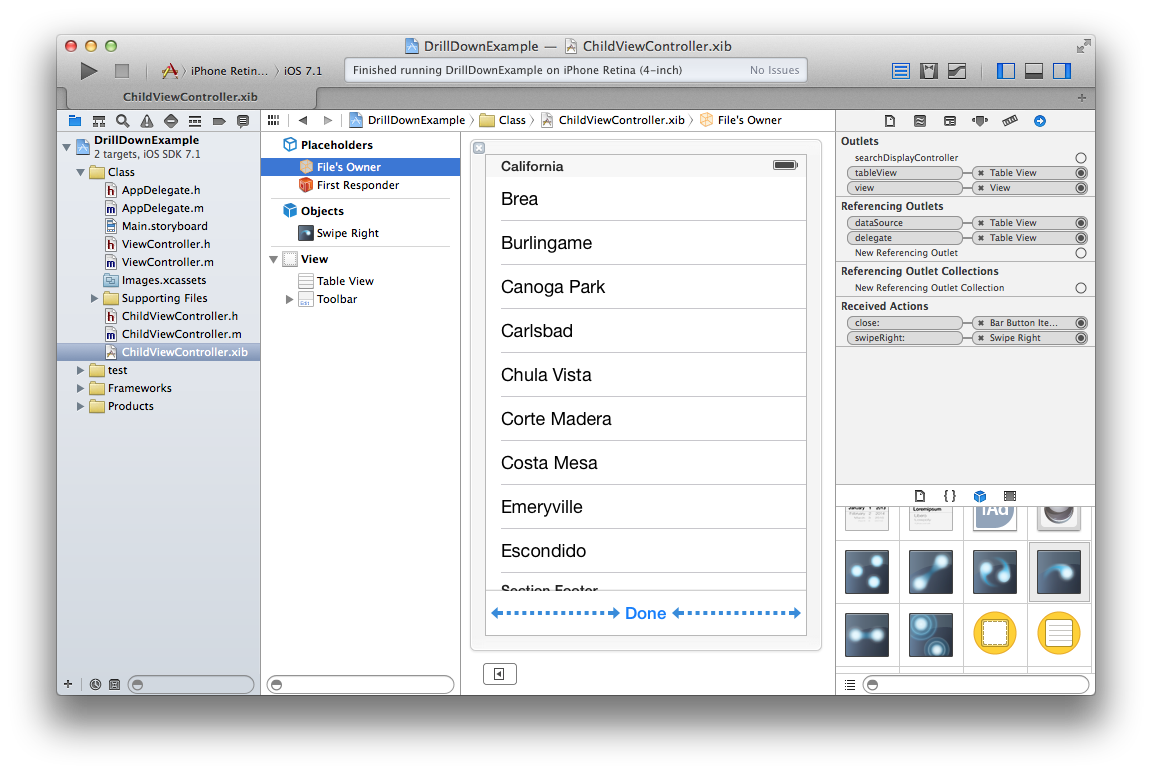
ドリルダウン型のファイルマネージャを実装しようと思い、UINavigationControllerのサンプルコードを探したところ、単純なのを見つけられませんでした。仕方なく試行錯誤したところ、ドリルダウン部分はシンプルに実装できたので、参考のために公開します。xibファイルからUIViewControllerを生成する例にもなっています。
ViewController.h
# import <UIKit/UIKit.h>

@interface ViewController : UIViewController
@property UINavigationController *navController;
@end
ViewController.m
# import "ViewController.h"
# import "ChildViewController.h"

@implementation ViewController

- (void)viewDidLoad
{
    [super viewDidLoad];
    ChildViewController *childViewController
       = [[ChildViewController alloc] initWithNibName:@"ChildViewController" bundle:nil];
    childViewController.title = @"/";
	self.navController
       = [[UINavigationController alloc] initWithRootViewController:childViewController];
}

- (IBAction)open:(id)sender
{
    [self presentViewController:self.navController
          animated:YES completion:nil];
}

@end
ChildViewController.h
# import <UIKit/UIKit.h>

@interface ChildViewController : UIViewController <UITableViewDataSource, UITableViewDelegate>
@property IBOutlet UITableView *tableView;
@end
ChildViewController.m
# import "ChildViewController.h"

@implementation ChildViewController

- (IBAction)close:(id)sender
{
    [self.navigationController dismissViewControllerAnimated:YES completion:nil];
}

- (IBAction)swipeRight:(id)sender
{
    [self.navigationController popViewControllerAnimated:YES];
}

- (NSInteger) numberOfSectionsInTableView:(UITableView *)tableView
{
    return 2;
}

- (NSInteger) tableView:(UITableView *)tableView numberOfRowsInSection:(NSInteger)section
{
    return 10;
}

- (NSString*) tableView:(UITableView *)tableView titleForHeaderInSection:(NSInteger)section
{
    return [NSString stringWithFormat:@"Section %d", section + 1];
}

- (UITableViewCell*) tableView:(UITableView *)tableView cellForRowAtIndexPath:(NSIndexPath *)indexPath
{
    UITableViewCell *cell = [tableView dequeueReusableCellWithIdentifier:@"Cell"];
    if (!cell) {
        cell = [[UITableViewCell alloc]
                initWithStyle:UITableViewCellStyleDefault
                reuseIdentifier:@"Cell"];
    }
    cell.textLabel.text = [NSString stringWithFormat:@"%d-%d",
                           indexPath.section + 1, indexPath.row + 1];
    return cell;
}

- (void) tableView:(UITableView *)tableView didSelectRowAtIndexPath:(NSIndexPath *)indexPath
{
    UITableViewCell *cell = [tableView cellForRowAtIndexPath:indexPath];
    cell.selected = NO;
    ChildViewController *childViewController
       = [[ChildViewController alloc]
           initWithNibName:@"ChildViewController" bundle:nil];
    NSString *parent = self.navigation.prompt;
    if (!parent) parent = "/";
    childViewController.navigationItem.prompt
          = [parent stringByAppendingPathComponent:cell.textLabel.text];
    childViewController.title
        = [tableView cellForRowAtIndexPath:indexPath].textLabel.text;
    childViewController.navigationItem.rightBarButtonItem
        = [[UIBarButtonItem alloc]
             initWithTitle:@"Root"
                     style:UIBarButtonItemStyleBordered
                    target:self.navigationController
                    action:@selector(popToRootViewControllerAnimated:)];
    [self.navigationController
         pushViewController:childViewController animated:YES];
}

@end
肝はUIViewControllerのinitWithNibName:bundle:です。構成が変化するドリルダウンでは、いかに子供を生成するかが問題なのですが、UIViewControllerは簡単にxibファイルから生成できます。ナビゲーションバーのプロンプトにフルパスを表示するようにして、右側にはルートに戻るボタンを付けてみました。ちなみにxibファイルは以下の図を参考にしてください。

