FirebaseのAuthentication機能を使うには…
初めに
この記事の続きです
UIはこちらのテンプレートを使用しています
1.新しくauthentication.dartを作成
authentication.dart
import 'package:firebase_auth/firebase_auth.dart';

class Authentication{
  static final FirebaseAuth _firebaseAuth = FirebaseAuth.instance;
  static User? currentFirebaseUser;
}
2.アカウント新規作成画面の実装
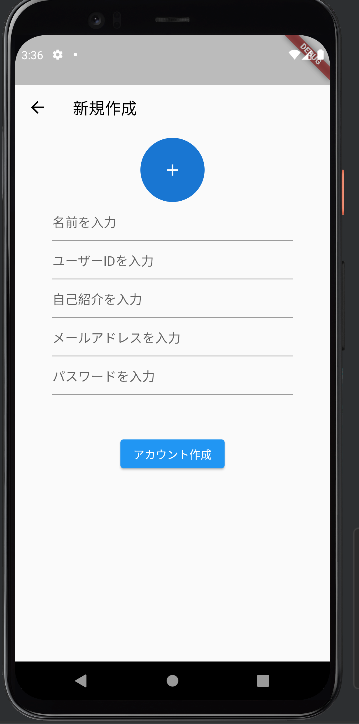
メールアドレスとパスワードを引数で受け取り、アカウントを作成。
うまくいかないときは、auth登録エラーと出力。
authentication.dart
static Future<dynamic> signUp({required String email,required String pass}) async{
      try{
         UserCredential newAccount = await _firebaseAuth.createUserWithEmailAndPassword(
             email: email,
             password: pass
         );
         print('auth登録完了');
         return newAccount;
      }on FirebaseAuthException catch(e){
        print('auth登録エラー: $e');
        return false;
      }
  }
クラスの下にControllerを定義して、5つ全部が埋められているときだけアカウント作成という処理を作る。
create_account.dart
//名前
TextEditingController nameController = TextEditingController();
//ユーザーID
TextEditingController userIDController = TextEditingController();
//自己紹介
TextEditingController selfIntroductionController = TextEditingController();
//メールアドレス
TextEditingController emailController = TextEditingController();
//パスワード
TextEditingController passController = TextEditingController();
if文で5つ全部が埋められているか判断し、trueならアカウントを作成。
その結果をrusultに格納し、resultがtrueならログイン画面に戻る。
create_account.dart
ElevatedButton(
    onPressed:() async{
        if(nameController.text.isNotEmpty
            && userIDController.text.isNotEmpty
            && selfIntroductionController.text.isNotEmpty
            && emailController.text.isNotEmpty
            && passController.text.isNotEmpty
        ){
        var result = await Authentication.signUp(
            email: emailController.text,
            pass: passController.text
        );
        if(result == true){
            Navigator.pop(context);
        }
    }
},
3.ログイン画面の実装
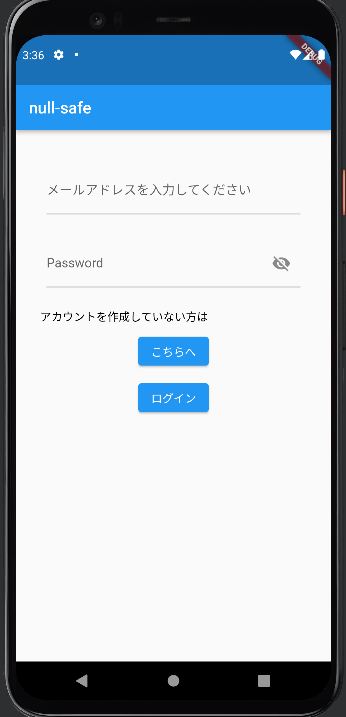
authentication.dartのsignupクラスの下に新しいクラスを追加して、そこにコードを追加
authentication.dart
static Future<dynamic> signIn({required String email,required String pass}) async{
    try{
      final UserCredential _result = await _firebaseAuth.signInWithEmailAndPassword(
          email: email,
          password: pass
      );
      currentFirebaseUser = _result.user;
      print('authサインイン完了');
      return true;
    } on FirebaseAuthException catch(e){
      print('authサインインエラー: $e');
      return false;
    }
  }
Firebaseに格納されているメールアドレス・パスワードと一致すればtrue
login.dart
ElevatedButton(
    onPressed: () async{
        var result = await Authentication.signIn(
            email: emailController.text,
            pass: passController.text
        );

        if(result == true){
            Navigator.pushReplacement(
                context, MaterialPageRoute(
                    builder: (context) => //行きたい画面のクラス名()
                ));
        }
    }, child: Text('ログイン')
),
これで実装完了!!