QIITAを自分の開発メモ用に使ってみようと思います。
今の仕事では当面.NET Frameworkから離れられないのでASP.NET Coreは止む無く自分で何かプロジェクト作ってそこに適当にアプリを埋めていく予定です。
まずはその前にお勉強しないといけないので「ASP.Net Coreを開発するにあたって覚えておかないといけないこと」を全部で5つか6つのシリーズに分けて書き留めていく予定です。
Section 1. ASP.NET Coreプロジェクトについて
1. プロジェクトの作成とその構成
まず空のプロジェクトを作成する。
-
Visual Studioの場合
新しいプロジェクトの作成 -> ASP.NET Core Webアプリケーション -> 空のプロジェクト
-
donet command
dotnet new プロジェクトの種類 -o プロジェクト名
(例 dotnet new web -o ANCEntry_EmptyApp)
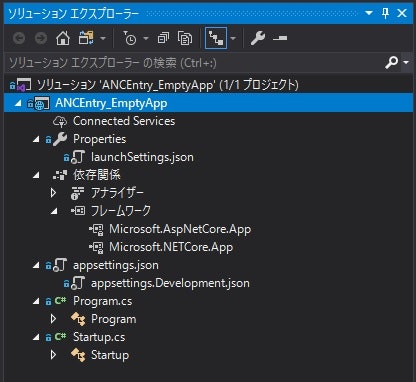
【主要ファイルの説明】
| ファイル名 | 内容 |
|---|---|
| appsettings.json | アプリケーションの設定情報の記載 |
| appsettingsDevelopment.json | アプリケーションの開発版の設定を記載する |
| Program.cs | プロジェクト内で最初に実行されるメインプログラム |
| Startup.cs | アプリケーションの起動処理を記述したプログラム |
【プログラムの実行方法】
- dotnet command
    dotnet run
    dotnet run -c Debug (デバッグモード)
    dotnet run -c Release (非デバッグモード)
2.Program.csにってい
using Microsoft.AspNetCore.Hosting;
using Microsoft.Extensions.Hosting;

namespace ANCEntry_EmptyApp
{
    public class Program
    {
        public static void Main(string[] args)
        {
            CreateHostBuilder(args).Build().Run();  // **[1]
        }

        // **[2]
        public static IHostBuilder CreateHostBuilder(string[] args) =>
            Host.CreateDefaultBuilder(args)
                .ConfigureWebHostDefaults(webBuilder =>
                {
                    webBuilder.UseStartup<Startup>();
                });
    }
}
【解説】
- コール階層: Main -> CreateHostBuilder
- CreateHostBuilder: HostBuilderを作成してくれる。HostBuilder=Webサーバー(=ホスト)のファクトリー(またはビルダー)
    Host.CreateDefaultBuilder(args)
        .ConfigureWebHostDefaults(webBuilder =>
        {
            webBuilder.UseStartup<Startup>();
        });
-
CreateDefaultBuilder -> 既定のHostBuilderを生成する。
-
ConfigureWebHostDefaults -> 既定のHostの構成を生成する。
設定情報の読み込みにWebBuilderがStartupクラスを使用する。
つまり、Startupクラスを使って設定情報を初期化したWebサーバー(=HostBuilder)を返す。
- これをMainが呼んで、返されたHostBuilderをBuildしてHost(=Webサーバー)のインスタンスを生成してRun(=実行)させる。
3. Startup.csについて
using Microsoft.AspNetCore.Builder;
using Microsoft.AspNetCore.Hosting;
using Microsoft.AspNetCore.Http;
using Microsoft.Extensions.DependencyInjection;
using Microsoft.Extensions.Hosting;

namespace ANCEntry_EmptyWeb
{
    public class Startup
    {
        public void ConfigureServices(IServiceCollection services)
        {
        }

         public void Configure(IApplicationBuilder app, IWebHostEnvironment env)
        {
            if (env.IsDevelopment())
            {
                app.UseDeveloperExceptionPage();
            }

            app.UseRouting();

            app.UseEndpoints(endpoints =>
            {
                endpoints.MapGet("/", async context =>
                {
                    context.Response.ContentType = "text/html";
                    await context.Response.WriteAsync("<html><head><title>Hello</title></head");
                    await context.Response.WriteAsync("  <body><h1>Hello World!</h1>");
                    await context.Response.WriteAsync("    <p>This is sample asp.net core page.</p>");
                    await context.Response.WriteAsync("</body></html>");
                });
            });
        }
    }
}
【解説】
-
ConfigureServices -> そのアプリケーションで使用するサービスの登録を行う。
MVCアプリケーションでは
services.AddControllerWithView();が実装され、Razorページアプリケーションではservices.AddRazorPages();が実装される。 -
Configure -> そのアプリケーションで使用するミドルウェアの登録を行う。
| 引数 | 説明 |
|---|---|
| IApplicationBuilder app | HttpRequestを受け付けてからResponseを返すまでの処理の流れ(これを「パイプライン」という)を返す。 |
| IWebHostEnvironment env | Webアプリケーション(=ホスト)の実行環境設定を行うクラス |
- 開発モードにおける例外ページの設定
    if (env.IsDevelopment())
    {
        app.UseDeveloperExceptionPage();
    }
-
ルーティングの設定:
app.UseRouting(); -
エンドポイントの設定:
エンドポイント=パイプラインの一番最後に呼び出す処理。
    app.UseEndpoints(endpoints =>
    {
        endpoints.MapGet("/", async context =>
        {
            context.Response.ContentType = "text/html";
            await context.Response.WriteAsync("<htm><head><title>Hello</title></head");
            ・・・
- endpoint.MapGet()
- → 第1引数のパスにアクセスすると第2引数のラムダ式を実行する。
- 使用例
    app.UseEndpoints(endpoints =>
    {
    endpoints.MapGet("/view/{query}", async context =>
    {
        string paramstr = (string)context.GetRouteValue("query");
        await context.Response.WriteAsync("Hello ASP.NET Core World EndPoint!:"+paramstr);
    });
    });
