画像を作る、探す
設定したいfaviconの画像を作ったり探したりします。 今回はすでに作成されているものをこちらのサイトからお借りします。
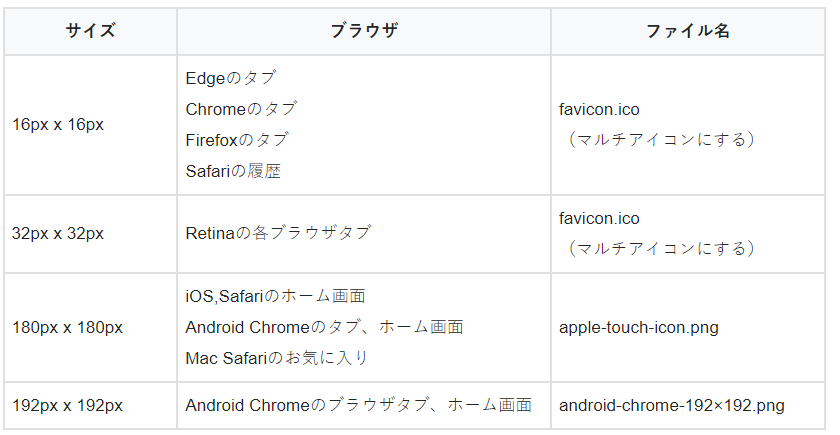
なお、ブラウザによってfaviconで使う画像サイズが違うため、対応させたいブラウザのサイズにしましょう。
すでに設定したい画像がある場合も、画像サイズの調整をしましょう。
画像引用: https://sdesignlabo.com/web/favicon/
ちなみに、オリジナルのものを作成したいときは、こちらのサイトでも作成できるようです。
実装方法
今回はReactで実装していきます。 実装方法は2ステップ。まず、設定したい画像を配置します。
配置するディレクトリは、public直下になります、
2つ目にpublic直下のindex.htmlファイルのfaviconを設定している箇所を修正します。
初期値は「favicon.ico」で、最初に配置した画像の名前が同様ならこのステップは必要ありません。
index.html
<!DOCTYPE html>
<html lang="en">
  <head>
    <meta charset="utf-8" />
    <link rel="icon" href="%PUBLIC_URL%/favicon.ico" />#ここを設定したい画像の名前にする
    <meta name="viewport" content="width=device-width, initial-scale=1" />
    <meta name="theme-color" content="#000000" />
    <meta
      name="description"
      content="Web site created using create-react-app"
    />
    <link rel="apple-touch-icon" href="%PUBLIC_URL%/logo192.png" />
    <!--
      manifest.json provides metadata used when your web app is installed on a
      user's mobile device or desktop. See https://developers.google.com/web/fundamentals/web-app-manifest/
    -->
    <link rel="manifest" href="%PUBLIC_URL%/manifest.json" />
    <!--
      Notice the use of %PUBLIC_URL% in the tags above.
      It will be replaced with the URL of the `public` folder during the build.
      Only files inside the `public` folder can be referenced from the HTML.

      Unlike "/favicon.ico" or "favicon.ico", "%PUBLIC_URL%/favicon.ico" will
      work correctly both with client-side routing and a non-root public URL.
      Learn how to configure a non-root public URL by running `npm run build`.
    -->
    <title>React App</title>
  </head>
  <body>
    <noscript>You need to enable JavaScript to run this app.</noscript>
    <div id="root"></div>
    <!--
      This HTML file is a template.
      If you open it directly in the browser, you will see an empty page.

      You can add webfonts, meta tags, or analytics to this file.
      The build step will place the bundled scripts into the <body> tag.

      To begin the development, run `npm start` or `yarn start`.
      To create a production bundle, use `npm run build` or `yarn build`.
    -->
  </body>
</html>
これでfaviconの設定が完了です。アプリを起動して実際に確認してみましょう。

参考
https://qiita.com/yono2844/items/6853470460ecbf1ce6c9