Astro(静的サイトジェネレーター)を使ってポートフォリオサイトを作って見たので、その時の手順などを簡単にまとめました。
コンテンツの部分はNewt、UIフレームワークはshadcn/ui、デプロイはCloudflarePagesを使っています。
Astroをインストール
まずはAstroをインストールします。
npm create astro@latest
#or
bunx create-astro@latest
#or
pnpm create astro@latest
- Where should we create your new project?
./your-app-name
- How would you like to start your new project?
Choose a starter template (or Empty)
- Install dependencies?
Yes
- Do you plan to write TypeScript?
Yes
- How strict should TypeScript be?
Strict
- Initialize a new git repository? (optional)
Yes/No
インストール時に初期設定を行います。

インストールが完了すると上記のディレクトリ構造が作られます。
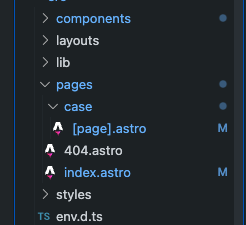
ページやコンポーネントの配置などはNext.jsなどと似ています。
pagesディレクトリにファイルを増やしていくことで、自動的にルーティングを行ってくれます。
ファイル名を404とすると、自動的に404のエラー用のページになります。
動的なページは[id]のように[]で囲む必要があります。
Reactコンポーネントを使えるようにする
AstroではReact、Vue、Svelteなど有名なフロントエンドフレームワークをサポートしています。
今回はReactを使用できるようにします。
npx astro add react
import { defineConfig } from 'astro/config';

import react from "@astrojs/react";

// https://astro.build/config
export default defineConfig({
  integrations: [react()]
});
Tailwindとshadcn/uiをインストール
UIフレームワークはTailwindとshadcn/uiを使用します。
npx astro add tailwind
import { defineConfig } from 'astro/config';
import react from "@astrojs/react";

import tailwind from "@astrojs/tailwind";

// https://astro.build/config
export default defineConfig({
  integrations: [react(), tailwind()]
});
npx shadcn-ui@latest init
Would you like to use TypeScript (recommended)? no / yes
Which style would you like to use? › Default
Which color would you like to use as base color? › Slate
Where is your global CSS file? › › ./src/styles/globals.css
Do you want to use CSS variables for colors? › no / yes
Where is your tailwind.config.js located? › tailwind.config.mjs
Configure the import alias for components: › @/components
Configure the import alias for utils: › @/lib/utils
Are you using React Server Components? › no
astro.config.mjsやtailwind.config.mjsでtailwindの設定をしていきます。
export default defineConfig({
  integrations: [
    react(),
    tailwind({
      applyBaseStyles: false
    })
  ]
})
content: ["./src/**/*.{astro,html,js,jsx,md,mdx,svelte,ts,tsx,vue}"],
---
import '@/styles/globals.css'

interface Props {
  title: string
}

const { title } = Astro.props
---

<!doctype html>
<html lang="ja">
  <head>
    <meta charset="UTF-8" />
    <meta name="description" content="Astro description" />
    <meta name="viewport" content="width=device-width" />
    <link rel="icon" type="image/svg+xml" href="/favicon.svg" />
    <meta name="generator" content={Astro.generator} />
    <title>{title}</title>
  </head>
  <body>
    <slot />
  </body>
</html>
Layoutファイルでtailwindのglobals.cssを読み込みます。
shadcn/uiでは使用したいコンポーネントを個別にインストールして使用していきます。
bunx shadcn-ui@latest add button
import { Button } from '@/components/ui/button'
<Button variant="outline"/>
Newtと連携する
まずはNewtにコンテンツを入れていきます。

コンテンツを入れたらAstroとNewtを連携させます。
npm install newt-client-js
#or
pnpm add newt-client-js
#or
bun add newt-client-js
NEWT_SPACE_UID=your-space-id
NEWT_CDN_API_TOKEN=xxxxxxxxxxxxxxx
interface ImportMetaEnv {
  readonly NEWT_SPACE_UID: string
  readonly NEWT_CDN_API_TOKEN: string
}
env.d.tsでImportMetaEnvを設定すると環境変数の自動補完が効くようになります。
import { createClient } from 'newt-client-js'

export const newtClient = createClient({
  spaceUid: import.meta.env.NEWT_SPACE_UID,
  token: import.meta.env.NEWT_CDN_API_TOKEN,
  apiType: 'cdn'
})
一覧取得
import { newtClient } from '@/lib/newt-client'

export const getBlogs = async () => {
  const { items: blogs } = await newtClient.getContents({
    appUid: 'blog',
    modelUid: 'blog',
    query: {
      select: ['title', 'slug', 'body'],
      order: ['_sys.createdAt']
    }
  })
  return blogs
}
queryに条件を指定することが可能です。
詳細取得
---
export const getStaticPaths = async () => {
  const { items: blogs } = await newtClient.getContents<Blog>({
    appUid: 'blog',
    modelUid: 'blog',
    query: {
      select: ['title', 'slug', 'body'],
    },
  })
  return blogs.map((blog) => ({
    params: { id: blog.slug },
    props: { blog }
  }))
}

const { blog } = Astro.props
---

<Layout>
  <div>{blog.title}</div>
  <div>{blog.body}</div>
</Layout>
ページネーションもできる
Astroのpaginateを使えばページネーションも実装できます。
---
import { newtClient } from '@/lib/newt-client'
import type { GetStaticPathsOptions } from 'astro'

export const getStaticPaths = async ({ paginate }: GetStaticPathsOptions) => {
  const { items: blogs } = await newtClient.getContents<Blog>({
    appUid: 'blog',
    modelUid: 'blog',
    query: {}
  })
  return paginate(blogs, { pageSize: 1 }) // 1ページに表示する個数
}

const { page } = Astro.props
propsのpageには下記のページネーションの情報が入っています。
currentPage: 1,
lastPage: 4,
url: { current: '/case/1', next: '/case/2', prev: undefined

shadcn/uiのPaginationコンポーネントで簡単にページネーションのUIを実装できます。
下記は実装例です。
import {
  Pagination,
  PaginationContent,
  PaginationEllipsis,
  PaginationItem,
  PaginationLink,
  PaginationNext,
  PaginationPrevious
} from '@/components/ui/pagination'

type Props = {
  total: number
  currentPage: number
  url: {
    current: string | undefined
    next: string | undefined
    prev: string | undefined
  }
}

const Pagination = ({ total, currentPage, url }: Props) => {
  return (
    <Pagination>
      <PaginationContent>
        <PaginationItem hidden={!url.prev}>
          <PaginationPrevious href={url.prev} />
        </PaginationItem>
        <PaginationItem hidden={!url.prev}>
          <PaginationLink href={url.prev}>{currentPage - 1}</PaginationLink>
        </PaginationItem>
        <PaginationItem>
          <PaginationLink isActive>{currentPage}</PaginationLink>
        </PaginationItem>
        <PaginationItem hidden={!url.next}>
          <PaginationLink href={url.next}>{currentPage + 1}</PaginationLink>
        </PaginationItem>
        <PaginationItem hidden={currentPage + 1 >= total}>
          <PaginationEllipsis />
        </PaginationItem>
        <PaginationItem hidden={!url.next}>
          <PaginationNext href={url.next} />
        </PaginationItem>
      </PaginationContent>
    </Pagination>
  )
}

export default Pagination
Astroのデプロイ
AstroのデプロイはVercel・Cloudflare Pages・GitHub Pagesなどのホスティングサービスを使えば簡単にできます。
ドキュメントにホスティングサービスごとのデプロイ方法が記載されています。
CloudflarePages

今回はCloudflarePagesでデプロイしました。

Newtの環境変数は別途設定する必要があります。