概要
前回の備忘録(下記)に続いて、Antビルドをしてwarファイルを作ってみます。
手順1:Antビルドファイルを作成する
まずは、この状態であること(前回の続き)から確認してください。

プロジェクトを選択して右クリックし、「エクスポート」を選択します。
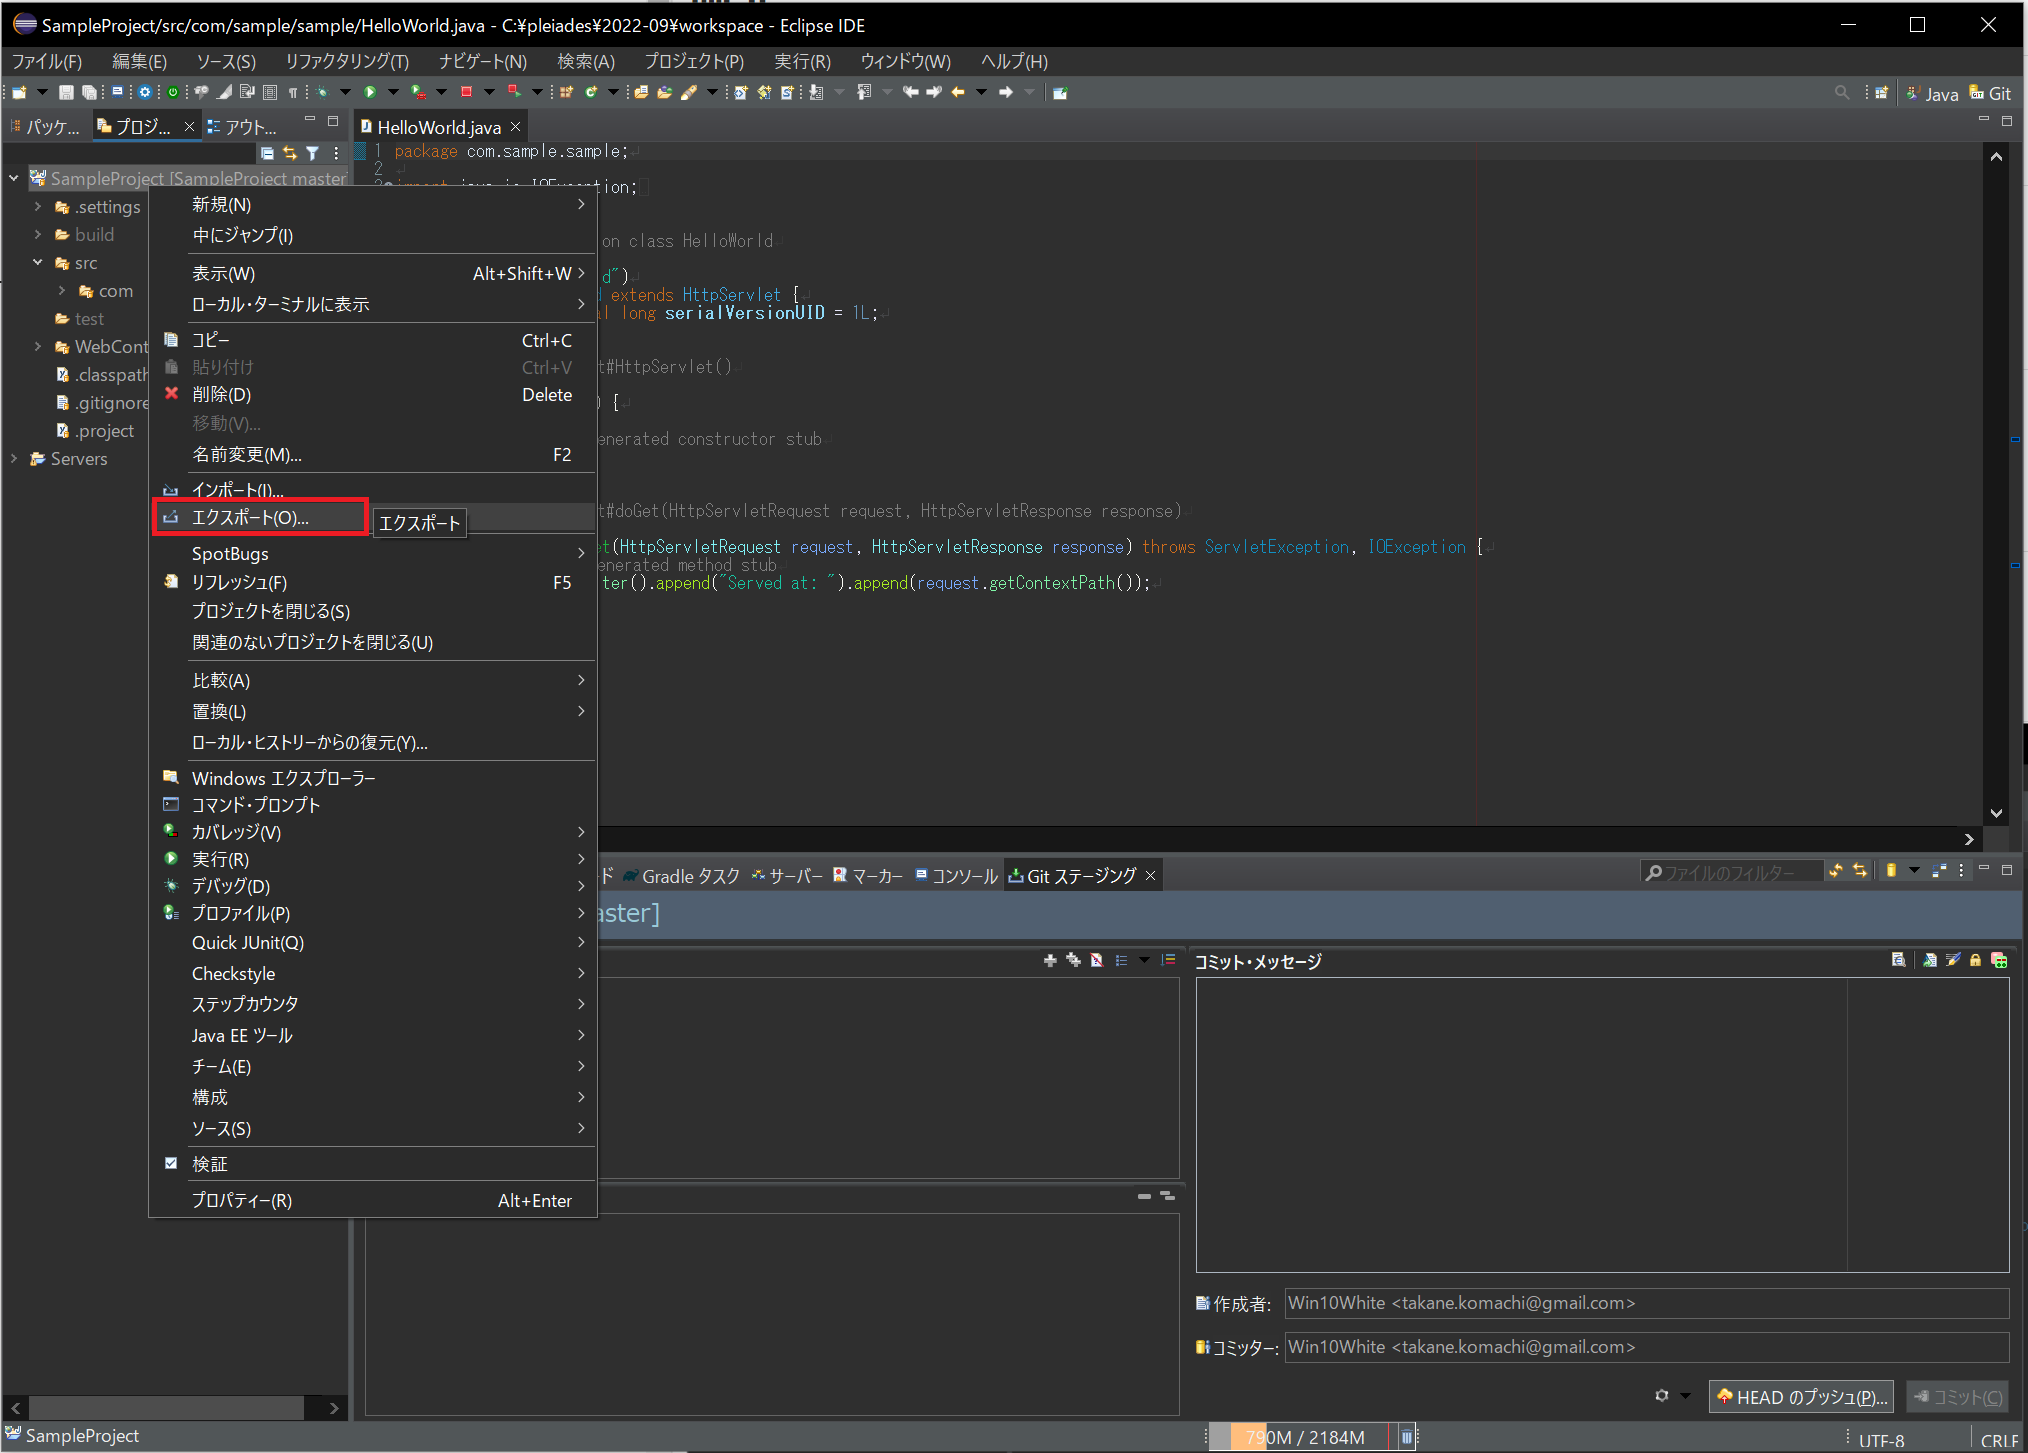
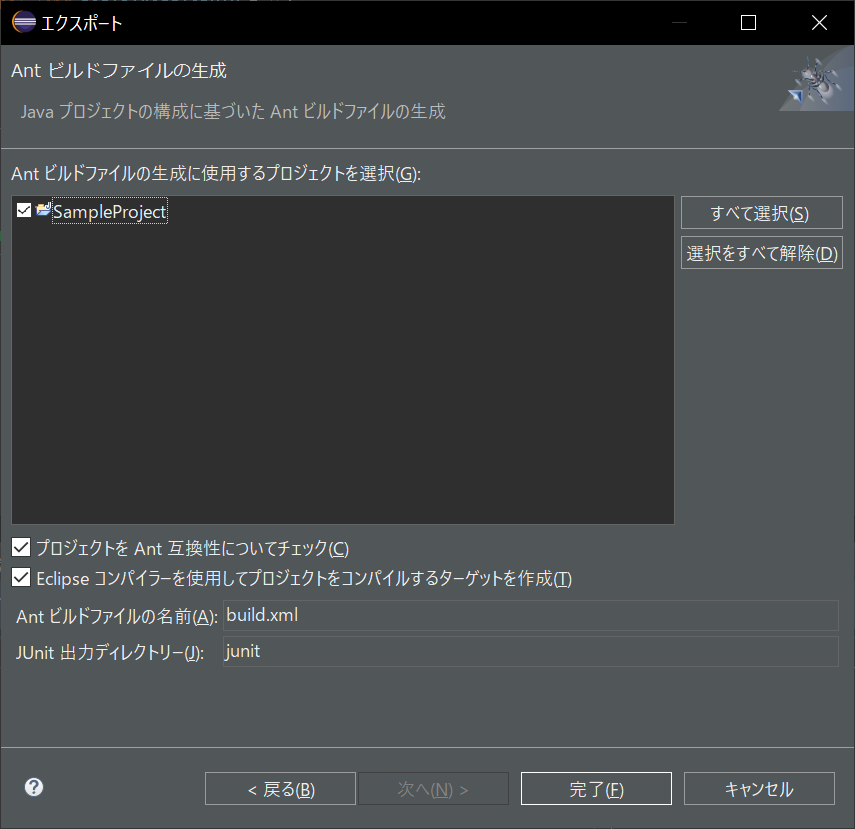
「一般」-「Antビルドファイル」を選択して「次へ」

初期状態ではプロジェクトが何も選択されていないので、対象のプロジェクトにチェックを付けます。

「完了」ボタンを押して作成します。
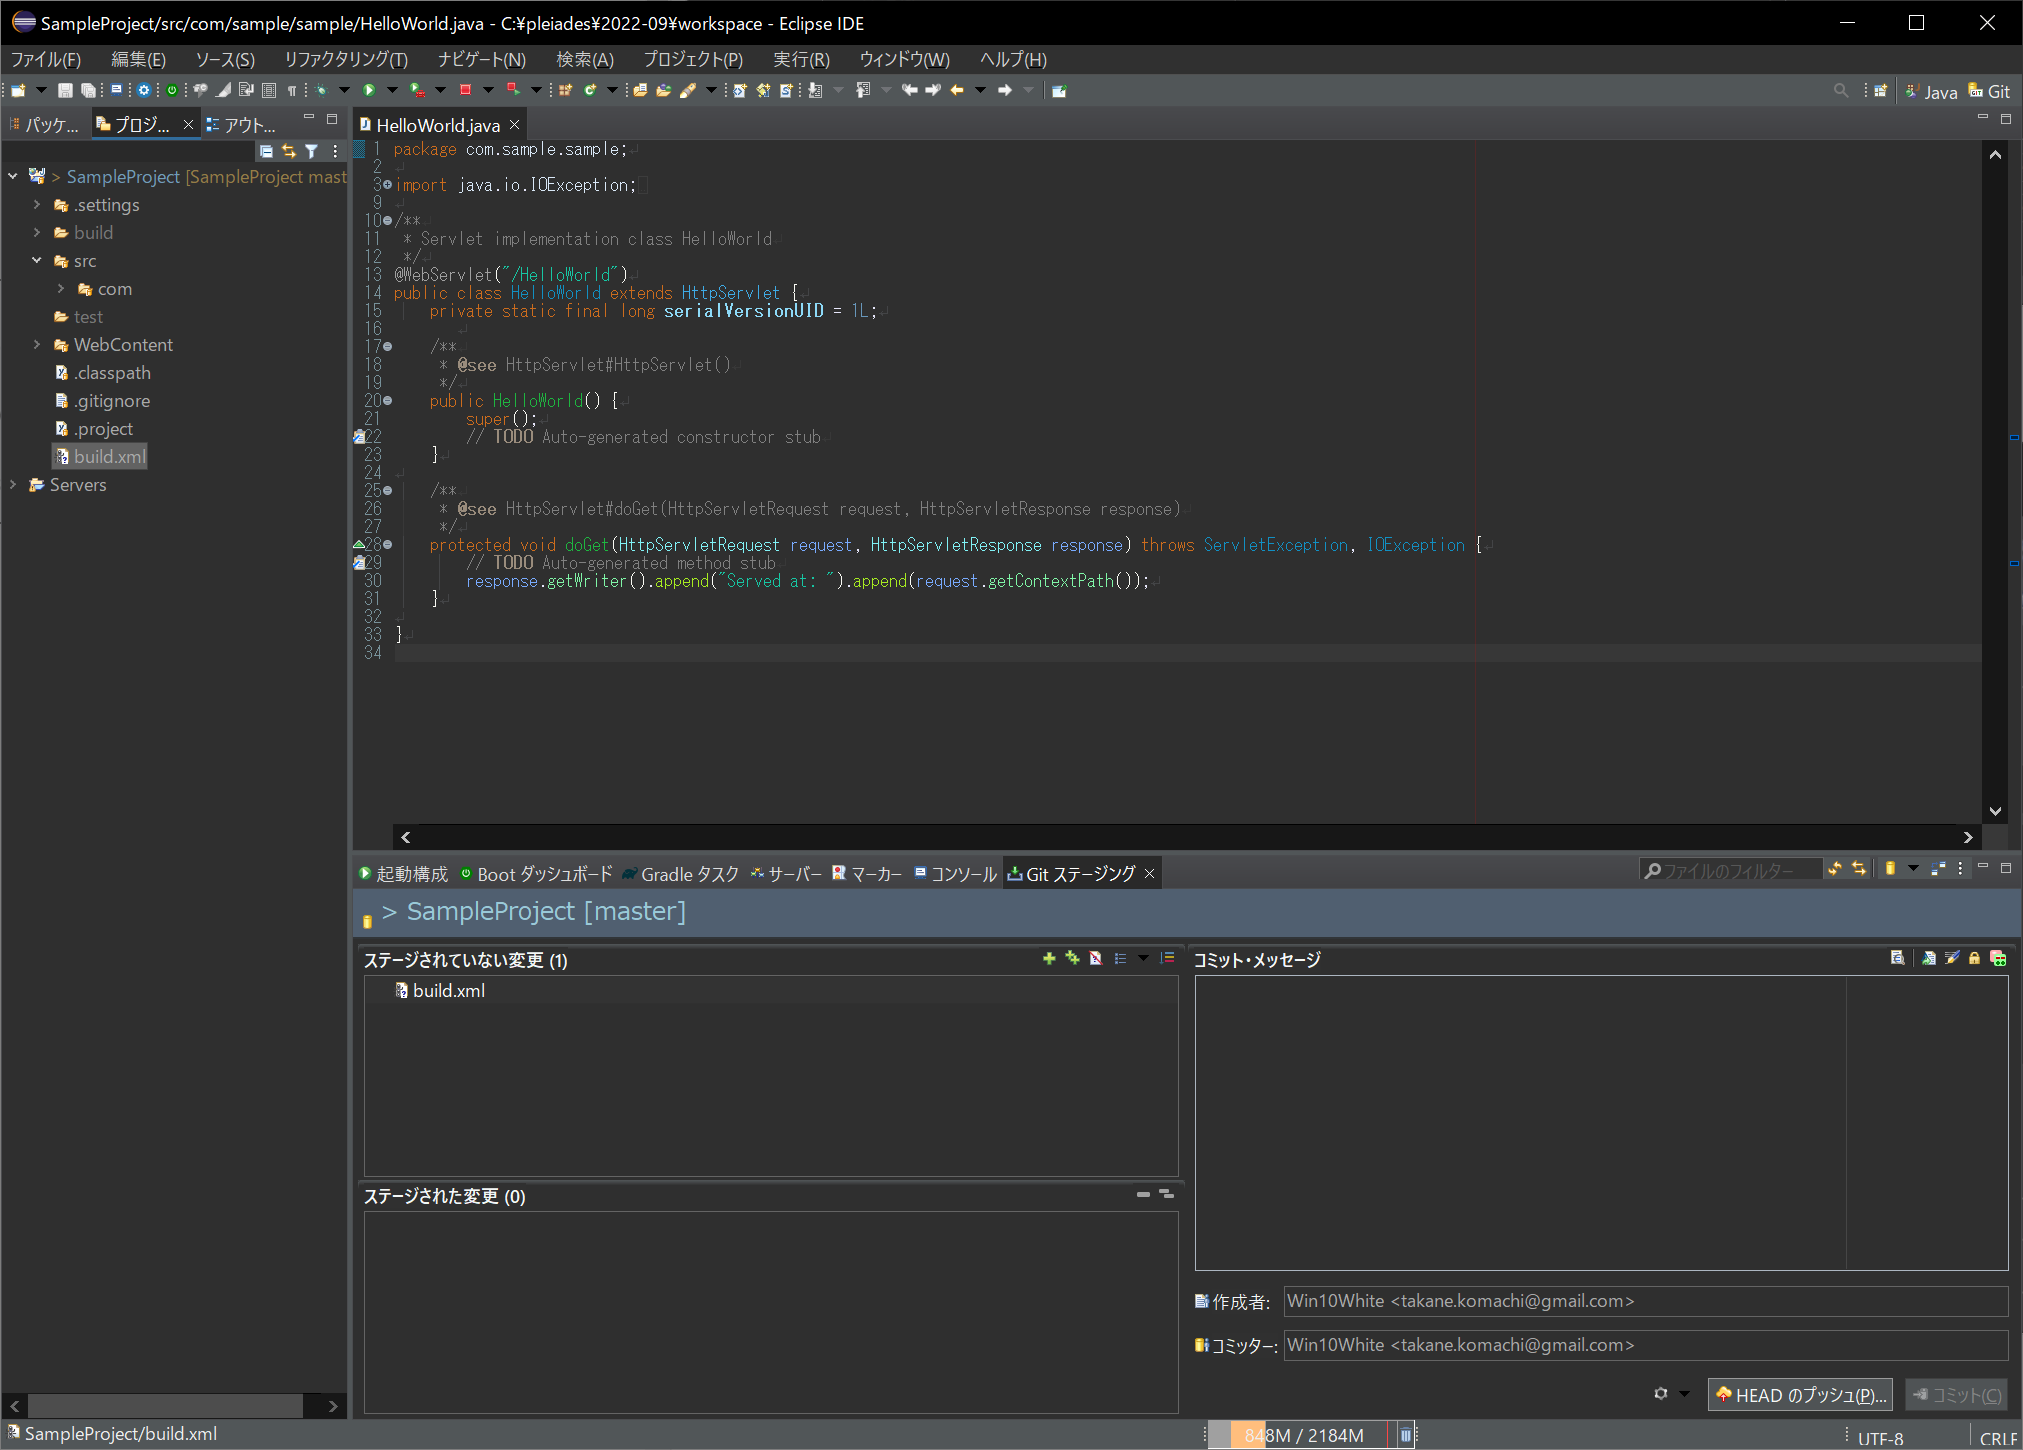
作成されると、ルートに「build.xml」が作成されます。
手順2:build.xmlの中身を確認する
build.xmlを開くと下記のように自動的にプロジェクトから内容を生成してくれます。
<?xml version="1.0" encoding="UTF-8" standalone="no"?>
<!-- WARNING: Eclipse auto-generated file.
              Any modifications will be overwritten.
              To include a user specific buildfile here, simply create one in the same
              directory with the processing instruction <?eclipse.ant.import?>
              as the first entry and export the buildfile again. -->
    <project basedir="." default="build" name="SampleProject">
    <property environment="env"/>
    <property name="debuglevel" value="source,lines,vars"/>
    <property name="target" value="17"/>
    <property name="source" value="17"/>
    <path id="サーバー・ランタイム [Tomcat9 (Java17)].libraryclasspath">
        <pathelement location="../../tomcat/9/lib/annotations-api.jar"/>
        <pathelement location="../../tomcat/9/lib/catalina-ant.jar"/>
        <pathelement location="../../tomcat/9/lib/catalina-ha.jar"/>
        <pathelement location="../../tomcat/9/lib/catalina-ssi.jar"/>
        <pathelement location="../../tomcat/9/lib/catalina-storeconfig.jar"/>
        <pathelement location="../../tomcat/9/lib/catalina-tribes.jar"/>
        <pathelement location="../../tomcat/9/lib/catalina.jar"/>
        <pathelement location="../../tomcat/9/lib/ecj-4.20.jar"/>
        <pathelement location="../../tomcat/9/lib/el-api.jar"/>
        <pathelement location="../../tomcat/9/lib/jasper-el.jar"/>
        <pathelement location="../../tomcat/9/lib/jasper.jar"/>
        <pathelement location="../../tomcat/9/lib/jaspic-api.jar"/>
        <pathelement location="../../tomcat/9/lib/jsp-api.jar"/>
        <pathelement location="../../tomcat/9/lib/servlet-api.jar"/>
        <pathelement location="../../tomcat/9/lib/tomcat-api.jar"/>
        <pathelement location="../../tomcat/9/lib/tomcat-coyote.jar"/>
        <pathelement location="../../tomcat/9/lib/tomcat-dbcp.jar"/>
        <pathelement location="../../tomcat/9/lib/tomcat-i18n-cs.jar"/>
        <pathelement location="../../tomcat/9/lib/tomcat-i18n-de.jar"/>
        <pathelement location="../../tomcat/9/lib/tomcat-i18n-es.jar"/>
        <pathelement location="../../tomcat/9/lib/tomcat-i18n-fr.jar"/>
        <pathelement location="../../tomcat/9/lib/tomcat-i18n-ja.jar"/>
        <pathelement location="../../tomcat/9/lib/tomcat-i18n-ko.jar"/>
        <pathelement location="../../tomcat/9/lib/tomcat-i18n-pt-BR.jar"/>
        <pathelement location="../../tomcat/9/lib/tomcat-i18n-ru.jar"/>
        <pathelement location="../../tomcat/9/lib/tomcat-i18n-zh-CN.jar"/>
        <pathelement location="../../tomcat/9/lib/tomcat-jdbc.jar"/>
        <pathelement location="../../tomcat/9/lib/tomcat-jni.jar"/>
        <pathelement location="../../tomcat/9/lib/tomcat-util-scan.jar"/>
        <pathelement location="../../tomcat/9/lib/tomcat-util.jar"/>
        <pathelement location="../../tomcat/9/lib/tomcat-websocket.jar"/>
        <pathelement location="../../tomcat/9/lib/websocket-api.jar"/>
    </path>
    <path id="Web App ライブラリー.libraryclasspath"/>
    <path id="EAR ライブラリー.libraryclasspath"/>
    <path id="SampleProject.classpath">
        <pathelement location="build/classes"/>
        <pathelement location="build/test-classes"/>
        <path refid="サーバー・ランタイム [Tomcat9 (Java17)].libraryclasspath"/>
        <path refid="Web App ライブラリー.libraryclasspath"/>
        <path refid="EAR ライブラリー.libraryclasspath"/>
    </path>
    <target name="init">
        <mkdir dir="build/classes"/>
        <mkdir dir="build/test-classes"/>
        <copy includeemptydirs="false" todir="build/classes">
            <fileset dir="src">
                <exclude name="**/*.launch"/>
                <exclude name="**/*.java"/>
            </fileset>
        </copy>
        <copy includeemptydirs="false" todir="build/test-classes">
            <fileset dir="test">
                <exclude name="**/*.launch"/>
                <exclude name="**/*.java"/>
            </fileset>
        </copy>
    </target>
    <target name="clean">
        <delete dir="build/classes"/>
        <delete dir="build/test-classes"/>
    </target>
    <target depends="clean" name="cleanall"/>
    <target depends="build-subprojects,build-project" name="build"/>
    <target name="build-subprojects"/>
    <target depends="init" name="build-project">
        <echo message="${ant.project.name}: ${ant.file}"/>
        <javac debug="true" debuglevel="${debuglevel}" destdir="build/classes" includeantruntime="false" source="${source}" target="${target}">
            <src path="src"/>
            <classpath refid="SampleProject.classpath"/>
        </javac>
        <javac debug="true" debuglevel="${debuglevel}" destdir="build/test-classes" includeantruntime="false" source="${source}" target="${target}">
            <src path="test"/>
            <classpath refid="SampleProject.classpath"/>
        </javac>
    </target>
    <target description="Build all projects which reference this project. Useful to propagate changes." name="build-refprojects"/>
    <target description="copy Eclipse compiler jars to ant lib directory" name="init-eclipse-compiler">
        <copy todir="${ant.library.dir}">
            <fileset dir="${ECLIPSE_HOME}/plugins" includes="org.eclipse.jdt.core_*.jar"/>
        </copy>
        <unzip dest="${ant.library.dir}">
            <patternset includes="jdtCompilerAdapter.jar"/>
            <fileset dir="${ECLIPSE_HOME}/plugins" includes="org.eclipse.jdt.core_*.jar"/>
        </unzip>
    </target>
    <target description="compile project with Eclipse compiler" name="build-eclipse-compiler">
        <property name="build.compiler" value="org.eclipse.jdt.core.JDTCompilerAdapter"/>
        <antcall target="build"/>
    </target>
</project>
ただ、この初期状態ではいろいろ「足りない」ので、Antのリファレンスを見ながら編集していきます。
ちなみにAntのリファレンスは下記です。
手順3:build.xmlを編集する
propertiesファイルを作成してリンクする
Pleiadesを使用していることもありますが、基本的に「変数」はbuild.xml内に書きたくないので変数はpropertiesに外出しします。


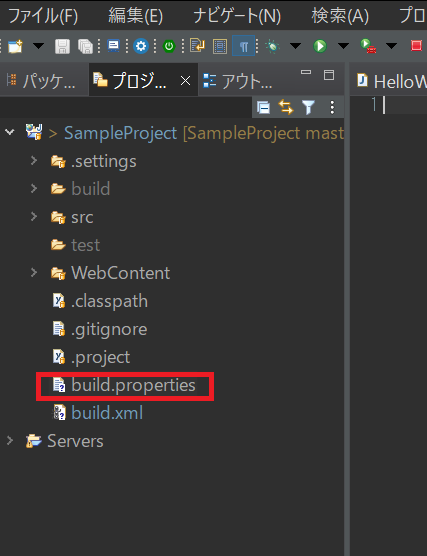
build.xmlにbuild.propertiesのインポート設定をします
...
<project basedir="." default="build" name="SampleProject">
+	<property file="build.properties" />
    <property environment="env"/>
    <property name="debuglevel" value="source,lines,vars"/>
...
Tomcatライブラリの読み込みを簡潔にする
初期状態だと、動かすTomcatのバージョンを変えてもTomcat9のライブラリを見に行くし、jarが個別指定なので面倒です。
    <path id="サーバー・ランタイム [Tomcat9 (Java17)].libraryclasspath">
        <pathelement location="../../tomcat/9/lib/annotations-api.jar"/>
        <pathelement location="../../tomcat/9/lib/catalina-ant.jar"/>
        <pathelement location="../../tomcat/9/lib/catalina-ha.jar"/>
        <pathelement location="../../tomcat/9/lib/catalina-ssi.jar"/>
        <pathelement location="../../tomcat/9/lib/catalina-storeconfig.jar"/>
        <pathelement location="../../tomcat/9/lib/catalina-tribes.jar"/>
        <pathelement location="../../tomcat/9/lib/catalina.jar"/>
        <pathelement location="../../tomcat/9/lib/ecj-4.20.jar"/>
        <pathelement location="../../tomcat/9/lib/el-api.jar"/>
        <pathelement location="../../tomcat/9/lib/jasper-el.jar"/>
        <pathelement location="../../tomcat/9/lib/jasper.jar"/>
        <pathelement location="../../tomcat/9/lib/jaspic-api.jar"/>
        <pathelement location="../../tomcat/9/lib/jsp-api.jar"/>
        <pathelement location="../../tomcat/9/lib/servlet-api.jar"/>
        <pathelement location="../../tomcat/9/lib/tomcat-api.jar"/>
        <pathelement location="../../tomcat/9/lib/tomcat-coyote.jar"/>
        <pathelement location="../../tomcat/9/lib/tomcat-dbcp.jar"/>
        <pathelement location="../../tomcat/9/lib/tomcat-i18n-cs.jar"/>
        <pathelement location="../../tomcat/9/lib/tomcat-i18n-de.jar"/>
        <pathelement location="../../tomcat/9/lib/tomcat-i18n-es.jar"/>
        <pathelement location="../../tomcat/9/lib/tomcat-i18n-fr.jar"/>
        <pathelement location="../../tomcat/9/lib/tomcat-i18n-ja.jar"/>
        <pathelement location="../../tomcat/9/lib/tomcat-i18n-ko.jar"/>
        <pathelement location="../../tomcat/9/lib/tomcat-i18n-pt-BR.jar"/>
        <pathelement location="../../tomcat/9/lib/tomcat-i18n-ru.jar"/>
        <pathelement location="../../tomcat/9/lib/tomcat-i18n-zh-CN.jar"/>
        <pathelement location="../../tomcat/9/lib/tomcat-jdbc.jar"/>
        <pathelement location="../../tomcat/9/lib/tomcat-jni.jar"/>
        <pathelement location="../../tomcat/9/lib/tomcat-util-scan.jar"/>
        <pathelement location="../../tomcat/9/lib/tomcat-util.jar"/>
        <pathelement location="../../tomcat/9/lib/tomcat-websocket.jar"/>
        <pathelement location="../../tomcat/9/lib/websocket-api.jar"/>
    </path>
    <path id="サーバー・ランタイム [Tomcat (Java)].libraryclasspath">
        <fileset dir="${tomcatdir}/lib">
            <include name="*.jar" />
        </fileset>
    </path>
tomcatdir=../../../tomcat/9
JUnit用の設定を削除しておく
<?xml version="1.0" encoding="UTF-8" standalone="no"?>
<!-- WARNING: Eclipse auto-generated file.
              Any modifications will be overwritten.
              To include a user specific buildfile here, simply create one in the same
              directory with the processing instruction <?eclipse.ant.import?>
              as the first entry and export the buildfile again. -->
<project basedir="." default="build" name="SampleProject">
	<property file="build.properties" />
    <property environment="env"/>
    <property name="debuglevel" value="source,lines,vars"/>
    <property name="target" value="17"/>
    <property name="source" value="17"/>
    <path id="サーバー・ランタイム [Tomcat (Java)].libraryclasspath">
        <fileset dir="${tomcatdir}/lib">
            <include name="*.jar" />
        </fileset>
    </path>
    <path id="Web App ライブラリー.libraryclasspath"/>
    <path id="EAR ライブラリー.libraryclasspath"/>
    <path id="SampleProject.classpath">
        <pathelement location="build/classes"/>
-        <pathelement location="build/test-classes"/>
        <path refid="サーバー・ランタイム [Tomcat9 (Java17)].libraryclasspath"/>
        <path refid="Web App ライブラリー.libraryclasspath"/>
        <path refid="EAR ライブラリー.libraryclasspath"/>
    </path>
    <target name="init">
        <mkdir dir="build/classes"/>
-        <mkdir dir="build/test-classes"/>
        <copy includeemptydirs="false" todir="build/classes">
            <fileset dir="src">
                <exclude name="**/*.launch"/>
                <exclude name="**/*.java"/>
            </fileset>
        </copy>
-        <copy includeemptydirs="false" todir="build/test-classes">
-            <fileset dir="test">
-                <exclude name="**/*.launch"/>
-                <exclude name="**/*.java"/>
-            </fileset>
-        </copy>
    </target>
    <target name="clean">
        <delete dir="build/classes"/>
-        <delete dir="build/test-classes"/>
    </target>
    <target depends="clean" name="cleanall"/>
    <target depends="build-subprojects,build-project" name="build"/>
    <target name="build-subprojects"/>
    <target depends="init" name="build-project">
        <echo message="${ant.project.name}: ${ant.file}"/>
        <javac debug="true" debuglevel="${debuglevel}" destdir="build/classes" includeantruntime="false" source="${source}" target="${target}">
            <src path="src"/>
            <classpath refid="SampleProject.classpath"/>
        </javac>
-        <javac debug="true" debuglevel="${debuglevel}" destdir="build/test-classes" includeantruntime="false" source="${source}" target="${target}">
-            <src path="test"/>
-            <classpath refid="SampleProject.classpath"/>
-        </javac>
    </target>
    <target description="Build all projects which reference this project. Useful to propagate changes." name="build-refprojects"/>
    <target description="copy Eclipse compiler jars to ant lib directory" name="init-eclipse-compiler">
        <copy todir="${ant.library.dir}">
            <fileset dir="${ECLIPSE_HOME}/plugins" includes="org.eclipse.jdt.core_*.jar"/>
        </copy>
        <unzip dest="${ant.library.dir}">
            <patternset includes="jdtCompilerAdapter.jar"/>
            <fileset dir="${ECLIPSE_HOME}/plugins" includes="org.eclipse.jdt.core_*.jar"/>
        </unzip>
    </target>
    <target description="compile project with Eclipse compiler" name="build-eclipse-compiler">
        <property name="build.compiler" value="org.eclipse.jdt.core.JDTCompilerAdapter"/>
        <antcall target="build"/>
    </target>
</project>
initにひと手間
init時にbuildnumberとtimestampを設定しておきます。
MANIFEST内に入れるときに使います。
    <target name="init">
+        <buildnumber/>
+        <tstamp>
+            <format property="timestamp" pattern="yyyy/MM/dd HH:mm:ss" />
+        </tstamp>
        <mkdir dir="build/classes"/>
        <copy includeemptydirs="false" todir="build/classes">
            <fileset dir="src">
                <exclude name="**/*.launch"/>
                <exclude name="**/*.java"/>
            </fileset>
        </copy>
    </target>
WARの出力先を設定する
Antビルドを実行した際にWARファイルを作成する場合の出力先を考えます。
まぁ、直下に「war」フォルダを作って、そこに出力ということで、、、
う~ん、どうせならwarを作る際の作業領域として設定してしまうか。
+ PROJECT_NAME=SampleProject
+ VENDOR=John Smith
+ workdir=./war
tomcatdir=../../../tomcat/9
build.xml側は、ちょっと色々改変が必要です。
なぜなら「build」したら「作成」するけど「clean」したら消すのがお作法だから。
とりあえず、面倒なのでwarフォルダを削除するものを定義します。
(あとは、必要なところでdependsに追加して実行する)
    <!-- CLEAN WAR FOLDER-->
    <target name="clean_war">
        <delete dir="${workdir}/${PROJECT_NAME}"/>
    </target>
続いて、warを作成する際にwarに含めるものをかき集めるものを定義します。
かき集めるのは、まずビルドされた「build/classes」の中身と、「WebContent」の中のものです。
    <!--   ITITIALIZE MAKE WAR    -->
    <target depends="clean_war" name="init_war">
        <mkdir dir="${workdir}/${PROJECT_NAME}/WEB-INF"/>
        <mkdir dir="${workdir}/${PROJECT_NAME}/WEB-INF/classes" />
        <mkdir dir="${workdir}/${PROJECT_NAME}/WEB-INF/lib" />
        <copy todir="${workdir}/${PROJECT_NAME}/">
            <fileset dir="WebContent">
                <exclude name=".git" />
                <exclude name="WEB-INF/web.xml" />
            </fileset>
        </copy>
        <copy todir="${workdir}/${PROJECT_NAME}/WEB-INF/classes">
            <fileset dir="build/classes">
                <exclude name="log4j*.xml"/>
            </fileset>
        </copy>
        <copy file="WebContent/WEB-INF/web.xml" tofile="${workdir}/${PROJECT_NAME}/WEB-INF/web.xml"/>
    </target>

    <!--   MAKE WAR FILE          -->
    <target depends="build-project,init_war" name="make-war">
        <jar jarfile="${workdir}/${PROJECT_NAME}.war" basedir="${workdir}/${PROJECT_NAME}">
            <manifest>
                <attribute name="Author" value="${user.name}"/>
                <section name="Shared">
                    <attribute name="Title" value="${PROJECT_NAME}" />
                    <attribute name="Vendor" value="${VENDOR}" />
                    <attribute name="Build" value="${build.number}"/>
                    <attribute name="Date" value="${timestamp}"/>
                </section>
                <section name="Copyright">
                    <attribute name="Copy" value="${VENDOR}" />
                </section>
            </manifest>
        </jar>
    </target>
手順4:warファイルを作成する
それでは、build.xmlを選択して右クリックしていきます。
「2 Antビルド」を実行すると「build」されるだけなので「3 Antビルド...」を選択します。

そうすると、下記のように定義されているnameを一覧で列挙してくれます。
今回作成した3つも末尾に追加されていますね。

通常だと「build」を実行することになっているので「make_war」にのみチェックをつけて実行します。

コンソールに処理ログが表示されます。

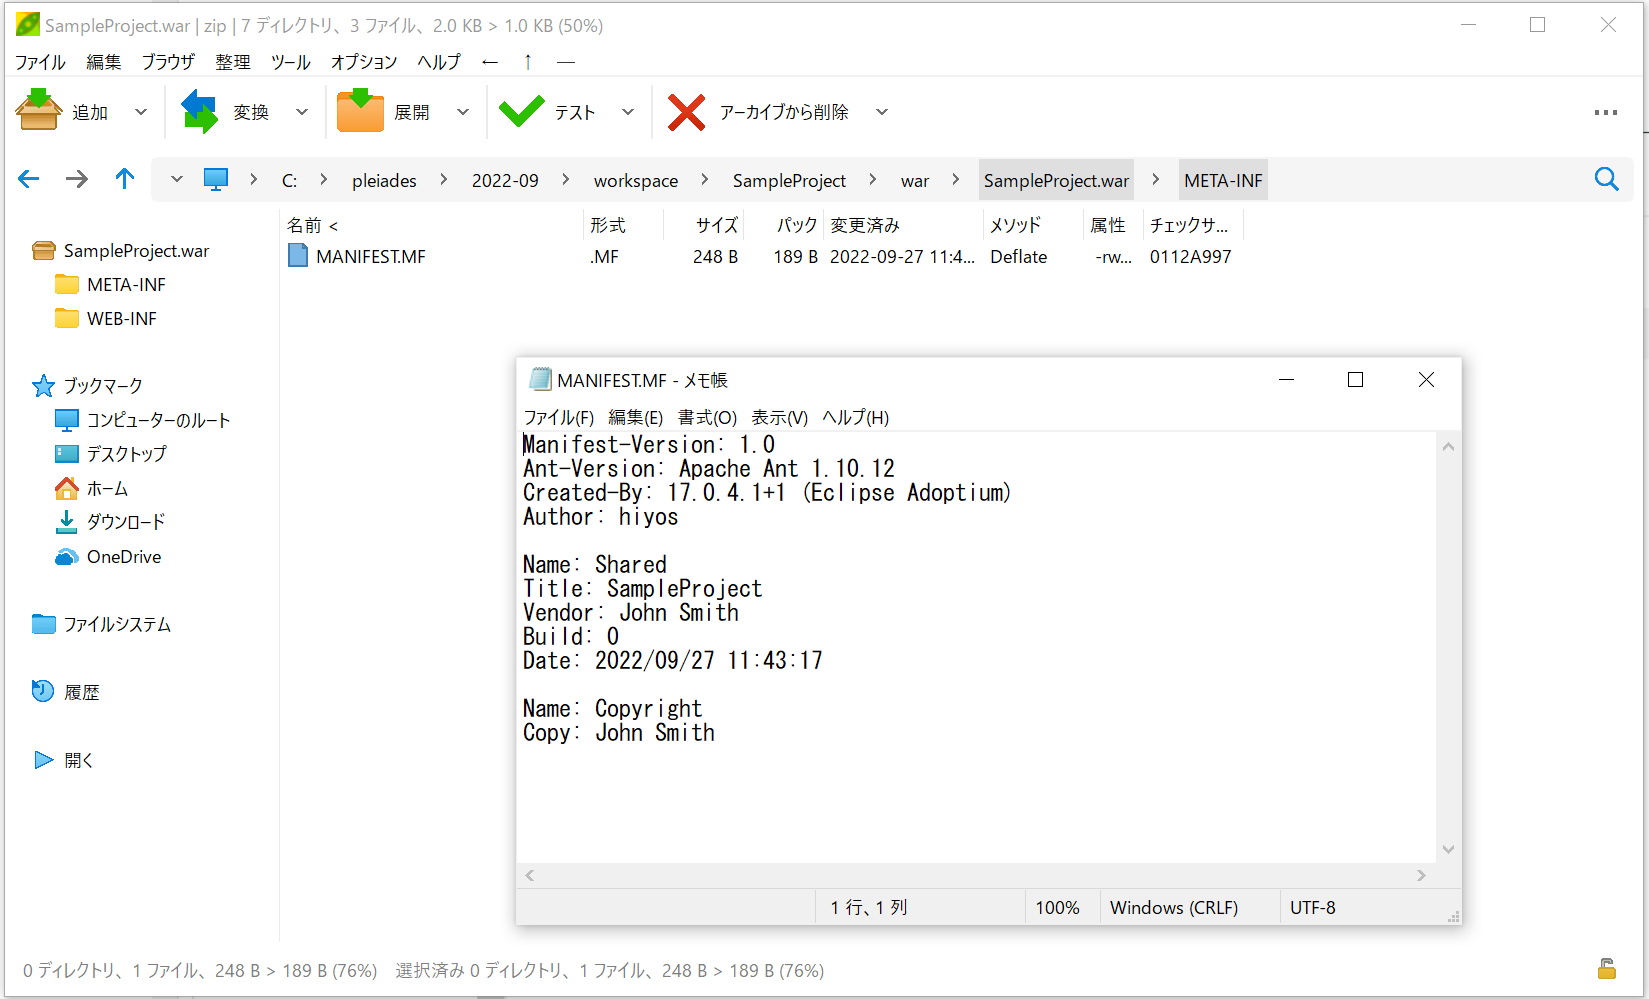
エクスプローラで確認してみます。
一応、warが出来てますね。

warファイルの中身も、想定されているような状況、、、、っぽいです。

MANIFEST内もそれなりに書かれてますね
とりあえず、これでwarができたので、Apache/Tomcatのサーバにポイっと置いて動くのを確認することができれば、あとは改変、改変でいけますね。