概要
Windows(Windows10 64bit)上で、Vagrant/VirtualBoxを使ってみる。
環境ができたらUbuntu20.04(Focal Fossa)を取得して起動する。
必要なもの
- Vagrant
- VirtualBox
やってみる
Vagrantをインストールする
Vagrant by HashiCorp
Downloadページ(https://www.vagrantup.com/downloads )から、Windows 64bit用のインストーラをDLする。

DLした「vagrant_2.2.19_i686.msi(以前は、vagrant_2.0.1_x86_64.msiというように「x86_64」という書き方だったんですけど「i686」に変わったんですね)」をインストールする。
デフォルトの設定のままインストールすると、Cドライブ直下にインストールされる。(使用領域は約1GBぐらい)
インストールが完了すると、PCの再起動を要求される。

VirtualBoxをインストールする
VirtualBox.org
Downloadページ(https://www.virtualbox.org/wiki/Downloads )からインストーラをDLする。

今回は、下記をDLした。
- VirtualBox 6.1.34
あとは、指示通りインストールする。
VagrantFileを作成する
まずは、適当な場所に空のフォルダを作成します。
ここを『Vagrantで使う作業領域にする』というイメージです。
どこでも良いので、ひとまずCドライブ直下にでも作っていきます。
※Powershellでやってますが、コマンドプロンプトでOK。
Windows PowerShell
Copyright (C) Microsoft Corporation. All rights reserved.

新しいクロスプラットフォームの PowerShell をお試しください https://aka.ms/pscore6

PS C:\Users\userA> cd c:\
PS C:\> mkdir Vagrant_work


    ディレクトリ: C:\


Mode                 LastWriteTime         Length Name
----                 -------------         ------ ----
d-----        2022/06/16     11:05                Vagrant_work


PS C:\> cd .\Vagrant_work\
PS C:\Vagrant_work>
続いて、Vagrantコマンドで最初のファイルを作成します。
PS C:\Vagrant_work> vagrant init
A `Vagrantfile` has been placed in this directory. You are now
ready to `vagrant up` your first virtual environment! Please read
the comments in the Vagrantfile as well as documentation on
`vagrantup.com` for more information on using Vagrant.
PS C:\Vagrant_work>
Vagrant_workフォルダに「Vagrantfile」が生成されます。
中を開くと、行頭のコメントアウト「#」が連発している状況ですが、なんかが出来上がってます。
# -*- mode: ruby -*-
# vi: set ft=ruby :

# All Vagrant configuration is done below. The "2" in Vagrant.configure
# configures the configuration version (we support older styles for
# backwards compatibility). Please don't change it unless you know what
# you're doing.
Vagrant.configure("2") do |config|
  # The most common configuration options are documented and commented below.
  # For a complete reference, please see the online documentation at
  # https://docs.vagrantup.com.

  # Every Vagrant development environment requires a box. You can search for
  # boxes at https://vagrantcloud.com/search.
  config.vm.box = "base"

  # Disable automatic box update checking. If you disable this, then
  # boxes will only be checked for updates when the user runs
  # `vagrant box outdated`. This is not recommended.
  # config.vm.box_check_update = false

  # Create a forwarded port mapping which allows access to a specific port
  # within the machine from a port on the host machine. In the example below,
  # accessing "localhost:8080" will access port 80 on the guest machine.
  # NOTE: This will enable public access to the opened port
  # config.vm.network "forwarded_port", guest: 80, host: 8080

  # Create a forwarded port mapping which allows access to a specific port
  # within the machine from a port on the host machine and only allow access
  # via 127.0.0.1 to disable public access
  # config.vm.network "forwarded_port", guest: 80, host: 8080, host_ip: "127.0.0.1"

  # Create a private network, which allows host-only access to the machine
  # using a specific IP.
  # config.vm.network "private_network", ip: "192.168.33.10"

  # Create a public network, which generally matched to bridged network.
  # Bridged networks make the machine appear as another physical device on
  # your network.
  # config.vm.network "public_network"

  # Share an additional folder to the guest VM. The first argument is
  # the path on the host to the actual folder. The second argument is
  # the path on the guest to mount the folder. And the optional third
  # argument is a set of non-required options.
  # config.vm.synced_folder "../data", "/vagrant_data"

  # Provider-specific configuration so you can fine-tune various
  # backing providers for Vagrant. These expose provider-specific options.
  # Example for VirtualBox:
  #
  # config.vm.provider "virtualbox" do |vb|
  #   # Display the VirtualBox GUI when booting the machine
  #   vb.gui = true
  #
  #   # Customize the amount of memory on the VM:
  #   vb.memory = "1024"
  # end
  #
  # View the documentation for the provider you are using for more
  # information on available options.

  # Enable provisioning with a shell script. Additional provisioners such as
  # Ansible, Chef, Docker, Puppet and Salt are also available. Please see the
  # documentation for more information about their specific syntax and use.
  # config.vm.provision "shell", inline: <<-SHELL
  #   apt-get update
  #   apt-get install -y apache2
  # SHELL
end
コメントアウトされてる箇所を取り除くと、書かれているのはこれだけです。
※先頭2行はあえて残しておきましたが・・・
# -*- mode: ruby -*-
# vi: set ft=ruby :

Vagrant.configure("2") do |config|
  config.vm.box = "base"

end
VagrantでUbuntuを取得して構築する
まずは、Vagrantで提供しているBoxを見てみます。
Ubuntuでフィルタリングして、Ubuntu20あたりを探します。(focalです)

Ubuntu/focal64の詳細を見てみます。
なるほど、「ubuntu/focal64」でBoxを指定か・・・

先ほど作成したVagrantfileを開いて「config.vm.box」の情報を変更します。
Vagrant.configure("2") do |config|
- config.vm.box = "base"
+ config.vm.box = "ubuntu/focal64"
※余談ですが、「init」してVagrantfileの編集をするのと、「vagrant init ubuntu/focal64」として作成されたVagrantfileは上記の箇所しか違いがないです。
PS C:\Vagrant_work2\ubuntu> vagrant init ubuntu/focal64
A `Vagrantfile` has been placed in this directory. You are now
ready to `vagrant up` your first virtual environment! Please read
the comments in the Vagrantfile as well as documentation on
`vagrantup.com` for more information on using Vagrant.

それでは、「vagrant up」してみましょう。
PS C:\Vagrant_work> vagrant up
Bringing machine 'default' up with 'virtualbox' provider...
==> default: Box 'ubuntu/focal64' could not be found. Attempting to find and install...
    default: Box Provider: virtualbox
    default: Box Version: >= 0
==> default: Loading metadata for box 'ubuntu/focal64'
    default: URL: https://vagrantcloud.com/ubuntu/focal64
==> default: Adding box 'ubuntu/focal64' (v20220615.0.0) for provider: virtualbox
    default: Downloading: https://vagrantcloud.com/ubuntu/boxes/focal64/versions/20220615.0.0/providers/virtualbox.box
Download redirected to host: cloud-images.ubuntu.com
    default:
==> default: Successfully added box 'ubuntu/focal64' (v20220615.0.0) for 'virtualbox'!
==> default: Importing base box 'ubuntu/focal64'...
==> default: Matching MAC address for NAT networking...
==> default: Checking if box 'ubuntu/focal64' version '20220615.0.0' is up to date...
==> default: Setting the name of the VM: Vagrant_work_default_1655768025415_13080
Vagrant is currently configured to create VirtualBox synced folders with
the `SharedFoldersEnableSymlinksCreate` option enabled. If the Vagrant
guest is not trusted, you may want to disable this option. For more
information on this option, please refer to the VirtualBox manual:

  https://www.virtualbox.org/manual/ch04.html#sharedfolders

This option can be disabled globally with an environment variable:

  VAGRANT_DISABLE_VBOXSYMLINKCREATE=1

or on a per folder basis within the Vagrantfile:

  config.vm.synced_folder '/host/path', '/guest/path', SharedFoldersEnableSymlinksCreate: false
==> default: Clearing any previously set network interfaces...
==> default: Preparing network interfaces based on configuration...
    default: Adapter 1: nat
==> default: Forwarding ports...
    default: 22 (guest) => 2222 (host) (adapter 1)
==> default: Running 'pre-boot' VM customizations...
==> default: Booting VM...
==> default: Waiting for machine to boot. This may take a few minutes...
    default: SSH address: 127.0.0.1:2222
    default: SSH username: vagrant
    default: SSH auth method: private key
Timed out while waiting for the machine to boot. This means that
Vagrant was unable to communicate with the guest machine within
the configured ("config.vm.boot_timeout" value) time period.

If you look above, you should be able to see the error(s) that
Vagrant had when attempting to connect to the machine. These errors
are usually good hints as to what may be wrong.

If you're using a custom box, make sure that networking is properly
working and you're able to connect to the machine. It is a common
problem that networking isn't setup properly in these boxes.
Verify that authentication configurations are also setup properly,
as well.

If the box appears to be booting properly, you may want to increase
the timeout ("config.vm.boot_timeout") value.
PS C:\Vagrant_work>
Ubuntu起動中にタイムアウトになったっぽい・・・
まぁ、いいや・・・
VirtualBox側を確認する。
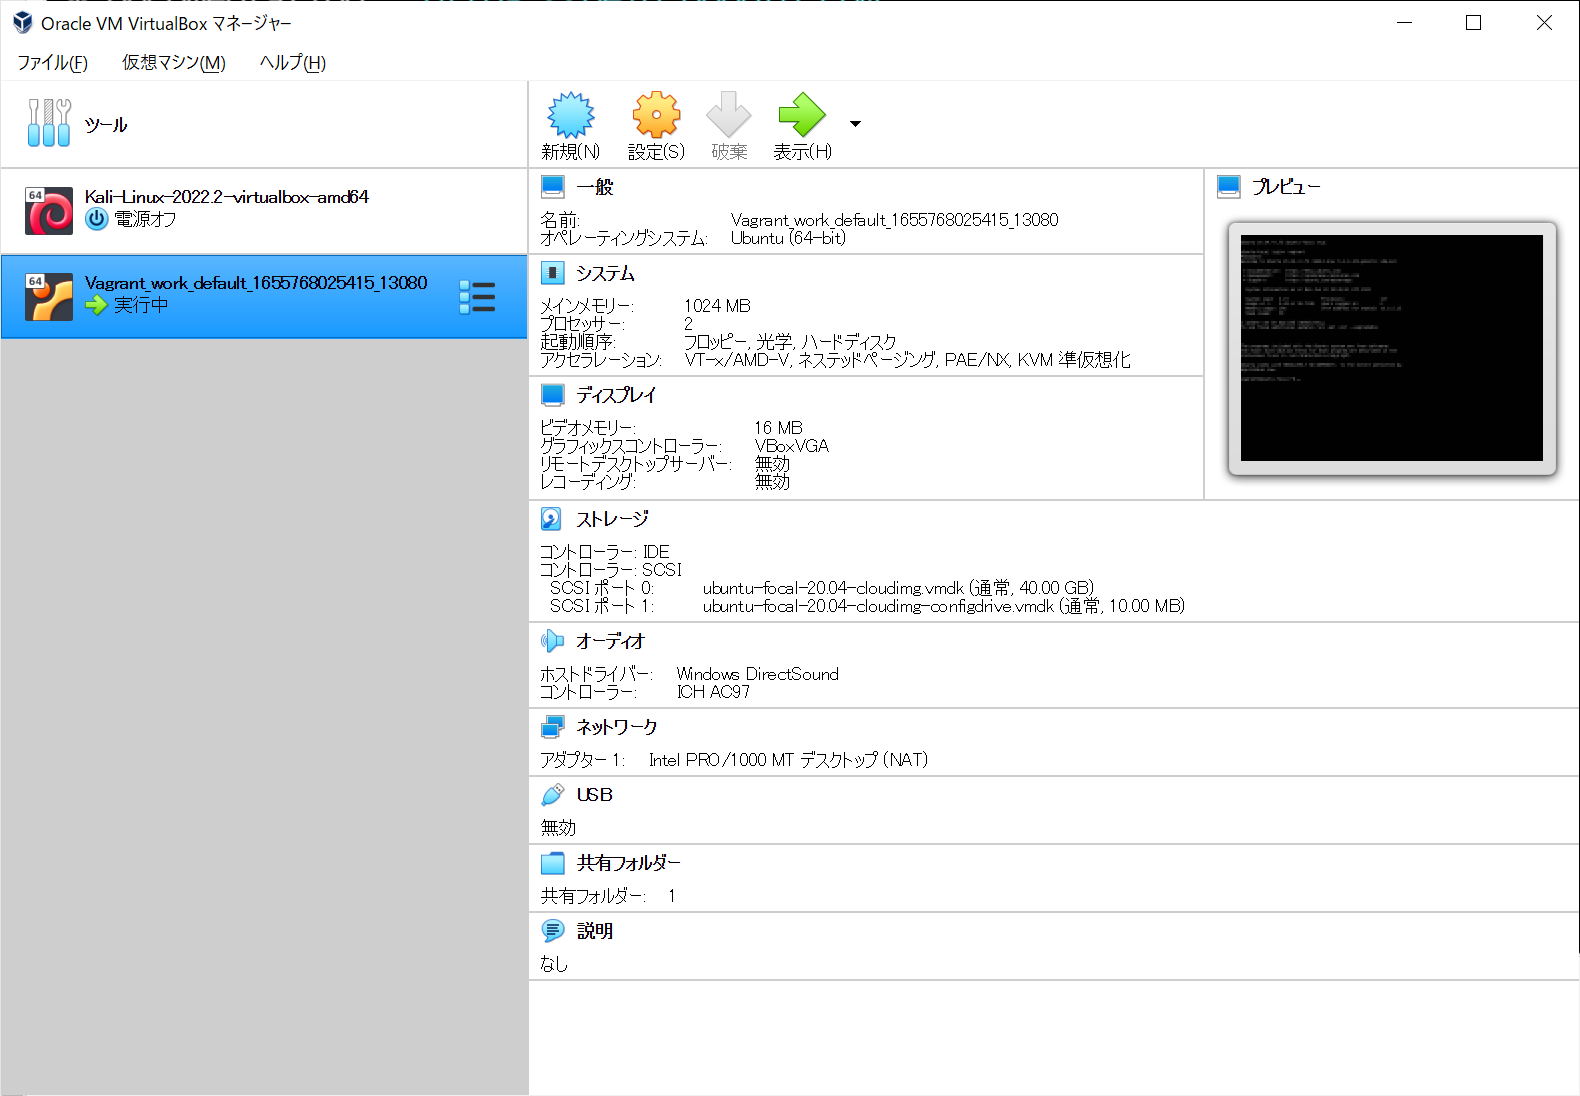
作成された「Vagrant_work_default_xxxxx」を選択して「表示」。

ID/PWは"vagrant"でログイン。

SSHでログインしてみる。
起動時のメッセージにSSHだと「127.0.0.1:2222」に繋ぎ、ユーザ名は「vagrant」で、「private key」を指定せよと・・・・・

む、、、「private key」?
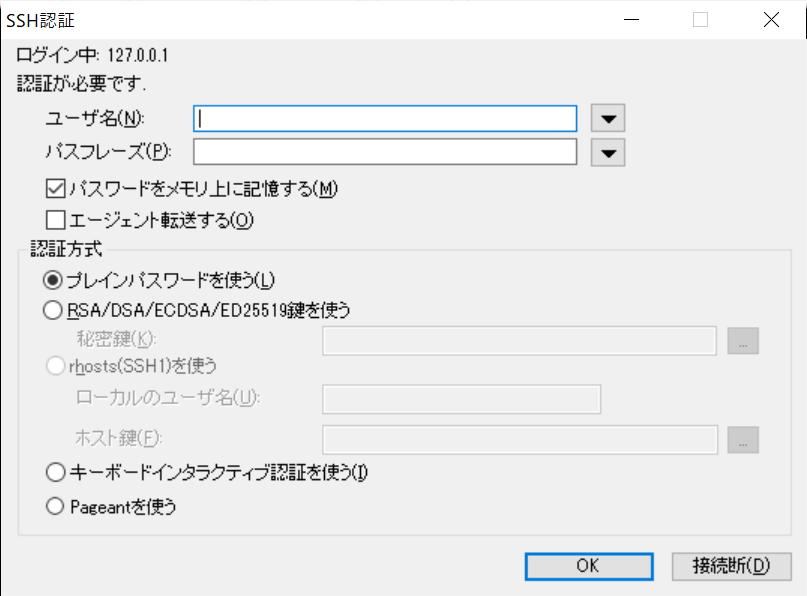
作るか・・・
PS C:\Vagrant_work> vagrant ssh-config
Host default
  HostName 127.0.0.1
  User vagrant
  Port 2222
  UserKnownHostsFile /dev/null
  StrictHostKeyChecking no
  PasswordAuthentication no
  IdentityFile C:/Users/xxxx/.vagrant.d/insecure_private_key
  IdentitiesOnly yes
  LogLevel FATAL
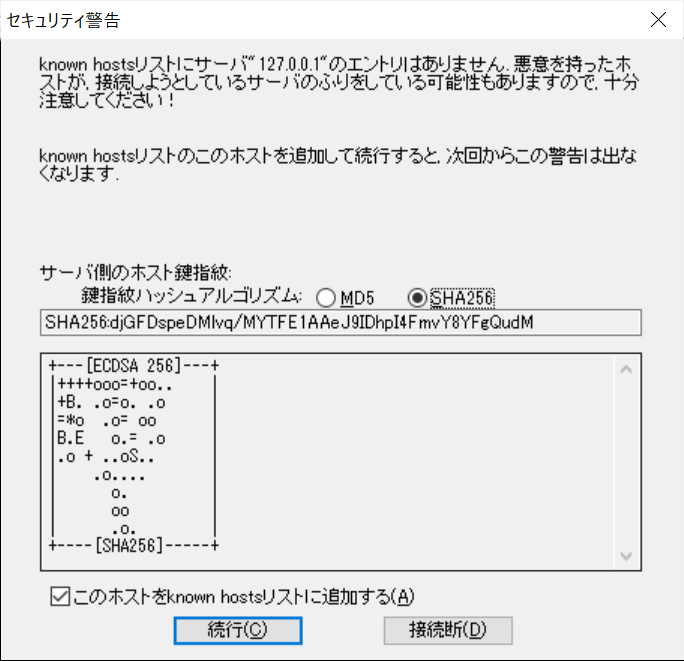
これで、「IdentityFile C:/Users/xxxx/.vagrant.d/insecure_private_key」に作成されたので、TeraTermで「RSA/DS/ECDSA/ED25519鍵を使う」を選択して、「秘密鍵」に「insecure_private_key」を指定する。(「すべてのファイル」を選択して表示させないと出てこない)
無事、ログインできた。

VagrantでUbuntuを停止して廃棄する
Vagrantで作ったUbuntuを停止(halt)して廃棄(destroy)します。
■Vagarnt CLIのドキュメント
PS C:\Vagrant_work> vagrant halt
==> default: Attempting graceful shutdown of VM...
    default:
    default: Vagrant insecure key detected. Vagrant will automatically replace
    default: this with a newly generated keypair for better security.
    default:
    default: Inserting generated public key within guest...
    default: Removing insecure key from the guest if it's present...
    default: Key inserted! Disconnecting and reconnecting using new SSH key...
廃棄。
PS C:\Vagrant_work> vagrant destroy
    default: Are you sure you want to destroy the 'default' VM? [y/N] y
==> default: Destroying VM and associated drives...
、、、、まぁ、廃棄しても取得したBOXは残ってるんですけどね・・・

次の「vagrant up」で同じBox使う場合は、取得時間が節約できるのでいいか・・・