サーバ経由のオートアップデートの動作確認をしました。
arduino-esp32 公式のUpdateライブラリです。
https://github.com/espressif/arduino-esp32/tree/master/libraries/Update
AWSのbucketにobjectを作成すると、Httpsのリンクが作成されるのですが、httpでも同じデータにアクセスできました。
準備
サンプルコードの説明は以下です。
   Upload:
   Step 1 : Download the sample bin file from the examples folder
   Step 2 : Upload it to your Amazon S3 account, in a bucket of your choice
   Step 3 : Once uploaded, inside S3, select the bin file >> More (button on top of the file list) >> Make Public
   Step 4 : You S3 URL => http://bucket-name.s3.ap-south-1.amazonaws.com/sketch-name.ino.bin
   Step 5 : Build the above URL and fire it either in your browser or curl it `curl -I -v http://bucket-name.ap-south-1.amazonaws.com/sketch-name.ino.bin` to validate the same
   Step 6:  Plug in your SSID, Password, S3 Host and Bin file below

   Build & upload
   Step 1 : Menu > Sketch > Export Compiled Library. The bin file will be saved in the sketch folder (Menu > Sketch > Show Sketch folder)
   Step 2 : Upload bin to S3 and continue the above process
-
Step 1 : Download the sample bin file from the examples folder
-
Step 2 : Upload it to your Amazon S3 account, in a bucket of your choice
- S3のバケットにアップロードする。
- AWS側の設定詳細は以下
https://docs.aws.amazon.com/ja_jp/AmazonS3/latest/dev/website-hosting-custom-domain-walkthrough.html
-
Step 3 : Once uploaded, inside S3, select the bin file >> More (button on top of the file list) >> Make Public
- アップロードしたファイルをPublicにする。
-
Step 4 : You S3 URL => http://bucket-name.s3.ap-south-1.amazonaws.com/sketch-name.ino.bin
- URLの確認。自分のアカウントのバケットの名前になります。
-
Step 5 : Build the above URL and fire it either in your browser or curl it
curl -I -v http://bucket-name.ap-south-1.amazonaws.com/sketch-name.ino.binto validate the same- ブラウザーやcurlコマンドでアップロードしたファイルがダウンロードできるかを確認する。
-
Step 6: Plug in your SSID, Password, S3 Host and Bin file below
- SSID, Password, S3 Host and Bin fileをソースコードに入力して、WROOM32で実行する。
デバイスで実行したところ、以下のログが確認できたので、アップデート成功しているようです。
rst:0x1 (POWERON_RESET),boot:0x13 (SPI_FAST_FLASH_BOOT)
configsip: 0, SPIWP:0xee
clk_drv:0x00,q_drv:0x00,d_drv:0x00,cs0_drv:0x00,hd_drv:0x00,wp_drv:0x00
mode:DIO, clock div:1
load:0x3fff0018,len:4
load:0x3fff001c,len:812
load:0x40078000,len:0
load:0x40078000,len:10212
entry 0x40078a00
Connecting to [指定したSSID]
.......
Connected to [指定したSSID]
Connecting to: [指定したアドレス].amazonaws.com
Fetching Bin: /StartCounter.ino.bin
Got application/octet-stream payload.
Got 357280 bytes from server
contentLength : 357280, isValidContentType : 1
Begin OTA. This may take 2 - 5 mins to complete. Things might be quite for a while.. Patience!
Written : 357280 successfully
OTA done!
Update successfully completed. Rebooting.
ets Jun  8 2016 00:22:57

rst:0xc (SW_CPU_RESET),boot:0x13 (SPI_FAST_FLASH_BOOT)
configsip: 0, SPIWP:0xee
clk_drv:0x00,q_drv:0x00,d_drv:0x00,cs0_drv:0x00,hd_drv:0x00,wp_drv:0x00
mode:DIO, clock div:1
load:0x3fff0018,len:4
load:0x3fff001c,len:812
load:0x40078000,len:0
load:0x40078000,len:10212
entry 0x40078a00

OTA Update succeeded!! This is an example sketch : Preferences > StartCounter
Current counter value: 1
Restarting in 10 seconds...
E (102660) wifi: esp_wifi_stop 802 wifi is not init
ets Jun  8 2016 00:22:57
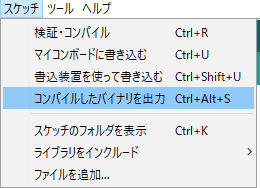
自作したプログラムをアップする場合は、以下のメニューからバイナリを作成したものを使用します。
サンプルプログラム動作概要は以下です。
 - S3の情報をセットする。
 - execOTA()
    - Http GET リクエスト(ファイルをS3からダウンロード)
    - レスポンスをヘッダまで読み込み
        - レスポンス200の確認
        - Content-Lengthの確認
        - Content-Typeの確認
    - アップデート処理開始 < Update.begin(contentLength) >
        - レスポンスの続きをUpdateのストリームに送信 < Update.writeStream(client) >
   - 書き込み確認 < write成功したbyteをContent-Lengthと比較 >
   - アップデート処理終了< Update.end() >
   - アップデート確認 < Update.isFinished() >
 - setup()
    - Wi-Fiの設定
    - execOTA()の実行