この記事はHowtelevision Advent Calendar 2022(https://qiita.com/advent-calendar/2022/howtelevision) 8日目の記事です。
はじめに
皆さん、ポケモンランクマッチ楽しんでらしゃいますでしょうか![]() ?
?
「ポケモンSV」発売されて二週間を経て、やっと12月2日から記念すべき第一回のランクマッチが始まりました。
ランクマッチを存分楽しむために、私は普段幾つかのポケモン攻略サイトを利用してますが、こういったサービスもし自分で作る場合、どこから始めたら良いのか、
![]() 軽く調べてみたら良いライブラリを見つけたので、紹介したいと思います。
軽く調べてみたら良いライブラリを見つけたので、紹介したいと思います。
PokeAPI
PokeAPIは簡単に言うとポケモンのデータを取得することができるデータベースのようなもの、 RESTfulAPIもしくはGraphQLの形式でデータを取得することができます。
使用例
特定のポケモンのデータを取得したい場合、下記のAPIにurlパラメーターとして、そのポケモンの全国図鑑ID、もしくは英語名を指定する必要があります。
https://pokeapi.co/api/v2/pokemon/{id or name}
例えば全国図鑑No.1であるフシギタネというポケモンのデータを取得したい場合、下記のようにリクエストを送ります。
そのレスポンスからフシギタネの画像を取得したい場合は、
response -> sprites -> front_default の階層で取得できます。
![]()
送信用のライブラリ
![]() さらに便利なのは、PokeAPI公式が用意してくれたリクエスト送信用のライブラリです、それを使えば自分でリクエストの送受信をパッケージ化する手間を省けます。
さらに便利なのは、PokeAPI公式が用意してくれたリクエスト送信用のライブラリです、それを使えば自分でリクエストの送受信をパッケージ化する手間を省けます。
複数言語のバージョンがありますが、TypeScript対応のライブラリをNext.jsプロジェクトで使用する方法を簡単に紹介します。
ディレクトリ抜粋
...
- pages
- | - api
- | - | - info.ts
- | - | - list.ts
- | - pokemon
- | - | - [name].tsx
- | - | - index.tsx
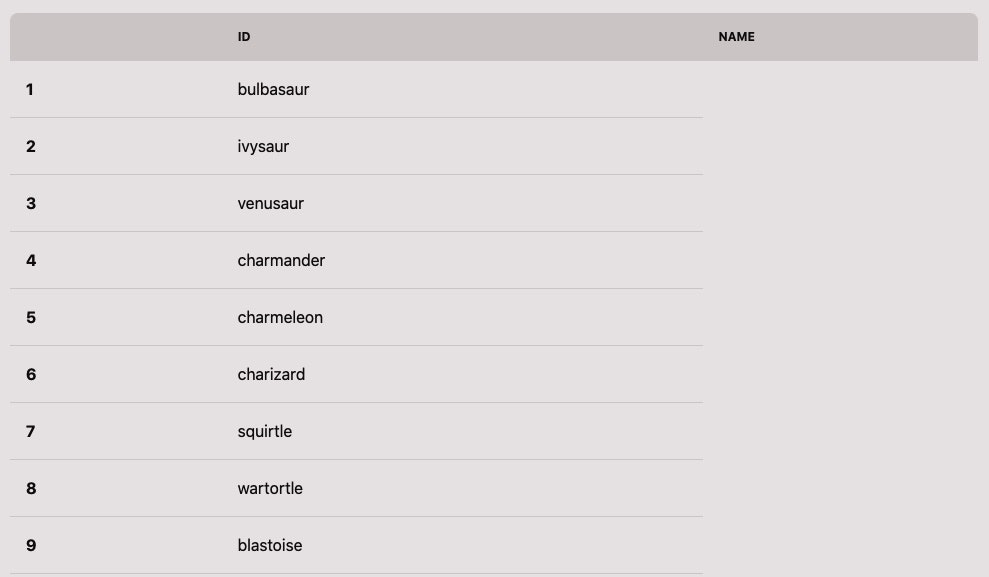
作った機能は非常にシンプルです、
一覧ページでポケモンの名前をクリックすれば、そのポケモンの詳細ページに飛びます。
一覧ページ
ライブラリのインストール
npm i pokenode-ts
# or
yarn add pokenode-ts # Recommended
一覧ページの中身は、/api/pokemon/listというAPIをただいて、返ってきたデータを表示します、
表示されたポケモン名をクリックすれば、そのポケモンの名前をパラメータとして使用され、詳細ページに飛びます。
import { useEffect, useState, ReactElement } from 'react';
import Link from 'next/link';
import { AxiosResponse } from 'axios';
import { NamedAPIResourceList, NamedAPIResource } from 'pokenode-ts';

import request from '~/utils/axios';

const EffortPage: NextPageWithLayout = () => {
  const [resource, setResource] = useState<NamedAPIResource[]>();
  useEffect(() => {
    request
      .get(`/api/pokemon/list`, {})
      .then((res: AxiosResponse<NamedAPIResourceList>) => {
        setResource(res.data.results);
      });
  }, []);
  return (
    <div>
      <div className="overflow-x-auto">
        <table className="table w-full">
          <thead>
            <tr>
              <th></th>
              <th>ID</th>
              <th>NAME</th>
            </tr>
          </thead>
          <tbody>
            {resource?.map((item, index) => {
              return (
                <tr key={index}>
                  <th>{index}</th>
                  <td>
                    <Link href={`/pokemon/${item.name}`} legacyBehavior>
                      <a>{item.name}</a>
                    </Link>
                  </td>
                </tr>
              );
            })}
          </tbody>
        </table>
      </div>
    </div>
  );
};

export default EffortPage;
/api/pokemon/listAPIの中身はpokenode-tsライブラリーからPokemonClientを使用し、listPokemonsというメソッドで複数のポケモン情報を一覧ページに返します。
![]() その情報の中で、ページング、総数も含まれてますが、今回は使いません。
その情報の中で、ページング、総数も含まれてますが、今回は使いません。
import { NextApiRequest, NextApiResponse } from 'next';
import { PokemonClient } from 'pokenode-ts';

export default async function list(req: NextApiRequest, res: NextApiResponse) {
  const api = new PokemonClient();
  const listPokemon = await api.listPokemons();
  res.status(200).json({
    data: listPokemon,
  });
}
詳細ページ
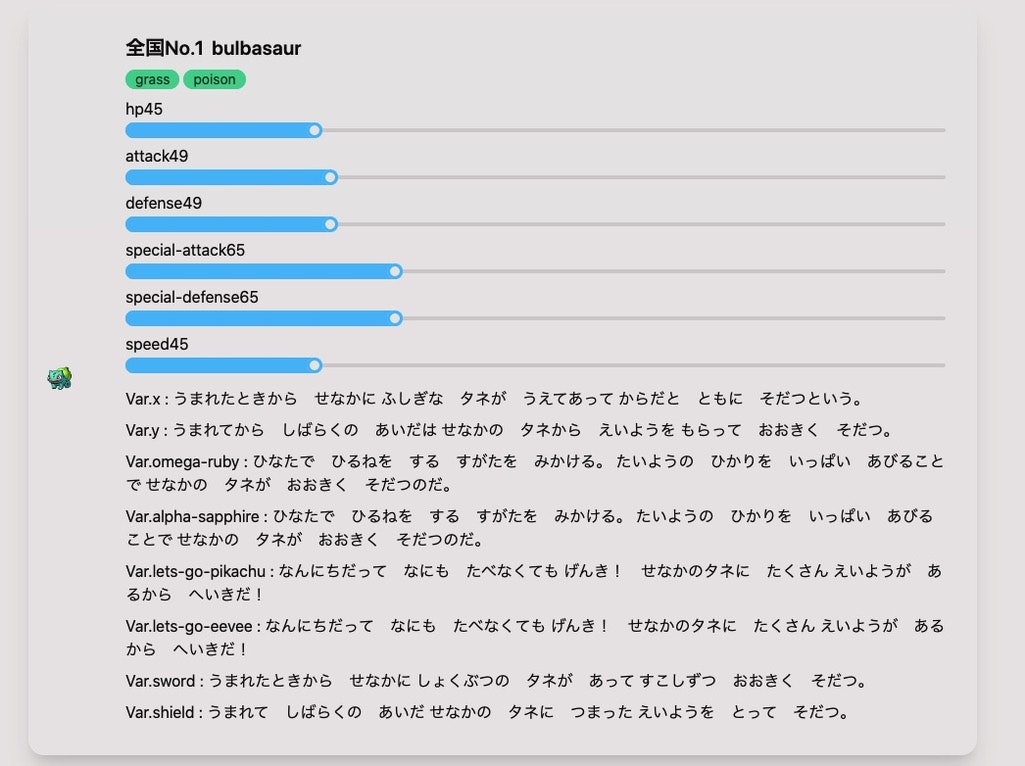
詳細ページは渡ってきたポケモンの名前を使って、 /api/pokemon/info?name=${name}というAPIをただき、返ってきたポケモンの詳細データを表示します。
import { AxiosResponse } from 'axios';
import { useRouter } from 'next/router';
import { Pokemon, PokemonSpecies } from 'pokenode-ts';
import { useState, useEffect, ReactElement } from 'react';

import request from '~/utils/axios';

interface Info {
  pokemonInfo: Pokemon;
  species: PokemonSpecies;
}

const Info: NextPageWithLayout = () => {
  const router = useRouter();
  const { name } = router.query;
  const [pokemon, setPokemon] = useState<Pokemon>();
  const [species, setSpecies] = useState<PokemonSpecies>();

  useEffect(() => {
    request
      .get(`/api/pokemon/info?name=${name}`)
      .then((res: AxiosResponse<Info>) => {
        setPokemon(res.data.pokemonInfo);
        setSpecies(res.data.species);
      });
  }, [name]);

  return (
    <div>
      <div className="card card-side bg-base-100 shadow-xl">
        <figure>
          <img src={pokemon?.sprites?.front_default as string} alt="Movie" />
        </figure>
        <div className="card-body">
          <h2 className="card-title">
            <span>全国No.{pokemon?.id}</span>
            {pokemon?.name}
          </h2>
          <div className="flex gap-1">
            {pokemon?.types.map((item, index) => {
              return (
                <div className="badge badge-success gap-2" key={index}>
                  {item.type.name}
                </div>
              );
            })}
          </div>
          <div>
            {pokemon?.stats.map((item, index) => {
              return (
                <div key={index}>
                  {item.stat.name}
                  {item.base_stat}
                  <input
                    type="range"
                    min="0"
                    max="200"
                    value={item.base_stat}
                    className="range range-info range-xs"
                  />
                </div>
              );
            })}
          </div>
          {species?.flavor_text_entries.map((item, index) => {
            console.log(item);
            if (item.language.name === 'ja-Hrkt') {
              return (
                <div key={index}>
                  Var.{item?.version?.name} : {item.flavor_text}
                </div>
              );
            }
          })}
        </div>
      </div>
    </div>
  );
};

export default Info;
api/pokemon/infoAPIの中身はpokenode-tsライブラリーからPokemonClientを使用し、getPokemonByName、 getPokemonSpeciesByName二つのメソッドで該当ポケモンの情報を詳細ページに返します。
import { NextApiRequest, NextApiResponse } from 'next';
import { PokemonClient } from 'pokenode-ts';

export default async function info(req: NextApiRequest, res: NextApiResponse) {
  const api = new PokemonClient();
  const { name } = req.query;
  const pokemonInfo = await api.getPokemonByName(name as string);
  const species = await api.getPokemonSpeciesByName(name as string);
  res.status(200).json({
    data: { pokemonInfo: pokemonInfo, species: species },
  });
}
最後に
pokeapiを使用すれば、確かに便利になりますが、
必要なポケモンデータが複数のメソッドに分散され、フロントの作業が多くなりがちという感想を受けました、
もしちゃんとしたアプリを作る場合、自分でDBを設計した上に、データ更新する目的でPokeApiを利用した方が良い気がします。
もし興味あれば、是非使ってみてください。