対象読者
- create-react-appでなくviteでサクッと開発始めたい方
- viteのreactテンプレートにESLintとPrettierとJestをサクッと組み込みたい方
- VSCode上でコンテナによる開発環境を構築したい方
じっくりと理解しながら進めたい場合は以下の記事が参考になります。
- Viteで作成したReact(TypeScript)プロジェクトにEsLintとPrettierを導入する(2022/02)
- Vite+React+TypeScriptに テスト環境 Jest+TesttingLibrary をステップbyステップで作る
環境
node(v19.0.1)
yarn(1.22.19)
※筆者は以下環境ですが、コンテナである必要はないです。
Windows10(WSL2)
VSCode(Dev Containers使用)
コンテナ利用する場合はおまけを参考にしてください
Viteのテンプレートで生成
yarnが実行可能な環境で以下のコマンドを実行するだけでReactのテンプレートを利用できます。create-react-appと始め方は似ていますね。
yarn create vite
公式の記載ではnpmだとlatest指定が必要なようです.
$ npm create vite@latest
コマンドを実行すると対話式で入力を求められるため、以下を入力・選択するとReact/TypeScript環境を構築可能です。
- プロジェクト名
- React
- TypeScript
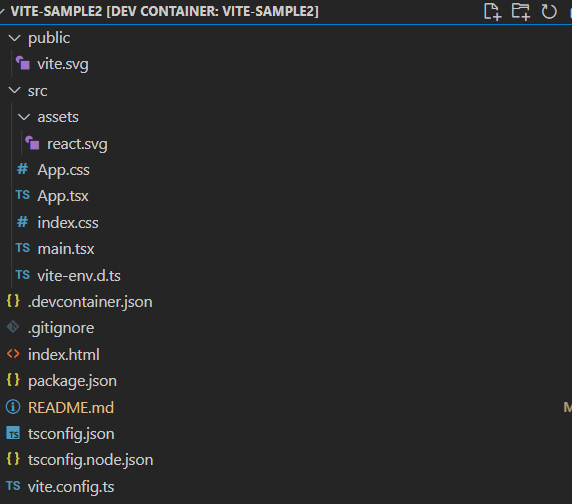
画像のようなディレクトリが作成されます。

※create-react-appと異なり、README.mdはViteだと生成されません(筆者が作成しています)
※.devcontainer.jsonもVSCodeのDev Containersのために筆者が作成しています。
vite.config.tsのプラグイン@vitejs/plugin-reactは、差分検知のリフレッシュやjsx利用時のimport React省略などを行ってくれます。以前は各機能ごとにプラグインが分かれていたようです(vite-react-jsx)

テンプレートの状態からESLintを導入
eslintをインストールして初期化します
yarn add -D eslint
npm init @eslint/config
対話式の回答は以下を選択しました。つい最近airbnbからstandardへスタイルガイドを乗り換えました。
  To check syntax, find problems, and enforce code style
  JavaScript modules (import/export)
  React
  TypeScript
  Browser
  Use a popular style guide
  Standard
  JSON
Would you like to install them now? はNoを選択し、提示されたパッケージをyarnでインストール(npmで統一する場合はYesで良いです)
yarn add -D eslint-plugin-react@latest eslint-config-standard-with-typescript@latest @typescript-eslint/eslint-plugin@^5.0.0 eslint@^8.0.1 eslint-plugin-import@^2.25.2 eslint-plugin-n@^15.0.0 eslint-plugin-promise@^6.0.0 typescript@*
yarn add eslint-plugin-react-hooks
Prettierも追加
サクッと設定するので、ESLintの動作確認を後回しにしてPrettierを追加しちゃいます。
yarn add -D prettier
yarn add -D eslint-config-prettier
ESLintの設定ファイル編集
ESLintの設定をプロジェクトに沿った定義で行います。
{
  "env": {
    "browser": true,
    "es2021": true
  },
  "extends": [
    "plugin:react/recommended",
+   "plugin:react-hooks/recommended",
+   "standard-with-typescript",
+   "prettier"
  ],
+ "parser": "@typescript-eslint/parser",
  "overrides": [],
  "parserOptions": {
    "ecmaVersion": "latest",
    "sourceType": "module",
+   "project": "./tsconfig.eslint.json"
  },
+  "plugins": ["react", "react-hooks", "@typescript-eslint"]
}
tsconfig.eslint.jsonを新規作成します。
{
  "extends": "./tsconfig.json",
  "include": ["src/**/*.js", "src/**/*.jsx", "src/**/*.ts", "src/**/*.tsx"],
  "exclude": ["node_modules"]
}
.eslintignoreファイルも作成します
build/
public/
**/coverage/
**/node_modules/
**/*.min.js
*.config.js
.*lintrc.js
**/vite.config.*
**/jest.setup.ts
.prettierrc.ymlファイルも作成します(設定値はお好みです)
"singleQuote": true
"trailingComma": "all"
"semi": false
"useTabs": false
Jestの導入
Jestやtesting-libraryを追加
yarn add -D jest @types/jest ts-jest
yarn add -D @testing-library/react @testing-library/jest-dom @testing-library/user-event @testing-library/react-hooks
yarn add -D jest-environment-jsdom
yarn add -D eslint-plugin-jest eslint-plugin-jest-dom eslint-plugin-testing-library
Jestの設定
eslintにJestのプラグインを組み込みます。
"overrides": [
    {
      "files": [
        "**/__tests__/**/*.+(ts|tsx|js)",
        "**/?(*.)+(spec|test).+(ts|tsx|js)"
      ],
      "extends": [
        "plugin:jest/recommended",
        "plugin:jest-dom/recommended",
        "plugin:testing-library/react"
      ]
    }
  ],
  "plugins": [
    "react",
    "react-hooks",
    "@typescript-eslint",
    "jest",
    "jest-dom",
    "testing-library"
  ],
package.jsonに追加
scriptsにJestやESLintをまとめて追加しておきます。
  "scripts": {
    "dev": "vite",
    "build": "tsc && vite build",
    "preview": "vite preview",
+    "start": "vite serve",
+    "lint": "eslint --ext .tsx,.ts src/",
+    "lintfix": "yarn run lint -- --fix",
+    "format": "prettier --write \"**/*.+(js|json|yml|ts|tsx)\"",
+    "test": "jest --config ./jest.config.json",
+    "test:watch": "yarn run test -- --watch"
  },
VSCodeの設定も追加
.vscodeディレクトリにsettings.jsonを追加します。VSCodeの設定→設定(JSON)を開くボタン押下でも自動で追加されます。
保存時に自動で静的解析とフォーマットが行われるようにします。
{
  "editor.codeActionsOnSave": {
    "source.fixAll.eslint": true
  },
  "editor.formatOnSave": false,
  "eslint.packageManager": "yarn",
  "typescript.enablePromptUseWorkspaceTsdk": true,
  "editor.defaultFormatter": "esbenp.prettier-vscode",
  "[graphql]": {
    "editor.formatOnSave": true
  },
  "[javascript]": {
    "editor.formatOnSave": true
  },
  "[javascriptreact]": {
    "editor.formatOnSave": true
  },
  "[json]": {
    "editor.formatOnSave": true
  },
  "[typescript]": {
    "editor.formatOnSave": true
  },
  "[typescriptreact]": {
    "editor.formatOnSave": true
  }
}
Jest実行確認(エラー解消のお時間)
適当なテストを書いて動作確認
import { render, screen, waitFor } from '@testing-library/react'
import userEvent from '@testing-library/user-event'
import App from './App'

test('Appのテスト', async () => {
  render(<App />)

  void userEvent.click(screen.getByRole('button'))
  await screen.findByText('count is 1')

  await waitFor(() =>
    expect(screen.queryByText('count is 0')).not.toBeInTheDocument(),
  )
})
yarn testをやってみたところ以下エラー
Cannot find module './generated/HTMLOptionsCollection'

interface.jsを見にいくとrequireのファイルがなぜか無かったです。
ひとまずアップグレードしたら解決しました(jsdomが20.0.1→20.0.2になったっぽい)。
yarn upgrade jest-environment-jsdom
軽く調べたところ静的ファイルであるcssやsvgはそのままだとJestが読み込めないみたいです。何かしらモックを入れたりプラグインが必要みたいですが、今回は動作確認したいだけのためApp.test.tsxの対象としているApp.tsxからcssとsvgのimportをコメントアウト。(当然yarn startした時のスタイルが崩れます)
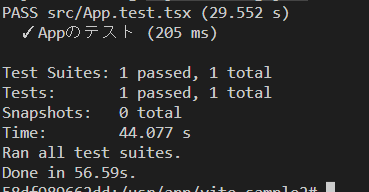
cssとsvgのimportをコメントアウトしたらPASSしました。
(WSL2のコンテナの問題or設定不備なのか、テスト時間ちょっと長いですね。原因の検討つく方、ご教授いただけると助かります)

おまけ
筆者はVSCodeの拡張機能Dev Containersを使用しており、追加で以下設定ファイルを用意しています。ディレクトリ名などはもろもろ参考値です。
{
  "name": "vite-sample2",
  "dockerComposeFile": "../docker-compose.yaml",
  "service": "front",
  "workspaceFolder": "/usr/app/vite-sample2",
  "postCreateCommand": "apk update && apk add git",
  "shutdownAction": "stopCompose",
  "customizations": {
    "vscode": {
      "extensions": [
        "dbaeumer.vscode-eslint",
        "oderwat.indent-rainbow",
        "esbenp.prettier-vscode",
        "burkeholland.simple-react-snippets",
        "infeng.vscode-react-typescript",
        "steoates.autoimport",
        "eamodio.gitlens"
      ]
    }
  }
}
プロジェクトの一つ上の階層にDocker各ファイルを置いています。PJの外に置いてしまったので、こちらもちゃんとバージョン管理すべきかもしれません。
.devcontainer.jsonで指定されているdocker-compose.yamlです。
version: "3.8"
services:
  front:
    build: ./ #DockerFile のあるディレクトリのパスを指定(左記はカレントディレクトリを指定)
    container_name: vite-sample2
    volumes:
      - ./vite-sample2:/usr/app/vite-sample2 #ホストからバインドマウント
      - vite_sample2_node_modules_volumes:/usr/app/vite-sample/node_modules # node_modulesはホストと共有しないでnamed volumeマウント
    working_dir: /usr/app/vite-sample2
    ports:
      - 3000:3000
    tty: true
    stdin_open: true
    environment:
      - CHOKIDAR_USEPOLLING=true
volumes:
  vite_sample2_node_modules_volumes:
docker-compose.yamlで指定されるDockerfileです。
FROM node:19-alpine
ENV NODE_VERSION 19.0.0
WORKDIR /usr/app/vite-sample2
COPY ./vite-sample2 /usr/app/vite-sample2
RUN npm install yarn
RUN yarn install
EXPOSE 3000
ENV CI=true
ソースコード全て
参考

